
Reference page 6 for special care and
maintenance of stainless steel
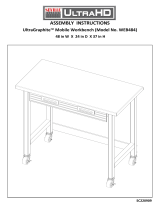
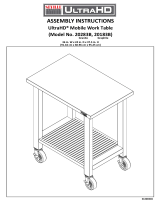
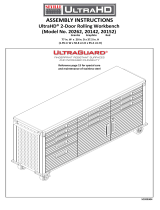
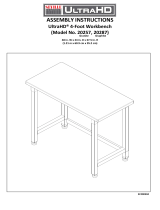
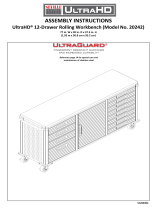
ASSEMBLY INSTRUCTIONS
UltraHD® Pegboard Workcenter (Model No. 20168)
48 in. W x 24 in. D x 61.5 in. H
(1.21 m W x 60.9 cm D x 1.56 m H)
SC200304

Drawer
No. Qty. No. Qty. No. Parts Qty.
#1 1 pc #20-6 1 pc #50 SCREW I (M6 x 15L) 48 pcs
#2-C 1 pc #20-7 2 pcs #100 1/2" CURVED 4 pcs
#3-C 1 pc #47 8 pcs #101 1" CURVED 4 pcs
#3-B 1 pc #48-2 1 pc #102 1" STRAIGHT 4 pcs
#5-B 2 pcs #48-3 1 pc #103 1.5" STRAIGHT 4 pcs
#6 4 pcs #49-A PEGBOARD LONG SUPPORT BAR 2 pcs #104 2" DOUBLE PRONG 2 pcs
#18 1 pc #15 32 pcs #105 4" CURVED DOUBLE PRONG 2 pcs
#19-2 1 pc #21 SCREW DRIVER 1 pc #106 2" PLIER HOLDER 2 pcs
#20-1 1 pc #25 WRENCH 1 pc #107 2" MULTI-TOOL HOLDER 1 pc
#20-3 1 pc #27-B WASHER 10 pcs
#20-4 1 pc #40 SCREW E (M8 x 18L) 10 pcs
#20-5 DRAWER BACK PANEL 1 pc #41 SCREW F (M4 x 8L) 8 pcs
LEG PIECE
"L" BRACKET
DRAWER FRONT PANEL SUPPORT PLATE
DRAWER LEFT PANEL
SMALL DRAWER LEFT SUPPORT
SCREW B (M4 x 8L)
BOTTOM CROSSBAR
DRAWER MAT
DRAWER RIGHT PANEL
Parts
Parts
DRAWER DIVIDER
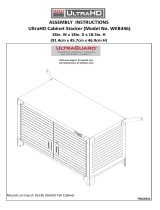
PARTS LIST
Please check the parts carefully according to the parts list. If you are missing any parts, please contact our customer service
department. (Please see page 7.)
SMALL DRAWER RIGHT SUPPORT
LEVELING FOOT
DRAWER BASE PANEL
DRAWER FRONT PANEL
SOLID HARDWOOD TOP
TOP PEGBOARD PANEL
BOTTOM PEGBOARD PANEL
#100
#101
#102
#103
#104
#105
#106
#107
#40
#27-B
#15
#25#21
#50
#41
M8X20 pcs
#20
#18
#20-7
#40
#49-A
#2-C
#27-B
#15
#41
#3-C
1

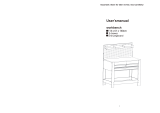
Step 2.
NOTE:
Step 3.
Install Leg Piece (#5-B).
A: Open box and put parts aside. Attach the "L" Bracket (#47) to the Leg Piece (#5-B), using 4 pcs Screw I
(#50) to tighten. Repeat Step A to install "L" Brackets (#47) to another Leg Piece (#5-B) with another 4 pcs
Screw I (#50). Note: Tighten all the screws after the Brackets (#47) are flush with the Leg Piece (#5-B).
Leave the Solid Hardwood Top (#1) on cardboard to reduce the chance of scratching during assembly.
B: Attach the Leg Pieces (#5-B) to the back of the Solid Hardwood Top (#1), line up the screw holes,
using 16 pcs of Screw I (#50) and Screwdriver (#21) to tighten.
Install (#48-2) Small Drawer Left Support,
(#48-3) Small Drawer Right Support.
Attach the (#48-2) Small Drawer Left Support
to the bottom of (#1) Solid Hardwood Board,
line up the screw holes, use (#50) Screw I
and (#21) Screwdriver to tighten.
Repeat this step to install (#48-3) Small
Drawer Right Support.
TIP: A magnetic screwdriver is included for your convenience.
If using a power screwdriver, keep torque setting on LOW.
Do not fully tighten the screws. This will help
you make any adjustments for alignment.
Install Bottom Cross Bar (#3-B) and Leveling
Feet (#6).
Attach the Bottom Cross Bar (#3-B) to the back
of Leg Piece (#5-B), line up the screw holes,
use 4 pcs of Screw E (#40) with Washer (#27-B)
and Wrench (#25) to tighten.
After installing the Bottom Cross Bar (#3-B),
attach Leveling Feet (#6) to the Leg Pieces
(#5-B) , use Wrench (#25) to tighten.
UltraHD® Pegboard Workcenter (Model No. 20168)
*NOTE: We recommend using TWO people to assemble the workbench.
2
NOTE:
Front
Back

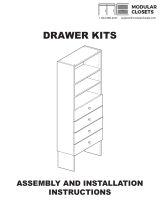
Step 4. Install Pegboard Long Support Bar (#49-A).
Step 5:
Step 6: Install (#20-3 & #20-4) Left & Right Drawer Side
Panels and (#20-5) Drawer Back Panel.
Attach (#20-3 & #20-4) Left & Right Drawer Side
Panels and (#20-5) Drawer Back Panel to the
(#19-2) Drawer Base Panel. Line up the screw
holes and use (#15) Screw B to tighten.
NOTE: Do not fully tighten the screws until next
step had finish.
Turn the workcenter up right, attach Pegboard
Long Support Bar (#49-A) to the back of the
workbench, line up the screw holes, using 6 pcs of
Screw E (#40) with Washer (#27-B) to tighten.
NOTE: Do not fully tighten the screws. This will
help you make any adjustments for alignment.
Install FPR-SS Top Pegboard Panel (#2-C) and FPR-
SS Bottom Pegboard Panel (#3-C).
Attach FPR-SS Bottom Pegboard Panel (#3-C) on
the back top edge of workcenter and Pegboard
Long Support Bar (#49-A), line up the screw holes,
use 4 pcs of Screw F (#41) and Screwdriver (#21) to
tighten.
NOTE: Do not fully tighten the screws. This will
help you make any adjustments for alignment.
Attach FPR-SS Top Pegboard Panel (#2-C) to the
Pegboard Long Support Bar (#49-A), line up the
screw holes, use 4 pcs of Screw F (#41) and
Screwdriver (#21) to tighten.
Use 2 pcs Screw B (#15) to fasten the FPR-SS Top
and Bottom Pegboards (#2-D and #3-D) together
as left detail photos shows.
Back
Front
#49-A
#27-B
#40
#15
#2-C
#3-C
#41
UltraHD® Pegboard Workcenter (Model No. 20168)
*NOTE: We recommend using TWO people to assemble the workbench.
3

Step 7:
Step 8:
Note:
Install (#20-1) Drawer Front Panel
Attach the Drawer Case to the (#20-1) Drawer
Front Panel. Line up the screw holes and use
(#15) Screw B to tighten.
Drawer's maximum loading capacity is 60 lbs to
avoid the unit from tipping when drawer is fully
extended.
UltraHD® Pegboard Workcenter (Model No. 20168)
*NOTE: We recommend using TWO people to assemble the workbench.
4
Install (#20-6) Drawer Front Panel Support Plate
Attach (#20-6) Drawer Front Panel Support Plate as
the left arrow shows. Line up the screw holes and
use (#15) Screw B to tighten.
NOTE: Once you adjust all the parts in position,
tighten all screws.

Step 9. Insert Drawer
Step 10.
After sliding in the Drawer, place (#18) Drawer
Mats inside the drawer or you can place the
(#18) Drawer Mat inside the drawer before you
slide them in.
NOTE: Once you insert the drawers, tighten (#15)
Screw B for (#48-2) Small Drawer Left Support
and (#48-3) Small Drawer Right Support.
Place (#18) Drawer Mat
Pull out the drawer sliders and inner ball bearing
track completely. Then attach and fit the Drawer
to the inner track of the sliders and slide
drawers in.
Pull out slides
UltraHD® Pegboard Workcenter (Model No. 20168)
*NOTE: We recommend using TWO people to assemble the workbench.
5

Step 11. Install (#20-7) Drawer Divider
Lift the Drawer Divider up and to the side to
remove from the slot.
How to remove the Drawer Divider
Insert Drawer Divider into the drawer.
The solid wall of the divider should be
facing the desired slot position. Slide
the divider towards the slot, then push
down into the slots.
Repeat the above steps to assemble
another Drawer Divider.
You can assemble this step before or
after the drawer is assembled on the
Workbench.
NOTE:
UltraHD® Pegboard Workcenter (Model No. 20168)
*NOTE: We recommend using TWO people to assemble the workbench.
6
UltraHD® Wood Top Care Instructions
Our tops are made with real wood, and while great
care is taken to ensure consistent top color and
graining, there may be natural variations between
finished products. We hand select the wood for
every top to ensure the material is undamaged and
naturally beautiful. If the wood top is received with
excessive damage or splitting, Seville Classics will
guarantee replacement of the top. Variations of
color, and minor scratches in the clear coat finish will
not be reason for replacement.
Restore Shallow Scratches or Chips
The wood surface of this product is finished with a
polyurethane coat. If the wood top becomes chipped
or scratched, a polyurethane coat can be reapplied
to restore a smooth texture and protect from future
damage.
• Please follow the manufacturer's instruction
on the product for application.
Step 12.
Place (#100), (#101), (#102), (#103),
#104), (#105), (#106), (#107) Hooks to
Pegboard as you desire.

CONTACT INFORMATION
*If you are missing any parts, have any questions, or need additional assistance in assembly, please contact our bilingual
(English and Spanish) customer service department at:
Seville Classics, Inc.
19401 Harborgate Way Torrance, CA 90501 USA
Telephone: (800) 323-5565 within USA
Fax: (310) 533-3899
Hours: 9:00am - 4:30pm (Pacific Standard Time)
E-mail: [email protected]
Website & Online Store: www.sevilleclassics.com
***Please visit our website or call and inquire about our additional UltraHD Line***
UltraHD® Tall Storage Cabinet
UltraHD® Mega Rolling Cabinet
Model No. 16236 (Granite)
Model No. 20143 (Graphite)
Model No. 20153 (Red)
Model No. 20133 (White)
Model No. 16238 (Granite)
Model No. 20148 (Graphite)
Model No. 20158 (Red)
UltraHD® Line
7

UltraHD® Line
UltraHD® Wall Cabinet with Open Shelf
Model No. 20217
UltraHD® Trash Bin
UltraHD® Lighted Workcenter
UltraHD® 2-Door Rolling Workbench
UltraHD® 6-Foot Height Adjustable Workbench
UltraHD® 4-Drawer Rolling Cabinet
Model No. 20205 (Granite)
Model No. 20296 (Granite)
Model No. 20141 (Graphite)
Model No. 20230 (Granite)
Model No. 20246 (Graphite)
Model No. 20150 (Red)
Model No. 20262 (Granite)
Model No. 20142 (Graphite)
Model No. 20152 (Red)
Model No. 20247 (Granite)
Model No. 20246 (Graphite)
Model No. 20157 (Red)
-
 1
1
-
 2
2
-
 3
3
-
 4
4
-
 5
5
-
 6
6
-
 7
7
-
 8
8
-
 9
9


Seville Classics UltraHD Pegboard Workcenter Assembly Instructions
- Type
- Assembly Instructions
- This manual is also suitable for
Ask a question and I''ll find the answer in the document
Finding information in a document is now easier with AI
Related papers
-
 Seville Classics UltraHD 4-Drawer Rolling Cabinet Assembly Instructions
-
 Seville Classics UltraGraphite Mobile Workbench Assembly Instructions
-
 Seville Classics WEB484 User manual
-
 Seville Classics UltraHD Mobile Work Table Assembly Instructions
-
 Seville Classics UltraHD 20142 Assembly Instructions
-
 Seville Classics UltraHD 4-Foot Workbench Assembly Instructions
-
Seville Classics WEB256 Assembly Instructions
-
-
 Seville Classics UltraHD 12-Drawer Rolling Workbench Assembly Instructions
-
 Seville Classics WEB346 Assembly Instructions


Other documents
-
ROOMS TO GO BRA-003-White/Gold-ET Assembly Instructions
-
 netthandelen 2494 User manual
-
aiwen NW-BL12075 User manual
-
aiwen NW-BL75063 User manual
-
 Modular Closets Vista Drawer Kit Assembly And Installation Instructions
-
Husky D6TC09002 Operating instructions
-
Hasbro Creative Shapes Pegboard Operating instructions
-
Clarke STWB5150 User manual
-
Platinum STWB5150 User manual
-

