Page is loading ...

ASSEMBLY INSTRUCTIONS
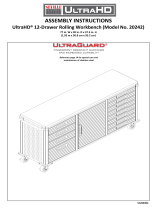
UltraGraphite™ Mobile Workbench (Model No. WEB484)
48 in. W x 24 in. D x 37.5 in. H
(1.21 m x 60.9 cm x 82.5 cm)
Reference page 6 for special
care and maintenance of
stainless steel
SC200304

Drawer
No. Qty. No. Qty.
#1 1 PC #20-6 1 PC
#3-B 1 PC #20-7 2 PCS
#5-B 2 PCS #47 8 PCS
#11 2 PCS #48-2 1 PC
#13 2 PCS #48-3 1 PC
#18 1 PC #50 48 pcs
#19-2 1 PC #40 4 pcs
#20-1 1 PC #27-B 4 pcs
#20-3 1 PC #15 30 pcs
#20-4 1 PC #21 1 pc
#20-5 1 PC #25 1 pc
PARTS LIST
Please check the parts carefully according to the parts list. If you are missing any parts, please contact our
customer service department (please refer to page 7.)
Parts
Parts
WASHER
SCREW B (M4 x 8L)
SCREW DRIVER
DRAWER DIVIDER
SOLID HARDWOOD BOARD TOP
WRENCH
DRAWER BASE PANEL
DRAWER FRONT PANEL
BOTTOM CROSSBAR
LEG PIECE
WHEEL WITH BRAKE
DRAWER MAT
DRAWER LEFT PANEL
DRAWER RIGHT PANEL
DRAWER RIGHT SUPPORT
DRAWER BACK PANEL
SCREW E(M8 x 18L)
5
"L" BRACKET
DRAWER LEFT SUPPORT
SCREW I (M6 x 15L)
WHEEL W/O BRAKE
DRAWER FRONT PANEL SUPPORT PLATE
1
#15 #27-B #40 #50 #21 #2
M8X20 pcs

Tip: A magnetic screwdriver is included for your convenience.
If using a power screwdriver, keep torque setting on LOW.
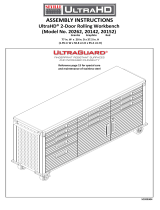
Step 1:
Step 2:
NOTE:
Do not fully tighten the screws. This will help you make
any adjustments for alignment.
Attach the (#48-2) Small Drawer Left Support to the
bottom of (#1) Solid Hardwood Board, line up the screw
holes, use (#50) Screw I and (#21) Screwdriver to
tighten.
UltraGraphite™ Mobile Workbench (Model No. WEB484)
Install (#5-B) Leg Piece.
A: Open the package, and put the parts aside.
Leave the Solid Hardwood Board Top (#1) on cardboard
during assembly to reduce the chance of scratching top.
Attach the (#47) "L" Bracket to the (#5-B) Leg Piece, use
(#50) Screw I to tighten.
Repeat Step A to install (#47) "L" Brackets to another
one (#5-B) Leg Piece.
Tighten the all the screws after the (#47) Brackets are
flush with the (#5-B) Leg Piece.
Install (#48-2) Drawer Left Support, (#48-3) Drawer
Right Support.
*NOTE: We recommend using TWO people to assemble the workbench.
NOTE:
2

Front
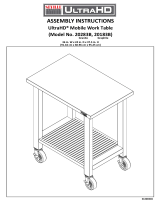
Step 4:
Back
Step 5:
Turn the workbench right side up once you
finish this step. Step the break of the wheel
(#11) as the the side photo to stable the
workbench.
Install (#3-B) Bottom Cross Bar and (#11)
Swivel Wheel with Brake & (#13) Swivel
Wheel w/o Brake.
Attach the (#3-B) Bottom Cross Bar to the back
of (#5) Leg Piece, line up the
screw holes, use
(#40) Screw E with (#27-B) Washer and (#25)
Wrench to tighten.
After installing (#5-B) Leg Pieces, attach (#11)
Swivel Wheel with Brake & (#13) Swivel Wheel
w/o Brake to (#5-B) Leg Pieces, use Wrench
(#25) to tighten.
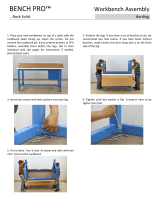
Install (#20-3 & #20-4) Left & Right Drawer
Side Panels and (#20-5) Drawer Back Panel.
Attach (#20-3 & #20-4) Left & Right Drawer
Side Panels and (#20-5) Drawer Back Panel to
the (#19-2) Drawer Base Panel. Line up the
screw holes and use (#15) Screw B to tighten.
NOTE: Make sure the hook slots on the (#20-5)
Drawer Back Panel are facing inward.
NOTE: Do not fully tighten the screws until
next step had finish.
#15
#20-5
Back
Front
#19-2
#20-3
#20-4
UltraGraphite™ Mobile Workbench (Model No. WEB484)
*NOTE: We recommend using TWO people to assemble the workbench.
3
Step 3:

Step 6:
Step 7:
Note:
Install (#20-6) Drawer Front Panel Support Plate
Attach (#20-6) Drawer Front Panel Support Plate as
the left arrow shows. Line up the screw holes and use
(#15) Screw B to tighten.
NOTE: Make sure the hook slots on the (#20-6)
Drawer Front Panel Support Plate are facing inward.
NOTE: Once you adjust all the parts in position,
tighten all screws.
Install (#20-1) Drawer Front Panel
Attach the Drawer Case to the (#20-1) Drawer Front
Panel. Line up the screw holes and use (#15) Screw B
to tighten.
Drawer's maximum loading capacity is 60 lbs to avoid
the unit from tipping when drawer is fully extended.
#20-6
#19-2
#20-5
#15
Front
Back
UltraGraphite™ Mobile Workbench (Model No. WEB484)
*NOTE: We recommend using TWO people to assemble the workbench.
4

Step 8:
NOTE:
Step 9:
Insert Drawer
Pull out the drawer sliders to full length, then
attach and fit the Drawer to the inner track of the
sliders and slide drawers in.
Once you insert the drawers, tighten (#15) Screw B
for (#48-2) Small Drawer Left Support and (#48-3)
Small Drawer Right Support.
Place (#18) Drawer Mat
Insert (#18) Drawer Mats to drawer before (or after)
sliding drawer into bench.
Make sure to remove the rubber guards on the
hooks of the inner track before fitting the
drawer in.
UltraGraphite™ Mobile Workbench (Model No. WEB484)
*NOTE: We recommend using TWO people to assemble the workbench.
5

Step 10:
NOTE:
How to Remove Dividers
Lift the Drawer Divider up and to the side to remove
from the slot.
Dividers can be added to the drawer
before or after finishing assembly.
[!] CAUTION: Potential Shock or Fire Hazard. This
unit is not intended for use in wet or potentially wet
locations, such as showers, saunas, under or near
fishtanks, sinks, etc.
UltraGraphite™ Mobile Workbench (Model No. WEB484)
*NOTE: We recommend using TWO people to assemble the workbench.
UltraHD® Stainless Steel Care Instructions
The stainless-steel parts of this product are protected with an UltraGuard™ fingerprint resistant finish.
DO NOT use traditional stainless-steel cleaners. To safely manage unwanted fingerprints and prevent new stains,
perfom the following steps once monthly:
• Lightly wipe with warm water and clean microfiber cloth
• Always wipe in the direction of the surface grain (NEVER ACROSS)
• Wipe away excess water with dry clean cloth
UltraHD® Wood Top Care Instructions
Our tops are made with real wood, and while great care is taken to ensre consistent top color and graining,
there may be natural variations between finished produts. We hand select the wood for every top to ensure the
material is undamaged and naturally beautiful. If the wood top is received with excessive damage or splitting,
Seville Classics will guarantee replacement of the top. Variations of color, and minor scratches in the clear cloat
finish will not be reason for replacement.
Restore Shallow Scratches or Chips
The wood surface of this product is finished with a polyurethane coat. If the wood top becomes chipped or
scratched, a polyurethane coat can be reapplied to restore a smooth texture and protect from future damage.
• Please follow the manufacturer's instruction on the product for application.
Install (#20-7) Drawer Divider
Insert Drawer Divider into the drawer.
Th e solid wall of the divider should be
facin g the desired slot position. Slide the
divider towards the slot, then push down
into th e slots.
Repeat the above steps to assem ble
another Drawer Divider.
6

UltraHD® Line
UltraHD® Tall Storage Cabinet
UltraHD® Mega Rolling Cabinet
CONTACT INFORMATION
If you are missing any parts, have any questions, or need additional assistance in assembly,
please contact our bilingual (English and Spanish) customer service department at:
Seville Classics, Inc.
19401 Harborgate Way Torrance, CA 90501 USA
Telephone: (800) 323-5565 within USA
Fax: (310) 533-3899
Hours: 9:00am - 4:30pm (Pacific Standard Time)
E-mail: [email protected]
Website & Online Store: www.sevilleclassics.com
***Please visit our website or call and inquire about our additional UltraHD Line***
7
Model No. 16236 (Granite)
Model No. 20143 (Graphite)
Model No. 20153 (Red)
Model No. 20133 (White)
Model No. 16238 (Granite)
Model No. 20148 (Graphite)
Model No. 20158 (Red)

UltraHD® Wall Cabinet with Open Shelf
Model No. 20217
UltraHD® Trash Bin
UltraHD® Lighted Workcenter
UltraHD® 2-Door Rolling Workbench
UltraHD® 6-Foot Height Adjustable Workbench
UltraHD® Line
UltraHD® 4-Drawer Rolling Cabinet
Model No. 20205 (Granite)
Model No. 20296 (Granite)
Model No. 20141 (Graphite)
Model No. 20230 (Granite)
Model No. 20246 (Graphite)
Model No. 20150 (Red)
Model No. 20262 (Granite)
Model No. 20142 (Graphite)
Model No. 20152 (Red)
Model No. 20247 (Granite)
Model No. 20246 (Graphite)
Model No. 20157 (Red)
/