Page is loading ...

Manual for MC91
SETUP INSTRUCTIONS
Evaporative cooling
works on the principle
of heat absorption by
moisture evaporation.
Simply put, heat is
removed from the air as
water evaporates. You
feel this principle in
action when you step out
of a swimming pool or
shower and feel cool as
water evaporates from
the surface of your skin.
Your evaporative cooler
works on the same
principle. The fan pulls
hot outside air through
the wet cooling pads,
where the air is cooled
by evaporation and then
discharged from the
cooler.

1
Hessaire Customer Service Centers
Hessaire Products, Inc.
11550 U.S. Highway 278 E.
Holly Pond, AL 35083, United States
Phone: (256) 734-3003
Fax: (256) 734-3201
Website: www.hessaire.com
Email: evap@hessaire.com
Phoenix, AZ Location Contact:
Phone: (602) 251-2003
Do not return this item to the place of purchase unless instructed to
do so by Hessaire customer support.
If you should find any missing parts, any loose, or dislodged items or have any
questions, please call us first. We have parts and expert support that can help
you. We value your business and are here to help. We can ship any replacement
or warranty parts to you quickly so your Hessaire mobile cooler can keep you
cool.
STOP!!!
READ THIS FIRST

2
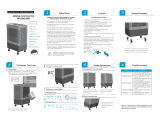
Getting started
Inspection:
After unpacking your evaporative cooler, carefully inspect for any damage that may have
occurred during transit. Inspect for loose, missing or damaged parts.
Contents:
Evaporative Cooler
(1)
Hardware Bag (1)
Casters (4)
Tools / Materials
Needed:
Drill with #2
Phillip’s bit
Or Phillip’s head
screwdriver
Use all precautions and
disconnect from power source
before performing any
maintenance.
Operating Instructions
Evaporative cooling works on the principle of heat absorption by moisture evaporation.
Simply put, heat is removed from the air as water evaporates. You feel this principle in
action when you step out of a swimming pool or shower and feel cool as water evaporates
from the surface of your skin.
Your evaporative cooler works on the same principle. The fan pulls hot outside air through
the wet cooling pads, where the air is cooled by evaporation and then discharged from the
cooler.

3
Hessaire Products Inc. Manufacturing Warranty
EVAPORATIVE COOLER
Each new cooler is warrantied to be free from defects in material or workmanship for one full year from the
date of original purchase. If a component is found to be defective in this one year period, it will be repaired
or replaced with a new or refurbished product at the option of the factory.
Should a warranty issue arise, please contact the dealer from whom the fan was purchased. A Return
Material Authorization (RMA) number is required for all returns.
What is not covered by the warranty:
1. Malfunctions resulting from misuse, negligence, alteration or lack of necessary maintenance.
2. Loss of time, inconvenience, use of product or other consequential damages due to defects.
3. Return transportation costs. All return transportation costs are the responsibility of the purchaser.
Damaged Shipments:
Hessaire is not responsible for damaged shipments or shortages resulting from carrier mishandling. Notify
your carrier’s office immediately to file a claim. Keep damaged goods and containers for inspection until
advised by the carrier as to disposal.
Returns:
All items must be returned with all original parts and packaging. Additional charges may apply for any missing
or damaged parts.
The customer must re-package and ship their item(s) back to the manufacturer at their own expense.
No freight cost/shipping cost will be re-funded to the customer.
The customer needs to provide us with the tracking number of the shipment.
Upon receipt of the product, including original parts and packaging, we may issue a full refund for the product
or may repair or replace the item with a new or refurbished product.
If our returns department finds that the item is not defective, you may be responsible for additional shipping
costs as well as a 10-30% re-stocking fee.

4
Section 3 Getting started
Key Operational Points:
1. Your cooler must be positioned in front of an open window or door if it is to operate effectively.
2. Always ensure that there is another open window or door through which the air can exhaust
from the room.
3. Ensure the filter is kept clean throughout the summer season.
4. At the end of each day run your cooler on FAN ONLY for 30 minutes to dry out the filter.
5. Prior to putting your cooler away for winter, always:
a. Drain the tank and wipe out clean.
b. Clean the filter
c. Reassemble and run on FAN ONLY for 30 minutes to dry out the filter.
Location! Location! Location!
Having completed assembly of your cooler, position the unit with its back to an open window or door.
This will allow fresh air to be drawn through the cooler and exhausted from the room. Constant air
change is essential and part of the fresh air benefit from evaporative air cooling.
Remember your cooler has been designed to operate even if it runs out of water. No damage will be
caused to the pump if cooler runs out of water.

5
Safety Rules
1. Read and follow all instructions, cautions, and warnings. Failure to do so could result in
personal injury, death or property damage.
2. Unit must be in the OFF position and UNPLUGGED from power receptacle before
performing any maintenance.
3. Make sure the electrical power source conforms to the requirement of the evaporative
cooler(s) as well as local codes.
4. To reduce the risk of fire or electrical shock, do not expose electrical connections to
water.
5. Do not touch electrically live components.
6. Adequate ventilation is required.
7. Assure that all power cords do not come in contact with any sharp edges, hot surfaces
or chemicals. Immediately replace any damaged parts.
8. This appliance is not intended for use by persons (including children) with reduced
physical, sensory or mental capabilities, or lack of experience and knowledge, unless they
have been given supervision or instruction concerning use of the appliance by a person
responsible for their safety. Children should be supervised to ensure that they do not play
with the appliance.

6
Section 4A
Cooler Set Up and Operation
1. Remove the
screws from the
top, rear panel.
2. Lift and pull out
on the panel to
remove
3. Locate the bag
of hardware
inside the cooler.
Remove the
hardware bag
and check for; 4
caster, 16 bolts
and washers,
garden hose
adapter
4. Lay the
cooler down.
Attach the
casters to the
bottom of the
cooler.
5. Replace the
previously
removed panel.
Attach the
garden hose
adapter. Your
evaporative
cooler is ready
to use
Hessaire Coolers are pre-assembled and ready to operate. Simply remove the packaging and then
carefully remove the unit from the box. Install Casters. Lock the 2 locking wheels before filling and
turning on fan to keep the cooler from moving from the air velocity.
NOTICE: the Xel50 Media pad will have a slight odor when it is new. This is normal. It will dissipate
after a period of time depending on the use time. Draining the tank often during the break-in period will
help speed this up. (See draining tank in section 5)
Filling Cooler or Connecting to Water Supply
Move the cooler to an area where it can be filled
Manual fill method
The cooler can be filled via the front fill door by hose or bucket. Using the water fill indicator to monitor
water level, simply depress the fill door and the spring lock will release and open it. To close, simply
push it closed and locked.
Auto fill connections
Connect to a water supply using a garden hose or coil hose (supplied by customer), or a direct water
line. (Parts for direct connection can be obtained at any hardware store.) Simply attach hose adaptor
(supplied with cooler) to the float valve nipple protruding from cooler. Verify water tight connections by
visually examining the hose connection
CAUTION:

7
Water inlet pressure should be limited to a maximum 50 PSI. If valve is overcome, install a pressure
reducer (25 PSI) on nipple first. (It can be obtained at hardware stores in irrigation section.) Hose bib
needs only be opened slightly to supply water to float valve and the cooler only needs to be about half
filled when in auto fill configuration. The float is already set to that level.
Section 4B
Connecting to a power supply.
Plug the Hessaire cooler into any 115 volt power supply. It is permissible to use extension cords when
needed. It is not recommended to use a GFCI circuit usually found in garage or patio areas. These
outlets/circuits are sensitive and may trip inadvertently to the cooler in normal operation. Should that
be the only power supply please be aware of this and if the GFCI trips simply reset it.

8
Section 4C
Using the Control Switches
Mechanical Version
Rotary Switch/Motor Speed Has 4 positions. (Clockwise from OFF)
OFF, LOW Fan Only, MED Fan Only, HI Fan Only.
Pump Switch
Controls the pump
Middle Rocker Switch
Controls the fan Oscillation
Power Switch
Controls power to the main controls, it will be lit when it is in the ON position, dark when OFF. When it
is OFF the other switches will not function.
Section 5
Cooler Maintenance WARNING: (DO NOT remove back panel with cooler
running)
For best operation and long useful life the following maintenance and cleaning
procedures should be followed.
Cleaning Cooler and Pads

9
At regular intervals your Hessaire Mobile cooler should be shut down and disconnected from power
supply. The water tank should be drained of dirty water and sprayed out with fresh water and refilled.
The more you do this the better it will work and less calcium will develop on pads or other surfaces.
You may spray through the cooling pads to wash them out and allow water to deposit in the tank to be
drained away. The removable panel and media pad can be sprayed out on the ground to clean pad.
Use light pressure when spraying pads. NEVER spray pads with water while cooler is operating and
fan is running. This can cause damage to motor and will void the warranty.
Removal of the Back Panel, same for the side panel (Disconnect power supply before this
procedure.)
Unscrew the screws at top of back panel (3). Lift panel up and pull out at the bottom. Then slide panel
out of the cabinet. You will now have access to the pump, float valve and water distributor spreaders.
Draining the Cooler Tank
Unscrew drain cap from drain assemble and drain away water. You may tip the unit carefully to the
drain side to help drain all the water out.

10
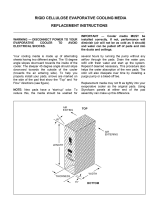
Removal and Replacement of Xel50 Cooling Media.
The cooling pads are made from a special resin impregnated craft paper specially designed for
evaporative cooling. They will last many years if maintained properly and water quality is maintained.
It is not necessary to remove the pads to clean them.
Inspect the pads for deposits of calcium on the air entering side. If the flute cells are clogged or the
pad is very heavy it may be time to change the media. New OEM Xel50 media can be purchased where
you bought the cooler. Follow these steps for replacing the pads.
1. With access panel removed, simply pull off the pad retainer disc from the pad pin. Older models
may have a pushed on pin that will need to be pulled away using pliers to grasp disc and pull
away. Be careful not to break the pin although the new pads will come with new pins and disc.
The newer models will have a threaded disc that will unscrew from the pin
2. With disc removed, remove the pins from the pads and carefully remove pads from the fixed
side mounting frame. Then do the same for the back panel or panels.
3. Xel50 pads are made with a 45/45 flute and can be installed either side to the frame. Just make
sure the distribution pad that is fixed to the top of the new media pad is at the top. This allows
water get onto the top of the pad evenly. The installation of the pads is opposite of the removal,
install the pad, insert pins and install the retaining disc. YOU’RE DONE… It’s that easy.
4. Reinstall the back panel and you are ready to use the cooler again.
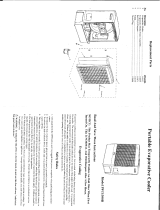
Pump Maintenance and Replacement. (Disconnect power supply before this procedure.)
The submersible pump is mounted inside the tank to the bottom with a retention bracket. While you are
cleaning the cooler the pump may be removed and the strainer cap on the bottom of pump can be
cleaned of debris. If pump has failed and needs replacing follow these steps:
1. Remove retention bracket.
2. Remove the switch control panel from the top of cooler, by inserting a small screwdriver into
the tap slots and pop loose.
3. The pump is connected to the control via the white plastic clip. Disconnect the pump clip and
feed the plastic clip through the control box into the cooler.
4. The pump cable is connected to the cooler by twist clips that are mounted in the side of the
corner between the left pad and the front of cooler. You may have to remove that pad to get
to the clips. Also there may be cable ties holding cable to the motor mounting bracket.
Remove the pump from cooler when cable is free.
5. Reinstall the new pump in reverse. Being sure to reconnect the cable in the twist ties and
secure the cable in a manner of which it stays clear of fan blade when cooler is running.
Reattach the pump clip in the control box and reinstall the control panel in its place. Be sure
not to pull any other wires loose from control switches when you have panel loose.
6. Reinstall the control panel into the cabinet making sure it is seated. And YOU’RE DONE!
Float Valve Replacement or Adjustment: (Disconnect power supply before this procedure.)
The float valve is mounted to the left side of cooler if you are facing the front grill. It is held in
place by the retaining nut that is visible from the outside. The rubber washer is between the nut

11
and cabinet. The rear panel will have to be removed to adjust the float (if the water level is too
high or too low) or remove and replace a float that has failed to shut of water supply. Note: Be
sure that the PSI of the supply water is within the 50 PSI spec. before determining the float has
failed.
1. The float valve can be purchased where you purchased your cooler.
2. Remove any hose adapters attached to the float valve nipple.
3. Remove the rear panel assembly as instructed in Section 5.
4. Remove the float valve retaining nut and rubber washer. Remove float valve from cabinet.
5. Reinstall the float valve in reverse. Set the valve adjustment to around 60 degrees for best
results.

12
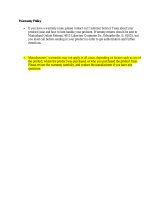
No.
Parts name
Parts
number
1
Media Panel
6091004
2
Water Pump
6018050
3
Motor
6018051
4
Fan Blade
6018052
5
Rigid Media
6018053
6
Switch of Motor
6091054
7
Switch of Power
6091055
8
Oscillator Motor
6018057
9
Water Level Float
6018059
10
Caster Non-
Locking
6018061
11
Caster Locking
6018062
12
Media Keeper
6091063
13
Water Tank
6091064
14
Water Distributor
6018067
15
Control Panel
6091069
16
Rear Water
Distributor
6018070
17
Water Diverter
6018071
18
Motor Bracket
6018072
19
Oscillator Rib
6018074
20
Water Filling Door
6091076
21
Water Level
Display
6018077
22
Drain Plug
6091081
23
Float Valve
6018058
24
Hose Adapter
6018088
25
120v Cord
6018089

13
QUICK TROUBLESHOOTING TABLE
Problem
Cause/Remedy
1. Cooler fails to work at all
1.1 Check that the unit is plugged properly.
1.2 Check the POWER switch, push it to "ON".
1.3 The TIMER switch is "OFF", turn it to "ON".
1.4 Make sure cooler is not plugged into a tripped GFIC outlet. If so, reset
GFCI or move to non GFCI outlet.
2. Cooler does not pump
2.1 Pump is not activated. Push the PUMP switch to "ON".
2.2 Water level is low. Fill with water and make sure pump is activated.
2.3 Be sure the pump and pump hose is clear of debris.
2.4 Pump may be defective. Replace pump.
3a. Fan does not operate
3.1 Check that unit is plugged properly.
3.2 Check the POWER switch, push it to "ON".
3.3 If connected to a GFCI outlet, check if it is tripped.
3.4 Troubleshoot rotary switch.
3b. Fan runs slow at start up
3b.1 Replace motor capacitor.
4. Louver does not operate
4.1 Louver does not move. Louver switch. Position to "ON".
4.2 Check Oscillator motor for proper placement and operation.
5. Water leakage
5.1 Check the cap of the drain assembly, make sure it tightened.
5.2 Inspect tank for cracks or breakage.
5.3 Make sure cooler is level.
5.4 Check media pads for buildup allowing water out on outside of pad
frame -- change media if needed.
5.5 If water is coming out fan, check for leaks in water distribution hoses
and/or leaks at hose connections to spreaders,
5.6 Be sure there is at least 4 inches of space for rear panel free from wall
or other obstruction. This could make the side panels release water to
airstream due to increased air velocity through the sides.
5.7 Spreaders may have scale buildup allowing water to pool and spill over
into airstream---Clean spreaders.
6a. Oscillation does not work
6b. Power does not start
6c. Slow in the power
6a.1 The oscillation does not work with USB plugged in.
6b.1 Check if USB plugged in, It must be unplugged for USB to start.
6c.1 There is a slow in the power when first plug into USB

14
/