Page is loading ...

PYLE
OWNER'S MANUAL
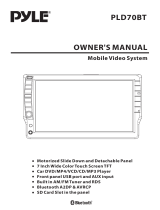
PLDD75BG
7"
Double
DIN
In-Dash
Touch
Screen
TFT/LCD
Monitorw
/
DVD/CD/MP3/MP4/USB/SD/AM-FM/RDS/Bluetooth
&
Screen
Dial
Pad
Built-In
GPS/TTS w
USA/Canada
&
Mexico
Maps
www.pyleaudio.com

Section
D)
(Contents
Thank
you
for buying this product.
Please read through these operation instructions so you will
know
how
to
operote
your model properly. Afrer reading
please
keep
this booklet in safe
place
for
future
reference.
o
Before
You
Start
Important
Safeguards
"
About
this
manual "
Precautions
Ii
Maintenance
I
Location
&
function
of
the
controls
1
Remote
control
8
Specifications
n
a
Installation
Wiring
Connections
II
Install the Unit D
Detach
the
Unit
•
Install the Front
Panel
•
Detach the
Front
Panel
•
o
Common
Operations
To
Select
Source
by
Menu •
Reset
the
Unit
•
Turning
the
Unit On/Off •
Volume
Control
•
Setting
the
Sound
Characteristics
•
EQSetting •
Turning
Loudness
On/Off
17
Eject
a
Disc
17
Insert a
SD
Card
11
Angle
Setting
17
Mute
Function
17
Night Mode
11
Mode Selector
11
Infrared
Sensor
17
Double Function
11
o Main Menu
Main Menu
Setup
•
Video
Setup •
Audio Setup •
Source
Setup •
System
Adjust •
o DVDIVCDIMP4
DVDNCDIMP4
Setup
II
DVDNCDIMP4
Play
II
Selecting
Tracks
Fast
II
Number
Buttons
II
Pause
the
Playback
II
Stop the
Playback
III
Play
tracks
at
Random
2A.
Repeat
Playing
II
Skip
backwardlforwardlF.FIF.REW
the
Playback
II
System
Switch
II
Slow Motion
Playback
II
Increase
Picture
Size
2A.
On
Screen
Display
2A.
Setting the
Playback
Time
iii
Changing
Audio
Language
iii
Changing
the
Subtitle
Language
2Ii
Changing
the
Viewing
Angle
21
Selecting Channel
II
Program
Playing
II
Playing
PBC(Menu)
II
Selecting Menu
f]
DVD
Setup Menu
f]
Section
Additional Information
)
..
Simple Troubleshooting Guide
The following checklist might helped to solve the problems which you meet wheo using
the
unit. Please double check and make sure
if
the connectioo and the procedure
of
the
operation
is
properly
before
using
the
checklist below.
Problem
No power.
Some errors occur in
the
LCD
or
no function
when
pressing
the
button.
Unable
to
receive stations.
Poor
effect on receiving a
station.
CDs
cannot
be
loaded.
Sound skips.
No images.
Note:
cause/Solution
•
Check
and
make
sme
whether
the
fuse
is
blown,
replace with the proper value
if
necessary.
• Press
RESET
button.
•
Check
and
make
sure
whether
the
antenna
is
inserted
or
the
antenna
is
properly
connected,
if
not,
insert
the
antenna
or
connect
it
properly.
• Antenna
may
not
be
the proper leogth. Make sure
the antenna is fu\\y exteoded;
if
broken, replace
the
antenna
with
a
new
one.
• The anteona is poorly grouoded, check and make
sure
the anteona is properly grouoded at its
mounting
location.
• A
CD
is
loaded
in
the
mechanism.
• The CD is dirty
or
damaged.
•
The
Video
line
from
main
unit
to
the
TV
is
not
coonected properly.
If
any
of
the
problem
persist
after
c.heck:
list
had
been
made,
co.nsuIt
your
nearest
service
dealer.
Never
attempt
to
disassemble
your
unit
by
yourself.
"Due
to continuous product improvement. the operations
are subject to run the modeL

Section
ED
G~
A_
U
_
X
__________________
~
__
G
_
o
_
n
_
re
_
n
_
~
______________
)
Section
mil
AUX Touch Screen Menu
Press SRC
to
switch
to
the
AUX
mode:
In
AUX
mode, select
AUX
SET:
IAUX SETI
For more
details
to
adjust AUDIO,
VIDEO
and
SYSTEM
(Auto I:
PAL,
NTSC,
SECAM),
(Auto
2:
P-M, P-N).
To
adjust
AUDIO
and
VIDEO
plesse refer
to
pages
18
to
19.
I VOL-I
To
docrease the volume
I
VOL+ I
To
increase the volume
~
Mode selector
o
CDIMP31SDIUSB
CDIMP31SDIUSB
Setup
81
CDIMP31SDIUSB
Play
It
Selecting
Tracks
Fast
Ii
Repeat
Playing
Ii
Number
Buttons
•
Selecting
Track
Ii
Stop
Play
Ii
Playing
Tracks
at
Random
Ii
Pause
the
Playback
•
Skip
backwardlforwardlF.FIF.REW
the
Playback
•
On
Screen
Display
Ii
Program
Playing
•
Eject
SO
Card
•
EjectUSB •
H
Tuner
listening to the
Radio
11
Band
Selector
11
Manual/Automatic
Tuning
81
Dx/LOC
Selector
11
Selecting
The
stored Station
11
MOIST
Selector •
Scanning/Memorizing
Stations
Automatically
Ii
Number
Buttons
•
On
Screen
Display
Ii
GotoFREQ
Ii
o
Bluetooth
Bluetooth Operational Interface
Ii
Using
a
Bluetooth
Wireless
connection
•
Pairing
Your
Una
and
Bluetooth
Phone
•
Pairing
in
Handsfree
Mode
•
Cellphone
Pairing
Mode
...
Bluetooth
Connection
and
Disconnection
•
Using
the
Unit
as
a
Handsfree
Device
U
Last
Number
Dialing
II
To
Dial by Cel/phone
..
To
Dial by the Unit
'1
Using
the
Unit
as
Bluetooth
Music
..
Audio
Transfer
between
The
Una
and
Phone
..
OAUX
AUX
Touch
Screen
Menu
.a
([i Additionallnformation
Simple
Troubleshooting
Guide
.a

Section
E)
(Before You Start
IMPORTANT
SAFEGUARDS
About
this
manual
1 Be
SUn!
to
conned:
the
color coded leads
according
to
the
diagram.
IncorT8CI:
con-
nections may cause
the
unit
to
malfunct-
ion
or
damage
the
vehicle's electrical sy-
stem.
2 Be sure
to
connect
the
speaker
(-)
leads
to
the
speaker
(-)
t&mlnal.
Never
conn-
ect
the
left
and
right
channel speaker c-
ables
each
oilier
or
to
the
vehicle body.
3 Make sure all
the
connections are comp-
letely corTed:
before
bimini
on
your
unit.
4 When replacing
the
fuSl8(s),
the
replace-
ment
must
be
of
the
same amperage as
shown on
the
fuse holder.
S Do
not
block vents
or
radiator panels. B-
locking them
will
caU88
heat
to
build
up
Inside:
and may result In ftre.
I To
lest
the
driver
diSb'aC:k
his attention
from,
please Install
the
unit
In an
apt
pl-
ace.
7 Using
the
unit
after
starting
the
engine,
otherwise
the
unit
can
not
be
started,
be-
cause:
the
electric energy
of
battBy'
..
s
used
up.
S Do
not
put
the
remote control under high
temperature
or
where
the
sun
strikes
It,
or
else
the
control remote can
not
work
normally.
9 Do
not
use
the
unit
in
extreme high
tem-
perature
or
such
low
temperature condi-
tiOns, and also avoid humidity and
direct
sunlight.
10
Take care
of
the
magnetism
of
the
unit.
Do
no
put
the
credit card, cassette
or
w-
atch around
the
unit,.
or
they
would
be
broken
or
some Information In them lose.
11
To
lest
disturb
the
video frequenc.y, keep
far
away
from
the
unit
when using
your
phone.
This unit features a number
of
sophisti-
cated functions ensuring superior
operation. All the functions have been
designed for the easiest possible use,
but many are not self-explanatory. This
manual will help you understand the
functions and operations
of
the unit.
This manual main explains remote
control operation. However, in
addition to those functions related with
DVDNCD/CDIMP31MP4 operation
that can only be operated by the remote
control, there are also functions can be
operated
by the buttons provided for
the main unit.
Improvements and changes to this User
guide necessitated by typographical errors,
inaccuracies
of
current information, or
improvements to programs and/or equip-
ment, may be
made by our company at
any time and without notice.
Bluetooth
To Dial
by
the
Unit
When
cellphone
is
conoected,
press@)
to
inpot
the
call
number,
then
press
€Dl
'"
to
dial,
DIAL
OK
appears,
when
the
call
is
pick
up,
and
it
appeara
PICK
UP.
00
Note:
* Press
~CLEAR
on
the remote control
or
rn
in the monitor
to
delete wrong inputs.
* Pressing
rn
in the monitor also performs
the
same
function.
Using
the
Unit
as Bluetooth
Music
During bluetooth mode,
the
musics
on
the
cellphone
switch
to
the
unit
for
play.
To
select
music
fast:
press
~
,.. to
play
the previous track, press
MIl
to
play
the
next
one.
Pause
play:
press
iI
II
to
pause
play.
Stop
play:
press
ail.
to
stop
play,
and
press
the
PLAY
to
return
to
the
beginning
of
the
current
track.
00
Note:
* This function
is
only valid
on
remote control.
)
Section
emil
Audio Transfer between the
Unit
and Phone
Press
rn
to change
the
conversation from
the
unit
to
the
cellphone.
00
Note:
*
The
function will
be
cause to
be
disconnected
bluetooth link for some phones,
but
you
do
not
worry
just
press
rn
button while private
conversation
with
some phones,then switch
back
to the unit automatically.

Section
Section
Ef)
C~
B
~
ru
~
e
~
t
~
oo
~
t
~
h
__________________
~
B
~
e
~
fo
~
~
~
e
~
YI
~
o
~
u
~
S
~
t
~
arl
~
______
__
)
011
Cell
phone Pairing Mode
1.
Browse
your
cellphone
menu
and
find
the connectivity
or
Bluetooth connectioo
section.
2.
Select search
for
a new
handsfrce
device
function and allow the phone
to
find
the
mobile.
(Different cellphone has different blue-
tooth
menu,
please
refer
to
your
phone
manul.)
3.
When
CAR
AN
DEVICE
appear, select
this
item.
(
if
it
can
not
be
coonected, please refer
to mobile
manual,
and coonect
it
again.)
4.
To
input
the
password,
the
password
is:
1234.
5.
Press the connect with the Handsfree
option
on
your
cellphooe, and CON-
NECT
appears.
Bluetooth Connection and
Disconnection
When
established bluetooth connection
between this unit and the cellphone, bluetooth
icon
G
on
the display appears in red.
Press
W PAIR to turn
offbluetooth
connec-
tion, and
G appears
in
blue.
Press
W
,PAIR
SUCCESS
appear
00
the display, then display shows
CONNECT
when
bluetooth connected
or
overtime display
shows
PAIRING
TIME
OUT,
when
bluetooth
disconnected.
I!l Note:
...
Pressing
rn
in
the
monitor
also
performs
the
same
function.
...
Press
rn
in
the
monitor
to
tum off the
bluetooth
function.
Using
the
Unit
as a Handsfree
Device
When
the
unit
is
ringing,
then
it
appears
call
from
and
the
phone
number
ill······
·"··on
the
dialing,
To accept call: Press
~
......
to answer a call,
it
appears
PICK
UP
00
the display.
To reject call: Press
al -
to
reject a call,
it
appears
REJECT
00
the display.
To
end
call:
Press
-.
to
end
call,
and
HANG
UP appears
00
the display.
I!l Note:
...
Some
of
cellphones
do
not
support
reject
call
during
bluetooth
mode.
...
Pressing
rn
and
rn
in
the
monitor
also
performs
the
same
function.
Last Number Dialing
Press
m
~
button,
it
appears
last
call
number
on
rn,
press
~
again,
and
then
REDIAL
OK
appears
00
the display during
conversation.
I!l Note:
...
Pressing
rn
in
the
monitor
also
performs
the
same
function.
...
To
dail
the
number
of
the
unit
in
the
car
only.
• Please keep the phone battery
is
full
of
power,
To
Dial
by
Cellphone
or
else
the
bluetooth
connection
will
be
disturbed
...
To
ensure
connection
succeed
----Please
delete
menu
of
cellphone
with
bluetooth.
----Please
reset
the
unit
and
cellphone.
----Please
reset
every
step
of
pairing.
...
Disconnect
after
paring
----Please
pair
the
phone
in
manual.
For
example:
pairing
fixture-cellphone-connect.
1.
The
unit
activated
automatically
when
you
make a call
by
cellphone, and
DIAL
OK
appears.
2.
When
you
receive a call,
PICK
UP appears
on
the
display.
PRECAUTIONS
This
unit
can
play
the
following
discs
only'
Type
of
disc
Recorded
marerial
Size
of
disc
DVD
Sound
and
moving
12cm
pictures
veo
Sound
and
moving
12cm
pictures
CD
Sound
only
12cm
MP3
Sound
only
12cm
MPEG-4
Sound
and
moving
12cm
pictures
USB
Sound
and
moving
Vcrsion2.0
pictures
and
less
NOTE:
The
unit
i,
compatible with VCD1.0/2.0/3.0 vernon and DVCD
diK.
• Do not
attempt
to
modify the unit.
modifying
the
unit may cause an
accident.
• Stop the vehicle before carrying
out any operation
that
could
interfere
with
your driving.
• Do not
work
in extremely high or
low temperature.
Be sure the
temperature inside the vehicle
is between
+60'
C and
-10'
C
before tuming
on
your
unit.
• To enjoy optimum sound and
images while playing, handle the
discs as follows:
--Handle
the disc
by
its edge
to
keep
the
disc clean, and do not touch
theS@
--Do
not
use
your
CDs
with
paste
residue
orinkattac~
--Do
not
use
CDs
with labels
or
stickers
attached, which
may
leave a sticky residue
while beginning to
peel
off.
(Showo as the pictore)
--Clean
the discs with
an
optiooa1 clean-
ing cloth. Wipe each diac
from the center out.
(Shown as the picture)
=
__

Section
ED
(Before You Start
Maintenance
Replacing
the
Fuse
Make
sure
the
amperage
matches
the
specified
value
when
replacing
the fu-
ses.
If
the
fuse
is
blown,
check
the
po-
wer
connection
and
replace
with
a
n-
ew
one.
If
the
same
problem
occurs,
it
would
be
subjected
to
the
malfun-
ction.
In
such
cases,
please
consult
In
the
nearest
service
dealer.
Awaming!
Never
use
the
fuse
with
the
rared
amperage
more
than
that
supplied
tD
your unit,
otherwise
it
will
damage
the
unit.
Replacing
the
Battery
When
the
range
of
the
operation
oft-
he
card
remote
control
becomes
short
or
no
functions
while
operating.
Rep-
lace
the lithium battery with a
new
b-
utton
cell
(CR2025).
Make
sure
the
b-
attery polarity
before
replace.
Gently pullout the Battery Holder while
pressing the Stopper.
,
Putthe button-type batterywithmark(+)
upward into the Battery Holder.
Insert the Battery Holder into the Remote
Cootrol.
Precautions
on
Using Lithium
Battery
Always keep the lithium battery beyond
children's reach.
In
case
swallowed, see adoctorimmediately.
Cleaning the batterywith a
dry cloth,
to ensure
its perfectconnected.
Make sure the proper polarity when
loading with the battery.
Toprevent short circuit,
do
notuse
metal tweezer to clip the battery.
AWaming!
Improperhand/e with
the
battery
may
lead
tD
explosion.
Itcannotbecharged,
disassembled
or
thrown
intD
a
fire.
Bluetooth
Bluetooth Operational
Interface
Press
~
BT
00
the remote control or BT in
the monitor to
open the bluetooth operatiooal
interface:
BLUETOOTH
I
~
'
.I
f 1 2 3
'"
\ \
11\
- 4 5 6
-Co
\
\.
' \ _ 7 6 9 "
""
I
fi
\
~
J
,
.e<
rn
NumberButIOns
To
input the phone number.
rn
- Dail,lastphone,answeraphone.
CD
_ Hangup,refuseaphone:.
rn
NumberShow
rn
PAIR
IT]
ACH(audiodlangej
(!)
Note:
•
Some
of
phone canjust switch the audio from
the unit to the phone.
rn
POWER
Press it
to
tum
on
or
tum
off
the bluetooth
function.
rn
C(dearj
IT]
BACK
)
Using a Bluetooth Wireless
Connection
Section
emil
Thedevice can be dialed wirelesslyin bluetoo-
th status. Beforeusingthe bluetoothfunctioo,
please
tum
00
yourcellphooe bluetooth func-
tion.
(!]
Note:
" To provide the
best
sound
without
or
little
distorted sound(the cellpbone
or
network
bring,).
" Full duplex conversation.
" Bluetooth ver2.0 compliant.
" Please dial-up the device before connecting
bluetooth.
Pairing Your
Unit
and Bluetooth
Phone
The device supports handsfree profile, head-
set profile, A2DP( Audio Advanced
Distri-
butioo profile)and AVRCP(Audio Video
Remote Control profile). Follow
the pairing
instruction for the first
time
use, after that
the unit will connect automatically.
Pairing in Handsfree Mode
1.
Press
~
PAIR,
andPAIRlNG
shows on
the screen.
2.
To
get into CELLPHONE CONNECTION
to search fixtures;
3.
If
the cellphooe has coonectecl, PAIR
SUCCESS appear and then CONNECT
in order, G will from blue to red.
(!]
Note:
* Pressing
rn
in
the
monitor also performs
the
same
function.

Section
.0
(
Tuner
MOIST
Selector
During radio status, you can pressCi)
ST
button
on
the
remote
control
to
select MO-
NO mode or STEREO mode.
Stereo
reception
is
charged
when
"Stereo"
appears.
It
is
switched
to
MONO
mode
when
"Mono"
appears.
00
Note:
•
It
is only valid
on
remote
control.
•
Switch
to
MONO
compulsively
to
improve
the listening quality wheo week sigoal.
•
It
is only valid
in
PM
tuning.
ScanninR/Memorizing Stations
Automatically
During radio status, briefly press 0
AMS
button
00
the remote cootrol to scan each
stored statioo 6 secoods respectively wh-
ich stored in
~
Number Buttons (from I
to
6).
You
can press the correspooding
N-
umber Buttons or
AMS
button when your
desired statioo is
chorged.
And it starts pl-
aying that statioo.
When press and hold
0
AIJIIS
buttoo for
more
than
2
seconds,
it
will
activate
auto-
matically meroory storing function. The
radio automatically selects a statioo and
has it stored in any ooe
of
the
~
Number
Buttons
(from1 1o 6).
00
Note:
*
The
unit
can
be
stored
up
to
6 stations
for
each
band.
*
Pressing
II!
in
the
monitor
also
performs
the
same
function.
Number Buttons
During
mdio
status,
press
Number Buttons
to
receive
the
stored
stations.
During radio status,
Number
Butto
...
(from
1
to
6)
~can
help you store yo-
ur
favorite
station.
You
can
follow
the
steps
as
below:
I When receiving a
station,press
and
hold
anyone
of
the
Number
Buttons
(from 1 1o
6)
uotil the number app-
ears
00
the LCD, which indicates that
station
is
already
stored
in
the
corresp-
onding number button.
2 Press and hold
9
AMS
buttoo
to
receive
stations
automatically,
and
store
them
in
I
to
6 number respectively.
3 Press and hold another number button
more
than 2 secoods when listening in
a
station
in
one
number
button's,
the
statioo will be stored in that number
button.
00
Note:
•
Pressing
rn in
the
monitor
performs
the
same
function.
On
Screen Display
During radio status, press 0
OSD
to display
the edition information. The preset frequency
displays
as
the default setting.
GotoFREQ
Press e
GOTO,
and the monitor shows:
FREQ,then press the Number
to
input the
valid frequency
as
100.00, then the
TV
pregram will be played.
00
Note:
...
It
is only valid
on
remote
control.
...
It
is only valid
when
GOTO
FREQ
is
ON
in
main
menu.
Before
You
Start
)
Section
011
Location
of
the
Controls
Front
Panel
4
The
Base
10
~
~
9
0
0
l r
0
11
[
0 0
0 0
0
I I
CJ
0
0
0 III
0

Section
ED
m
@
®
@
®
@
Section
C~
B
~
e
~
fo
~
~
~
e
~
YI
~
o
~
u
~
S
~
t
~
a
~
rl
~
_____________
Tl
~
u
~
n
~
e
~
r
__________________ )
mil
SRC
W
RELButton
Owing waiting mode, briefly press it to
tum
Briefly press it
to
slidedown the monitor, then
on the unit; during working status, briefly
you can insert or eject a disc or a
SD
card.
press it to select the different modes available!
Press
and hold it, the monitor shows ANGLE,
press and
hoW
it
to
tum the unit on
or
off.
then press
+1-
to
adjust angle.
[1+1]/[
...
] (Previous Track, tune frequency
@
RES Button
forward
1 Next
Track,
tune frequency rewind)
Press it
to
set the unit
to
initial status.
But10n
@)
..
(Eject) Button
Press it
to
eject a disc.
MUT ( Mute)
But10n
Briefly press it
to
mute; press and hold it
to
® Disc Loading Slot
switch
to
the night mode.
Press REL:first before you load the disc.
@
Common
SD
Card Slot
REMOTE hlfrared Sensor
©
Navigation
SD
Card Slot
SELINA
VI
Button
Briefly press it
to
select the function; press
@
I!li
(REL) Button
and hold it
to
activate the double function.
Press
to
release
the front panel.
+1
-
Press + I -
to
increase or decrease the volume,
and press
them
also can adjust BALAN,
FADE,
BASS, TREBL.
Press and hold the REL
button, the monitor
shows ANGLE, then press
+1-
to adjust angle.
Ustening to the radio
CD
Band
Indicator
Shows which band the radio is tuned
to.
rn
Preset
Number IndicalDr
Shows what preset
has
been selected.
OJ
Frequency IndicalDr
Shows which frequency the tuner
is
tuned.
rn
SEEK+/SEEK-
Briefly press to tune by the presettable
range,
press
and
hold
to tune automatically.
rn
lbe
6 stations
of
the
current
band.
Briefly press to select station, hold and
press
to save the current station to one
of
the 6 stations.
CIlBAND
To select
the
bands.
ClJAMS
Briefly press to scan the current station,
press and hold
to search the stored station
automatically.
rnMENU
Press it to enter the MENU.
rnSRC
Press this button to select the signal
source.
Band Selector
During radio status, repeatedly press D
BAND button to select bands in the
following order:
~~1--'FM2--'FM3--'FM4~
~
(OIIlT)
I
MW2
__
MWI
••
f--~
@ Note:
(For
Two
Bands)
* Pressing
rn
in the monitor also performs
the
same
:function.
Manual/
Automatic
Tuning
Manual Tuning:
Press€l!i~o_)
button
on
the
remote
control continuously to select
a station
downward
or upward respectively.
Automatic Tuning: Press and
hold€l!i(~or
..)
button
for
more than 3 seconds, the ra-
dio
automatically searches a station
down-
ward
or
upward respectively and plays
when
it finds a station.
@ Note:
* PressingIIJ in the monitor or
Moll
....
on the
main unit
performs the
same
:function.
DX/LOC Selector
During radio status, press 0
we
button
to select strong
or
weak
station reception.
"LOC" appe"" on the display and only
local station is available.
when
it
disappears
both distance and local stations can
be
received.
~
Note:
* The
:function
is only valid on remote control.
*
The
:function
is
invalid in
AM
tuning.
Selecting
the
Stored
Station
During radio status, press
~
..
button to
select
the
stored station upward, press
.,.
to
select the stored station downward.
@
Note:
* The function
is
only valid on remote control.

Section
ED
(
CDIMP31SDIUSB
Pause
the
Playback
During CDIMP3/SDlUSB playback, press
~
II
to switch between play and pause.
@
Note:
* PressingOO
in
the monitor also performs the
same function.
Skip
backward/forward/F.F
/F.REW
the
playback
Press
~
(
...
or
..
) on remote control to
perform fast reward or fast forward.
C2X
-4X
-;-
8X-16X~
@ Note:
• This function is operated by using the remote
controL
On
Screen Display
During
CD
status, press
OSD
button the
display shows:
I Single elapsed
-----+
Single
remain
I
L-
Total Total
~
remain
........-
elapsed
@ Note:
* This function is operated
by
using the remote
control.
Program Playing
During CD mode, press
(i
PROG,
the TFT
displays the program menu. Press
NUMBER
BUTTONS
to select the track Number and
then press
~
to
move the cursor to START,
press
ENTER
to start program playing;
move the cursor to EXIT and press ENTER
to exit the program playing. Move the cursor
to
~
and press ENTER
to
the previous page;
move the cursor to
~
and press ENTER to
the next page. During this process, press
~
• to cancel the program playing.
@
Note:
* The function is only valid
on
remote control.
* Press@l CLEAR to clear the mistake input.
Eject
SD
Card
Push SD card to eject it.
During SD playing mode, to eject SD card
to switch to Disc mode;
if
there is no disc in
the main unit, it will switch to USB mode,
or else, it will switch to Radio mode.
During other modes,
to eject SD card to
keep the previous mode.
Eject
USB
Pull USB
to
eject it.
During USB playing mode, to eject USB
to switch to Disc mode;
if
there is no disc
in the main unit, it will switch to SD Card
mode, or else, it will switch to Radio mode.
During other modes, to eject USB
to
keep
the previous mode.
Section
Before
You
Start
)
-
Remote Control
Tips:
For
more
information
as
to
replacing
battery,
please
refer
to Replacing
the
Battery
on
page
2,

Section
E)
(Before
You
Start
• SOURCE/PWR
Q
II (Pause/Play)
e GOTO (playing time/track)
6)
• (Stop Playing)
e BANDITITLE
6)
SETUP
o AMSiMENU
~
"/~(F.RlF.F)
o LOC/SUB-T
GI
.....
/11+1
(PreviouslN ext Track)
o ST/AUDIO
e
CLEAR
o ANGLE
e
0-9(Number) Buttons
o OSD
~
......
(Eject Button)
During
DVD
mode, briefly press it to show
fa
LOUD(loudne"
)
the
current
information, press
and
hold it
to
turn off. During
radio
mode, press this
e
EQ(equalizer)
button
to show
the
version
number.
o
ZOOM
(zoom in or
zoom
out)
G
"!~!JiJ.!"'!ENTER
(Left/Right/Up/Down
ENTER)
o
II
....
(Slow Forward/Rewind)
e
BT (bluetooth mode) Button
G
PIN
(System Adjusting)
e
PAIR
During
bluetooth,
press
to
pair.
II)
~
Mute
~
...
G)
PROG(Program playing)
During bluetooth, press to dial, dial again
or
answer a
phone.
«I
VOL+NOL-/SEL
G
-=-
G)
RPT(Repeat Playing)
During bluetooth, press to bang up or refuse
.,
RDM (Playing Tracks
at
Random)
a phone.
CDIMP31SDIUSB
Selecting Tracks Fast
DuringMP3/SDIUSBplayback,pressQl ~
Inplayprevioustrack,press
QI
...
Inplay
next track.
DuringCDplayback,firstpress
QI
~ In
return In
the
beginning
of
the currenttrack,
press
QI
~
again within 3 secoodslnplay
previoustrack,pressQl'"
Inplaynexttrack.
[!)
Note:
•
Pressing
[8[J
and
DHJ in
the
monitor
perform
the
same
function.
•
In
CDIMP3/SD/USB
mode,
you
can
press
track'
s
Number
or
name
to
play.
Repeat
Playing
During CDIMP3/SDIUSB
playback,
press
4Ii
RPT
In replay the current track, press
it
again to cancel
this
function.
@ Note:
•
This
function
is
operated
by
using
the
remote
control
•
The
default
setting
is
Disc
Repeat.
Number Buttons
Press one
of
@I
Number Buttons(l).-A) In
select a track In play aulnmatically.
(!) Note:
•
Press
track
region
and
the
screen
shows
the
number
keys,
touch
the
number
to
select
tracks.
•
Press~
CLEAR
to
clear
the
mistake
input.
)
Section
mil
Selecting Track
During
CD
playback, first press
f)
GOTO,
and TFT shows:
disc
go
to:-:-,press
your
desired time
of
the
playback by using
num-
ber
buttons.
Secood press GOTO buttnn, track go
to:-:-
appears
on
TFT,
also
input
your
desired
numbers In play
the
current time
of
your
selection.
During MP3/SDIUSB mode, first press
f)
GOTO
and
the
TFT shows:---. Then press
NUMBER BUTTONS In input
the
MP3/SD
track's
Number In play it; secoodly press
GOTO
buttnn, and the TFT
shows:
--:--,
now input the desired time In play the
current track at this point.
[!)
Note:
•
This
function
is
operated
by
using
the
remote
control.
•
Press
e
CLEAR
to
clear
the
mistake
input
Stop Play
During CDIMP3/SDIUSB playback, press
lEi. In
Slnp
the
playback.
[!)
Note:
*
Press!ng
~
in
the
monitor
performs
the
same
function.
Playing Tracks
at
Random
During CDIMP3/SDIUSB playback, press
m
RDM
buttnn on the remote control In
play any track at randmn under the directory
which you select.
Press
it
again
to
return
to
normal playing.
@ Note:
•
This
function
is
operated
by
using
the
remote
control.

Section
~
(
CDIMP31SDIUSB
CD/MP3/SD/USB
setUp
During CD playback, touching the screen
shows
the
following
menu:
During MP3/SDlUSB playback, touching
the
screen
shows
the
following
menu:
I:"J ] Scan
the
tracks
[YJ
Trackregion
CARD
CARD
appears
in the
SD
mode and USB
appears
in
the
USB
mode.
~
Sound
characteristics
c::::::J
Decrease
volume
level,
adjust
some
items
[TI
Increase
volume level,
adjust
some
items
D!D
Play!pause
[IJ
Stop
~
Previous
track
~
Next1Iack
o::::3;J
DVD
setop
menu
MQQ§
Mode
selector
Track
Region:
Press
this
region
and
the
screen
shows
the
following
menu:
number
keys
appears, touch the
number
to
select
tracks.
Touch
the
II
X
II
to
exit
this
menu.
CD/MP3/SD/USB
Play
Insert a CDIMP3 disc into the slot, the unit
will play automatically.
Press
REL
after toming the unit on, then
insert a SD card when the
TFf
slanted and
the programs in the card will
be
played.
From
the
back
of
the main unit
insert
the
USB and programs in the USB
will
be
pl-
ayed.
If
there have
be
loaded a disclUSB/SD card,
press SOURCE
on
the remote control to
switch to play,
or
back
to play source
to
select
menu,
press
DVD in
the
monitor
to
play disc, press SD
to
play SD card, press
USB
to
play USB.
I!l Note:
•
Press
SRC
on
the
IIlIrin
unit
to
switch
to
DVD
mode.
When
SD
card
and
USB
were
inserted
into,
press
this
key
again
and
again
to
switch
among
USB,
SD
card
and
disc.
•
Press
~
to
tum
to
mode
switch.
• Bit
rate
not
more
than
320kbps.
• Supports ID3V!.
Before
You
Start
Specifications
General
Power Requirement 14.4V
DC
(1l-16V
allowable)
Load Impedance
40
Max.Power Output 80W X 4
Tone
Controls
:!e7
dB
Bass 100Hz
Treble 10KHz
Dimensions
Approx.184 x 178
xlOO
mm
(dlwth)
Mounting
Approx.l64
xl83xl12
Dimensions
mm(dlwth)
Weight Approx.3.5kg
FM Section
1\ming Range
87.5-108(MHz)
(Optional) (Europe)
87.5-107.9(MHz)
(U.S.A.)
IF Range
1O.7MHz
Usable Sensitivity IOdBuV
(-30dB)
Signal-to-noise Ratio 60dB
Stereo Separation
30dB
(1KHz)
Freqoency Response 40-12KHz
)
AM
Tuner
SectIon
Frequency Range 522-1620(KHz)
(Optional) (Eorope)
IF Range
530-17\0
(KHz)
(U.S.A.)
450KHz
Usable Sensitivity 28dBuV
(-20dB)
YCD/CD
Player Section
Section
011
VCDSignalSystem AUTOIPALINTSC
Signal-to-noise Ratio 60dB
Separation 60dB(IKHz)
Distortion
0.3%
DYD Player SectIon
DVD Signal System AUTOIPAUNTSC
Numberofchannel 2 channels
Frequency Response 40Hz to 16KHz
Dynamic Range 60dB
Signal-to-Noise Ratio 60dB
Note:
Due
to
continuous
product
improve-
ment,.
specifications
and
design
are
subject
to
change wilflout
prior
notice

Section
ED
C~
/n
_
s
_
m
_
n
_
at
_
ro
_
n
__________________
D
_
~
_
D
_
/Vi
_
C
_
D
_
/M
__
P_4
__________
)
Wiring Connection
RearL
Speaker
Battery +
Ground
'-------''''''''''''-----Ground
'----~~~----PukmgB~
'-----''-'''''-----
Lamp
In
'--_=""-
____
Antenna
FrontL
Speaker
[
)r::::::~~~~~::~I~====;;~~~~==~FromR
Speaker
o Output Plug(Male)
o Fanwindow
f)
Output Socket(Fema\e)
o Navigation Slot
---Preferences page--
I
Default
I ExampleshowinghowtosetloadfacIDrysetling:
(Press..t..
or
....
)
(Press
....
,
..t..
or
....
,
tbenpressENTER)
--Preference
Page--
--Preference
Page--
TVJYpo
Auto
TVJYpo
Auto
Audio
Eng
I¢
Audio
Eng
Subtitle
Eng-
Subtitle
Eng
DiacMerm
Eng
DiscMerm
Eng
p.,."tal
p~
Puswmd
Dofiw1t
GoToP:referenccPagc
LoadFactmys.tting
Section
mil

Section
.m)
( DVDIVCDIMP4
---Preferences page--
I
Disc Menu
I
Example
showing
howbl
set
Disc
Menu
Language:
(Press
....
or
....
)
(Press
...
,
....
or
....
,thenpressENTER)
--Preference
Page-
--Preference
Page--
TVTypc
Auto
f TVTypc
Auto
1§jMft1,M
Awlio Eng
¢
Audio
Eng
Fmwh
Subtitle
Eng
Subtitle
Eng
Spanim
DiscMcnu
Eng
'·ra$"..1
..
"
~csc
p......u
f
P
_
tal
,,,,,,,,,,,,
Password
K=
Defuul!
Password
~~
-
Doflou1!
GoToPrefere:ncePage
l'<efmedMenuLonguage
Oth",
7
I
Parental
I
Example
showing
howbl
set
parental
oontrol:
(Press
....
or
....
)
(Press
...
,
....
or
....
,thenpressENTER)
--Preference
Page-
--Preference
Pago--
TVTypc
Auto
TVTypc
Auto
~.
Awlio
Eng
¢
Audio
Eng
3
PG
Subtitle
Eng-
Subtitle
Eng
4
PG
13
DiscMenu
Eng
DiscMenu
Eng
5
PGR
p......u
'i,j#,jM
6 R
7 NC
17
Password
[
Password
J
.!"
Adult
Defuul!
Default
GoToPreferenccPage
SetParcntal
Control
I
Password
I
Example
showing
howblset
password,and
the
default
password
is
8888.
(Press
....
or
....
)
(Press
...
,
...
or
....
,then
press
ENTER)
--Preference
Page-
--Preference
Pago--
TVTypc
Auto
TVTypc
Auto
Awlio
Eng
¢
Audio
Eng
Subtitle
Eng
Subtitle
Eng
DiscMenu
~
i
DiscMenu
Eng
p......u
P"""tal
Password
'Fh
i
""
.!
"'U~
Defuul!
I
Dofuu1!
I
GoToPrcfenmccPagc
ChangePassword
Installation
Installation Method 0 :
DIN
Front-Mount
Bend
tIlese
claws
outward
for a tight fit,
if
necessary.
CD CD
Push
in
the
unit
Installation
Method e
Installation using
the
saew
holes
at
the
sides
of
the
unit.
Select a position
where
the
screw
holes
of
1 2
the
mounting
bracket
supplied
with
the
car
and
the
screw
holes
of
the
main
unit
become
aligned
(are
fitted),
and
tighten
the
screws (soc
at
2
pla-
ces
on
each
side).
And
then
fasten
them
to
the
car.
)
Dashboardor
Console
Section
mill

Section
~
(Installation
Detach
the
Unit
Detach the front
panel
before disassembl-
ing the unit.
l.Take out the Outer Trim Frame.
Main Parts List
CD
~
~
2.Insert the keys supplied to the unit at
both sides
of
the unit (shown as illustrated)
until they click. Pulling the keys makes it
possible
to remove the unit from the dashboard.
MSxS
4
Screws
M S x 20
S
Screws
Mounting
Sleeve
xl
Rear
Mounting
Bolt
xl
Harness
Rubber
xl
® ®
o
/
Keys
x 2
Outer
Trim
Frame
xl
Connecting
Wire
xl
® ®
Steel
Bar
x 1
USB
Connecting
Wire
(optional)
DVDIVCDIMP4
)
---Preference page---
I
I
TV
Type
I
Example
showing
how
to
set
TV
type:
(Press
....
or T )
--Preference Page--
TVType Auto
Audio Eng
Subtitle Eng
Disc Menu Eng
Parental
Password
Default
Go
To
Preference Page
(Press
~
,
....
or
T,
then press ENTER)
--Preference Page--
TVT
e Auto
Audio
Subtitle
Disc Menu
Parental
Password
Default
SetTVStandard
Eng
Eng
Eng
I
PAL
Audio
I
Example
showing
how
to
set
Audio
language:
(Press
....
or T )
(Press
~
,
....
or
T,
then press ENTER)
--Preference Page--
-Preference
Page--
TVType Auto
I
TVType Auto
1
Em1~
Audio
Eng
It:)
, ,
,.
French
Subtitle
Eng
Subtitle Eng
Spanish
Disc Menu
Eng
Disc Menu
Eng
Chinese
Parental
Parental
Japanese
Password
Password
Korean
Default
Default
Russian
Go
To
Preference Page
PreferredAudio Language
Others
Subtitle
I
Example
showing
how
to
set
subtitle
language:
(Press
....
or T )
(Press
~
,
....
or
T,
then press ENTER)
--Preference Page-- --Preference Page--
TVType Auto
TVType
Auto
,.
,
Audio
Eng
It:)
Audio
Eng
French
Subtitle
Eng
,.
Spanish
Disc Menu
Eng
Disc Menu
Eng
Chinese
Parental
Parental
Japanese
Password
Password
Korean
Default
Default
Russian
Go
To
Preference Page
Preferred subtitle Language
Others
Section
mill
v
v

Section
.m)
( DVDIVCDIMP4
Installation
)
Section
mill
--Dolby Digital Setup--
Install the Front Panel Detach the Front Panel
I
Dual Mono
I Exampleshowinghowtosetstereomode:
Put notch@(shownaspictore)ooto shaft Press REL button in the upperrightcomer,
®.And
then slightly press into the right side. and then the front panel
will
be folded down.
(Press
...
or
....
)
(Press
Il1o
,
...
or
....
,
then
press
ENTER)
--Dolby Digital Setup-- --Dolby Digital Sotup--
f
DuolMono
1
41'·w·
•
...
Dynamk
I¢
I
Dynamic
I
L-Mono
j
~
R-Mono
Mix-Mono
Go
To
Dolby
Digital
Setup
DualMono
(1
+
1)
Setup
I
Dynamic
I
Example
showing
howtosetdynamic
range
compression:
II II
(Press
...
or
....
)
(Press
~
, ... or .... thenpressENTER)
--Dolby Digital Setup-- --Dolby Digital Sotup--
f
DuolMono
1
I
DuolMono
I
Dynamk
I¢
t
•.
II
,~
,
3/'
- -
- -
1/2
- -
__
1/4
- -
OH
Go
To
Dolby
Digital
Setup
SetDRCoff
II II

Section
~
(Common Operations
To
select
SOUrce
by Menu
In
any
mode,
press
SRC
in
the
monitor,
the
following
menu
will appear:
Press
it
to select
your
desired item.
If
you
want
to
navigation,
press
NAVI;
if
it
did
not
enter
into,
that
means
the
unit
does
not
include the function.
In
any mode, press
BACK
to return to the
previous
mode.
(!) Note:
• If
the
font
display
in cyan.
that
means
there
is
not
have
this
function.
Reset
the
Unit
Opemting the unit for the
fir1It
time
or
after
replacing
the
car
battery,
you
must
reset
the
unit
Remove the front panel
at
fir1It,
and then
Press
®
RES
button
in
the panel with
a pointed object, (such as a ballpoint pen)
to
set
the unit to initial status.
(!)
Notes:
*
When
some
errors
occur
on
the
display,
you
can
also
press
RESET
button
to
resume
to
normal,
and
it
will
erase
the
clock
setting
and
some
me-
morized
functions.
•
This
function
can
only
be
operated
by
the
main
unit
Turning the Unit
On/Off
During waiting status, briefly press 0
PWR
button to
tum
on
the unit, during working
status,
press
and
hold
it
to tum off
or
tum
on
the
unit
(!) Note:
•
Pressing
SRC
button
on
the
main
unit
also
performs
the
same
function.
Volume Control
Press
~
VOL+
button to increase the
sound level and
press~VOL-
button to
decrease the sound level.
(!)
Note:
•
Pressing
+1-
on
the
main
unit
or
VOL+I-
in
the
monitor
perfonns
the
same
function.
setting the Sound Characteristics
Repeatedly press
~
SEL
button to select
the
desired
mode
in
the
following
order:
,...
VOL_
BALAN_
FADEl
L
SUBWF
+-TREBL
+-
BASS
.-J
Afler selecting the desired mode,
you
can
adjust the current level
by
pressing~VOL
buttons.
(!)
Notes:
•
Pressing
+1-
and
SEL
on
the
main
unit
also
performs
the
same
function.
EQ
setting
While listening to the popular music, classic
music
or
rock
music, you
can
select
the
co-
rresponding preset modes
to
adjust the sou-
nd quality perfectly
by
using
~
EQ
button.
Repeatedly pressing
~
EQ
button
to
choose
the following modes in
tum:
,-------+
POP • CLAS I
L
OFF • ROCK
.....-J
The default setting is OFF.
(!)
Note:
•
This
function
is
operated
by
using
the
remote
controlooly.
DVDIVCDIMP4
)
--General5etup Page--
Captions I
Example
showing
howtosetcaptionson/off:
(Prea
....
or'"
)
·-General
Setup
Page··
Tv~lay
__
Wide
AnglcMark
On
Osd Lang Eng
C!PJions
Off
Screen
Saver
On
Logo
Type
DC!
Go
To
General
SetupPage
(Press
~
, ... or ... , theopressENTER)
··Geoeral
Setup
Pago-
SPOIF
IScreen
Saverl
Example
showing
howtosetScreen
Saveron/off:
(Prea
....
or ... )
--General
Setup
Page--
Tv Display
Wide
AnglcMark
On
Osd Lang
__
Eng
Captions
Off
Screen
Saver
On
Lo~'IfEe
Dc!
Go
To
General
Setup
Page
(Press
~
, ... or ... , theopressENTER)
--General
Setup
Page-
TvIn
....
lay
Angl.Marl<
001 Lang_
Cap""'"
Wulc
On
Eng
Off
Screen
Saver
On
I."
~
~~
~~
~~f
..JILI
~
o~ff
~~
ScreenSaver
Logo
Type I
Example
showing
how
to
set
Logo
Type:
(Prea
....
or'"
)
--General
Setup
Page--
Tv
DispLay
Wide
AnglcMark
On
Osd Lang Eng
~Jions
Off
Screen
Saver
Off
LogoT
e
DC!
GoToGen...JSeNpPage
(Press
....
, ... or
T,
thenpressENTER)
--Geoeral
Setup
Pago-
TvDisplay
Wulc
AngloMarl<
On
Osd
Lang
Eng
C
...
Off
Screen
Saver
On
Logo'IyPe
Def
Logo'IyPc
I Coptmed
Section
mil

Section
.m)
( DVDIVCDIMP4
--General Setup Page--
I
lVDisplay
I
Example
showing
howto
setlV
Display
mode:
(Pros, ... or
'I'
)
(Press
~
, ...
or
'I'
,1henpressENTER)
--General
Setup
Page-- --General SetupPag ....
TvDisplay
Wide
MijtM¥'
"1ftM
I
NmmaliPS
1
AngIeMark
On
;¢
[
~=
~
I
,vr
o.!
Long
Eng
Captions
Off
C'ons
Off
Screen
Saver
On
Screen
SaYm'
On
----,""
go
1)j>e
Def
Lo~1)J>co
Dof
GoToGeneralSetupPage
SetlVDi",laynwde
I AngleMark I Exampleshowinghowtosetpicturemode:
I
(Pross ... or
'I'
)
--General
Setup
Page--
Tv
Display
Wide
AngleMark
On
o.!
Long
Eng
Captions
.
Off
Screen
Saver
On
Logo
Type
Def
Go
To
General
Setup
Page
(Press
.......
or
.....
thenpressENTER)
-General Setup Page--
I TvDi"Play
Wule
I
~~.~
f
~~:.
;:
r
O~
Screen
SaYm'
On
Logo
_.
Def
SetAngIeMark
OSDLang
I
Exampleshowinghowtosetlanguagemode:
(Pros''''
or
'I'
)
(Press
...
, ...
or
....
,
thenpressENTER)
--General
Setup
Page-- --General SetupPag ....
TvDisplay
Wule
f
TvDi"Play
~de
l
AngleMark
On
;¢
Angl.Mmk
o.!
Long
Eng
a::~em,
Captions
Off
Screen
Saver
On
Screen
Saver
On
----'""ao_
1)J>co
Def
Lo~1)J>co
Dof
Go
To Genml
SeWp
Page
SetOSDLa:nguage
Section
Common Operations
)
mil
Turning Loudness
On/Off
Press and hold
~
WUD
button activate
loud function. You can press this buttoo
to
increase
the
low
frequency,
which
can
improve
sensitivity
for
your
ears.
Press
it
again to quit this function.
00
Note:
•
This
function
is
operated
by
using
the
remote
control
only.
~ecta
Disc
Briefly press REL atler turning the uuit
00
,
then insert a disc when
the
1FT
slanted, press
~
on
the
remote
control
to eject a disc.
Or
TFT
will
return
to
the initial status.
00
Note:
•
Pressing
~
on
the
main
unit
also
performs
the
same
function.
Insert a SD card
Briefly press REL atler turning
the
uuit on,
then insert a
SD
card into
SD
slot when the
TFT slanted.
Common
SD
Card:
insert
a
common
SD
card into ®
SD
slot aud the programs
in
the card will
be
played.
Navigation
SD
Card:
insert
a navigation
SD
card (is loaded with the navigatioo map
into the
SD
card ) into@ SD slot, otherwise
this
uuifs
NAVI dees
not
work.
Angle Setting
Because
of
the uuit character, the display is
different from the different angle. You can
adjust
the
desired angle.
Press
and
hold
Cf>
REL rill ANGLE appears
in
the
monitor,
the
press
® +
to
adjust
mouitor backward
by
definite angle, press
Cf>
-
to
adjust it forward.
(!)
Notes:
•
When
adjusting
the
monitor
angle,
please
press
this
button,
or
the
monitor
would be
broken.
•
This
function
is
operated
by
the
main
unit
only.
Mute
Function
Press I!! il button
to
shut
off
the sound
output,
and
"
oa:"
appears
on
the
LCD.
Press
it
again
to
resume
to
previous
volume
level.
00
Note:
*
Briefly
pressing
MUT
on
the
main
unit
also
performs
the
same
function.
Night Mode
Press and
hold
®
MUT
button
to
enter
the night mode, press it again to switch to
the normal mode.
[!]
Note:
•
This
function
is
operated
by
the
main
unit
only.
Mode Selector
Repeatedly briefly press 0
SOURCE
button
to select the different modes available.
(!)
Note:
• Briefly
Pressing
SRC
on
the
main
unit
also
performs
the
same
function.
Infrared
Sensor:
Receptor 0
00
the main uuit for
the
card
remote
control.
Double Function
Except for navigation, press and hold ®
SEUNAVI
to
activate the deuble function,
it
means
that
the
cwrent
mdio
or
playing
is
on,
press
it
to switch to
navigation
status.
Press and hold it again to shut this function,
back to the previous .tatus.
[!]
Note:
•
This
function
is
operated
by
the
main
unit
only.

Section
E)
(Main Menu
Main Menu Setup
Press
and
hold
SETUP
on
the
remote
control
or
MENU
on
the
main
unit,
or
press
SET
in
the
monitor
to
enter
the
menu
as
follows:
This menu includes VIDEO, AUDIO,
SOURCE, SYSTEM, EXIT. Press them in
the
monitor
to
set
the
desired
status.
1.
Video
Adjust
After selecting VIDEO, the sub menu will
appear
as
follows:
In
this menu you can adjust CONTRAST,
COLOR, TINT, BRIGHT, PICTURE.
M
Picture
Adjust
Press PICTURE in
this
menu, it will appear
as
follows:
Press
IBI
and
~
to adjust the size, then
press
SAVE
to save the setup, press EXIT
to
exit
this
menu.
(!) Note:
..
Adjusting
the
other
options
perform
the
same
operatioo.
DVDIVCDIMP4
Selecting MENU
I Selecting Menu:
DuringDVDstatus,
press
0
MENU
to
return
to
the
root
menu, all
of
the chapters will appear
on monitor. You can press
iii
or
~
button
to
select your desired chapter.
2 Selecting Title:
During
DVD
status,
pressDTITLE
to
return
the
title
menu,
all
of
the titles will appear on monitor.
You
also
can
press
~
or
@)
button
to
select your desired chapter.
(!) Note:
..
Under
DVD
menu,
touch
the
screen
to
select
items.
..
If the touch
menu
options
invalid
or
the disc
does
not
support
touch-TITLE,
.
~,
that
is
the
same
as
~
bottons
on
the
remote
control
will
display
on
the
screen.
Press
..
to
left:,
press
'"
to
right,
press
....
to
up,
press
.,.
to
down
and
press.
to
ENTER.
)
Section
mil
DVD
SETUP
MENU
Press
~
SETUP on remote control or =
in
the
monitor,
main
menu
and
sub-menu
will appear on TFT, pressingED [ ..
][,.
]
[~
] [
...
] on the remote control to select
your desired items,
then
press ENTER.
Press
...
to
the
pervious
one,
press
SETUP
or press [
..
][,. ][
~
] [
...
] to move the cursor
on
"X"
,then
press
ENTER
to
exit
the
mcnusetup.
(!)
Noles:
..
The
selections
are
the
preferred
options
that
will
be
chosen
if
they
are
available
on
a disc.
If
the disc
that
is
inserted
does
not
have
the
preferred
option
then
the
discs
own
prefer-
ence
will
be
used.
..
Regarding SETUP MENU, please
refer
to
the
following
pages
for
more
details.
..
Some
functions
varies
depending
on
the
types
of
models
or
formats
of
the
disc.
..
To
touch
the
screen
to select
menu,
touch
it
again to select
the
item.

Section
Section
.m)
C~
D
_
~
_
D
_
/~
_
C
~
D
_
l
_
M
~
P
~
4
______________
~
M
~
a
~
i
~
n
~
M
~
e
~
n
~
u
____________
)
mil
Chan9ing
the
viewing angle
(Multi-angie)
With DVDs featuring multi-angle (scenes
shot
from multiple angles) recordings,
you
can press
.ANGLE
to
switch among vie-
wiog angles during playback.
Selection options switch
as
follows:
ANGLE 1 - ANGLE 2 - ANGLE 3
......
(!)
Notes:
•
This
function
is
operated
by
using
the
remote
control.
•
This
function
only
operates
with DVDs
featu-
ring multi-angle reconlings.
•
The
..
ffi:f
mark
on
a DVD's package indic-
ates
it
features
multi-angle scenes.
The
number
in
the
..
ffij'
mark
indicates the
number
of
angles
from
which scenes were shot
•
It
is invalid to pressing
ANGLE
during
fast
forward/fast
reverse
or
pause.
Selecting Channel
During
VCD
status, repeatedly press
(,)
AUDIO button
to
select the followiog
channel:
C Stereo . Mono
Left~
Mono Rigbt
_---...J
Selecting the corresponding channel
to
set
the different sound characters.
(!)
Note:
•
This
function
is
operated
by using
the
remote
control
only.
Program Playing
During VCD mode, press
~
PROG,
the
TFT displays the program menu. Press
NUMBER
BUITONS
to
select the track
Number and
then
press
~
to
move the cursor
to
START, press
ENTER
to
start program
playing;
move
the
cursor
to
EXIT
and
press
ENTER to exit the program playing. Move
the cursor to
1441
and
press ENTER to the
previous
page;
move
the
cursor
to
....
and
press ENTER
to
the next page.
During this process, press
4tl
• to cancel
the program playing.
(!)
Note:
•
The
function is only
valid
on
remote
control.
•
Press~
CLEAR to
clear
the
mistake
input
Playing
PBC
(Menu)
During
VCD
status, first press
.,
TITLE,
PBC playback starts and
the
menu
of
entire
disc
appears
on
the
monitor,
and
then
you
can select your favorite track
by
using al
Number
Buttons.
When
a track is playing,
you can press 0 MENU to retorn to the
menu
if
you would \ike to end the track and
select others. To cancel PBC playing, press
.,
TITLE button again.
(!)
Note:
•
This
function
is
operated
by
using
the
remote
control.
• PBC playing
confirms
to version 2.0 ofVCD
disc
and
SVVD disc only.
2.Audio
Adjust
After selecting AUDIO, the sub menu will
appear
as
follows:
You can adjust VOLUME, SUBWOOF,
BALANCE, FAD, BASS, TREBLE,
For
example,
press
FAD,
the
setting
menu
will appear as follow:
•
Press
IBI
and
IBI
to adjust the desired FAD
level,
press
EXIT
to
exit
this
menu.
(!) Note:
• Adjusting
the
other
options
perform
the
same
operation.
3.Source
Adjust
In
the main menu, press SOURCE in the
monitor,
the
sub
menu
will
appear
as
follows:
You can adjust all
of
the
items to
ON
or
OFF, press the corresponding button to set.
If
one
of
them
was set
OFF,
that
function
is null.
For
example, to
set
the
TV
OFF,
press SOURCE can
not
activate
TV
function .
But can
not
set the current playback OFF.
(!)
Note:
•
If
the
font
display in
red,
then
this
item
can
not
be set
"ON"
and
this
model does not contain
this
function.
4.System
Adjust
After selecting SYSTEM, the sub
menu
will
appear as follows:
In
this menu you can adjust CLOCK SYS,
KEY BEEP and so on.
(!)
Note:
•
If
the
item
display in sky-blue,
then
it
can
not
be
setup.

Section
E)
(Main
Menu
M
Clock
System
Press CLOCK SYSTEM in the monitor
to
set
12
HOUR or
24
HOUR in this menu.
M
Key
Beep
In
this moou you can adjust KEY
BEEP,
press it in the monitor and select ON or
OFF,
the default setting is
ON,
it means when yoo
press
the keys, they sounded.
M
Next
Setup
Press • to display the menu follows, press
+
to
display the previous one.
M
Reverse
Pola
Setting REVERSE POLA in this menu.
The signal is
+ 12V when you back a car,
ple
..
e press
BATTERY
in the monitor;
if
the signal is
OV,
please press GROUND.
11
Lamp
SEL
In
this menu you can adjust LAMP SEL,
press it in the monitor and select ON or
OFF,
the default setting is
ON.
MAMSFuliup
In
this menu to set the modes
of
AMS.
When
the setup is ON, the presettable stations are
full,
no
new's
is allowed. When you select
OFF,
it
will
searching continually.
DVDIVCDIMP4
During VCD status, press
OSD
button the
display shows:
During
MP4
status, press OSD button the
display shows:
r
--
s_
_
SiD""
___
---,
elapled
remdD
DO,lay
off
------'
(!J Note:
• This function
is
operated
by
using the remote
control.
Setting
the
Playback Time
During DVD mode, press
f)
GOTO button
to
set the playing time, when the TFT dis-
play:
1it/e/Chapter/Audio/Subtit/e/AlIgl.
/IT
time/CH
time/RepeatlTim. Disp.
Press
'11
[
..
][
"J to select the options, press
ENTER to set the status. Then press NU-
MBER BUTTONS or
'11
[
~
][
..
J
to
set
the current status.
During VCD mode, press
f)
GOTO button
to
set the playing time, when the TFT dis-
play:
track/disc timeltrtu:k timelrepeat
/tim.
disp. Press
'11
[
..
][
"J
to
select the
options, press
ENTER to set the status.
Then press
~
NUMBER BUTTONS
or
'11
[~J
[
..
J
to
set the current status.
During MP4 playback, first
pressf)
GOTO,
and monitor shows:
-,
press your desired
track
by
using nomber buttons and press EN-
TER
to
set the status. Second press GOTO
button, and the monitor shows:
-:-:-,
input
yoor desired time, then press ENTER.
(!J Note:
• This fimction is operated by using the remote
control.
• Press
e
CLEAR
to clear the mistake
input.
)
Changing audio language
(Multi-audio)
Section
mil
DVDs can provide audio playback with
different iangusge. With DVDs
featurinJ!
multi-audio recordings, you can press 0
AUDIO
to
switch between language and
audio systems during playback.
Selection options switch
..
follows:
AUDID 1 - AUDIO 2 - AUDIO 3
......
(!J Note:
• This function is operated by using the remote
control.
...
This function only operates with DVDs fea-
turing multi-audio recordings.
...
The
number
in
the
"dD)"
mark
on
a
DVD's
package indicates the
number
of
recorded
laoguageslaudio systems.
Chan!j1ing
the
subtitle
language
(Multi-subtitle)
With DVDs featuring multi-subtitle recor-
dings.
You
can press 0 SUB-T to switch
between sobtitle languages during playback.
Selection options switch
as
follows:
Subtltl.
1 -
Subtltl.
2 - ...... - SUbtitles
OFF
(!J Note:
• This function is operated
by
using
the remote
control.
...
This function
only
operates with
DVDs
fea-
turing multi-subtitle recordings.
...
The
number
in
the
"~"
mark
on
a
DVD's
package indicates the
number
of
recorded
subtitle languages.
/