
INSTALLATION INSTRUCTIONS
LCS
1625 Surveyor Avenue • Simi Valley, CA 93063 • (805) 527-0987 • (800) 766-Vista (8478) • FAX: (888) 670-Vista (8478) • [email protected] • www.Vistapro.com
Lighting Control System
THESE INSTRUCTIONS SUPERCEDE SET-UP INSTRUCTIONS IN THE APP
AQUICK START
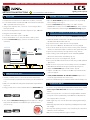
1. Install and wire host transformer to 120V service (no fixtures connected).
2. Locate and mount LCS controller within 100’ of host transformer and within
100’ of your WiFi network access point.
3. Using 12-15V output from host, connect min. 12-2 low voltage cable to
LCS input terminals.
4. Connect low voltage fixtures to three LCS output zones up to 150W total.
5. Energize host transformer output.
6. Locate LCS control switch - push to “ALL ON”
7. Ensure all field fixtures are on, then push switch to “APP” position.
8. Download VISTA CLOUD app to your device and follow on screen
instructions.
B DOWNLOAD SETUP APPS
1. Confirm your mobile device is connected to the home network in the
location that the LCS is installed at and ensure that your device’s Bluetooth
is on.
2. Make note of the WiFi name and password as this will be required later in
the process.
3. Using your smart device search and download the free VISTA CLOUD App.
4. Also, download ESP BLE Provisioning App from the App Store or Google
Play. (as this will allow Bluetooth enabled set-up for quicker and easer
account set-up.)
CCREATING A VISTA ACCOUNT
1. Open the VISTA CLOUD App and create a new account. If you already
have an existing account, sign in.
2. Next the VISTA CLOUD App will prompt you to “add a controller."
DO NOT add a controller, close the VISTA CLOUD App, as the controller
must be added to the network using the ESP-BLE-Provisioning App first.
DADDING LCS CONTROLLER TO YOUR NETWORK & ACCOUNT
1. Make sure your Bluetooth is on and open the ESP-BLE-Provisioning App.
2. Hold down the WiFi connect button on the LCS for 5 seconds then release it.
(The WiFi status LED should be solid red)
3. Tap "Provision Device" (allow camera access if prompted).
4. Tap "I don't have a QR Code" (allow Bluetooth access if prompted).
5. Tap on the text field at the top next to where it states "prefix" and delete
all text in the next field and replace it with these three capital letters: LCS
6. Tap the reload (circle/arrow) to the right of where it says "Devices."
7. After searching, a text should appear in the list named LCS_XXXXXX
(where X are random letters and numbers), tap on it.
8. On the next screen, do not modify the text, tap next.
9. Select your home WiFi network from the list and enter your WiFi password.
Tap Provision.
10. Wait for unit to connect, if the unit successfully connects to the WiFi the
WiFi LED will be illuminated solid green. (If failed, repeat steps 1-9).
11. Open the VISTA CLOUD App and add controller. Tap next.
12. Tap the "scan QR code" icon and scan the QR code, and wait until the
next screen appears.
13. STOP, DO NOT PROGRESS TO THE NEXT SCREEN!! Tap the zones
icon at the upper left hand corner of the screen.
14. You are now finished and your controller should be online and ready to use.
ENETWORKING NOTES
• To ensure a strong network signal, install a WiFi extender/booster if required.
• Connect only to 2.4GHz WiFi network. Controller will not work with 5Ghz
networks
• In the event of power loss, re-connection to designated WiFi is automatic
once power is restored, indicated by a red “WiFi status” LED, which will
turn solid green when connected.
• If WiFi signal only is lost, controller will continue with programed settings
indefinitely.
• Networking steps will need to be repeated if your WiFi password or SSID
has changed.
• For set-up and operating convenience, any controller may be scanned and
added to a new account/device.
• Only one account may add/control a given controller.
for Serial Numbers 5463 and Above
Transformer LCS
WiFi
Router
100’ max. 100’ max.
12-15V Supply to LCS
ZONE 1 ZONE 3ZONE 2

1625 Surveyor Avenue • Simi Valley, CA 93063 • (805) 527-0987 • (800) 766-Vista (8478) • FAX: (888) 670-Vista (8478) • [email protected] • www.Vistapro.com LT21058 3/22
THESE INSTRUCTIONS SUPERCEDE SET-UP INSTRUCTIONS IN THE APP
ENETWORKING NOTES continued
• To remove any controller from your account, simply tap the settings icon
below any zone and select remove controller.
• After successful activation, the three zones of your new LCS should appear
by pulling down (refreshing) or scrolling your App screen. An unlimited
number of controllers may be added to your account screen.
FLCS IOS/ANDROID VISTA CLOUD APP FUNCTIONS
1. Download the VISTA CLOUD App and create your personal account.
2. When a controller is added to your account, connected to your network,
and loaded into your device, a group of three zones will appear
representing a single TCS controller.
3. If properly connected to Wi-Fi, signal strength bars will appear to the right
of each controller name:
Green = good signal, Yellow = fair signal, Red = poor signal
4. In most cases, action will be need to be
taken to improve signal when Red bars
are present. Any Red cloud indicates no
Wi-Fi connection.
5. Below the photo of any Zone, an on/off
switch and settings icon is available which
includes Zone location photo, Controller
and Zone naming options, brightness
level controls and controller geo-location.
6. Tap ‘All On’ at the bottom of the App
screen. All Zones and connected fixtures
will ramp to previously saved brightness
levels (default is MAX BRIGHTNESS).
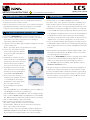
7. Choose a Zone photo and tap it. A
scheduling screen will appear. Each Zone
on, off and brightness levels may be
programmed on a ‘time-of-day’ dial for
each or all nights of the week.
• From scheduling screen, tap Add a
Schedule.
• Tap and Drag ON lamp icon to desired ON time. Time set is displayed on
left. ON brightness level may be set within this box.
• Tap and drag OFF icon to desired OFF time. Time set is displayed on right.
• Tap “+” between ON/OFF displays. Drag DIM lamp icon to desired DIM
time. DIM level may be set within this box. Tap Save and run your schedule.
• Tap “x” in ON or DIM box to delete that schedule.
8. Back on main screen, tap Settings icon under any Zone.
• Zone Name - Change the name of each Zone as desired.
• Controller Name - Change the name of each of LCS on the property.
• Photo - Tap to add your own Zone photo.
• Brightness Levels - step control is provided, allowing fine adjustment of
LOW, MED, HI brightness selections. Once set to the desired brightness,
all levels may be saved, allowing ultimate control of Zone scheduling.
GTROUBLESHOOTING
1. Follow all steps in sections A through D before proceeding.
2. For device control, ensure 3-position rocker switch is in the APP position.
3. Once the APP is loaded, if scanned controller(s) (Zone Groups) do not
appear, refresh your device screen by slowly sweeping down from the top.
4. If WiFi LED is not solid green, hold WiFi connect switch for 5 seconds until
it turns solid RED, then repeat networking steps. Network connection status
is also displayed on the App main Zone screen. If a red cloud with diagonal
line appears below any Zone, refresh screen and /or repeat networking
steps. Still not connected? Perform “forget network” or switch in and out of
“airplane mode” on your device to bring “LCS” to the access point list.
5. Test your local WiFi networking signal strength by connecting your device
to WiFi (disable cellular network), then successfully loading any web page
while standing near the antenna of your LCS. Install WiFi booster/extender
if required.
6. Try the App and/or networking with a different smartphone/tablet. If you
are having issues with Android, try an iOS device, and vice versa. Isolate
issues by changing the connecting device.
7. Make sure your VISTA CLOUD App and device operating system software
is the latest version from the App Store/Google Play Store. When in
doubt, you can always delete and reinstall the App on your device.
Go to SETTINGS, App Stores and always enable “Updates” under the
AUTOMATIC DOWNLOADS section.
8. Using the circuit protector switch inside the LCS wiring compartment, try
switching it off, waiting a few moments, then switching it back on again.
9. Power your smartphone/tablet completely off and back on again (reboot).
10. Try Remove Controller after selecting the settings icon ‘gear’ under any
Zone photo within a controller group screen. Re-scan QR code to add,
then refresh device screen for each controller.
INSTALLATION INSTRUCTIONS
LCS
Lighting Control System
for Serial Numbers 5463 and Above
Vista Cloud Scheduling Screen
-
 1
1
-
 2
2


Ask a question and I''ll find the answer in the document
Finding information in a document is now easier with AI
Related papers
-
Vista 5463 User manual
-
Vista LCS Installation guide
-
TCS TCS Installation guide
-
Vista Glass Border 1502 Series User manual
-
Vista 1051 User manual
-
Vista Glass Border User manual
-
-
Vista 1142 User manual
-
Vista Architectural Series Installation Instructions Manual
-
Other documents
-
Tuya CR02 User manual
-
Magic Home CCWiFi Operating instructions
-
Cisco GS7000 Nodes Installation and Configuration Guide
-
Lionel SYSTEM UTILITY Owner's manual
-
-
Sony SLT-A57 Quick start guide
-
AVer CP2 Series User manual
-
-
Microsoft Lumia 550 User manual
-