20mm / OO Gauge Engine Shed
B20-CS-507
Please read these instructions fully before starting construction.
PVA or equivalent glue will be required to stick sections together.
Sand paper can be used to gently clean any joints.
A sharp modelling knife will be required to remove sections from the sprue. Please use knives with due
care and remember to cut away from yourself at all times.
During the construction of this model, you may find it convenient to use pegs / elastic bands to hold
pieces in place while you allow glue to dry.
Note: These instructions show the model being built on its base. Some modellers may find it easier to
build the structure first, then glue it to the base.
Note: There are two different large arched pieces. The ones that go at the ends of the model have holes
in the top, whereas the ones for the centre of the model have lugs at the top.
We sprayed our model before assembly, but you may find it easier to spray / paint your model once the
basic assembly is done to prevent any build up of paint on the lugs / holes.
Due to the filigree nature of the pieces making up this model they are fragile, please take care when
exerting pressure on them so as not to damage them.
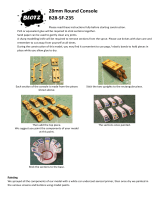
Take two large arched sections (one with holes
and one with lugs). Also take 1 high, 2 medium
and 2 low side wall sections.
Glue the end piece to the floor sections as shown
above.
Add the high wall piece, so that the upper pair of
lugs fit into the holes in the end section.
Repeat this for the medium and low wall sections,
gently moving them so the lug on their central pillar
slots into the base.

Take one of the central arched sections (with lugs
on the top) and position the lugs on its columns
into the holes in the base.
Gently ease the lugs from the side pieces into the slots
on the arched section.
Repeat the above steps until you have added all
the side sections.
Add the end piece in the same way you have
added the two internal large arched pieces.
Attach the two upper roof pieces.
Then add the lower roof strips.
Paint in the lines on the roof.
Take the two end caps.
Glue these into place, ensuring the notches at the top
line up.

Add the ridge piece.
The finished engine shed.
Painting
We sprayed the majority of our model with white car undercoat / primer before assembly – but you
may wish to do this after you have constructed the basic structure to prevent paint build up on the lugs
/ holes.
The floor pieces were sprayed black, then dry brushed with three shades of a grey colour over the black
primer to give the concrete effect – dark grey, light grey then very pale grey. All were household DIY
emulsion.
The roof was painted blue (DIY Emulsion) before the dark and light stripes were painted in with pale
blue (DIY emulsion) and dark blue (model paint). Any tidy up was then done with the original blue
colour.
/