Page is loading ...

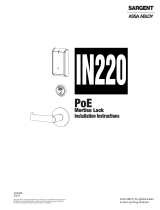
Handle Parts Illustration
202220901-1015
Lock and Handle
INSTALLATION INSTRUCTIONS
• Phillips screwdriver #2
• Allen wrench (provided)
Tools Required
A
B
C
E
D
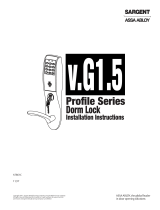
4
3
Install lock body with
attached screws.
Right Hinge Installation: go to Step 3.
Left Hinge Installation: change the latch
orientation.
Left Hinge Installation
1
Right Hinge Installation
A. Lift up on locking tab.
B. Push latch bolt through the mortise plate.
C. Rotate latch bolt 180 degrees.
D. Release latch bolt back through the mortise plate.
E. Release locking tab and ensure it returns
to its original position.
2
Insert key cylinder.
Turn-knob faces
interior side
NOTE: Strike plate and key cylinder screw match your door
color and are found in the closer kit. Handle style may vary.
Drawings in this instruction show a right hinge installation.
Remove lock body from edge of door
and remove packaging.
Handle
Bushing
Handle
Washer
Retaining Clip
Spindle
Lock Body
Key Cylinder
Bushing
Interior Face Plate
Exterior Face Plate
Allen Wrench
Face Plate
Screw (2)
Strike Plate
Key Cylinder Screw
Top View
of Latch Position
Right Hinge
Configuration
Left Hinge
Configuration

© 2015 Pella Corporation All Rights Reserved.
T
i
g
h
t
e
n
5
Assemble: Exterior handle,
black bushing, exterior
face plate, and flat washer.
S
l
i
d
e
6
Secure with
retaining clip.
7
Insert
spindle.
8
Tighten set screw with
provided Allen wrench.
Loosely assemble: interior handle, black bushing,
interior face plate, and exterior assembly. Install key
cylinder screw, found in Bag C in the closer kit.
9
10
Locate strike plate with
aached screws in the closer
kit. Aach to the latch rail.
Adjust if necessary.
11
Face Plate Screw #10-32 x 1-3/4” Pan Head
color matched to hardware
Qty. 2
Return to your “Owners Manual
and Installation Guide” to
complete the installation.
Choose your exterior
handle. Scroll handles
can point up or down.
Actual Size
Hold handles together and
tighten interior set screw.
Secure with face plate screws.
PRESS
PRESS
T
I
G
H
T
E
N
Note: Black bushing may be
pre-assembled to handle.
Note: Black bushing
may be pre-assembled
to handle.
Key Cylinder Screw
Qty. 1
Actual Size
#10-32 x 1-1/2” Flat Head
color matched to hardware
/