Page is loading ...

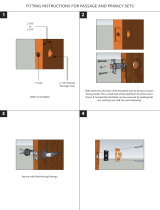
1A
1B
2C
3B
3E
3F
2B
1C
1D
INSTALLATION INSTRUCTIONS
Mortised Hardware
IMPORTANT! Read thoroughly before beginning. Failure to install as
recommended will void any warranty, express or implied.
NOTE: The handle style shown in the illustrations may be different than the style of handle
being installed. The steps for installing the handles will be the same for all handle styles.
1 REPOSITION LATCH BOLT, IF NEEDED
FOR YOUR HINGE POSITION
A. Lift up on locking tab.
B. Push the latch bolt through the mortise plate.
C. Rotate the latch bolt 180 degrees.
D Release the latch bolt back through the mortise plate.
2 INSTALL MORTISE LATCH ASSEMBLY AND KEYLOCK
A. Insert the mortise latch assembly into the edge of the door panel,
ensuring the latch bolt is at the top position of the assembly and the
deadbolt in the bottom position.
NOTE: The UP arrow on the mortise latch assembly should be pointing up.
B. From the interior of the door, insert the key cylinder into the door panel.
Ensure the thumb knob is to the interior side of the door panel.
C. From the edge of the door panel, insert the #10-32 x 1-1/2” key cylinder
screw (provided) through the mortise plate and latch assembly into the
screw hole at the bottom of the key cylinder.
D. Slide the mortise latch assembly down, so it rests on the bottom of the
cutout in the edge of the door panel.
3 ATTACH THE EXTERIOR HANDLE TO THE EXTERIOR
HANDLE ESCUTCHEON PLATE
A. Determine which of the two handles will be the exterior handle.
B. Slide a bushing onto the shaft of the exterior handle.
C. Insert the shaft of the exterior handle through the spindle
hole in the exterior escutcheon plate.
D. Slide the flat washer onto the handle shaft.
E. Slide the “D” shaft clip onto the handle shaft, securing the
handle to the escutcheon plate.
F. Insert the latch spindle into the exterior handle and tighten
the set screw using the Allen wrench provided.
202220799 6.12

4C
4B
4C
5B
5C
4A
4 INSTALL THE HANDLES ON THE DOOR PANEL
A. Position the exterior handle and escutcheon on the exterior of the door.
B. Position the interior handle, bushing and escutcheon plate on the
interior of the door.
C. Align the interior and exterior escutcheon plates, and attach the
plates to the door using the two escutcheon screws provided.
NOTE: DO NOT overtighten the screws.
Escutcheon Screw:
#10-32 x 1-1/4” qty 2
D. Tighten the interior handle set screw using the Allen wrench provided.
5 ATTACH THE MORTISE PLATE TO THE DOOR
A. Centerpunch the two attachment screw holes along the score line,
and pre-drill using a 1/8” drill bit.
B. Install a #8 x 1/2” screw (provided) in each hole.
C. Snap the cover plate into the mortise slot that is located
on the hinge side of the door panel.
6 ATTACH THE TRIM PLATE TO THE LATCH SIDE
OF MOUNTING FRAME
A. Close the door so the latchbolt and deadbolt make
contact with the mounting frame. Tape a piece of
paper to the mounting frame or mark lightly with a
pencil, the top and bottom locations of the latch bolt
and deadbolt where they come in contact with the
mounting frame.
B. IMPORTANT: Make certain you have clearance behind
the latch side mounting frame for proper operation of
the deadbolt. Use a chisel to cut away enough material
behind both notches to create the clearance needed.
Verify operation of both the latch bolt and deadbolt.
C. Open the door and position the strike plate on the
mounting frame. Slide the strike plate to the front edge
of the mounting frame as shown. Center the latchbolt
and deadbolt pencil marks with the cutouts in the strike
plate. Center punch and drill (2) 3/32" pilot holes as
illustrated. Install two #8 Flat head screws, test lock
operation and adjust strike as needed. Check that the
latchbolt and deadbolt operate properly.
Paper
Use drill
and chisle
to remove
wood from
strike
openings
1/2" deep
#8 FLAT HEAD
STRIKE SCREWS
#8 FLAT HEAD
STRIKE SCREWS
FRONT OF
MOUNTING
FRAME
Pencil Marks
Slide strike against front edge of
mounting frame (towards exterior)
Place screws at rear of slot
(towards interior)
Short Strike Screw:
#8 x 3/8"qty 2
/