Page is loading ...

www.zippity-outdoor.com
1
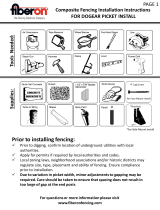
ASSEMBLY
INSTRUCTIONS
NEWPORT VINYL PICKET
FENCE WITH POST AND NO-DIG
STEEL PIPE ANCHOR KIT
60 MIN
Approximate assembly
time of one fence panel
Ground
70 3/8 in
72 in
2 in
2 15/16 in
68 1/2 in
6 in
18 1/2 in
24 in
4 in
36 in
33 1/2 in
22 7/8 in
This fence can easily be trimmed
Want to see a video on how to
the code below!
Finishing Post Kit (ZP19003) sold
separately.
@
6935 Reames Rd. Ste. K. Charlotte, NC 28216
support@zippity-outdoor.com
704-892-5222 / 877-234-6196
zippity-outdoor.com

www.zippity-outdoor.com
2
GENERAL INFORMATION
IMPORTANT
• Please read through before starting assembly.
• Important: Check the inside of the larger pieces in your box for other materials packed inside.
• When assembling components, place on a non-abrasive surface (i.e. shipping box) to avoid scratching.
• We recommend an area approximately 5’x 8’ for unobstructed assembling.
• You should not need to use excessive force when assembling components.
VISIT OUR WEBSITE FIRST, SO WE CAN HELP YOU RIGHT AWAY!
EMAIL:
WEBSITE:
support@zippity-outdoor.com
nychgroup.com/parts
PHONE: 704-892-5222 / 877-234-6196
To help you quickly and accurately, please have reference item number
ZP19002
found on the next page. It is helpful if you can provide the batch lot which is a stamped number on the end of the box.
If you are having problems with the assembly or installation of this product, we are happy to assist you with the process, so
please give us a call at 704-892-5222 / 877-234-6196.
return the product, you will need to initiate the return from the company you originally purchased from.
Although great care has been taken to ensure proper packaging and handling of this product, occasionally problems occur.
If you discover any missing, damaged or defective parts, please visit our website to order replacement parts. If you experi-
ence any further trouble with your product, please contact our customer service department.
Customer service agents are available to take calls weekdays from 8am-5pm EST. If you
call outside of business hours, please leave a voicemail.

www.zippity-outdoor.com
3
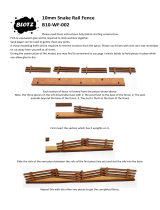
STEP 1: LAY OUT MATERIALS
A
D
G H
E F
B C
Post Cap (1)
Rail Bracket (4)
Top Rail (1)
Pipe Anchor (1)
¾” Self-Drilling Stainless
Steel Screw (24)
Bottom Rail (1)
Picket (11)
Post (1)
⅞” x 3” x 29¾”
2” x 3½” x 38⅝”
1½” x 3½” x 68¼”
44¼”
1½” x 3½” x 68¼”
Note: Top rail has
picket holes on
both sides.

www.zippity-outdoor.com
4
STEP 2: INSTALL PIPE ANCHORS
STEP 2.1
STEP 2.2
After establishing the placement
Tool options for driving pipe anchor
Note: Check level in both
directions.
5lb Sledgehammer
Post Pounder
Hammer
10lb Sledgehammer
GOOD
BETTER
BEST
DO NOT USE
G

www.zippity-outdoor.com
5
STEP 3: INSTALL POST OVER PIPE ANCHOR
STEP 3.1 STEP 3.2
STEP 2.3
STEP 3.3
post to easily insert itself into the
Orient post (C) correctly with
over the pipe anchor and into the
Step 3.1 is only to be completed
if ground is hard
1
C
72 in.
70 1/4in.

www.zippity-outdoor.com
6
STEP 4 (OPTIONAL): SECURE POSTS TO PIPE ANCHOR
¼
Step 4 is only to be completed if you are concerned that someone may pull your fence posts out of
the ground.
Note: Remove vinyl burrs
with pliers if necessary.
Adjust until level.
Note: Ensure the screw is
driven into the center of the
pipe.
Top view
STEP 4.1
STEP 4.2
1
1
2
2
3

www.zippity-outdoor.com
7
STEP 5: INSTALL FENCE PANEL
STEP 5.1
STEP 5.2
2 in
H
F
H
D

www.zippity-outdoor.com
8
STEP 5.3 STEP 5.4
STEP 5.5 STEP 5.6
Use a level on the top of the
bottom rail to determine where
to install the opposing rail
Temporarily remove the
Insert the bottom rail into
slide the top rail (E) into
18 1/2 in
E

www.zippity-outdoor.com
9
STEP 6.1
STEP 6.2
STEP 6: INSTALL PICKETS AND POST CAPS
1
Note: The tops of the
posts can be trimmed
down as necessary.
Use PVC glue (NOT
INCLUDED) to perma-
nently install post caps
as necessary.
Tip: Install one complete panel of fence rst. Then proceed to install one
or two pipe anchors at a time until you are accustomed to the process.
This will prevent repeated mistakes.
B
A

www.zippity-outdoor.com
10
STEP 7 (OPTIONAL): INSTALL BOTTOM RAIL BRACKET AT A 90° ANGLE
STEP 7.1
STEP 7.2
STEP 7.3
Note: Alternatively, you
can use self-drilling metal
screws (NOT INCLUDED)
for steel and avoid having
to pre-drill.
Step 7 is only to be completed if you wish to install your next fence panel at a 90° angle.

www.zippity-outdoor.com
11
TIPS!
Note: Use a wood spacing guide (NOT INCLUDED)
and cut to 70¼” to help identify the location of your
next pipe anchor.
1.
2.
3.
4.
5.
Warning: If your yard has a severe slope or elevation change greater
than approximately 5” to 6” over one panel of fence, you will not be able
to install this fence. Your post will not be long enough to accommodate
this slope
Dig bottom rail into the point of higher elevation to
minimize the gap on the lower side.
Ground

www.zippity-outdoor.com
12
AVOID THESE PITFALLS:
1. Have you contacted your local utilities?
You must call before you start installation of your fence to avoid puncturing any unseen underground utili-
ties, especially electrical or gas lines. Simply call “811” in the US or visit www.call811.com. In Canada, visit
www.transcanada.com/contactus.html.
2. Have you checked your local zoning laws?
Local zoning laws and Home Owners Associations may regulate the height, style, and placement of your
fence. Some locations may even require a permit or a list of phone numbers by province.
3. Are you absolutely sure where your property line is?
Many disputes have arisen from questions about the location of a fence. We recommend the outside edge
of your fence be at least 2” inside your property line to avoid any encroachment on your neighbor’s prop-
erty.
4. Have you talked to your neighbors?
Your fence will become part of their yard, and you’ll have an easier time building it if you can have access
to both sides. Besides, you may get lucky if they decide to share the cost with you!
5. Unstable ground or rock?
If you encounter rocky or unstable ground, you can dig a hole and concrete the pipe anchor into place
much the same way you would traditionally install a fence. This can be done either during the installation
of the pipe anchor or even after the fence is complete.
IMPORTANT!
@
6935 Reames Rd. Ste. K. Charlotte, NC 28216
support@zippity-outdoor.com
704-892-5222 / 877-234-6196
zippity-outdoor.com
/