Page is loading ...

LXF-50W Infrared sensor LED floodlights Instruction
Specifications
Summary
LED Floodlight
LEDS 56PCS
1X
2X
2X
Quantity
Packing list in
Φ6 Plastic expansion
4x30 Screw
The product is a High-power cast LED sensor light; it
adopts good sensitivity detector, integrated circuit and
SMT. It gathers automatism, convenience, safety,
saving-energy and practicality functions. The wide
detection field is made up of up and down, left and right
service field. It works by receiving human motion infrared
rays. When one enters the detection field, it can start the
load at once and identify automatically day and night; Its
installation is very convenient and Its using is very wide.
Power source: 220-240VAC
Power frequency: 50Hz
Rated load:50w Max.
Time setting: 8s-9min (adjustable)
Light-control: <10LUX-300LUX(Adjustment)
Detection range: 2-10m Max(24°C)
Detection angle: 120°
Working temperature: -10°C~+40°C
Working humidity: <93%RH
Installation height: 1.8m~2.5m
Standby power0.5W
Luminous flux: 4600lm
IP: 65
Function
Can identify day and night: the light control can be adjusted freely when it works. It can work in the daytime and at
night when it is adjusted on the “sun” position (max); but it can only work in the light control less than 10lux when it is
adjusted on the “moon” position (min). As for the adjustment pattern, please refer to the testing pattern.
Time delay can be added continually: when it received the second induction signal after the first it will compute time
once more on the rest of the first time delay basic.(Set time)
It can be defined in the range of 10~>300 LUX. To turn the knob fully clockwise is about 10 lux,fully anti-clockwise is

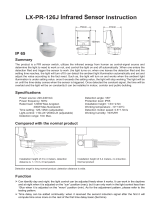
120°
10m max (24°C)
Sensing information
Side detection angleDetection range
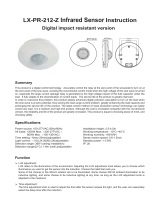
Top LED
56PCS
Fixed frame
If you need to
put your logo
in here
PIR Sensor
The name of each part
(Lamp shell for aluminum material)
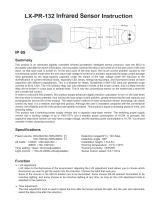
350°
Fluctuation angle
adjustment
+175°
-175°
180°
+60°
-60°
Control knob
According to the demand of the lamp
adjust good use of sensors and
illuminate angle of view, make the best
use of products in view.
Time-delay
setting
Light-control
setting
Detection range
setting
about 300 lux.When adjusting the detection zone and performing the walk test in daylight,you should turn the knob
fully clockwise.
It can be defined from 8 seconds(turn fully anti-clockwise) to 9 minutes(turn fullyclockwise). Any movement detected
before this time elapses will re-start the timer. It is recommended to select the shortest time for adjusting the detection
range and for performing the walk test.

(1)Time-delay setting
It can be defined from 8 seconds(turn fully anti-clockwise) to 9 minutes(turn
fullyclockwise). Any movement detected before this time elapses will re-start
the timer. It is recommended to select the shortest time for adjusting the
detection range and for performing the walk test.
(2)Detection range setting
Setting manner :potentiometer
Turn clockwise to increase it and turn anti-clockwise to decrease it. It is
2-4m when turn to mini, and it is 10m when turn to max.
(3)Light-control setting
It can be defined in the range of 10~>300 LUX. To turn the knob fully
clockwise is about 10 lux,fully anti-clockwise is about 300 lux.When
adjusting the detection zone and performing the walk test in daylight,you
should turn the knob fully clockwise.
NOTE:When the light be auto off,it will take 3 seconds before the sensor is ready to detect another
movement,that is,only signal detected later can the light be auto-on.
1. Time adjustment knob (TIME): The user can select the delay time according to the need, usually
in the installation of measurement, the time adjustment knob (TIME) to a minimum, so that the
installation inspection quick and easy. After installation can be 8 seconds ~ 9 minutes ± 2 minutes
arbitrarily selected lights out time, set the time and confirm the test time, the sensor head should be
as far down as possible, so as not to move the front of the sensor signal, resulting in the set time is
not quasi;
2. Illumination adjustment knob (LUX): The user can use this knob to select under what kind of
ambient light (daytime to nighttime), the sensor enters the value of automatic induction lighting.
Usually 3LUX is shown as night, 100LUX ~ 2000LUX should be daytime value. Therefore, the first
time setting, the user can adjust the LUX knob according to their needs;
3. Sensitivity adjustment knob SENS (detection distance adjustment knob): The maximum
detection distance of the sensor is the maximum distance of 10 meters when the ambient
temperature is 24 . If the ambient temperature is too high, the detection distance will be reduced.
High sensitivity in winter and low sensitivity in summer, the user can adjust the SENS knob
according to the size of the area to make the sensor automatically sense the distance required by
the user.
Test

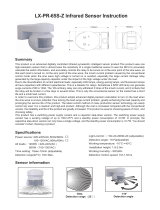
Installation
Pencil Electric drill Hammer Screwdriver
Note:Please bring the following tools.
Warning!
1. Please keep it away from the children.
2.This product can installed for outdoor, but we suggest
that against for the rain/storm & High lights.
Mounting holes
Switch off the power;
Screw off the nail on the bottom. Open the wire hole. The power wire and the loadwire are bored in the
bottom;
Fix the bottom on the selected position with the inflated screw;
Connect the power and the load with the connection-wire column according to thesketch diagram;
Fix the sensor on the bottom, please screw the nail and switch on the power.
Warning!
Please confirm when shut off the power cord access.
Note
Electrician or experienced human can install it;
The unrest objects can’t be regarded the installation basis-face;
In front of the detection window there shouldn’t be hinder or unrest objects effecting detection;
Avoid installing it near air temperature alteration zones for example: air condition, central heating, etc;
For your safety, please don’t open the case if you find hitch after installation;
In order to avoid the unexpected damage of product, please add a safe device of 6A when installing Infrared
sensor,for example,fuse,safe tube etc.
Some problem and solved way
The load don’t work:
a. Check the power and the load;
b. If the load is good;
c. If the indicator lamp speed quicken after sensing;
d. Please check if the working light correspond to the light-control.
120mm

The sensitivity is poor:
aPlease check if in front of the detection window there are hinderthat effect to receive the signals;
b. Please check the ambient temperature;
c. Please check if the signals source is in the detection fields;
d. Please check the installation height;
e. If the moving orientation is right.
The sensor can’t shut automatically the load:
a. If there are continual signals in the detection fields;
b. If the time setting is set to the longest;
c. If the power correspond to the instruction;
d. If the air temperature change near the sensor, for example air condition or central heating etc.
Warning!
For type Y attachments: If the external flexible cable or cord of this luminaire is damaged,it shall
be exclusively,replaced by the manufacturer or his service agent or a similar qualified person in
order to avoid a hazard.
1.The LEDS in serial can function when all the seals installed in place.
2.Please don’t remove or connect with other lamp when powered on.
3.When the LEDS in serial are damaged ,you need experienced technician to repair using the same
rating LEDS.
● Please confirm with prefessional installation.
● Please cut off power supply before installation and removal operations.
● Make sure that you have cut off the power for safety purposes.
● Improper operation caused losses, the manufacturer does not undertake any responsibility.
We are committed to promoting the product quality and reliability, however, all the electronic
components have certain probabilities to become ineffective, which will cause some
troubles.When designing, we have paid attention to redundant designs and adopted safety
quota to avoid any troubles.
This instruction, without our permission, should not be copied for any other purposes.
/