Post Cover Installation
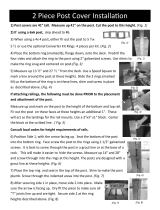
1) Post covers are 41” tall. Measure up 41” on the post
and cut the post to this height. (Fig. 1)
2) If using a 6x6 post, skip ahead to #8.
3) When using a 4x 4 post, either fir out the post to 5 1/2 x
5 1/2 or use the optional Converter Kit Rings. 4 pieces per kit. (Fig. 2)
4) Place the bottom ring (marked B), flange down, onto the deck. Pre-
drill the four sides and attach the ring to the post using 2” galvanized
screws. Use shims to make the ring snug and centered on post.(Fig. 3)
5) Measure up 13” and 26 “ from the deck. Use a Speed Square to mark
a line around the post at these heights. Slide the 2 rings (marked M) to
these heights, shim and screw in place as described above. (Fig. 4)
If attaching railings, the following must be done PRIOR to the placement
and attachment of the post.
Measure up and mark on the post to the height of the bottom and top rail.
Fir out the post on these faces at these heights an additional 1". These
will act as the landings for the rail mounts. Use a 3"x3" x1" block. Center
the block at the scribed line . ( Fig. 5)
Consult local codes for height requirements of rails.
6) Slide the post over the rings, and seat the bottom of the post into the bot-
tom ring. Face screw the post to the rings using 2 1/2" galvanized screws. It
is best to screw through the post in a grout line or at the base of a rock. This
will make it easier to hide the screws. Measure up 13" and 26" and screw
through the rings at this height. (Fig. 6)
7) Place the top ring and seat in the top of the post. Shim to make the post
plumb. Screw through the indented areas into the post. (Fig. 7)
8) If using a 6x 6 post, simply cut the post to 41", slide the post cover over the
post, and secure using 2 1/2" galvanized screws as described in #6 above. Be
sure and shim the top of the post to make it plumb before screwing the post
cover to the post.
(Fig. 2)
(Fig. 1)
(Fig. 3)
(Fig. 4)
(Fig. 5)
(Fig. 6)
(Fig. 7)

Post Cover install cont.
9) Attaching the Cap. Apply adhesive around the top surface of the
post. (Fig. 8) In addition, apply adhesive to the inside top of the cap
along the inside ledge. ( Fig. 9)
10) Install Rail Mounts. After locating the desired height of the railing
and securely attaching the mounts (see #5), measure up on the outside
of the post cover, and select the spot to place the landing. In this exam-
ple Trex ™ universal mounts are used. When the landing location is de-
cided, dry fit the landing on the rock surface. Using a carpenter knife or
chisel, cut out the high points of the rock surface to achieve a smooth flat
surface. (Fig 10-13)
11) Using 3" deck screws minimum, attach the mount to the post, screwing through the pillar
into the landing attached in section 5. (Fig. 14-15)
12) Finish the job using NextStone Textured Grout and Paint kit to
cover any space around the mountings and to hide screw heads .
(Grout and Touch Up Kit sold separately). (Fig. 16)
(Fig. 8)
(Fig. 9)
(Fig. 10) (Fig. 11)
(Fig. 12)
(Fig. 13)
(Fig. 14)
(Fig. 15)
Finished Post and Cap
Use 3” screw
(Fig. 16)
-
 1
1
-
 2
2
Ask a question and I''ll find the answer in the document
Finding information in a document is now easier with AI
Related papers
-
 NextStone SLS-PC-2PC-RMG Installation guide
-
NextStone SLS-PC-2PC-RMG Operating instructions
-
NextStone SS-L-IC-GPH-2 Installation guide
-
NextStone RVRP-SD-1 User manual
-
NextStone BK-OC-AR-4 Installation guide
-
NextStone 30 4PC-SLS-CW-RUR Operating instructions
-
 NextStone 30 4PC-SLS-CW-PW Operating instructions
-
 NextStone RR-OC-DB-4 Installation guide
-
 NextStone SS-L-OC-C-2 User manual
Other documents
-
Deckorators 237910 Installation guide
-
Mendocino Forest Products 05350 Installation guide
-
RDI 73021948 Installation guide
-
Avalon 73020654 Installation guide
-
Deckorators 357931 Installation guide
-
SEM ME-P3 Mag EraSURE Operating instructions
-
 Crown Heritage BC419601016 Installation guide
-
Deckorators 346704 Installation guide
-
EZ-ACCESS TITAN S16 Installation guide
-
RDI 73018098 Installation guide


