NextStone BK-OC-AR-4 Installation guide

Type
Installation guide
NEXTSTONE™
INSTALLATION
MANUAL
2
Forward and Important Notes ………….………………………………………………… 3
Product Line …………………………………………………………….…………………….. 4 - 9
Basic Tools ……………………………………………………………..………………………….. 10
Preparing the Wall ……………………………………………………..……………………... 11
Starter Strip Installation …………………………………………………….………………. 12
Corner Installation ...………………………………………………….………………. 13 - 17
Panel Installation ………………………………………………………………………... 18 - 19
Trim Installation ………………………………………………………………………….. 20 - 23
Column Wrap Installation………………………………………………………………. 24 - 26
Slatestone Post Cover Installation ……………………………………………... 27 - 29
Mitered Corner Installation …………………………………………………………. 30 - 31
Touch Up …………………………………………………………………………………………….. 32
Clean Up …………………………………………………………………………………………….. 33
Frequently Asked Questions ……………………………………………………….. 34 - 35
NextStone™ Take Off Guide …………….……………………..………………….. 36 - 39
Specification Data ……………………………..………….……………………………. 40 - 43
Material Safety Data Sheet …………………….……………………………………. 44 - 45
Warranty Information …………………………………………………………………………. 46
CONTENTS
3
Compared to natural or cast stone, NextStone™ polyurethane products are designed
for an easier, quicker installation requiring fewer steps. Masonry skills are not
required. This Manual provides basic guidelines for NextStone™ installation.
Additionally, it is recommended that Installers review applicable building codes for
specific products and/or geographic areas. This publication is not intended to
provide specific advice, legal or otherwise, on particular products or processes.
Readers should consult with their own legal and technical advisors, suppliers, and
other appropriate sources including but not limited to product or package labels,
technical bulletins and sales literature that contain information about known health
and safety risks. NextStone™ does not assume any responsibility for the users
non-compliance of applicable laws and regulations.
This Installation Manual should be used as a guide for installation of NextStone™
Products. It is the responsibility of the Contractor and/or the Installer to ensure
panels are installed in accordance with these instructions and any applicable building
codes. The manufacturer assumes no liability for either improper installation or
personal injury resulting from improper use or installation.
ACCLIMATION
All products must be allowed to acclimate for a minimum of 48 hours. While
Polyurethane expands and contracts in it’s natural state, heat and moisture may
cause minimal expansion and contraction. Best results are obtained by installing
cool, dry product. NextStone™ does not warrant against gapping caused by
expansion and contraction.
STORAGE AND TRANSPORTATION
All panels must be stored flat, in the box, at 65° Fahrenheit when possible until
ready for installation. While polyurethane has minimal expansion and contraction,
the effects of expansion and contraction can be minimized by avoiding installation
during periods of extreme heat or cold. Do not store in direct sunlight before
installing.
INSTALLATION BASICS
Never leave cut edges of NextStone™ products exposed. Exposed Polyurethane will
discolor with exposure to sunlight. Use NextStone™ touch-up paint or other color
match with a good quality latex paint. Drive the first screw on the right hand side of
the panel at a 45 degree angle to the left in order to tighten the panel into adjacent
panel, corner or wall.
IMPORTANT NOTES
FORWARD
4
PRODUCT LINE
Castle Rock Panel - Castle Rock Panels provide a seamless design with vertical
and horizontal stones. Panel dimensions are 15¼" x 43¼" x 1¼" and are packaged 4
panels per box covering approximately 16.12 square feet per box.
Castle Rock Outside Corner - 4 Corners per box (2 Left, 2 Right).
Dimensions are 11" x 15¼" (long side) and 7" x 15½" (short side). Used to wrap 90°
corners and will interlock flush to the Castle Rock Panels eliminating compound
miter cuts and caulking of the joints.
PANELS AND INTERLOCKING OUTSIDE CORNERS
Brick Panel - Brick Panels have the look and texture of classic brick. Panel
dimensions are 15¼" x 43½" x 1½" and are packaged 4 Panels per box covering
approximately 17.72 square feet per box.
Brick Outside Corner - 4 Corners per box (2 Left, 2 Right). Dimensions are
12" x 15¼" (long side) and 6½" x 15¼" (short side). Used to wrap 90° corners and will
interlock flush to the Brick Panels eliminating compound miter cuts and caulking of
the joints.
5
PRODUCT LINE
Random Rock Panel - This original NextStone™ rock profile has the look of
quarried stone. Panel dimensions are 15 ½" x 48" x 1½" and are packaged 4 panels
per box covering approximately 19 square foot per box.
Country Ledgestone Panel - Country Ledgestone Panels have a faux finish and
bring character to a common stone application. Panel dimensions are
15½" x 43½" x 1½" and are packaged 4 panels per box covering approximately 16.96
square feet per box.
Country Ledgestone Outside Corner - 4 Corners per box (2 Left, 2 Right).
Dimensions are 8¼" x 15½" (long side) and 5½" x 15½" (short side). Used to wrap 90°
corners and will interlock flush to the Country Ledgestone Panels eliminating
compound miter cuts and caulking of the joints.
Random Rock Outside Corner - 4 Corners per box (2 Left, 2 Right).
Dimensions are 11" x 15½" (long side) and 7" x 15½" (short side). Used to wrap 90°
corners and will interlock flush to the Random Rock Panels eliminating compound
miter cuts and caulking of the joints.
6
PRODUCT LINE
Slatestone Panel - Slatestone panels have a stacked stone appearance with deep
and defined grout lines . Panel dimensions are 8¼" x 43" x 1¾" and are packaged 8
panels per box covering approximately 17.12 square foot per box.
Stacked Stone Panel - Stacked Stone Panels provide the traditional flat stacked
stone appearance. Panel dimensions are 13¼" x 46½" x 1½" and are packaged 5
panels per box covering approximately 18.15 square feet per box.
Slatestone Outside Corner - 4 Corners per box (2 Left, 2 Right).
Dimensions are 12¾" x 8¼" (long side) and 4¼" x 8¼" (short side). Used to wrap 90°
corners and will interlock flush to the Slatestone Panels eliminating compound miter
cuts and caulking of the joints.
Stacked Stone Outside Corner - 4 Corners per box (2 Left, 2 Right).
Dimensions are 12" x 13¼" (long side) and " x 13¼" (short side). Used to wrap 90°
corners and will interlock flush to the Stacked Stone Panels eliminating compound
miter cuts and caulking of the joints.
7
PRODUCT LINE
SANDSTONE CORNERS
Sandstone Outside Corner - 2 corners per box for a total of 8 linear feet.
Dimensions are 5½" x 5½" x 48". These corners are used on 90 degree outside
Corners and are installed prior to the panels. Panels will sit securely behind the
corners.
Sandstone Inside Corner - 2 corners per box for a total of 8 linear feet.
Dimensions are 3½" x 3½" x 48". These corners are used on 90 degree inside
Corners and are installed prior to the panels. Panels will sit securely behind the
corners.
Sandstone Flush Outside Corner - 2 corners per
box for a total of 8 linear feet.
Dimensions are 3" x 3" x 48". These corners are used on
90 degree outside corners and are installed prior to the
panels. Panels sit flush to corners and can be used to
transition into another product.
8
PRODUCT LINE
SANDSTONE ACCESSORIES
Sandstone Ledger - 4pcs. per box for a total of 16
linear feet. Dimensions are 2½" x 4" x 48". Used as a
water sill and aids in the transition between other
siding products and NextStone™ Panels in wainscot
installations.
Sandstone Ledger Outside Corner - 2pcs. per box.
Dimensions are 4¼" x 6¼" x 2½". Used to wrap corners in
conjunction with Ledgers. Prevents the need for compound
miter cuts or caulking 90˚ joints.
Sandstone Ledger Inside Corner - 2pcs. per box.
Dimensions are 9 ¾" x 7 ⅝" x 2½". Used to wrap corners in
conjunction with Ledgers. Prevents the need for compound
miter cuts or caulking 90˚ joint.
Sandstone Small Mounting Block - 1pc per box. Dimensions
are 8" x 9" x 2¼". Used behind hose bibs, electrical boxes, small
electrical fixtures, etc. Provides a flush mounting surface for
watertight installations.
Sandstone Window and Door Trim - 4pcs. per
box for a total of 16 linear feet. Dimensions are
2¼" x 3½" x 48". Used to trim around doors and windows.
Can also be used as termination ends for wall
applications.
Sandstone Large Mounting Block - 1pc per box. Dimensions
are 10" x 13" x 2¼". Numerous uses such as mounting large exterior
lights or as a house address plaque. Provides a flush mounting
surface for watertight installations.
Metal Starter Strip - 2" x 48". Used to begin the first
(bottom) course of NextStone™ panels by securing the
bottom panel and avoiding the need to face screw. Ensures
level installation.
RECOMMENDED WITH EVERY INSTALL
Touch Up Paint Kit & Grout - Used to finish cut
ends, sealing miter joints, cover surface damage, or
general touch up.
9
PRODUCT LINE
SPECIALTY ACCESSORIES
Slatestone 1pc Post Cover (Sleeve)
Outside dimensions are 8" x 8" x 41". Can be installed over any
nominal 4x4 or 6x6 post or column. Post covers can be stacked for
taller post applications or cut for shorter applications. Converter
Kits are available to fir out 4x4 posts and are sold separately.
Slatestone Post Cover Cap - 10½" x 10½" x 3". Used for
any 8" x 8" Slatestone Post Cover.
Slatestone 30" Column Wrap
Outside dimensions are 16" x 16" x 30". Four finger jointed
panels are used to wrap columns. Inside Dimensions are
13⅞" x 13⅞". Can be stacked for taller applications or cut for
shorter applications.
Sandstone 18" Column Wrap Cap - 18" x 18" x 3½".
Used for all Slatestone 30" Column Wraps and Columns made
from Interlocking Outside Corners.
Slatestone 2pc Post Cover (Split)
Outside dimensions are 8" x 8" x 41". Split Post Covers are for
installing around existing posts or columns that can not detach.
Can be installed around any nominal 4x4 or 6x6 post or column.
Post covers can be stacked for taller post applications or cut
for shorter applications. Converter Kits are available to fir out
4x4 posts and are sold separately.
NOTE: INSIDE POST SIZES ARE NOMINAL 4X4 AND 6X6.
TRUE DIMENSIONS ARE 3½" X 3½" AND 5½" X 5½".
10
BASIC TOOLS / EQUIPMENT
SAFETY EQUIPMENT
Always wear safety glasses for eye protection. Wearing a dust mask is recommended.
HAND TOOLS
Any wood cutting saw with a fine
tooth steel or carbide tip blade.
(NextStone™ does not dull blades
and does not require a special
blade). 4' level, tape measure,
chalk line, power or cordless drill
with 4" bits or extension, framing
square or speed square, jigsaw or
saber saw, wood rasp, and caulking
gun.
FASTENERS
For exterior applications, good quality deck screws or stainless steel screws are
recommended. Concrete applications require mechanical fasteners such as Tapcon™
and possibly an adhesive for additional support (adhesive is not required for
installation). The length of the screw will vary depending on the panel thickness or
accessory piece being installed. Verify length under section specific to product being
installed. Using the screw guide points on the panel screw hems, screw through the
substrate and into a stud when practical, with a minimum of 6 screws per panel
and a screw no less than 1" from each end of the tongue as well as in the bottom
right corner of the tongue. Plumbers tape is used to install outside corners (non
flush). Allow 1 roll for 4 outside corners.
ADHESIVE
The use of adhesives is optional, however they may allow for an easier installation
process in certain small applications. NextStone™ recommends the use of a good
quality polyurethane adhesive such as PL Premium Construction Adhesive by Loctite.
Most construction based adhesives are not compatible with polyurethane and should
never be used. The surface where the adhesive is to be applied must be sanded and
cleaned prior to applying the adhesive in a vertical application. If using an adhesive
other than those NextStone™ recommends, testing on a panel prior to beginning an
installation is advised.
11
RECOMMENDATIONS FOR NEW CONSTRUCTION
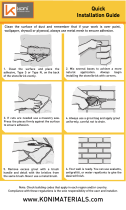
All studs must be straight and true to avoid bulges or dips in the finished wall.
Correct any bowed studs prior to installation if necessary. Sub-wall assembly must be
weather tight before applying NextStone™. NextStone™ accessories alone may not
constitute a waterproof installation. Wall sheathing should be weather-resistant,
or covered with a weather-resistant barrier such as fanfold insulation, house
wrap, or building paper. Independent studies indicate that the combination of a
weather resistant barrier plus a house wrap results in improved weather
performance. Some building code jurisdictions are currently requiring this
protection. sheathing must be properly fastened to the framing according to building
code requirements and/or the sheathing manufacturer’s recommendations.
NextStone™ should be applied over a sheathing that provides a smooth, flat, solid,
non-expansive, stable surface. Flashing and caulking should be added as needed in
such areas that transition from NextStone™ to other siding products, windows, and
doors to control moisture and protect the sub-wall assembly.
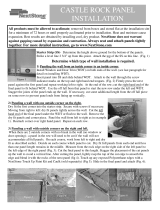
RECOMMENDATIONS FOR EXISTING STRUCTURES
Secure or remove any loose siding material and replace any rotten wood. Scrape off
loose caulk and other build-up that may interfere with the NextStone™ installation.
Remove all items such as downspouts, light fixtures, vents. etc. in the area to be
covered. Install suitable sheathing, as needed, to provide a smooth, flat, and stable
surface for the installation of NextStone™ panels. See above information in the
New Construction section for additional instructions on sub wall protection and
flashing.
RECOMMENDATIONS FOR MASONRY STRUCTURES
A smooth, flat, stable surface is required for proper installation of NextStone™.
Concrete, cinder or brick walls may need filling unless they are already in a smooth
and flat condition. Uneven walls may require furring strips to provide a flat surface.
When applying NextStone™ directly to concrete, cinder, or brick walls, the use of
concrete screws (such as Tapcon™) is recommended. Please refer to page 10 for
fastener information.
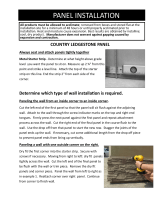
PREPARING THE WALL
12
STARTER STRIP INSTALLATION
STARTER STRIP
In order for NextStone™ panels to be installed level and to avoid screwing through
the rock face of the panel, the starter strip at the base of the wall must be level.
Step 1
Mark the wall horizontally where you want the bottom of the panel to rest. Measure
up 2½" to 3" depending on ground level surface and partially drive a nail at one
corner for attaching your chalk line.
Step 2
Attach a chalk line: go to the next corner, repeat step 1, and pull the line taut.
Make sure the line is level by using a line level or 4' level.
Step 3
Snap the chalk line and repeat the procedure on each area to be covered.
Step 4
Backset the starter from the edge 1 ¾" for Interlocking Outside Corners, 2 ¼" for
door/window trim, 3 ¾" for inside corners or 2" for Sandstone Outside Corners.
Step 5
Place the top edge of the starter strip on the chalk line with the “v” at the bottom
away from the wall. Screw the starter to the substrate using screws every 16". Make
sure Starter Strip is level. This will give ¾" clearance from the bottom of the panel
to the ground. If additional clearance is required, adjust the starter strip height
accordingly.
13
CORNER INSTALLATION
SANDSTONE OUTSIDE CORNERS
Determine how you plan to finish the corner as this will dictate the length of the
corner when using bold Sandstone Outside Corners versus Interlocking Corners.
Corners can be capped with ledger or ledger corners.
Step 1
Cut 6 pieces of plumbers strap approximately
6" long. With the corner upside-down so that
the “stair-step” blocks are exposed, attach
the strap to the top block on the left side so
that it extends out at a right angle to the
corner. The same should be done to the 3
rd
block, the bottom block, and finally to the
same three blocks on the right side.
Step 2
Apply the corner so that the bottom of the
corner lines up with the bottom of the first
panel. Screw through the end of the strap into the structure.
Step 3
If more than one length of outside corner is required, stack the corners by locking
the male end at the top of the corner to the female end on the bottom of the
corner.
Note: Sandstone
Accessories are
universal and can
be used with all
panel profiles
Optional Install:
Corners can be face
screwed to attach but
must be filled in with
grout and painted over
to conceal screw
heads.
14
SANDSTONE INSIDE CORNERS
Determine how you plan to finish the corner as this will dictate the length of the
corner. Corners can be capped with ledger or ledger corners. For a ledger finish, the
top of the corner (the end with the lip on top) should be 1 " below the top of the
flange on the top panel.
Step 1
Place corner so that the bottom of the corner will be flush with the bottom of the
bottom panel. Screw thru the recessed channel at the top, bottom and middle of
each side of the corner using at least a 4 ½" screw. Adhesive maybe applied to the
blocks on the back side of the corner, if appropriate for the installation.
Step 2
If more than one length of outside corner is required, stack the corners by locking
the male end at the top of the corner to the female end on the bottom of the
corner.
CORNER INSTALLATION
Note: Sandstone Accessories are universal and can be used
with all panel profiles
Optional Install:
Corners can be face
screwed to attach but
must be filled in with
grout and painted over
to conceal screw
heads.
15
CORNER INSTALLATION
SANDSTONE FLUSH OUTSIDE CORNER
Step 1
Install moisture barrier. Flush mounted corners can allow
moisture infiltration between the panel and the corner. A
moisture barrier may be required behind the panels and
corner extending a minimum of 4" from either side of the
corner. A self-adhering flashing membrane such as Grace
Vycor® is recommended.
Step 2
Flush mounted outside corners are 4' tall. The placement of
the corners will depend on how the top of the corner is
terminated. For applications over 48" in height, the corner
pieces can be stacked with the final corner cut to the
required height.
For wainscot applications, the corner
can be capped with a ledger attached to the tongue of the
top panel and cut with a compound miter at a 45° angle, or
a Ledger Outside Corner can be used.
The top of the corner should be placed 2" below the top of the
tongue on the top panel.
Step 3
The corner has screw guides or dimples to help position the
screws using the correct angle. There are also screw guides
along the sides. All screws are installed at an angle and at a
location where they will be concealed. Install two screws
through the top and at least 4 on each side. Good quality
exterior screws, #6 or #8 x 2 ½" are recommended.
Step 4
Install the remaining accessories and finish the panels. The
joints between the panels and the corner must be caulked
using a good quality caulk or textured grout to make a
water-tight installation.
Note: Sandstone Accessories
are universal and can be used
with all panel profiles
16
CORNER INSTALLATION
INTERLOCKING OUTSIDE CORNERS
Step 1
After placing the Start Strip, set the outside corner piece
against the corner and down into the strip. Using the screw
guides, place at least 3 screws along the top tongue and 2
screws at the right lap side of the corner where indicated.
(fig. 1)
Step 3
Interlock the panels working out from each corner. (fig. 3)
Install from Left to Right.
If the length of the wall does not allow the panels to
interlock into the corners at the end of a run, cut the panel
vertically in the middle of the panel to meet the length.
If terminating the run at the right side with alternate trim
pieces, measure the end of the grout line to the accessory
piece and add 1" if sliding behind a trim piece. Straight cut
the panel and fit behind trim piece or cut the panel flush so
it meets the terminating Accessory.
Step 2
Slide the second corner over the top of the first corner and
attach as indicated above. Continue alternating corners until
desired height is reached. (fig. 2)
Figure 1
Figure 2
Figure 3
All products must be allowed to acclimate; removed from boxes and stored at the
installation site for a minimum of 48 hours. Heat and moisture cause expansion. Best
results are obtained by installing a cool, dry product. NextStone™ does not warrant
against gapping caused by expansion or contraction due to improper installation.
17
CORNER INSTALLATION
INTERLOCKING OUTSIDE CORNERS CONTINUED
Figure 2
Note: Interlocking Outside Corners come Four (4) Corners per box (2 Left, 2 Right).
Corners are all different patterns. Check for the numbers on the inside of each
corner and be sure to alternate left and right corners with each course preventing
possible pattern repetition.
Figure 3
Step 4
Corners can be capped with a Sandstone Ledger (requires miter cutting) or
Sandstone Ledger Outside Corner. (fig. 4)
All products must be allowed to acclimate; removed from boxes and stored at the
installation site for a minimum of 48 hours. Heat and moisture cause expansion. Best
results are obtained by installing a cool, dry product. NextStone™ does not warrant
against gapping caused by expansion or contraction due to improper installation.
Step 5
Cut panels and corners around fixtures and other wall protrusions (hose bibs,
electrical boxes, dryer vents, etc.) to accommodate NextStone™ Mounting Blocks.
See Install instructions on page 23 for details on how to install the mounting blocks.
Figure 4
18
PANEL INSTALLATION
ALL PANEL PROFILES
Step 1
Metal Starter Strip - Determine at what height above grade level
you want the panel to sit. Measure up 2 ½" to 3" from that point
and strike a level line. (fig. 1)
*See page 12 for more specific Starter Strip install instructions.
Step 2
Determine which type of wall installation is required and follow the steps provided
below:
A) Paneling the wall using Sandstone Window Door Trim as termination pieces
on both ends
Install Sandstone Window and Door Trim (WDT) to both ends of
the wall working left to right. Insert panel into starter strip and
slide behind WDT. Using the screw indicator marks on the top
and right end tongues of panel, (fig. 2) firmly fit the next panel
into the first panel and repeat to the end of the course. Cut the
right end of the final panel to fit behind WDT. Use the left over
cut piece to start the next course to avoid a vertical seam at
final cut on each course. Screw panels into existing substrate.
B) Paneling the wall using Sandstone Window Door Trim as a termination piece
with a panel corner
Dry fit the first corner into the starter strip. Secure with screws if necessary. Dry fit
panels tightly against corner and across the wall. Cut the left end of the final panel
to fit behind the Window Door Trim. Repeat each course.
Figure 1
Figure 2
All products must be allowed to acclimate; remove from boxes and store at the
installation site for a minimum of 48 hours. Heat and moisture cause expansion. Best
results are obtained by installing a cool, dry product. NextStone™ does not warrant
against gapping caused by expansion or contraction due to improper installation.
19
2 3 4 1
1 2 3
4
PANEL INSTALLATION
C) Paneling the wall using Interlocking Outside Corners
When there are 4 outside corners with no break in the wall (no window or door
opening), panels may need be cut to fit the length of the wall. On each course, work
from left to right and dry fit Panels and Corners. Decide on each course which panel
to cut to avoid a vertical seam. Measure from the rock edge on the right side of the
left panel to the left edge of the right panel (fig. 3). Cut the final panel to this
length. (Stagger the placement of the cut panels up the wall to avoid verticals
line.) After cutting the panel, lightly rasp the top of the cut edge to smooth the edge
and blend it with the rocks of the next panel (fig 4). (Touch up any exposed
Polyurethane edges with a NextStone™ Touch Up Paint Kit and Grout) (fig. 5). Slide in
the final panel and attach (fig. 6).
D) Paneling an Accent Wall Corner to Corner
Straight cut first panel on the left to fit flush against the left wall. The final panel in
the course will need to be cut to fit properly flush to the “right” wall. Use the off
cut panel to begin the second course at the left. Repeat this method to complete
your wall.
All products must be allowed to acclimate; removed from boxes and stored at the
installation site for a minimum of 48 hours. Heat and moisture cause expansion. Best
results are obtained by installing a cool, dry product. NextStone™ does not warrant
against gapping caused by expansion or contraction due to improper installation.
Figure 3
Figure 6
Figure
Figure 4
Figure 5
Figure 6
Important Installation Tips!
Drive the first screw on the right hand side of the panel at a 45 degree
angle and to the left in order to tighten the panel into adjacent panel, corner
or wall. Visit the NextStone™ Classroom at www.NextStone™.com to see the
video.
Each panel is numbered on the back. Stagger the placement of each panel
and cut panels to avoid vertical lines or repetitious patterns.
Example
20
Sandstone Window and Door Trim (WDT) can be used as a universal trim piece to
terminate sections of NextStone™ where the panels will not turn a corner and/or as a
trim piece around windows and doors. For most applications, Sandstone Window and
Door Trim must be installed prior to the panels.
When using the WDT as a termination piece for a
wainscot application:
Step 1
Measure the total height of the wall before the Ledger
attachment to determine length/height of WDT needed.
Step 2
Use a level when placing WDT. Screw at a 45° angle
through the top of the piece and down along the inside
edge making sure to attach securely to the underlying
substrate. To miter for use with ledger, cut the top of
the piece on a 15°angle, with the long side of the angle
against the wall. (Shown below #1)
Step 4
If desired, a wood rasp can be used to round edges of
the door/window trim to provide a more realistic look.
Touch-up paint can be applied to the area formed with
the rasp. Always use a finished end to start and
terminate a section of door window trim. Cut ends can be butted tight and
concealed with touch-up paint and caulk. (Shown below #2) End Ledger with a
factory finished end. (See ledger installation).
TRIM INSTALLATION
Window and Door
Trim under the
Ledger
SANDSTONE WINDOW AND DOOR TRIM
1. 2.
  • Page 1 1
  • Page 2 2
  • Page 3 3
  • Page 4 4
  • Page 5 5
  • Page 6 6
  • Page 7 7
  • Page 8 8
  • Page 9 9
  • Page 10 10
  • Page 11 11
  • Page 12 12
  • Page 13 13
  • Page 14 14
  • Page 15 15
  • Page 16 16
  • Page 17 17
  • Page 18 18
  • Page 19 19
  • Page 20 20
  • Page 21 21
  • Page 22 22
  • Page 23 23
  • Page 24 24
  • Page 25 25
  • Page 26 26
  • Page 27 27
  • Page 28 28
  • Page 29 29
  • Page 30 30
  • Page 31 31
  • Page 32 32
  • Page 33 33
  • Page 34 34
  • Page 35 35
  • Page 36 36
  • Page 37 37
  • Page 38 38
  • Page 39 39
  • Page 40 40
  • Page 41 41
  • Page 42 42
  • Page 43 43
  • Page 44 44
  • Page 45 45
  • Page 46 46
  • Page 47 47
  • Page 48 48

NextStone BK-OC-AR-4 Installation guide

Type
Installation guide

Ask a question and I''ll find the answer in the document

Finding information in a document is now easier with AI