Brinsea AC261 GB Issue 01 User manual

Type
User manual

The Brinsea AC261 GB Issue 01 is an advanced incubator designed to provide precise control over temperature, humidity, and egg turning for successful hatching of various bird species. With its user-friendly digital control panel, you can easily adjust and monitor incubation settings, including temperature, turning interval, and turning angle. The incubator features a built-in hygrometer for humidity monitoring and an automatic egg turner to ensure even heat distribution.

The Brinsea AC261 GB Issue 01 is an advanced incubator designed to provide precise control over temperature, humidity, and egg turning for successful hatching of various bird species. With its user-friendly digital control panel, you can easily adjust and monitor incubation settings, including temperature, turning interval, and turning angle. The incubator features a built-in hygrometer for humidity monitoring and an automatic egg turner to ensure even heat distribution.

2
AC261 GB Issue 01
Read the instructions before use! Do not cover!
This appliance is only to be used with the power supply unit provided with the appliance.
Damaged appliances must not be used.
The appliance, its power supply unit and its supply cord must be placed in an indoor area not subject to splashes of water or wet conditions and protected
from or out of reach of animals.
Repairs must be carried out only by a suitably qualified person.
This appliance must not be used, cleaned or maintained by children or persons with reduced physical, sensory or mental capabilities or lack of experience
and knowledge without supervision. Children must not play with the appliance.
Disconnect the incubator from the mains power supply during cleaning. Ensure that all electrical parts are kept dry.
Please read these instructions carefully before setting up your incubator to achieve best results and keep these instructions safe for future reference.
This document includes recommended procedures for successful hatching but incubation involves the control and manipulation of a large number of factors and in
certain circumstances different procedures may be necessary.
For more detailed information on all aspects of egg incubation including helpful advice on getting best results please visit our website at www.brinsea.co.uk.
Your incubator is designed to allow the user to vary the incubation conditions to suit a wide range of species in different ambient conditions and the specific set-up for
every situation is beyond the scope of these instructions.
For more information on incubation and hatching please download our FREE Incubation Handbook: www.brinsea.co.uk/incubationhandbook, for more species specific
advice a range of publications can be found at: www.brinsea.co.uk/books.
To register your new Brinsea product please visit www.brinsea.co.uk within 30 days of purchase and follow the link on the home page to qualify for your free 3 year
guarantee. Sign up for the Brinsea Newsletter to receive the latest news and information.
Record your appliance serial number here: __________________
3
AC261 GB Issue 01
1 Setting Up Your Incubator
Unpacking & Part Quantities
Assembly
Location & Installation
2 Product Introduction Functional Features
3 Settings Control Menu
4 Display
5 Temperature
6 Humidity
7 Eggs
8 Periodic Incubation Cooling
9 Hatching & Cleaning up
10 Specifications
CONTENTS
-
4
5
6
7
8
9
11
12
14
16
17
18
4
AC261 GB Issue 01
2
1
4
3
5
6
5
AC261 GB Issue 01
1 SETTING UP YOUR INCUBATOR
ASSEMBLY
1: Fit the water pot guard to prevent chicks from
drowning.
2: Place the egg quadrants in the base of the
incubator. Ensure they are the correct way up
and are locked together as shown.
3: Place the top onto the base. Check the top fits
flush all the way around the base edge.
1.
2.
3.
1
6
AC261 GB Issue 01
1 SETTING UP YOUR INCUBATOR
LOCATION AND INSTALLATION
Your incubator will give best results in a heated room
free from wide temperature variations and with
generous ventilation particularly if several
incubators are running at the same time.
Ensure that the room temperature cannot drop on a
cold night. Ideally thermostatically control the room
at between 20 and 25°C (68 and 77°F). Never allow
the room temperature to drop below 17°C (63°F).
Make sure that the incubator cannot be exposed to
direct sunlight and is used on a flat, level surfaced
worktop or table, not on the floor.
Connect the mains power cable to the power supply
unit and connect the power supply unit cable to the
incubator lid. Ensure each connector is pushed fully
home in its socket.
Only use the power supply unit supplied with the
product. Use of a different power supply may cause
a hazard and will invalidate any guarantee.
1.
2.
7
AC261 GB Issue 01
2 PRODUCT INTRODUCTION
FUNCTIONAL FEATURES
1: Digital Display
2: Control Buttons
3: Adjustable Air Vent
4: External Fill Point
5: Egg Quadrants
2
1
5
4
3
8
AC261 GB Issue 01
3 SETTINGS
CONTROL MENU
The diagram on the right illustrates how to navigate
through the control menu. Look at the key below to
understand what each button does when pressed.
Press both buttons to unlock the
menu.
Select the option / return to the menu.
Go forward one screen / increase the
value / display in Celsius.
Go back one screen / decrease the value /
display in Fahrenheit.
INCUBATION TEMPERATURE
Range 20.0 40.0°C (68.0 104.0°F).
Default 37.5°C (99.5°F). See section 5.
REMAINING DAYS
The number of days left until the eggs are due to hatch.
Must be set for each new batch. Range 40 - 0.
HIGH TEMPERATURE ALARM
Range 1.0 5.0°C (1.8 9.0°F) above set incubation temperature.
Default 2.0°C (3.6°F). See section 4.
LOW TEMPERATURE ALARM
Range 1.0 5.0°C (1.8 9.0°F) below set incubation temperature.
Default 3.0°C (5.4°F). See section 4.
CELSIUS / FAHRENHEIT DISPLAY
Switches all temperature figures between °C and °F.
Default °C. See section 5.
SAVE
All changes are saved. Return to normal operation screen.
CANCEL
All changes are ignored. Return to normal
operation screen.
TURNING MODE
Switches the turning system to: on, automatic or off.
Default: automatic (AUT).
TURNING INTERVAL
Sets the delay between turns.
Range 15 180 minutes.
Default 45 minutes.
PERIODIC INCUBATION COOLING
Switches heater off for a timed period once every 24 hours. Do
not use before day 7 of incubation or whilst hatching.
Range 10 360 minutes. Default - OFF. See section 8.
TURNING ANGLE
Sets the angle of egg turning by how long the motor runs.
Range 1 20 seconds. Default 5 seconds. See section 7.
37.5C
OK - +
TEMP
OK
DAYS
OK
T-MODE
OK
TURN INT
OK
ALARM HI
OK
ALARM LO
OK
COOLING
OK
C/F
OK
SAVE
OK
CANCEL
OK
DAYS 21
OK - +
MODE AUT
OK - +
MINS 45
OK - +
HI 2.0C
OK - +
LOW 3.0C
OK - +
MINS OFF
OK - +
DISP C
OK C F
TURN ANG
OK
ANGLE 5
OK - +
9
AC261 GB Issue 01
4 DISPLAY
DIGITAL CONTROL SYSTEM
The Maxi 24 Advance control system utilises a highly
accurate, individually calibrated sensor for
temperature. Be cautious of low cost analogue or
digital thermometers when comparing them with
the incubator display reading.
(FIG 1)
Normal Operation Temperature, number of days remaining until the hatch is due and turn system status are continuously
displayed.
The asterisk “*” adjacent to the temperature reading shows when the heater power is on. When warming the asterisk will be
continuously on, once warmed up the asterisk will slowly flash as the heater is pulsed to maintain the correct temperature.
When reducing the temperature setting the asterisk may go off, this is normal.
During periodic incubation cooling (see section 8) the asterisk will be replaced by an arrow: “↓”.
If turning is switched off an “O” flashes at the corner of the display.
If turning is switched on a line “/” symbol rotates at the corner of the display.
Changing Settings The Control Menu allows the various settings to be modified and saved. All settings are retained in the event
of a power cut.
To access the Control Menu press the + and buttons simultaneously to unlock the display. For full details of menu settings
please refer to the contents on page 3 and view the relevant sections.
Power Loss Display (FIG 1) -- If power has been interrupted due to a power cut (or when first switching on) a “P” is shown
flashing in the corner of the display. Press OK for 2 or more seconds to clear the indicator. If the reason for the power loss is not known
check the power cable connections are secure.
Once the “P” indicator has been cleared, it is advisable to candle eggs a number of times to check for losses.
T*37.5
C
H 35%
P/
T*37.5
C
T*37.5C
DAY:19 P/
Example settings for poultry:
Temperature: 37.5°C
Humidity: Fill one side of the central water
pot, set vent to minimum
Turning interval: 45 minutes (turn off from
day 19 and remove egg quadrants)
Turning Angle: 7 seconds
Cooling: OFF
10
AC261 GB Issue 01
4 DISPLAY
(FIG 2)
(FIG 3)
(FIG 4)
(FIG 5)
T*32.1C
DAY:19 L/
High Temperature Alarm Display (FIG 2) If the measured temperature inside the incubator goes up by more than the
figure in the ALARM HI screen, the alarm will sound immediately and “H” will be displayed. Press OK to silence the alarm for 30 minutes.
If the high temperature problem rectifies itself the “H” remains on the display to show this has happened. Press OK to clear the
indicator. Check the incubator is not (and has not been) in direct sunlight or too near a heat source such as a room heater. It is
advisable to candle eggs a number of times after this event to check for losses.
Low Temperature Alarm Display (FIG 3) If the measured temperature inside the incubator goes down by more than the
figure in the ALARM LO screen, after 60 minutes “L” will be displayed and the alarm will sound. Press OK to silence the alarm for 30
minutes.
If the low temperature problem rectifies itself the “L” remains on the display to show this has happened. Press OK to clear the
indicator. Check the incubator is not (and has not been) in a cold draught or that the room temperature has dropped
significantly. It is advisable to candle eggs a number of times after this event to check for losses.
Low Room Temperature Alarm (FIG 4) If the calculated room temperature remains too low for optimum results for more
than 1 hour a warning is displayed “-RM” and an alarm will sound. Press OK to silence the alarm for 30 minutes.
If the low temperature problem rectifies itself the -RMremains on the display to show this has happened. Press OK to clear
the indicator.
Check the incubator is not (and has not been) in a cold draught or that the room temperature has not dropped significantly. It
is advisable to candle eggs a number of times after this event to check for losses.
High Room Temperature Alarm (FIG 5) If the calculated room temperature remains too high for optimum results for
more than 1 hour a warning is displayed “+RM” and an alarm will sound. Press OK to silence the alarm for 30 minutes.
If the high temperature problem rectifies itself the “+RM” remains on the display to show this has happened. Press OK to clear
the indicator.
Check the incubator is not (and has not been) in direct sunlight or too near a heat source such as a room heater. The eggs
themselves create significant metabolic heating at later stages of incubation and may contribute to this if room temperature is
high. It is advisable to candle eggs a number of times after this event to check for losses.
T*37.5C
-RM /
T*37.5C
+RM /
T*39.8C
DAY:19 H/
11
AC261 GB Issue 01
5 TEMPERATURE
SETTING THE TEMPERATURE
1. Press the - and + buttons
simultaneously to unlock the
Main Menu.
2. Press OK to select the
temperature screen and
adjust as necessary using the
+ and buttons.
3. Press OK to return to the
Main Menu and then scroll
down to SAVE. Press OK to
save the changes.
When reducing temperature the asterisk may go
out while the incubator cools this is normal. Adjust
temperature with care small differences have
large effects on hatching performance.
CHANGING TO FAHRENHEIT
1. Press the - and + buttons
simultaneously to unlock the
Main Menu.
2. Scroll to the C/F option and
press OK to select the C/F
display screen.
3. Press the + button to select
°F or the button to select
°C.
4. Press OK to return to the
Main Menu and then scroll
down to save. Press OK to
save the changes.
Please Note: Your incubator will be factory set for hen eggs, you may wish to adjust the temperature in the menu to suit the types
of eggs you are incubating.
As the incubator warms up and approaches its control setting the heater on asterisk “*” will change from continuously on to flashing.
Allow the incubator to stabilise for at least an hour before adjusting the temperature.
Recommended temperatures: Typical incubation period:
Hens 37.4 37.6°C 99.3 99.6°F 21 days
Pheasant 37.6 37.8°C 99.6 100.0°F 23-27 days
Quail 37.6 37.8°C 99.6 100.0°F 16-23 days
Ducks 37.4 37.6°C 99.3 99.6°F 28 days
Parrots:
Amazons 36.8 37.0°C 98.3 98.6°F 24-29 days
Macaws 36.8 37.0°C 98.3 98.6°F 26-28 days
Love birds 36.8 37.0°C 98.3 98.6°F 22-24 days
African Grey 36.8 37.0°C 98.3 98.6°F 28 days
Eclectus 36.8 37.0°C 98.3 98.6°F 28 days
Developing embryos are fairly tolerant of short term temperature drops and the user need not be concerned about cooling
that occurs when inspecting eggs. Temperatures above ideal can quickly have a serious detrimental effect on hatch rates and
must be avoided.
The Maxi 24 Advance has a built-in temperature alarm which warns of high or low temperatures. See section 4 for details.
12
AC261 GB Issue 01
CONTROLLING HUMIDITY
Two factors affect incubation humidity: water evaporation within the cabinet (from eggs as well as from additional water) and levels
of ventilation. The water content of the air being drawn through the incubator will also have an effect.
There are two methods available to bird breeders to achieve correct humidity levels:
1: As a general guide for poultry/game/waterfowl, maintain water in one of the two halves of the central water pot from
the time eggs are set until 2 days before hatching is due - the depth of water doesn’t matter.
For all species fill both halves of the water pot for the last two days of incubation. Higher humidity levels are needed for
hatching to prevent membranes drying too quickly. Ensure the water pot guard is fitted to prevent chicks drowning.
The above guidelines make no provision for different ambient conditions and are necessarily rather generalised but they are
simple and often effective.
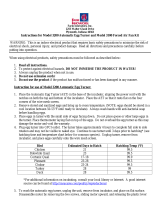
2: Monitor egg weight loss (which varies as a direct result of humidity) and correct them against published weight loss figures
for the species. This is the most reliable method and is recommended particularly where poor hatch rates are experienced
or if eggs of high value are being incubated.
Eggs lose moisture through their shells and the rate of evaporation depends on the humidity levels around the eggs and the
shell porosity. During incubation eggs need to lose a fixed amount of water which corresponds to a loss in weight of around
13-16% depending on species. By weighing eggs periodically during incubation it is possible to monitor and, if necessary,
correct humidity levels to achieve the correct weight loss.
HATCHING
In all cases the humidity for hatching needs to be high. Because of the short duration involved water/weight loss will not be
significantly affected. High humidity is necessary to prevent membranes drying and hardening before the hatch fully emerges.
Humidity will naturally increase as the first eggs begin to hatch and internal membranes begin to dry. This effect is in addition to the
increased area of water evaporation from the water pots. During hatching the high humidity levels will fall dramatically when the lid
is opened and will take some time to build up. Resist the temptation to lift the lid frequently leave for at least 6 hours between
inspections.
For more detailed information on all aspects of egg incubation including helpful advice on getting best results please visit our
website at www.brinsea.co.uk/incubationhandbook.
6 HUMIDITY & VENTILATION
UNDERSTANDING HUMIDITY
Short term variations in humidity are not important.
The average humidity over the incubation period
needs to be near optimum to achieve the ideal
weight loss.
High humidity for the day or two of hatching is also
important. Beware chronic, excessive humidity.
Typical Humidity:
Generally accepted incubation RH levels for species
groups:
During incubation: Poultry 40-50% RH
Waterfowl 45-55% RH
Hatching: All species 65% RH or more
Typical Weight Loss:
Typical ideal weight losses for species groups:
Poultry 13%
Waterfowl 14%
For more specific information on particular species’
requirements check the relevant literature.
13
AC261 GB Issue 01
6 HUMIDITY & VENTILATION
SETTING THE RELATIVE HUMIDITY LEVEL:
USING THE EXTERNAL FILL POINT
The humidity in the incubator can be adjusted by
adding water to one or both halves of the central
water pot. (If you want to decrease humidity don’t
add water).
The Maxi 24 has an external water fill point allowing
the water level to be checked and filled up without
removing the top of the incubator.
To fill the first half of the water pot, carefully add
water to the external fill point. Keep the water level
below the depth mark (see picture). The water will
flow through the tube and fill one half of the central
pot.
To increase humidity further, fill both halves of the
central water pot by continuing to add water to the
external fill point to above the level of the depth
mark. Water will flow through the tube and over the
divider wall to fill the second half of the pot. Maintain
the water level above the depth mark.
ADJUSTING THE VENT
Opening and closing the vent: Close the vent to
increase humidity or open the vent to decrease
humidity.
In practice the minimum and maximum levels of humidity achievable in an incubator depend upon several factors including the
ambient conditions in the incubation room. You may need to allow 24 hours for humidity to fully stabilise after making changes.
If you cannot achieve the relative humidity level required consider these notes:
Humidity will not go low enough
Open the vent fully to help.
A lower limit will be determined by the moisture content of the ambient air, particularly in warm humid conditions. This can
only be countered by dehumidification of the room air outside the incubator with a proprietary dehumidifier but is rarely a
problem in practice.
Humidity will not go high enough
Close the vent to its minimum setting to help. Fit evaporating card strips available from Brinsea or your stockist.
Condensation
It is normal for some condensation to occur on the cooler exposed parts of the clear top. This natural phenomenon is not a hazard or
a problem for incubation but may indicate the room is cooler than optimum.
Depth mark
External fill point
Central pot
Divider wall
OPEN
CLOSE
14
AC261 GB Issue 01
7 EGGS
SETTING THE DAY COUNTDOWN
The day countdown may be set to the correct
number of days for the particular species of egg
being incubated. If the turning system is in
automatic mode (see page 15) the eggs will stop
being turned 2 days before the eggs are due to
hatch. Note that if the eggs have already been
incubated by the parent bird the number of days
should be reduced accordingly.
1. Press the - and + buttons
simultaneously to unlock the
Main Menu.
2. Press + to scroll to the DAY
countdown option
3. Press OK to select the day
countdown screen and adjust
as necessary using the + and
buttons e.g. hens 21, ducks
28.
4. Press OK to return to the
Main Menu and then scroll
down to SAVE. Press OK to
save the changes.
EGG SETTING AND STORING
Ensure that you store eggs in cool, damp conditions. Most species may be safely stored for up to 14 days before serious reductions in hatch
rates are likely. Daily turning of stored eggs also helps maintain hatchability.
Discard cracked, mis-shaped and heavily soiled eggs (if possible). Only wash soiled eggs using a branded egg wash solution such as Brinsea
Incubation Disinfectant Concentrate following the manufacturer’s instructions. It is essential to wash eggs in solution which is significantly
warmer than the egg. Bear in mind that all solutions will remove the outer cuticle from the egg as well as the dirt and may leave the egg at
greater risk from bacterial contamination in the future.
Before setting eggs ensure that the incubator has been running for several hours and has stabilised at the correct temperature.
The Maxi 24 Advance is designed to accommodate eggs of different sizes. Quail eggs, hen eggs and large duck eggs are accommodated in
the egg quadrants provided. Goose eggs and a greater number of quail eggs may be accommodated in alternative egg quadrants for these
species (supplied separately). See page 18 for details.
Set the eggs in the pockets of the egg quadrants provided. The eggs need to be set lying flat and most eggs favour being set with their
pointed ends facing inwards towards the middle of the egg quadrant. Some experimentation may be required to check which direction
gives the most even turning. Very small eggs typically favour being set with their points towards the centre.
Eggs should rest so that their pointed end is down most of the time. This will happen more naturally as the air space gets larger during
incubation. If a particular egg is tending to rest point upwards turn it round to face the other way in the pocket on the egg quadrant.
Ensure the eggs are clean around their middle as large pieces of dirt may prevent them turning correctly.
Switch the turning system on (see page 15). The turning system will alternately roll the eggs left and right. A revolving line symbol “/”
should be shown in the corner of the display.
Once the eggs have been set the temperature must not be adjusted for 24 hours to allow the eggs to warm. Check the water level every 2
days or so and temperature daily. Candle the eggs after 1/3rd of the incubation period has elapsed to reject clear, infertile eggs. Remember
to stop the turning 2 days before the eggs are due to hatch. Turning will stop automatically if the turning mode is set to auto and the correct
incubation days are set.
15
AC261 GB Issue 01
TURNING EGGS
The Maxi 24 Advance turning system has three modes of operation:
ON The turning system will alternately roll the eggs left and right irrespective of the Day Countdown. A revolving line symbol “/” is shown
in the corner of the display.
AUTO The turning system will alternately roll the eggs left and right until the Day Countdown reaches 2. Turning will then automatically
be switched to OFF and an “O” will flash in the corner of the display.
OFF The turning system is switched off irrespective of the Day Countdown. This is used for hatching purposes. An “O” will flash in the
corner of the display.
The length of time interval between turns may be adjusted and the angle the eggs are turned through may also be adjusted to suit different
size eggs. The turning motor runs for a set time and this time (in seconds) can be adjusted to achieve the appropriate turn angle for the
eggs.
Larger eggs will require a longer turn to achieve the same angle as smaller ones. Use the chart below for a simple guide. Match the TURN
ANG setting to the diameter of the eggs. This should give a turn angle of between 90 and 120 degrees.
If eggs of mixed sizes are being incubated it will be necessary to compromise the turning angle. In general, if the larger eggs turn through
90 degrees (1/4 of a turn) then the smaller ones may turn through twice this with no problem. Parrot-like species may benefit from larger
turns in the first 10 days of incubation.
If eggs are set in both circles of pockets on the egg quadrants the outer circle of eggs will turn through a greater angle. This will not be a
problem, adjust the turning angle so that the inner circle of eggs turn through 90 degrees (1/4 of a turn).
If the turning mode is switched to ON remember to stop the turning 2 days before the eggs are due to hatch.
7 EGGS
SETTING THE TURNING OPTIONS
5. Press the - and + buttons
simultaneously to unlock the
Main Menu.
6. Press + to scroll to the T-
MODE option.
7. Press OK to select the turning
mode screen and use the +
and buttons to set to ON,
AUT or OFF as required.
8. Press OK to return to the
Main Menu. The TURN INT
option will now be displayed.
Press OK to select the turn
interval screen and use the +
and buttons to set the delay
between turns in minutes as
required.
9. Press OK to return to the
Main Menu. The TURN ANG
option will be displayed.
Press OK to select the turn
angle screen and use the +
and buttons to set the
turning angle timer as
appropriate for the size of
the eggs.
10. Press OK to return to the
Main Menu and then scroll
down to SAVE. Press OK to
save the changes.
Match the TURN ANG setting (seconds) to the diameter of the eggs in the diagram below
4
Seconds
5
Seconds
6
Seconds
8
Seconds
10
Seconds
16
AC261 GB Issue 01
BACKGROUND INFORMATION ON PERIODIC COOLING
The precise details of which days and what cooling period each day should be used for best effect are not known. Brinsea have assessed
the available research and suggest that poultry, water fowl and game bird eggs have a 30 minute daily cooling period from day 7 through
to 2 days before eggs are due to hatch (the same point that automatic turning would normally be stopped).
COOLING IS NOT RECOMMENDED FOR PARROTS AND BIRDS OF PREY BECAUSE THE RESULTS OF COOLING HAVEN’T YET BEEN
ESTABLISHED. For further details please visit the Brinsea website at www.brinsea.co.uk/cooling
HOW IT WORKS WITH YOUR INCUBATOR
The periodic cooling feature turns the incubator’s heater and low temperature alarm off for a selectable period but keeps the
fan running. After the cooling period is complete the incubator reverts to normal temperature and the alarm is automatically
reset.
Each cooling period starts at approximately the same time each day (24 hours between start times). The first cooling period will
start 24 hours after the incubator was last switched on. If there is a power interruption the 24 hour delay starts again.
During the cooling period the heater asterisk goes off and an arrow “↓” is displayed. When the cooling period ends the asterisk
is shown and the incubator warms to incubation temperature. The time taken to return to incubation temperature depends on
the room temperature and may take 30 or more minutes.
8 PERIODIC INCUBATION COOLING
SETTING THE COOLING PERIOD
The cooling function is not essential. It’s an optional
feature that may be adjusted for breeders wishing to
experiment. The factory default is set to “cooling
OFF”. Do not use before day 7 of incubation or whilst
hatching.
1. Press the - and + buttons
simultaneously to unlock the Main
Menu.
2. Press the + button to scroll to the
cooling option.
3. Press OK to select the cooling
screen. Use the + and buttons to
select OFF or 10 to 360 minutes of
cooling.
4. Press OK to accept the figure and
then scroll to SAVE and press OK
to save the changes.
17
AC261 GB Issue 01
9 HATCHING & CLEANING UP
HATCHING
1: If hatching in the Maxi 24, make sure turning is
switched to OFF in the control menu two days
before the hatch is due.
2: Remove the top, take out the egg quadrants and
insert the hatching mat into the base two days
before the hatch is due. Lay the eggs directly onto
the mat. Don’t re-use hatching mats. Replacements
are available from brinsea.co.uk, brinsea.com or
your local stockist (product code 14.902).
3: Put the top back on.
Hatching humidity levels need to be high (see section
6 above).
When most eggs have hatched (12 to 48 hours after
the first egg hatches) remove the hatchlings to a
brooder. The Brinsea EcoGlow 20 and 50 are ideal for
poultry and waterfowl etc. The Brinsea TLC-40 and
TLC-50 Brooders are recommended for exotics.
During hatching the high humidity levels will fall
dramatically when the lid is lifted and will take some
time to build up. Resist the temptation to open the
incubator frequently leave for at least 6 hours
between inspections.
CLEANING UP
IMPORTANT:
DISCONNECT THE INCUBATOR FROM THE MAINS POWER SUPPLY DURING CLEANING.
ENSURE THAT ALL ELECTRICAL PARTS ARE KEPT DRY. DO NOT IMMERSE THE INCUBATOR TOP.
NEVER WASH THE BASE, EGG QUADRANTS, COVERS OR CABINET PARTS IN LIQUIDS OVER 50°C (120°F). DO NOT USE A DISHWASHER TO
CLEAN ANY PARTS OF THE INCUBATOR.
Following each hatch in the Maxi 24 Advance remove and wash the egg quadrants, and base in Brinsea Incubation Disinfectant Solution
and then rinse thoroughly. Use a vacuum cleaner and soft brush to remove dust from the fan guard. Wipe all other internal surfaces with
a cloth made damp with the solution and then wipe off with a cloth made damp with clean water. Ensure that the instructions supplied
with the fluid are followed.
If a separate hatcher is used the procedure above should still be followed every two months.
The exterior of the incubator may be cleaned with a damp cloth. Avoid allowing any moisture to get inside electrical housings.
Periodically unscrew the four screws retaining the fan guard, remove the cover and soak. Dust and fluff may be removed from the fan and
heater cord with a soft brush. USE NO LIQUIDS. DO NOT TURN THE LID OVER AS THE FAN IS NOT FIXED ONCE THE FAN COVER IS REMOVED.
The fan must be located on the 4 pegs under the lid with its label facing into the lid before the cover is re-fitted. DO NOT OVER-TIGHTEN
THE SCREWS.
ALWAYS CLEAN THE INCUBATOR BEFORE STORAGE AND ENSURE THAT THE UNIT IS TOTALLY DRY INSIDE AND OUT. ALLOW IT TO RUN FOR
24 HOURS WITH NO WATER IN TO ENSURE IT IS THOROUGHLY DRY.
TROUBLE-SHOOTING AND CALIBRATION
In case of failure first check that the mains power supply is working and that the mains cable connector is fully engaged in the socket on
the control enclosure.
The digital temperature and humidity display is individually calibrated during manufacture but may be re-calibrated if required. In the
unlikely event that your hatching success makes you doubt the temperature or humidity calibration of your machine please contact your
distributor or Brinsea directly at [email protected] for further information and advice.
18
AC261 GB Issue 01
Used electrical and electronic products should not be mixed with general household waste. For proper treatment, recovery and
recycling, please take this product to a designated collection point where it will be accepted free of charge.
Please contact your local authority for further details of your nearest designated collection point.
Disposing of this product correctly will help save valuable resources and prevent any potential negative effects on human health and
the environment, which could otherwise arise from inappropriate waste handling.
10 SPECIFICATIONS
MAXI 24 MAXIMUM SETTING CAPACITIES:
Egg size Typical capacity
Quail 40
Pheasant 24
Hen 24
Duck 12
Goose 8
Dimensions: 354mm x 354mm x 165mm
Weight: 1.7 Kg
Power Consumption:
Incubator maximum 40 Watts
(typical average) 24 Watts
Electrical Supply: 100 - 240v, 50/60Hz, 1.3A
max.
Hen egg quadrants
(included)
Capacity 24
Part number AC06
Duck egg quadrants
(included)
Capacity 12
Part number AC03
Goose egg quadrants
(sold separately)
Capacity 8
Part number AC02
Quail egg quadrants
(sold separately)
Capacity 40
Part number AC10
19
AC261 GB Issue 01
Registered Community Design Application No 003007103.
Brinsea Products Ltd, 32-33 Buckingham Road, Weston Industrial Estate, Weston-super-Mare, N. Somerset, BS24 9BG
Tel: +44 (0) 345 226 0120 e-mail: sales@brinsea.co.uk website: www.brinsea.co.uk
DECLARATION OF CONFORMITY
We: BRINSEA PRODUCTS LTD.
32-33 Buckingham Road
Weston Industrial Estate
Weston-super-Mare
North Somerset
BS24 9BG
Declare under our sole responsibility the products:
Egg Incubators:
Maxi II Eco (Serial numbers AC25x/xxxxxxxxx, AC25/xxxxxxxxx)
Maxi 24 Advance (Serial numbers AC261x/xxxxxxxxx, AC261/xxxxxxxxx)
Maxi 24 EX (Serial numbers AC271x/xxxxxxxxx, AC271/xxxxxxxxx)
to which this declaration relates are in conformity with the following EU Directives:
2006/42/EC Machinery Directive
2014/30/EU Electromagnetic Compatibility Directive
2011/65/EU Restriction on the use of Certain Hazardous Substances in Electrical
and Electronic Equipment Regulations
The relevant sections of the following Standards have been used:
EN 60335-1:2012+A13:2017
EN 60335-2-71:2003+A1:2007
EN 55014-1:2006+A2:2011
EN 55014-2:2015
EN 50581:2012
The technical documentation for the products is available from the above address.
Authorised Representative: Ian Pearce, Managing Director
Signature:
Date of Issue: 21st October 2021
Place of Issue: 32-33 Buckingham Road, Weston Industrial Estate, Weston-super-Mare, North Somerset,
BS24 9BG, United Kingdom.
DECLARATION OF CONFORMITY
We: BRINSEA PRODUCTS LTD.
32-33 Buckingham Road
Weston Industrial Estate
Weston-super-Mare
North Somerset
BS24 9BG
Declare under our sole responsibility the products:
Egg Incubators:
Maxi II Eco (Serial numbers AC25x/xxxxxxxxx, AC25/xxxxxxxxx)
Maxi 24 Advance (Serial numbers AC261x/xxxxxxxxx, AC261/xxxxxxxxx)
Maxi 24 EX (Serial numbers AC271x/xxxxxxxxx, AC271/xxxxxxxxx)
to which this declaration relates are in conformity with the following UK regulations:
Supply of Machinery (Safety) Regulations 2008
Electromagnetic Compatibility Regulations 2016
The Restriction of the Use of Certain Hazardous Substances in Electrical and Electronic Equipment
Regulations 2012
The relevant sections of the following Standards have been used:
BS EN 60335-1:2012+A13:2017
BS EN 60335-2-71:2003+A1:2007
BS EN 55014-1:2006+A2:2011
BS EN 55014-2:1997+A2:2008
BS EN 50581:2012
The technical documentation for the products is available from the above address.
Authorised Representative: Ian Pearce, Managing Director
Signature:
Date of Issue: 21st October 2021
Place of Issue: 32-33 Buckingham Road, Weston Industrial Estate, Weston-super-Mare, North Somerset,
BS24 9BG, United Kingdom.
  • Page 1 1
  • Page 2 2
  • Page 3 3
  • Page 4 4
  • Page 5 5
  • Page 6 6
  • Page 7 7
  • Page 8 8
  • Page 9 9
  • Page 10 10
  • Page 11 11
  • Page 12 12
  • Page 13 13
  • Page 14 14
  • Page 15 15
  • Page 16 16
  • Page 17 17
  • Page 18 18
  • Page 19 19

Brinsea AC261 GB Issue 01 User manual

Type
User manual

The Brinsea AC261 GB Issue 01 is an advanced incubator designed to provide precise control over temperature, humidity, and egg turning for successful hatching of various bird species. With its user-friendly digital control panel, you can easily adjust and monitor incubation settings, including temperature, turning interval, and turning angle. The incubator features a built-in hygrometer for humidity monitoring and an automatic egg turner to ensure even heat distribution.

Ask a question and I''ll find the answer in the document

Finding information in a document is now easier with AI