
Ver E 1.0
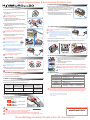
2. Identification of Parts
3. Basic components
View-Window
Power Cord
Silicon Tube
Main Controller
Humidity Pad
Rated voltage and product serial No. are marked inside of power cover.
Be sure to check this before connecting power.
Your Serial no. located on left-side of the main controller. Please be sure not to get dirty or break.
(ex:RCM0950278)
ABS Divider Hatching Pad
Egg Turning Wire
Bottom Body
Manual
Egg Tray
Power Cover fixing bolt
(1pcs.)
Main Controller Assembly Bolts
(2pcs.) (2pcs.)
(Power Cap)
(210mm * 150mm)
EX-SURO
Rcom KINGSURO ECO 20 MANUAL
Egg Turning Wire
Egg Tray
ABS Divider
Bottom Body
Main Controller
View-Window
Power Cab
Air Ventilation
Thermometer Humidity Injector Screw Driver
V-Pin
(2pcs.)
(100mm)
(6pcs.)
4. Display
1. Safety Precautions
①
②
① Heater Operation Lamp
- Light on when working
② Temperature Control Regulator
- Using screw driver and turn to “+” to make
Temp. Up, and “-“ to make Temp. Down.
● Name & Function of operation Parts
5. How to Assemble (Before Using)
How to cut and fold the Humidity pad properly.
50mm X 150mm
(Low Humidity Use : When using under 60% Humidity setting)
110mm X 150mm
(High Humidity Use : When using over 60% Humidity setting)
After cutting the Humidity pad as above sizes for your
purpose, fold up as below picture and insert it with 2 of V-pins.
Please put the Egg-Turning wires in the
holes, bottom outside of the main body.
▶Please remove all packing from the incubator and
parts. Then, check each part is present and
undamaged. (Please keep the carton and packing
materials for repacking to retain the incubator in good
condition when not using.)
50mm110mm 50mm
Low
Humidity Use
High
Humidity Use
1 2
3 Loose 2 screws, connecting Main-controller and
View-window. And then, disassemble Main-controller
and View-window by pushing out 4 hooks on
Main-controller.
Fix silicone tube which is assembled with nipple into the
hole.
Be careful to ensure the silicon tube is not folded.
Nipple
4
Please do not tighten the screws
too much.
The ‘use by’ of Humidity pad is about 4~6 months, but if you use dirty water, the life of pad will be short.
(Using Distilled-water strongly recommended) Humidity pad can be purchased separately again from our shop.
Humidification ability is different as the pad sizes.
Please make sure that the silicon tube end is located
onto the Humidity pad.
5
Insert the nipple into the holder, located
on edge of main controller, and assemble
View-window and main controller with
2 screws
Please assemble Bottom-body, Tray, and Hatching-pad
order.
Ensure the Hatching-pad is placed on the Tray.
After hatching finished, be sure to wash and dry the
Hatching-pad completely for next use.
Please keep the hatching pad, and if not using the pad
during incubation, the hatching rate will be lower.
Sensing part of the thermometer
has to be located opposite side with
the silicon tube out.
7
Please put the thermometer to the V-pin as right picture.
If you push too strong to put the thermometer into the
V-pin, the thermometer can be broken.
Please make sure to put the thermometer just like right
picture. The sensing part of the thermometer has to be
same side with the picture. Also, the thermometer must
not be touched with Humidity pad for exact temperature
read.
6
Please change the ‘50mm X 150mm sized humidity pad’ to ‘110mm X 150mm sized pad’ about
3 days before bird hatching to give much more humid environment inside of the incubator.
Please put about 100mm long silicon tube to the other end of the silicon tube nipple, made of plastic,
located outside of the incubator as below picture.
Nipple (1pcs.)
(125mm)
100mm
Rcom KINGSURO ECO 20 MANUAL
Electrical hazards Be careful the details below when you use.
Setting Cautions Be careful the details below when you use.
Do not pull the cord when
taking out the power cord,
and keep wet hands away
from connecting plug.
Do not use a damaged
power cord or loose
outlet.
Risk of electric shock or fire.Risk of electric shock or fire.
Do not insert multiple
connecting plugs in an
outlet.
Risk of fire or electrical overload.
Never pull the plug out of
the outlet during the
incubation period.
Incubation will be interrupted.
Do not twist or crush
electric cord.
Risk of electric shock or fire.
Cleaning Cautions
Be sure to disconnect the electric cord
from the outlet before cleaning.
Clean the incubator by a
soft cloth with a neutral
detergent.
Do not spray cleanser
directly on the incubator
surface.
Do not use chemicals like wax,
benzene, alcohol, thinner,
aromatic, or lubricant, etc.
Brush away dust on the
plug with a dry cloth.
For special cleaning of
inner part per year, contact
to the service center.
If you don't clean the inside of
incubator for a long time, dust
can cause some trouble or a fire.
Do not install under the
direct sunlight.
Do not install in dusty or
dirty environment.
Risk of fire or interference with
the incubation process.
Risk of damage or fire within
the incubator.
Do not install in excessively
cold or hot conditions,
cigarette smoke, etc.
Do not install in moist or
humid environment.
Risk of interference with
the incubation process.
Risk of fire or electric shock.
Do not use any other
non-standard parts
except those provided.
Risk of damage or hatching
failure.
Please ensure that no
small objects get into
the holes on the incubator.
Risk of electric shock or fire.
Do not disassemble or
modify the incubator in
any way.
Risk if electric shock or fire.
If the incubator sounds
strange or emits smoke
contact your service
center.
Risk of electric shock or fire.
If the incubator requires
repair disconnect from the
power supply and please
contact to your service center.
Clean the incubator
thoroughly before storing.
Install away from heat
sources.
Risk of damage to the incubator
case and interference with
the incubation process.
Do not turn the incubator
upside down.
Water will pour out of the incubator,
and view window can be dropped
or damaged.
Ensure that the incubator is
installed on a stable surface
away from edges.
Risk of damage to incubator
and eggs and user from
accidental knocks or drops.
Do not cover the
ventilating opening.
Inner temperature can rise,
interrupting incubation.
Risk of knocking the incubator
or accidental interference with
the controls.
This appliance is not intended for use by persons (including children) with reduced physical, sensory or
mental capabilities, or lack of experience and knowledge, unless they have been given supervision or
instruction concerning use of the appliance by a person responsible for their safety.
Children should be supervised
to ensure that they do not play
with the appliance.
When the spirit thermometer from KingSuro ECO has an inaccurate reading (separations look like blue dots)
caused by transit, please dip the thermometer in very warm water. When the thermometer spirit reaches
maximum, please take the thermometer out of the warm water. Please check the spirit has joined together.
The dipping method may need to be repeated to remove separations in spirit. At this time, if the water is too
hot or maximum temperature is kept for a long time, it may cause malfunction of the thermometer.
North America Sales & Service www.RcomCo.com
Rcom Bird Egg Incubator KingSuro Eco 20 User Manual

Power Cord
Just take off the power cord after hatching.
Depends on eggs of birds, egg turning cycles are various.
We recommend 1 hour, and maximum of egg turning
time is 3 hours, turn right or left. During the first week,
interval of the egg turning cycle is 1 hour, and stop the
egg turning before hatch.
Before 3 days of hatching, remove egg turning wires,
and place incubator on horizontal to stop egg turning.
Left Right
6. How to install incubator
8. Incubation Termination
7. Egg turning
9. Water supply for humidity.
10. How to set temperature.
Place assembled incubator on horizontal.
Open the power cap to insert the power code, and then
put reassemble.
Be careful and ensure the cord not to get jammed
when you tighten screw bolt.
Ensure rated voltage of the incubator .
If you open power cap, there is sticker which tells rated
voltage in the position picture.
When the first operated, there could be odor for
temporarily, but this is not incubator problem.
Set the eggs in the incubator, and then operate 1~2
hours to get internal temperature stable.
please calibrate temperature once.
We usually recommend higher temperature for
incubation. [37.5 ± 0.5 ]
For automatic egg turning, you can buy optional item,
KING SURO Eggvan.
You can purchase the fuse seperately at the shop, you purchased.
There is no specified ON or OFF button on the incubator.
If the view window is not closed completely,
internal temperature will not go up.
Temperature control is very sensitive. therefore, turn it little by little.
(After setting, read temperature about 10~20 minutes later.)
In the first time when putting the eggs, adjust temperature after 1~3hours for stabilization.
Please do not turn high from the first time, raise temperature from low to high little by little carefully.
Temperature regulator can be damaged if you use unspecified tool, and repair service will be
paid.
While egg turing, be careful and ensure the view window is not opened nor pour eggs.
Place eggs by adjusting tray divider according to egg
size and cover view window.
Check the temperature inside of the incubator before
putting eggs. When setting temperature, use the provided
screwdriver. [Ref. 10]
Slowly inject water with provided syringe, and be careful
not to drop on the eggs.
During hatching, supply water to humidity pad at least once a day.
If you want to adjust the desired temperature,
open the power cap and turn temperature control volume
using the supplied driver.
Raise temperature
Turn clockwise
Turn counterclockwise
Drop temperature
Use provided syringe, inject 15ml water through silicone tube.
Suitable installation
environment
Temperature and humidity
at the installation site are low
[Below 20°C(68°F), 40%]
Temperature and humidity
at the installation site are high
[Over 25°C(77°F), 60%]
Before 3 days
of hatching
1 time per every
5~6 hours Whenever day
Humidity pad (50mm x 150mm) Humidity pad
(110mm x 150mm)
1 ~ 2 times a day
At the end of incubation,
exchange to high humidity
pad and inject 20~25ml
It is recommended to place eggs
with sharp end side down.
Control the space of eggs and divider optimally,
so the eggs are not interrupted for incubation.
If you put too much pressure on syringe or not to
inject slowly, water can be dropped on the eggs.
11. Maintenance after Hatching
14. Specification
Newly-born birds, just after hatching are very weak for clod.
Therefore, a brooder should be ready for them. In case a brooder
is not prepared, please let them stay in the incubator for 1~2 days
after hatching. If you have a brooder, the temperature must be
around 35~37 (95~98.5) .
There are differences in bird feeding due to their various species,
so please find out proper feeding before hatching.
(we have many information for bird breeding on our web-site.)
Take off all the dust and feathers using brush carefully. Please do not brush too hard. The sensor,
heater or fan can be broken.
12. How to clean up after hatching finished
Be sure to pull out the power cord before clean up
incubator.
After incubation terminated, never leave the incubator
covered with the View-window because all the moisture
inside of the incubator can break electric parts, especially
PC board, and make your next hatching be failed.
Please be sure to remove the View-window and dry the
incubator perfectly.
Remove Main-controller from View-window.
If the cover is not perfectly assembled, the rubber seals are not perfectly
block the moisture from incubation room, and this can make the PC board
broken.
The success of incubation may vary according to different factors.
The manufacturer and distributor are not responsible for failure of incubation of costly eggs, loss of
life, property damage due to negligence of user, remodeling, painting, modification of purpose of
use or power failure. Please read carefully the instruction manual before use to avoid failures.
Average : 25[W]
power input
power consumption
Incubation Capacity
Weight
Fuse Standard
Size (W)370×(D)231×(H)209 [mm]
2.4[kg]
Quail : 60[eggs]Pheasant : 40[eggs]
Chick : 24[eggs] Duck : 20[eggs]
Turkey : 9 ~ 12[eggs]
Amazon / Macaw : 36[eggs]
Max : 48[W]
Operating serviceable temp.
20 ~ 42[℃] (68~107.6[℉])
AC 100~120[V], 50/60[Hz] / AC 220~240[V], 50/60[Hz]
250[V] 2[A] (Ø5×20[mm])
13. How to replace the Fuse
If you have power failure even though you plug in power cord, please check
the Fuse. If you disassemble the PC board after loosening 4 screws as left
picture, there is a Fuse, and if the Fuse is damaged, please remove and
replace it.
Please make sure the Fuse standard.
( 250V 2A Ø5*20mm )
After replacing the Fuse, please assemble in reverse order of disassemble.
For improvement, the functions of the incubator,
design, how to use, etc. can be changed without
notice in advance.
Power Cord
Power Cord
North America Sales & Service
www.RcomCo.com
North America Sales & Service www.RcomCo.com
Rcom Bird Egg Incubator KingSuro Eco 20 User Manual
-
 1
1
-
 2
2


Ask a question and I''ll find the answer in the document
Finding information in a document is now easier with AI
Related papers


Other documents
-
Brinsea Octagon 20 ECO User manual
-
-
-
HOMDOX 55 Digital Parrot Egg Incubator Auto Turning User manual
-
 Farm Innovators Farm Innovators Model 3200 Automatic Egg Turner View Guide
-
BellSouth 100 User manual
-
 Farm Innovators Farm Innovators Model 3200 Automatic Egg Turner User manual
-
 Farm Innovators Farm Innovators Model 3200 Automatic Egg Turner View Guide
-
PATENT PENDING Nurture Right Operating instructions
-
 Procon Grumbach CTD7 Operating instructions


