Page is loading ...

DRAFT
September 5, 2003 10:35 am, 4344950.fm
GeneMapper™ Software v3.5
Installation Instructions
This document includes:
Before You Install v3.5 . . . . . . . . . . . . . . . . . . . . . . . . . . . . . . . . . . . 2
Installing the Instrument Configuration . . . . . . . . . . . . . . . . . . . . . . 6
Installing the Remote Autoanalysis Configuration. . . . . . . . . . . . . 14
Installing the Standalone Configuration . . . . . . . . . . . . . . . . . . . . . 22
Upgrading Previous Versions . . . . . . . . . . . . . . . . . . . . . . . . . . . . . 29
Starting GeneMapper Software. . . . . . . . . . . . . . . . . . . . . . . . . . . . 33
Migrating Projects. . . . . . . . . . . . . . . . . . . . . . . . . . . . . . . . . . . . . . 36
Troubleshooting Installation . . . . . . . . . . . . . . . . . . . . . . . . . . . . . . 38
Contacting Applied Biosystems . . . . . . . . . . . . . . . . . . . . . . . . . . . 44
Index . . . . . . . . . . . . . . . . . . . . . . . . . . . . . . . . . . . . . . . . . . . . . . . . 45
Audience and
Assumptions
This guide is intended for customers installing GeneMapper™
Software v3.5 on a computer that meets or exceeds the requirements.
It is assumed that you have:
• A working knowledge of the Windows® 2000 operating system
• Administrative privileges on the computer
• Access to information about the network environment
Related
Documentation
The following related documents are shipped with the software:
•GeneMapper™ Software v3.5 User Guide – Describes the
software and provides information on controlling access and
auditing, archiving, and software functions.
•GeneMapper™ Software v3.5 Online Help – Describes the
software and provides procedures for common tasks.
Portable document format (PDF) versions of this document and the
GeneMapper™ Software v3.5 User Guide are also available on the
GeneMapper™ Software v3.5 software installation CD.
Note: For additional documentation, see “How to Obtain Services
and Support” on page 44.

DRAFT
September 5, 2003 10:35 am, 4344950.fm
2 GeneMapper Software v3.5 Installation Instructions
New Features in
v3.5
• Access control and auditing
• Automated analysis with ABI PRISM® 3100/3100-Avant Genetic
Analyzers
• New features and functions for analysis using the SNPlex™
Genotyping System:
– Cluster plot analysis and display for SNP genotyping
– Process (Component-Based) Quality Values (PQVs)
• OLA Analysis analysis method for certain oligo ligation assay
(OLA)-based mutation analysis
• Improved analysis and post-analysis functions:
– Improved performance of plot displays
– Improved printing speeds and views
• Drag-and-drop marker management
• Database archiving
Before You Install v3.5
Computer
Requirements
For optimal performance, install the software on a computer with:
• 2.4 GHz Intel® Pentium® 4 processor
•1 GB of RAM
• Two 120 GB hard drives
• 20/48x IDE CD-ROM
• 10/100 NIC with RWU (internal)
• 17" color monitor
• Microsoft® Windows® 2000 Professional operating system,
Service Pack 3
Note: Applied Biosystems ships the Dell Precision™ Workst a tion
340. The Dell 340 computer that shipped with the
Applied Biosystems 3730/3730xl DNA Synthesizers Data Collection
Software v1.0 is sufficient but does not provide optimal performance.
Note: GeneMapper software is not compatible with dual-processors
or with Intel Xeon® processors.
Note: For optimal performance of GeneMapper software, partition
the hard drives on your computer.

DRAFT
September 5, 2003 10:35 am, 4344950.fm
Before You Install v3.5
GeneMapper Software v3.5 Installation Instructions 3
Supported
Instruments
The GeneMapper™ Software v3.5 supports data generated on the
following instruments:
• Applied Biosystems 3730 DNA Analyzer
• Applied Biosystems 3730xl DNA Analyzer
•ABI P
RISM® 3100 Genetic Analyzer
•ABI P
RISM® 3100-Avant Genetic Analyzer
Data Collection
Software
Compatibility
Functional compatibility between GeneMapper Software v3.5 and
Data Collection Software v1.0 and v2.0:
Supported
Fragment
Analysis
Chemistry Kits
The GeneMapper™ Software v3.5 is designed to analyze the data
generated using several fragment analysis chemistry kits on the 3730,
3730xl, 3100, and/or 3100-Avant systems.
Kits Supported Using the 3730 or 3730xl Systems
•ABI PRISM® GeneScan™ Size Standards (LIZ® dye only)
•ABI P
RISM® Linkage Mapping Set v2.5
•ABI P
RISM® Mouse Mapping Primers v1.0
•SNPlex
™ Genotyping Systema
• Custom microsatellites (G5 dye set only)
Note: Analysis of non-STR applications, including AFLP, SSCP, and
polyploidy data, is not supported.
Data Collection
Software Version
Sample File
Compatibility
Installation on the
Same Computer Autoanalysis
2.0 Yes Yes Yes
1.0 Yes No No
a. New for v3.5.

DRAFT
September 5, 2003 10:35 am, 4344950.fm
4 GeneMapper Software v3.5 Installation Instructions
Kits Supported Using the 3100 or 3100-Avant Systems
•ABI PRISM® GeneScan™ Size Standards (ROX™ dye and LIZ®
dye)
•ABI P
RISM® Linkage Mapping Set v2.5
•ABI P
RISM® Mouse Mapping Primers v1.0
•ABI P
RISM® SNaPshot® Multiplex Kit
•ABI P
RISM® SNaPshot® Primer Focus Kit
•SNPlex
™ Genotyping Systema
•StockMarks
® Animal Parentage Typing Kits
• Custom microsatellites
• Certain oligo ligation assay (OLA)-based mutation analysis
assaysa
Note: Analysis of non-STR applications, including AFLP, SSCP, and
polyploidy data, is not supported.
What Gets
Installed
The installer on the CD installs:
• GeneMapper™ Software v3.5
•Oracle
® Database Standard Edition v8.1.7
• Size standard definitions
• Example data: sample files, reference sample files, and panels
•GeneMapper™ Software v3.5 User Guide (*.pdf) (PN 4343790)
•GeneMapper™ Software v3.5 Installation Instructions (*.pdf)
(PN 4344950)
•GeneMapper™ Software v3.5 Online Help
a. New for v3.5.

DRAFT
September 5, 2003 10:35 am, 4344950.fm
Before You Install v3.5
GeneMapper Software v3.5 Installation Instructions 5
Supported
Configurations
If you have no previous versions of GeneMapper software, you can
install GeneMapper software v3.5 as one of three configurations.
Configuration Description See Page
Instrument In the instrument configuration, Data Collection software and
GeneMapper software are installed on the same computer. You
can set up both software products so that GeneMapper software:
1. Obtains sample files from the local Data Collection Software
database.
2. Performs analysis of the generated sample files automatically
(autoanalysis).
6
Remote
autoanalysis
In the remote autoanalysis configuration, Data Collection
software and GeneMapper software are installed on separate
computer. You can set up Data Collection software and
GeneMapper software v3.5 so that GeneMapper software:
1. Connects to a remote computer with Data Collection software.
2. Obtains sample files from the remote Data Collection Software
database.
3. Performs analysis of the generated sample files automatically
(remote autoanalysis).
14
Standalone In the standalone configuration, Data Collection softwareand
GeneMapper software are installed on separate computers. You
can use GeneMapper software to add sample files from a remote
Data Collection software database to a project and perform
manual analysis of the project. GeneMapper software does not
interact with Data Collection software for autoanalysis or remote
autoanalysis.
22

DRAFT
September 5, 2003 10:35 am, 4344950.fm
6 GeneMapper Software v3.5 Installation Instructions
Installing the Instrument Configuration
Overview Install the instrument configuration if Data Collection Software v2.0
is installed on the local computer.
Workflow 1. Log onto the local domain of your computer as a user with
administrative privileges (below).
2. Confirm that your computer meets requirements (page 6).
3. Start Data Collection services (page 7).
4. Install the instrument configuration (page 9).
5. Register and log into the software (page 33).
Logging Onto the
Computer
Installing the GeneMapper software v3.5 on the computer requires
that you log onto the computer:
• As a user with administrative privileges, with complete and
unrestricted access to the computer/domain
• Onto the local domain
IMPORTANT! Do not log onto the network.
Confirming That
Your Computer
Meets
Requirements
IMPORTANT! For optimal performance, confirm that your computer
meets requirements.
To confirm that your computer meets requirements:
1. View the system properties:
a. Right-click My Computer on the desktop and choose
Properties.
b. Confirm that the properties meet requirements:
• Operating System: Microsoft Windows® 2000
Professional
• Ve r s i o n : Service Pack 3
• Processor: Intel Pentium® 4, 2.4 GHz
• Memory: at least 1 GB RAM
Note: GeneMapper software is not compatible with dual-
processors or with Intel Xeon® processors.
c. Close the System Properties box.

DRAFT
September 5, 2003 10:35 am, 4344950.fm
Installing the Instrument Configuration
GeneMapper Software v3.5 Installation Instructions 7
2. View the hard disk properties:
a. Right-click My Computer on the desktop and choose
Explore.
b. Confirm that the hard drive is partitioned.
Note: For optimal performance, partition the hard drives on
your computer.
c. Right-click one local disk, choose Properties, and confirm
that the hard disk is at least 120 GB and that there is at least
164 MB of free space.
d. Right-click another local disk, choose Properties, and
confirm that the hard disk is at least 120 GB and that there
is at least 2 GB of free space.
e. Click OK.
Starting Data
Collection
Services
Start Data Collection services before installing GeneMapper
software.
If you do not have Data Collection software on the computer, quit the
installer and do one of the following:
• Install Data Collection software before proceeding
• Install the remote analysis configuration (page 14)
• Install the standalone configuration (page 22)
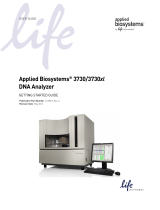
To start Data Collection services:
1. Choose Start > Programs > Applied Biosystems > Data
Collection > Data Collection v2.0 to display the Service
Console and wait until all four symbols are changed to green
squares.

DRAFT
September 5, 2003 10:35 am, 4344950.fm
8 GeneMapper Software v3.5 Installation Instructions
Note: If the services do not start automatically, click Start All.
2. If the Data Collection software requires a password, a login
dialog box appears. Enter the Login Name and Password and
then click OK.
Note: If you do not know the Login Name or Password, contact
the administrator.
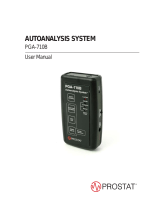
3. Confirm that Data Services started without errors:
a. From the Service Console, right-click the square next to
Data Service and select Show Console to display Data
Service output, a Java applet.
b. Confirm that no errors are displayed in the lower pane of
the Data Service output and close the applet.
Right-click here

DRAFT
September 5, 2003 10:35 am, 4344950.fm
Installing the Instrument Configuration
GeneMapper Software v3.5 Installation Instructions 9
Installing the
Software
(Instrument
Configuration)
Instrument configuration installation takes approximately 5 minutes.
Note: If you are not able to complete the installation as it is
described, then go to “Troubleshooting Installation” on page 38.
To install the instrument configuration:
1. Insert the GeneMapper™ Software v3.5 CD into the CD drive
and start the installer.
Note: If the installer does not start, then:
a. Right-click My Computer and choose Explore.
b. Expand the CD drive.
c. Select the GeneMapper v3.5 folder to display the contents.
d. Double-click setup.exe to start the installer.
2. Click Install GeneMapper Software v3.5 to open a Welcome
window.
No errors
displayed

DRAFT
September 5, 2003 10:35 am, 4344950.fm
10 GeneMapper Software v3.5 Installation Instructions
3. Make sure that Data Collection Software v2.0 is open and save
and close all other applications and windows before proceeding
with the installation.
4. On the Welcome window, click Next. The installer checks your
computer to confirm that your system meets the requirements.
Note: If your system does not meet the requirements, you
receive a warning message that if you proceed with the
installation, your system will not have optimal performance.
5. Click Next. The installer checks your system for Data
Collection software versions.
The installer presents a message that your computer has Data
Collection software installed. If you do not get this message,
start Data Collection services (page 7).
6. Click Next if Data Collection services is started.

DRAFT
September 5, 2003 10:35 am, 4344950.fm
Installing the Instrument Configuration
GeneMapper Software v3.5 Installation Instructions 11
7. Select the install drive:
a. Confirm that the boot drive has at least 164 MB of free
space.
b. Select an install drive with at least 5000 MB (5 GB) of free
space.
c. Click Next.
8. View the amount of disk space that is preallocated for the
GeneMapper database and click Next.
Note: You cannot change the values shown, but you can allocate
more disk space later using the Database Manager from within
GeneMapper software. For instructions, access the
GeneMapper™ Software v3.5 Online Help from within the
GeneMapper software.
Note: The amount of disk space that is preallocated varies
according to your computer configuration.
9. Read the license agreement, select I accept the terms of the
license agreement, and click Next to continue with the
installation.
10. Read the release notes and click Next.

DRAFT
September 5, 2003 10:35 am, 4344950.fm
12 GeneMapper Software v3.5 Installation Instructions
11. Read the installation preview and click Next to start the
installation.
IMPORTANT! During installation, DOS commands are executed
and a DOS windows open. Do not delete, close, or click in the
windows. If you click in one, press the Esc key.
After the installer completes the installation, it presents an
Installation Successful window.
12. Click Next to continue.
13. Select No, I will restart my system at a later time and then
click Finish.
Restarting the
System
Stop Data Collection Services before restarting the system.
1. On the Service Console for Data Collection Software v2.0, click
Stop All.

DRAFT
September 5, 2003 10:35 am, 4344950.fm
Installing the Instrument Configuration
GeneMapper Software v3.5 Installation Instructions 13
2. Press Ctrl+Alt+Delete and select Shut Down.
3. Select Restart and click OK to restart the system.

DRAFT
September 5, 2003 10:35 am, 4344950.fm
14 GeneMapper Software v3.5 Installation Instructions
Installing the Remote Autoanalysis Configuration
Overview Install the remote autoanalysis configuration for GeneMapper
software if you plan to connect to a remote computer with Data
Collection Software v2.0.
Workflow 1. Log onto the local domain of your computer as a user with
administrative privileges (below).
2. Confirm that your computer meets requirements (page 14).
3. Set up the remote computer (page 15).
4. Install the remote autoanalysis configuration (page 17):
5. Register and log into the software (page 33).
Logging Onto the
Computer
Installing the GeneMapper software v3.5 on the computer requires
that you log onto the computer:
• As a user with administrative privileges, with complete and
unrestricted access to the computer/domain
• Onto the local domain
IMPORTANT! Do not log onto the network.
Confirming That
Your Computer
Meets
Requirements
IMPORTANT! For optimal performance, confirm that your computer
meets requirements.
To confirm that your computer meets requirements:
1. View the system properties:
a. Right-click My Computer on the desktop and choose
Properties.
b. Confirm that the properties meet requirements:
• Operating System: Microsoft Windows® 2000
Professional
• Ve r s i o n : Service Pack 3
• Processor: Intel Pentium 4, 2.4 GHz
• Memory: at least 1 GB RAM
Note: GeneMapper software is not compatible with dual-
processors or with Intel Xeon® processors.

DRAFT
September 5, 2003 10:35 am, 4344950.fm
Installing the Remote Autoanalysis Configuration
GeneMapper Software v3.5 Installation Instructions 15
c. Close the System Properties box.
2. View the hard disk properties:
a. Right-click My Computer on the desktop and choose
Explore.
b. Confirm that the hard drive is partitioned.
Note: For optimal performance of GeneMapper software,
partition the hard drives on your computer.
c. Right-click one local disk, choose Properties, and confirm
that the hard disk is at least 120 GB and that there is at least
164 MB of free space.
d. Right-click another local disk, choose Properties, and
confirm that the hard disk is at least 120 GB and that there
is at least 2 GB of free space. Click OK.
Setting Up the
Remote
Computer
Set up the remote Data Collection computer before installing
GeneMapper software on the local computer.
To set up the remote computer:
1. On the remote Data Collection computer, choose Start >
Programs > Applied Biosystems > Data Collection > Data
Collection v2.0 to start Data Collection Software v2.0.
The software displays the Service Console. Wait until all four
symbols are changed to green squares.
Note: If the services do not start automatically, click Start All.
2. If the Data Collection software requires a password, a login
dialog box appears. Enter the Login Name and Password and
then click OK.

DRAFT
September 5, 2003 10:35 am, 4344950.fm
16 GeneMapper Software v3.5 Installation Instructions
Note: If you do not know the Login Name or Password, contact
the administrator.
3. Confirm that Data Services started without errors:
a. From the Service Console, right-click the square next to
Data Service and select Show Console to display Data
Service output, a Java applet.
b. Confirm that no errors are displayed in the lower pane of
the Data Service output and close the applet.
4. Obtain the host name:
Right-click here
No
errors
in
lower
pane

DRAFT
September 5, 2003 10:35 am, 4344950.fm
Installing the Remote Autoanalysis Configuration
GeneMapper Software v3.5 Installation Instructions 17
a. Right-click My Computer on the desktop and choose
Properties.
b. Select the Network Identification tab to view the full
computer name. The full computer name is the host name.
c. Write down the full computer name and save it for later.
d. Close the Properties dialog box.
Installing the
Software (Remote
Autoanalysis
Configuration)
Remote autoanalysis configuration installation takes approximately
45 minutes.
Note: If you are not able to complete the installation as it is
described, then go to “Troubleshooting Installation” on page 38.
To install the remote autoanalysis configuration:
1. Insert the GeneMapper™ Software v3.5 CD into the CD drive
and start the installer.
Note: If the installer does not start, then:
a. Right-click My Computer and choose Explore.
b. Expand the CD drive.
c. Select the GeneMapper v3.5 folder to display the contents.
d. Double-click setup.exe to start the installer.
2. Click Install GeneMapper Software v3.5 to open a Welcome
window.
3. Save and close all applications and windows before proceeding
with the installation.

DRAFT
September 5, 2003 10:35 am, 4344950.fm
18 GeneMapper Software v3.5 Installation Instructions
4. On the Welcome window, click Next. The installer checks your
computer to confirm that your system meets the requirements.
Note: If your system does not meet the requirements, you
receive a warning message that if you proceed with the
installation, your system will not have optimal performance.
5. Click Next. The installer checks your system for Data
Collection software versions.
If your computer does not have Data Collection software
installed, you are presented with a choice between the remote
autoanalysis and standalone configurations.
If you have a previous version of Data Collection software
installed, quit the installation and either go to page 6 to install
the instrument configuration or uninstall the Data Collection
software and repeat the installation of the remote autoanalysis
configuration of GeneMapper software (start at page 15).
6. Select Remote autoanalysis, enter the Computer ID (host
name) for the remote computer (see step 4 on page 16), and
click Next.

DRAFT
September 5, 2003 10:35 am, 4344950.fm
Installing the Remote Autoanalysis Configuration
GeneMapper Software v3.5 Installation Instructions 19
The installer checks your system for previous versions of Oracle
software and GeneMapper software. If no previous versions are
found, the installer presents a message that your computer has a
clean configuration.
7. Click Next if you are presented with the message that your
computer has a clean configuration.
8. Select the install drive:
a. Confirm that the boot drive has at least 164 MB of free
space.
b. Select an install drive with at least 5000 MB of free space.
c. Click Next.

DRAFT
September 5, 2003 10:35 am, 4344950.fm
20 GeneMapper Software v3.5 Installation Instructions
9. Allocate disk space for the GeneMapper database and click
Next:
• Allocate at least 3 GB of disk space.
• Increase the disk allocation in increments of 5 GB.
Note: You can allocate more disk space later using the Database
Manager from within GeneMapper software. For instructions,
access the GeneMapper™ Software v3.5 Online Help from
within the GeneMapper software.
10. Read the license agreement, select I accept the terms of the
license agreement, and click Next to continue with the
installation.
11. Read the release notes and click Next.
12. Read the installation preview and click Next to start the
installation.
IMPORTANT! During installation, DOS commands are executed
and DOS windows open. Do not delete, close, or click in the
windows. If you click in one, press the Esc key.
After the installer completes the installation, it presents an
Installation Successful window.
/