Page is loading ...

1
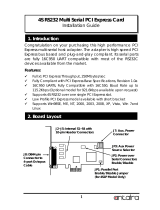
Congratulation on your purchasing this high performance PCI Express
multi-serial host adapter. The adapter is high speed PCI Express bus
based and plug-and-play compliant. Its serial ports are fully 16C1050
UART compatible with most of the RS232C devices available from the
market.
Features:
Full x1 PCI Express Throughput, 250Mbytes/sec
Fully Compliant with PCI Express Base Specifications, Revision 1.0a
256-byte FIFO UARTs, Fully Compatible with 16C1050, Baud Rate up to
921.6Kbps
Supports 8 RS232 ports over one single VHDCI-68 Octopus Cable
Supports Win 2000 and XP, 2003, 2008, Vista, Win 7, 8.x, 10 and Linux
8S RS232 Multi Serial PCI Express Card
Installation Guide
1. Introduction
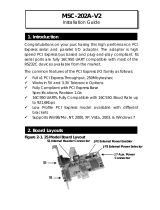
2. Board Layout
8-port VHDCI-68 to
DB9MX8 Octopus
Cable
J3: Aux. Power
Connector
JP2: Aux Power
Source Selector
JP3: Power over External Connector
Enable/Disable Jumper
Low Profile
Bracket
JP4: Mode Jumper (should
always be kept at “CEN”)
JP1: PME
Enable/Disable

8S RS232 Multi Serial PCI Express Card
2
JP1 – PME Enable/Disable Jumper: This jumper is to enable the
PCIe card to wake up the system by its serial ports. The default
was set at “DIS” (disabled).
JP1
Settings
PME Disabled
(default)
PME Enabled
JP3: - Pin-9 Power Enable/Disable Jumper: The design of all DB9
male connectors have an option to supply DC power to their Pin-9.
Pin number 9 of the DB9 connector was defined for RS232 RI (Ring
Indicator) signal. Since some applications do NOT use this signal, in
this case, Pin-9 can be used to deliver DC power for the serial
devices. This product provides 2 settings: “Disable” and “Enable”.
When Disabled, the Pin-9 for all DB9 connectors are not
connected to DC power. When Enabled, the Pin-9 of all DB9
connectors are supplied the DC power selected by JP2.
Pin-9 Power Enable/Disable Setting Table:
JP3
Jumper Settings
Disable Power on Pin-9
(Default)
(default)
Enable Power on Pin-9
3. Jumper Settings
DIS ENA
DIS ENA
DIS PWR
DIS PWR

8S RS232 Multi Serial PCI Express Card
3
JP2 - AUX. POWER Source Selector:
JP2
Settings
External 5V: Power source is +5VDC,
from J3 AUX power connector.
(Default)
External 12V: Power source is +12VDC,
from J3 AUX power connector.
Internal 12V: Power source is +12VDC,
from PCIe golden finger
(motherboard’s PCIe slot)
JP4 – Factory Use Only: This jumper is only for factory production
test purpose, please always keep its jumper at “CEN”.
1. Turn the system power OFF before installation!
2. Use static electricity discharge precautions, Remove the chassis
cover from your computer
3. Locate an unused PCI Express slot (typically white and smaller)
and remove the corresponding slot cover from computer chassis.
4. Plug the I/O card to the unused PCI Express expansion slot and
attached the I/O card bracket to the computer chassis screw.
5. Installing the supplied VHDCI-68-to-DB9MX8 octopus cable and
serial cables to your serial devices.
6. Put the chassis cover back on the computer.
7. Turn ON the power of your computer and peripherals.
8. Proceed with Software Driver Installation.
4. Installing the PCI Express I/O Adapter

8S RS232 Multi Serial PCI Express Card
4
9.
10.
Note:
PLEASE DO NOT LET WINDOWS AUTO SEARCH THE DRIVERS ON THE CD, it
will cause problems because the INF files will be conflict in this case.
Instead, please browse to the correct location (folder) manually to
make sure the correct drivers are chosen and installed correctly.
VHDCI68-Female Connector Pin Assignments
5. Software Driver Installation
Drivers are in each
corresponding folder
6. VHDCI68 Connector Pin Assignments
1
34
68
35

8S RS232 Multi Serial PCI Express Card
5
VHDCI68 Port#-Pin#
1 P1-1
2
P1-2
3 P1-3
4 P1-4
5 P1-6
6 P1-7
7
P1-8
8 P2-1
9 P2-2
10 P2-3
11 P2-4
12
P2-6
13 P2-7
14 P2-8
16 P3-1
19 P3-2
21
P3-3
23 P3-4
24 P3-6
25 P3-7
26 P3-8
27
P4-1
28 P4-2
29 P4-3
30 P4-4
31 P4-6
32
P4-7
33 P4-8
17+18+51+ P1-9, P2-9, P3-9,
P4-9, P5-9, P6-9,
P7-9, P8-9
34,68:
No Connection
VHDCI68 Port#-Pin#
35 P5-1
36
P5-2
37 P5-3
38 P5-4
39 P5-6
40 P5-7
41
P5-8
42 P6-1
43 P6-2
44 P6-3
45 P6-4
46
P6-6
47 P6-7
48 P6-8
50 P7-1
53 P7-2
55
P7-3
57 P7-4
58 P7-6
59 P7-7
60 P7-8
61
P8-1
62 P8-2
63 P8-3
64 P8-4
65 P8-6
66
P8-7
67 P8-8
15+20+22+49+54+
56,
shielding
P1-5, P2-5, P3-5,
P4-5, P6-5, P7-5,
P8-5, shielding

8S RS232 Multi Serial PCI Express Card
6
DB9-Male Pin Assignments:
Type
Specifications
Connector
Cable
Bus Interface
Number of Ports
RS-232 Signals
Baud Rate
Data Bits
Stop Bits
I/O address/IRQ
Parity
Flow Control
Power Requirement
Operating Temperature
Operating Humidity
Storage Temperature
VHDCI-68
VHDCI-68-to-DB9MX8 Octopus type
PCI Express x 1
8
TXD, RXD, RTS, CTS, DTR, DSR, DCD, GND
110 bps to 921.6Kbps
5,6,7,8
1, 1.5, 2
Plug-and-Play (various)
None, Even, Odd
RTS/CTS, XON/XOFF
3.3V/150mA
0 to 55
°C(32 to 132°F)
5 to 95% RH
-20 to 85°C (-4 to 185°F)
7. Specifications
/