Page is loading ...

1
Congratulation on your purchasing this high performance PCI Express
multi-serial/parallel host adapter. The adapter is high speed PCI
Express bus based and plug-and-play compliant. Its enhanced serial
ports (256-byte deep FIFO) are fully 16C550 UART compatible with most
of the RS232C devices available from the market.
Features:
Full x1 PCI Express Throughput, 250Mbytes/sec
Fully Compliant with PCI Express Base Specifications, Revision 1.1
Extended 16C650 UARTs, Fully Compatible with 16C550, Baud
Rate up to 921.6Kbps
Available Models: 2S and 2S+1P over one single PCI Express slot.
Supports Win 2000, 2003, XP-32, XP-64, Vista-32, Vista-64, Windows
7, Mac OS and Linux
Cable
# of DB9s
# of DB25s
2S
2
None
2S+1P
2
2
RS232 Multi Serial/Parallel PCI Express Card
Installation Guide
1. Introduction
2. Board Layout
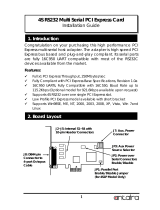
J5: Aux. Power
Connector
JP2: Aux Power
Source Selector
JP1: Power over Serial
Connectors
Enable/Disable jumpers
J3: 2’nd RS232 port (internal)
J2: 1’st RS232 port
(internal)
Installed Octopus Cables:
J4: DB44 pin
Connector to
2S+1P (or 2S)
Octopus Cable

2-Port 422/485 Serial PCI Card
2
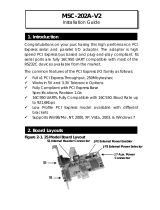
2S+1P and 2S Octopus Cable:
JP1- External Power Enabler: There are 2 jumpers that control the pin-9
signal of the 2 serial port DB9 connectors (S1, S2) respectively. If the
jumper(s) is at the “DIS” position (factory default), the pin-9 was
connected with the RI signal as standard RS232 definition. If the
jumper is at the “PWR” position, the pin-9 was connected with a power
either from PCI Express slot or from Aux Power connector (J5). The
power source is controlled by JP2 jumper (see the following section).
JP2- External Power Selector: The pin-9 of the serial port connector(s)
will be supplied with DC5V or DC12V. There are 3 sources depend on
the jumper’s position of the JP2:
X5V: DC5V, from J5, an optional power cable is required.
X12V: DC12V, from J5, an optional power cable is required.
I12V (factory default): DC12V, from PCI Express golden finger, no
cable is required.
1. Turn the system power OFF before installation!
4. Installing the PCI Express I/O Card
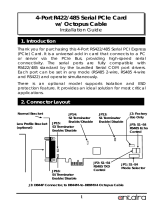
Parallel Port (DB25 Female),
2S+1P model only, 2S model
does not have this connector
P4
P3
S2
S1
Port 1 (DB9 male)
Port 2 (DB9 male)
To PCIe Card (DB44 Male)

2-Port RS422/485 Serial PCI Card
3
2. Remove the chassis cover from your computer
3.
Locate an unused PCI Express slot (typically white and smaller)
and remove the corresponding slot cover from computer chassis.
4.
Plug the PCI Express I/O card to the unused PCI Express
expansion slot and attached the I/O card bracket to the
computer chassis screw.
5.
Install the DB44 octopus cable, there are 2 types of cables
depends on it is 2S+1P or 2S model, the 2S+1P cable provides 2
DB9 male and 1 DB25 female connectors. However, the 2S cable
only provides 2 DB9 connectors.
6.
Installing the serial or parallel cables to your devices.
7.
Put the chassis cover back on the computer.
1. To install the Windows drivers, there are two methods, one is to
run the setup utility (StnSetup.exe) in each corresponding folder.
The other one is by the Windows’ driver installation Wizard. We
recommend you run the setup utility. It will be simpler. However,
PLEASE REFRESH HARDWARE OR REBOOT THE SYSTEM IN CASE
YOUR DRIVER DID NOT TAKE EFFECT AFTER RUNNING THE SETUP
UTILITY.
The drivers are shipped in the following folders on the driver CD:
E:\IO\MOSCHIP\MCS99xx
Drivers are in each
corresponding folder
5. Software Installation

2-Port 422/485 Serial PCI Card
4
In some cases, you may want to uninstall the drivers. To remove the
drivers that already installed for Windows, there are two methods:
1. Run (double click) the uninstall program (for example
MOSCHIP_StnUninst.exe) in each Windows’ folder on the
supplied driver CD, it is usually in the same folder as the
StnSetup.exe utility:
2. Go to Windows’ Control Panel’s Add/Remove Program to remove
the drivers.
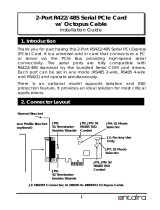
DB9(Male) on the 9-pin Flat Cable:
Pin#
Signal
Pin#
Signal
1
DCD
6
DSR
2
RXD
7
RTS
3
TXD
8
CTS
4
DTR
9
RI
5
GND
Driver Uninstalling Program
Driver Installing Program
7. Connector Pin Assignments
1
6
5
9
6. Uninstalling the Software Drivers
/