Page is loading ...

1 1
PROJECTS • PROYECTOS
Sun Screen Fabric
Patio Shade
Sombraje
de Patio
Greenhouse and
Invernadero y
Estructura para
Sombra
Playhouse and
Sandbox
Casita para
Juegos y
Cajón de Arena
Privacy Fence
Cerca de
Privacidad
Roll-up Shade
Visillo Enrollable
3-4
5-6
9-10
11-12
7-8
Garden Shade
Structure

2
asy Gardener Sun Screen Fabric is an excellent choice
for your garden fabric needs. It is available in an array of
colors including: black, green, jade, smoke blue and saddle
tan. Sun Screen Fabric provides shade, privacy and windscreen
for people, plants and pets.
Easy Gardener Sun Screen Fabric es una excelente alterna-
tiva para el jardín. Se ofrece en una variedad de colores, entre
ellos: negro, verde, jade, azul humo y café.
Sun Screen Fabric brinda sombra, privacidad y protección
contra el viento a la gente, las plantas y los animales.
Easy Installation
For the easiest installation of Sun Screen Fabric, select the
easy-to-use accessory best suited to your application. Choose
from Locking Clips, Locking Ties, Snap Grommets and Wood
Fasteners — all designed to make Sun Screen Fabric projects
simple to do so you can enjoy the results sooner.
Fácil Instalación
Para instalar su Sun Screen Fabric de la manera más sen-
cilla, seleccione el accesorio que mejor se adapte a su apli-
cación. Elija entre Presillas de Sujeción (Locking Clips),
Ataduras de Seguridad (Locking Ties), Arandelas de
Broche (Snap Grommets) y Sujetadores para Madera
(Wood Fasteners), todos ellos diseñados para facilitar la in-
stalación Sun Screen Fabric, para que pueda disfrutar los re-
sultados más pronto.
E
Wood Fasteners
Sujetadores para Madera
Fastens fabric to soft timber. Ideal for pine.
Sujetan la tela a madera suave.
Ideales para
pino.
Snap Grommets
Arandelas de Broche
Protects fabric from tearing.
Protegen la tela para que
no se desgarre.
Locking Ties
Ataduras de Seguridad
Fastens fabric to metal pipes,
posts and heavy cable.
Sujetan la tela a tuberías de metal,
postes y cable pesado.
Locking Clips
Presillas de Sujeción
Fastens fabric to wire, rope, cable,
chainlink and mesh fences.
Sujetan la tela a alambre, cuerda,
cable, cadena y alambrados.
PROJECTS • PROYECTOS
Sun Screen Fabric

3
PROJECTS • PROYECTOS
Sun Screen Fabric
This example is for a 12' x 12' shade. Materials can be varied for
other sizes. Sun Screen Fabric comes in 6' widths. Pressure treated
lumber is recommended. Metal connectors are available for wood
c
onnections.
Tools:
■
Posthole digger
■
String line
■
Hammer
■
Line level
■
Wood saw
■
3/8" electric drill and
3/8" bit
■
Measuring tape
■
8" adjustable wrench
■
Scissors
■
6' step ladder
■
Level
■
Two 8" C-clamps
Materials:
■
One 6' x 25' roll Sun Screen Fabric
■
Six 4" x 4" x 10' posts
■
Nine 2" x 6" x 14' lumber
■
Five 2" x 4" x 12' lumber
■
Six bags concrete mix
■
Twelve 3/8" x 7" carriage bolts
with nuts and flat washers
■
Eight 3/8" x 5 1/2" carriage bolts with
nuts and flat washers
■
Five pounds 16d galvanized box nails
■
Four packages of Wood Fasteners
Instructions:
1. Set posts in concrete leaving 8' above ground. Align and set
plumb according to dimensions on the sketch.
2. Use string and line level to mark tops of posts. Cut four corner
posts at the same level and the two middle posts
5 1/2" shorter.
3. Cut all nine beams 13'6"
long. With the crown of
the boards lined up, mark
and cut the bottom edge
of both ends at an angle
as shown.
4. Measure down 11" from
the top of each of the four corner posts and mark a level line all
around the post.
5.
Install a 2" x 6" primary beam above the lines on each side of the
two sets of three posts. The top of these beams should be 5 1/2"
down on the corner posts and flush with the middle posts. The
beams can be clamped to the posts and then through-bolted. One
foot of the beam should extend past the corner posts.
6. Install a cross beam on each end of the structure and through-
bolt to the corner posts.
7. Install the center beam over the two middle posts and toenail to
them.
8. Install two remaining cross beams. Center them in the remain-
ing spaces.
9. Cut and install 2" x 4" blocks between cross beams flush with
the beam tops. All five blocks between any two adjacent beams
should be the same lengths.
10. Cut two 6' x 12' pieces of Sun Screen Fabric. Overlap them
1 1/2" on the center cross beam and fasten with Wood Fasten-
ers. Stretch toward outside and fasten to all cross beams and
blocks as you work across the frame. Trim excess fabric along
the outside edges of the frame.
Top of beam
Patio Shade

5
PROJECTS • PROYECTOS
Sun Screen Fabric
This example is for a 6'x8' greenhouse. Materials can be varied to
construct other sizes. Pressure treated lumber is recommended.
Materials:
Two 6'x25' rolls Sun Screen Fabric
Four 4" x 4" x 8' posts
Twelve 2" x 4" x 8' lumber
Five 2" x 4" x 10' lumber
Five 1" x 4" x 8' lumber
One pair 3" x 3" square door hinges
Four pounds 16d galvanized box nails
One-half pound 4d galvanized box nails
Seven packages of Wood Fasteners
Four sacks concrete mix
Instructions:
1. Set four corner posts 2' deep in concrete, align and plumb.
2. With string and line level, mark tops of posts level and cut off.
3. Cut and nail a 2" x 4" band around the outside of the posts flush
with the post tops. Do the same at ground level.
4. Nail a 2" x 4" x 8' rafter plate on top of the posts and flush with
the outside of the band on the two 8' sides.
5. Nail two 2" x 4" x 8' to the inside of the top and bottom bands
to form a 2' door opening in the center of one of the 6' ends.
6. C
ut 1
0 rafters, 50 1/4" long at the longest point with a 45˚ angle
on each end.
7.
Use a 1" x 4" x 8' as a ridge and install the rafters in pairs, one
pair every 2'. The pair over the door should nail to the studs on
either side of the door.
8. Starting at the door opening, wrap the inside of the walls with
Sun Screen Fabric, fastening it to the top 2" x 4" band with
Wood Fasteners. Then fasten to bottom band, corner posts and
studs at door.
9. Cut two 6' x 8' pieces of Sun Screen Fabric for the roof.
Lay o
ne piece 6" past the ridge, fasten to the rafters on the op-
posite side, stretch down and fasten with Wood Fasteners
to ridge, rafters and rafter plate. Repeat on the other side.
Trim off excess fabric along rafter plate.
10. Cover gable ends with Sun
Screen Fabric. Fasten with
Wood Fasteners and trim
off excess.
11. Construct door from four
1" x 4" x 8' and 28" x 71"
piece of Sun Screen Fabric.
Cut: Two 1" x 4" x 28"
Two 1" x 4" x 57"
Two 1" x 4" x 21"
Two 1" x 4" x 64"
12
Using similar tools and materials as those for the greenhouse,
a simpler and more basic structure can be fabricated to provide
shade over a 6’ x 8’ garden space (see diagram below). Materials can
be varied to build other sizes. Constructed entirely out of pressure
treated 2x4 lumber, depending upon short or long-term needs, posts
may not need to be set in concrete. This frame is primarily designed
for attaching Sun Screen Fabric across its flat top; however, side
panels may be added to block the sun when it is at a low angle.
. Center doo
r o
pening and
hang with 3" x 3" hinges.
Lay out
frame,
cover
with Sun
Screen
Fabric
and
fasten
with
Wood
Fasteners.
Nail this
frame on
top of
the
Sun
Screen
Fabric
with 4d
nails.
Tools:
Posthole digger
String line
Hammer
Line level
Wood saw
Scissors
Measuring tape
6' step ladder
Combination square
Utility knife
Level
G
Garden Shade Structure
reenhouse

7
PROJECTS • PROYECTOS
Sun Screen Fabric
12. Decide where the ladder to the playhouse is to be located. Wall up the
other areas from the inside with 1" x 6" x 4'. Leave approximately 2"
b
etween boards. Nail to the top and bottom band with 6d nails.
13. The ladder is constructed from two 2" x 4" x 8' and six 16" long 1"
dowels. One foot of the bottom of the ladder should be set into the
ground to prevent shifting.A 2" x 4" can also be nailed between the
bottom of the posts to stabilize the bottom of the ladder. From ground
level on the rails, measure up 8", 16", 24", etc. to 48" and mark the
center of the 3 1/2" face of the rails at these points. Bore 1" holes for
the rungs. Insert the rungs and secure by nailing through the 1 1/2" edge
of the rail into the end of the rung with 8d nails.Through-bolt the rails
to the 2" x 6" band at the floor height. Three feet of the rails should
extend above the floor level.
14. Cut a 6' x 8' piece of Sun Screen Fabric to cover the playhouse roof.
Center on the ridge and fasten to it with Wood Fasteners. Stretch
down to each side and fasten to top 2" x 6" band with Wood Fasteners.
Trim off excess.
15. Cut a 6' x 9' piece of Sun Screen Fabric to cover the sandbox. Fasten to
2" x 4" band with Wood Fasteners. Trim off excess.
16. Cut a 6' x 4' piece of Sun Screen Fabric to complete the center roof. Fasten
to 2" x 6" band with Wood Fasteners. Trim off excess.
This example is 4' wide and 19' long. Materials can be varied to build
o
ther sizes. Pressure treated lumber is recommended. Construction
screws of appropriate lengths can be substituted for nails.
Tools:
■
Posthole digger
■
Line level
■
Hammer
■
3/8" electric drill
■
Wood saw
■
5/16" and 1"
wood bits
■
Measuring tape
■
8" adjustable wrench
■
Combination square
■
6' step ladder
■
Level
■
Two 8" C-clamps
■
String line
■
Utility knife
Materials:
■
One 6' x 25' roll Sun Screen Fabric
■
Six 4" x 4" x 10' posts
■
Two 4" x 4" x 8' posts
■
Two 2" x 6" x 12' lumber
■
Eight 2" x 6" x 8' lumber
■
Eleven 2" x 4" x 8' lumber
■
Twenty-four 1" x 6" x 8' lumber
■
Three 1" x 36" hardwood dowels
■
Forty 5/16" x 5 1/2" carriage bolts
with nuts and flat washers
■
Eight sacks of concrete mix
■
Eight 2" x 4" joist hangers
■
Five pounds 16d galvanized box nails
■
Two pounds 8d galvanized box nails
■
Two pounds 6d galvanized box nails
■
Three packages Wood Fasteners
Instructions:
1. Set posts 2' deep in concrete. Make certain they are carefully aligned and
plumb.
2. Using string and line level, mark the tops of the six tall posts level and cut
them to the same height. Do the same for the two shorter posts.
3. Measure down 4' from the tops of the tall post and mark on the outside of
the posts. Install a 2" x 6" band around the outside of the posts above this line.
Through-bolt the 2" x 6" x 8', two bolts per post and nail the 2" x 6" x 4'
boards with 16d nails to the posts.
4. Through-bolt a 2" x 6" x 12' to the outside of the three tall posts flush with
their tops, two bolts per post. Make sure the dimensions match those in the
sketch. Repeat for the other three posts.
5. Nail three 2" x 6" x 4' between the pairs of tall posts at their tops with 16d
nails to complete the band around the top.
6. Cut two 2" x 4" x 8' to 5'6" for the roof ridge poles. Point the top ends by
cutting the corners at 45˚ angles. Center on the two 4' bands and fasten, one
pole at each end of the playhouse.
7. Cut a 2" x 4" x 8' to fit between the tops of the ridge poles and fasten to
their tops with joist hangers.
8. Construct a 2" x 4" band around the outside of the tops of the four posts
around the sandbox. The high end will be below the 2"x6" band and the lower
end should be flush with or slightly above the tops of the two shorter posts.
Nail with 16d nails.
9. Construct a 2" x 6" band on the ground to form the sandbox.Through-bolt all
four sides (two bolts at each end of each board) to the outside of the posts.
10. Install five 2" x 4" x 4' floor joists for the playhouse floor. Nail the two end
joists to the posts, flush with the bottom of the 2" x 6" band. Three other
joists should be evenly spaced between these and fastened to the 2" x 6"
band with joist hangers.
11. Cut the 1" x 6" x 8' floor boards to length and nail with 8d nails to the floor
joists. Leave approximately 1/2" space between boards. Notch floor boards
around posts and ridge poles
.
Playhouse and Sandbox

9
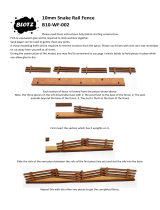
This example is for a 6' high fence in 8' long sections. Materials can
be varied to construct a taller fence in 6' sections. Pressure treated
lumber is recommended.
Tools:
■
P
osthole digger
■
Scissors
■
Hammer
■
Level
■
Wood saw
■
Utility knife
■
Measuring tape
■
6' stepladder
Materials required for each 8' section:
■
6' roll Sun Screen Fabric as long as
fence desired
■
4" x 4" x 8' pressure treated posts —
one post to start fence and one additional
post for each 8' section.
■
Two 2" x 4" x 8' lumber
■
One 1" x 6" x 8' lumber
■
Two 1" x 2" x 8' lumber
■
Four metal fence brackets
■
One sack of concrete mix per post
■
One-half pound 8d galvanized box nails
■
One-half package Wood Fasteners
Instructions:
1. Determine location of 4"x4" posts. Have no more than 7'6" be-
tween posts.
2. Set posts 2' deep in concrete. Make sure they are properly
aligned, spaced and plumbed.
3. Cut a 2" x 4" rail to fit between the tops of the first two posts
and install flush with the tops of the posts using fence brackets.
4. Measure down from the top of the posts 5'9" and mark. Install
fence brackets above these marks.
5. Cut a 2" x 4" rail to fit into these lower brackets but do not nail
in place.
6. Cut a length of Sun Screen Fabric 4" longer than the distance
between the posts (7' - 10' in our example).
7. Fasten one 7' - 10' side to the bottom edge of the bottom
2" x 4" rail using Wood Fasteners. The fabric should extend
2" beyond the ends of the rail.
8. Install the bottom 2" x 4" rail and nail in place.
9. Stretch the Sun Screen Fabric up over the top rail and fasten
to the top edge with Wood Fasteners.
10. Cut a 1" x 6" cap to extend to the center of the post. All splices
should be on top of the posts. Nail to posts and top rail.
11. Cut 1" x 2" furring strips between the rails. Fold Sun Screen
Fabric under 1" x 2" and nail to post.
12. Trim off excess Sun Screen Fabric with utility knife.
13. Repeat procedures for remaining sections.
PROJECTS • PROYECTOS
Sun Screen Fabric
Privacy Fence

11
PROJECTS • PROYECTOS
Sun Screen Fabric
This example is for a 6' x 6' shade. Materials can be varied to construct
s
hades 6' high and of any desired width or 6' wide and any height.
Tools:
■
Hammer
■
Wood saw
■
Measuring tape
■
Screwdriver
■
Scissors
Materials:
■
One 6' x 6' piece Sun Screen Fabric
■
Two 1" x 2" x 8' wood furring strips for top
■
Two 1" x 8' wood half-rounds for bottom
■
One-half pound 1 1/4" galvanized drywall nails
■
Ten #10 screw eyes
■
Three #8 ceiling hooks
■
One rope cleat
■
50' of 1/8" braided nylon cord.
Instructions:
1. Cut furring strips and half-rounds to 6' lengths.
2. Sandwich one cut edge of Sun Screen Fabric between the two
furring strips and nail the strips together. Repeat with the half-
rounds on the opposite cut edge.
3. Insert screw eyes into laths as shown on the sketch.
4.
Tie nylon cord to one screw eye. Pass it under shade and up
through opposite screw eye. Leave sufficient cord to pass to side
of shade as shown.
5. Hang shade from ceiling hooks.
6. Locate remaining screw eye to side of top rail of shade.
7. Place cleat at convenient position to hold cords.
Easy Gardener has tried to make the contents of this brochure as accurate and correct as possible. However, due to the variability of local conditions, construction materials, personal skill,
etc., Easy Gardener, its vendors and distributors assume no responsibility for the appropriateness of these plans and designs. All illustrations and plans should be carefully studied and clearly
understood before beginning construction. Always read the instructions and safety precautions accompanying any tool and follow them exactly. Always make certain the workplace is safe
and tools are in proper condition. Obey all local laws and codes. All projects involve some risks and require good judgement. Children should be carefully supervised in the construction
and/or use of any structure. Easy Gardener, its vendors and distributors provides no warranties of any kind, express or implied regarding the construction or use of any of the ideas, plans
or designs described or illustrated in the brochure and shall not be responsible or liable for any injuries incurred during the construction and/or use of those ideas, plans or designs.
Easy Gardener Products, Inc.
P.O. Box 21025
■
Waco,Texas 76702-1025
1099/ model #
Roll-up Shade
/