Page is loading ...

1
Version V1.0 9-99 MTN All Contents © Copyright 1999
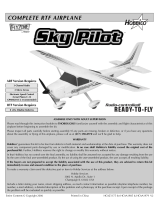
The Wattage Whisper is a 2-meter electric powered glider utilizing all balsa and plywood built up
construction techniques. The polyhedral wing design is a flat bottom, Phillips Entry style that is incredibly
stable throughout the entire flight envelope and produces good lift. The wing is built of true D-Tube
construction with balsa sheeting and shear webbing for great strength. The fuselage is built up light
plywood and balsa and the tail feathers are built up of lightweight balsa. Lightening holes have been
strategically placed to remove unnecessary weight without compromising strength. All this adds up to
an airplane that climbs out with authority and will also do well in the thermals. Included is a 540 direct
drive electric motor with folding propeller assembly and all wiring preinstalled at the factory. All necessary
hardware is included to finish the kit, including clevises, pushrods, control horns and all of the necessary
nuts and bolts, even a molded cowling and canopy! We hope you will enjoy building and flying the
Whisper as much as we have enjoyed designing it for you. Please fill out the Product Evaluation Sheet
at the end of this manual. We would love to hear your comments regarding the Whisper.
Instructions for Final Assembly

2
To make your modeling experience totally enjoyable, we recommend that you get experienced, knowledgable help
with assembly and during your first flights. Your local hobby shop has information about flying clubs in your area
whose membership includes qualified instructors. You can also contact the AMA at the address below.
Academy of Model Aeronautics
5151 East Memorial Drive
Muncie, IN. 47302-9252
(800) 435-9262
www.modelaircraft.org
Wattage guarantees this kit to be free from defects in both material and workmanship, at the date of purchase. This
does not cover any components parts damaged by use, misuse or modification. In no case shall Wattage's liability
exceed the original cost of the purchased kit.
In that Wattage has no control over the final assembly or material used for final assembly, no liability shall be assumed
for any damage resulting from the use by the user of the final user-assembled product. By the act of using the final
user-assembled product, the user accepts all resulting liability.
TABLE OF CONTENTS
Our Recommendations....................................................2
Metric Conversion Chart.................................................2
Kit Contents.....................................................................3
Additional Items Required..............................................4
Tools and Supplies Needed.............................................4
Full Size Hardware Drawings.........................................5
Motor Break-in...............................................................6
Wing Assembly...............................................................7
Laminating the Dihedral Braces..............................7
Installing the Outboard Dihedral Braces.................7
Joining the Outboard Wing Panels..........................8
Joining the Wing Halves.........................................8
Installing the Striping Tape.....................................9
Installing the Wing Hold Down Strip....................10
Wing Installation...........................................................10
Installing the Front Wing Dowels..........................10
Installing the Rear Wing Dowel.............................11
Installing the Wing.................................................11
Horizontal Stabilizer Installation...................................11
Aligning the Horizontal Stabilizer..........................11
Mounting the Horizontal Stabilizer........................12
Hinging the Elevator..............................................12
Vertical Stabilizer Installation.......................................13
Hinging the Rudder................................................13
Aligning the Vertical Stabilizer..............................13
Mounting the Vertical Stabilizer.............................14
Installing the Tail Fairing.......................................14
Servo Installation...........................................................15
Installing the Servo Tray........................................15
Installing the Servos...............................................15
Pushrod Installation.......................................................15
Installing the Pushrod Housings.............................15
Installing the Elevator Control Horn......................16
Installing the Rudder Control Horn........................16
Installing the Elevator Pushrod..............................17
Installing the Rudder Pushrod................................18
Motor Installation..........................................................18
Installing the Motor................................................18
Cowl and Propeller Installation.....................................19
Joining the Cowl Halves........................................19
Installing the Propeller...........................................20
Installing the Cowl.................................................20
Canopy Installation.......................................................21
Aligning the Canopy..............................................21
Mounting the Canopy.............................................21
Landing Skid Installation..............................................22
Installing the Landing Skid....................................22
Final Assembly..............................................................22
Installing the Receiver...........................................22
Installing the Switch...............................................22
Installing the Receiver and ESC............................22
Balancing.......................................................................23
Control Throws.............................................................23
Flight Preparation.........................................................23
Preflight Check......................................................24
ABC's of Flying............................................................24
Basics of Flight..............................................................25
Basics of Thermal Flying..............................................27
Glossary of Terms.........................................................28
Notes..............................................................................29
Product Evaluation Sheet..............................................30

3
OUR RECOMMENDATIONS
RADIO SYSTEM
The Wattage Whisper will require a minimum 3 channel radio control system that includes two servos. For this
we recommend the Hitec Focus 3 channel radio with two standard servos. If you already own a radio system, or
want to purchase a radio system that will be more upgradeable in the future, a four or more channel radio with
two standard servos will work fine. Our recommendation would be the Hitec Flash 4X FM Computer radio.
This is a very good system that offers the ability to grow as your experience grows. A standard size receiver will
fit in the Whisper with no problems, so the purchase of an aftermarket micro or mini receiver is unnecessary.
MOTOR CONTROLLER
To operate the motor, we highly suggest using a proportional electronic speed control that features B.E.C. cir-
cuitry, auto-cutoff and a brake. B.E.C. circuitry allows you to eliminate the receiver battery and uses the motor
battery to control both the motor and the servos. Eliminating the receiver battery provides a great weight savings
which effectively increases performance. The auto-cutoff feature turns off the motor when the voltage in the
battery drops too low to operate the radio system safely. This guarantees safe operation throughout the entire
flight. The brake feature electronically causes the motor to stop rotating allowing the folding propeller to fold
properly. This will prevent excessive strain and current draw in the electronic components, specifically the
motor controller. To obtain all of these features, we suggest using one of the Wattage Electronic Speed Controls
available for 540 and 05 size motors. If you opt not to use a proportional electronic speed control, an electronic
switch such as the Hitec Motor Controller SP-1003 (part # 41003) is an economical way to turn the motor on and
off. This switch does not offer any proportional speed, only off or full power.
MOTOR BATTERY
The battery you choose should be a 7 cell (8.4v) Nickel Cadmium battery pack. Choose a battery pack between
1100Mah and 2000Mah. A premade R/C car battery such as the Trinity 1400Mah flat pack (part # 842010)
works very good. A 6 cell battery pack will fly the Whisper, however climb out will be slower than if you use a
7 cell pack. Today's new generation of Sub-C 3000Mah Nickel Metal Hydride batteries also perform well,
however require a linear charger featuring adjustable peak cutoff voltage.
BATTERY CHARGER
Because the battery powers both the motor and the radio system, we suggest using an automatic Delta Peak
charger such as the Promax Black Widow Peak Charger (part # 35036) or the Promax Activator Digital Peak
Charger (part # 885650). It is vital to the Whisper's flying performance that the battery pack be fully charged
every flight, so using a peak charger is very important.
METRIC CONVERSION CHART
To convert inches into millimeters: Inches x 25.4 = MM
1/64” = .4mm
1/32” = .8mm
1/16” = 1.6mm
3/32” = 2.4mm
1/8” = 3.2mm
5/32” = 4.0mm
3/16” = 4.8mm
1/4” = 6.4mm
3/8” = 9.5mm
1/2” = 12.7mm
5/8” = 15.9mm
3/4” = 19.0mm
1” = 25.4mm
2” = 50.8mm
3” = 76.2mm
6” = 152.4mm
12” = 304.8mm
18” = 457.2mm
21” = 533.4mm
24” = 609.6mm
30” = 762.0mm
36” = 914.4mm
The following items are our recommendations to help you in deciding which types of accessories to purchase for
your new Whisper. We have tested all of these items, and many others with the Whisper, and found that these
will offer the best in performance, reliability and economy.

4
This instruction manual is designed to help you build a straight, great flying airplane. Please read this manual
thoroughly before beginning assembly of your new Wattage Whisper ARF. Use the parts photos below to
identify and separate all of the parts before beginning assembly.
**KIT CONTENTS** We have organized the parts as they come out of the box for better identification
during assembly. Each photo below represents parts that are required for each step in the assembly process.
We recommend that you regroup the parts in the same manner. This will ensure you have all of the parts
required before you begin assembly and will also help you familiarize yourself with each part. The corre-
sponding part number is listed first, then the quantity of the part is listed, along with it's description.
KIT CONTENTS
PUSHROD ASSEMBLIES
q {2} 2mm x 610mm Threaded Pushrods
q {2} 3mm x 640mm Nylon Pushrod Housings
q {1} 3mm x 55mm x 14mm Pushrod Support
q {1} 8mm x 20mm Clear Tubing
q {2} Metal Clevises
q {2} Nylon Control Horns w/ Backplates
q {4} 2mm x 15mm Machine Screws
q {2} Adjustable Servo Connector Assemblies
q {1} Hex Wrench
WOOD PARTS
q {1} 6mm x 95mm Rear Wing Hold Down Dowel
q {2} 6mm x 32mm Front Wing Hold Down Dowels
q {2} Front Wing Hold Down Dowel Blocks
q {4} Outboard Wing Panel Dihedral Braces
q {2} Inboard Wing Panel Dihedral Braces
q {1} Servo Tray
q {1} Servo Tray Support
PROPELLER ASSEMBLY
q {1} Nylon Propeller Hub
q {1} Nylon Spinner Cone
q {2} Propeller Blade Halves
q {1} Tapered Aluminum Hex Adapter
q {1} Threaded Adapter
q {1} Propeller Washer
q {1} Propeller Nut
q {3} 2mm x 12mm Smooth Shank Machine Screws
MOTOR ASSEMBLY
q {1} Electric Motor
q {2} Motor Mount Halves
q {2} 3mm x 8mm Machine Screws
q {4} 3mm x 12mm Machine Screws
q {4} 3mm Flat Washers
q {4} 3mm Nylon Insert Nuts
q {8} 2mm x 12mm Wood Screws
1
2
3
4
5
6
8
7
9
11
12
13
14
10
15
16
17
18
19
21
22
23
24
20
25
26
27
28
29
30
31
1
2
3
4
5
3
6
7
8
19
21
18
24
20
22
23
9
11
12
13
10
14
16
15
17
27
26
28
25
29
30
31

5
ADDITIONAL ITEMS REQUIRED
32
33
34
35
36
37
MOLDED PLASTIC PARTS
q {1} Molded Plastic Canopy
q {2} Molded Plastic Cowl Halves, Right & Left
q {1} Trim Tape (1 White, 2 Blue, 1 Red & White)
q {1} 15mm x 100mm Plastic Strip
q {1} Molded Plastic Tail Fairing
q {1} Molded Landing Skid
38
39
40
41
42
MAIN AIRFRAME ASSEMBLIES
q {1} Fuselage
q {2} Inboard Wing Panels
q {2} Outboard Wing Panels
q {1} Horizontal Stabilizer w/Elevator &Hinges
q {1} Vertical Stabilizer w/Rudder & Hinges
TOOLS AND SUPPLIES NEEDED
q Hitec Focus 3 AM Single Stick Radio w/2 Servos
Requires 8 AA Batteries # AC8AA
q Wattage ESC with BEC and Brake
q Trinity 7 Cell 1400 Mah Amp Max Battery # 842010
q Promax Black Widow Peak Charger # 350360
q Arco # 64 Rubber Bands # 24649
Recommended
Optional Upgrades
q Hitec Flash 4X FM Computer radio w/2 Servos
q Trinity 7 Cell 1700Mah Battery # 1779
q Promax Activator Digital Peak Charger # 885650
q Kwik Bond 5 Minute Epoxy # 887560
q Kwik Bond Thick C/A # 887510
q Trinity Bushing Oil # 4049
q Performance Plus Motor Spray # 4000
q Excell Modeling Knife # 16018
q Pliers
q 8mm Wrench or Adjustable Wrench
q Straight Edge Ruler
q Builders Triangle
q # 0 and # 2 Phillips Screwdrivers
q Hand or Electric Drill
q 1/16”, 5/64”, 1/8” and 1/4” Drill Bits
q TS Racing Zip Ties # TS-006B
q 220 Grit Sandpaper w/Sanding Block
q Paper Towels
q Rubbing Alcohol
q Clamps
q Pen
q Masking Tape
(Some Items Listed are Not Shown)
1
2
3
4
5
1
2
3
4
5
6
7
8
9
10
11
12
13
14
15
16
17
33
32
34
35
36
37
40
38
42
41
39
39
40
3
4
1
2
5
1
4
2
3
5
8
9
6
7
12
10
11
14
13
15
17
16

6
FULL SIZE DRAWINGS
Listed below are full size drawings of the hardware included with the Whisper. Use these drawings to familiarize
yourself with each piece. Please refer back to this page to locate the proper hardware items when they are needed
for a particular assembly step.
**IMPORTANT** We have included a glos-
sary of terms beginning on page # 28. Use this
glossary if you come across a term that is un-
familiar. Terms throughout this instruction
book that are written in bold are listed in the
glossary.
3mm x 12mm Machine Screw
(Quantity 4)
3mm x 8mm Machine Screw
(Quantity 2)
2mm x 15mm Machine Screw
(Quantity 4)
2mm x 12mm Smooth Shank
Machine Screw
(Quantity 3)
3mm Nylon Insert Nut
(Quantity 4)
3mm Flat Washer
(Quantity 4)
Propeller Washer
(Quantity 1)
Propeller Nut
(Quantity 1)
2mm x 12mm Wood Screw
(Quantity 8)
2mm Hex Nut
(Quantity 2-Part of Servo Connector
Assembly)
2mm Set Screw
(Quantity 2-Part of Servo Connector
Assembly)
Servo Connector Body
(Quantity 2-Part of Servo Connector
Assembly)
Aluminum Prop Shaft Adapter
(Quantity 1)
Tapered Hex Adapter
(Quantity 1)
Nylon Backplate
(Quantity 2)
Nylon Control Horn
(Quantity 2)
Metal Clevis
(Quantity 2)

7
**SUGGESTION** To avoid scratching your new airplane, do not unwrap the pieces until they are
needed for assembly. Cover your workbench with an old towel or brown paper, both to protect the aircraft
and to protect the table. Keep a couple of jars or bowls handy to hold the small parts after you open the
plastic bags.
**NOTE** Please trial fit all of the parts. Make sure you have the correct parts and that they fit and are
aligned properly before gluing! This will assure proper assembly. Since the Whisper is hand made from
natural materials, every airplane is unique and minor adjustments may have to be made. However, you
should find the fit superior and assembly simple.
If you should find a part missing or have questions about assembly, please call or write to the address below:
Wattage Customer Care
18480 Bandilier Circle
Fountain Valley, CA. 92728
Phone: (714) 963-0329
Fax: (714) 964-6236
E-Mail: service@globalhobby.com
MOTOR BREAK-IN
q 1) Set out the electric motor, battery, charger,
radio system and the electronic speed control onto
your workbench.
q 2) Charge the motor battery using the peak
charger according to the charger's instructions. In-
stall the 8 AA batteries into the transmitter (Focus 3)
or fully charge the transmitter batteries (radios using
rechargeable batteries).
q 3) Once the batteries are ready, plug the two
servos and electronic speed control into the receiver.
Plug the motor lead into the speed control lead.
The prewired plastic connector on the motor is
called a Tamiya Connector. Most electronic
speed controls also use this style of connector, but
some do not. If your speed control does not have this
type of connector, you will need to change the con-
nector to a compatible one at this time.
q 4) Set the motor, without the propeller installed,
between the handles of a pair of pliers. Secure the
motor to the handles using three # 64 rubber bands.
This will keep the motor secure enough for the break-
in procedure.
q 5) Turn on the transmitter and then plug the
motor battery into the speed control. If the motor
immediately turns on, use the throttle stick (on the
Focus 3, the throttle lever is on the back of the trans-
mitter) to turn off the motor.
q 6) With the motor turned off, test the operation
of the servos. They should move when you move the
control stick.
q 7) Carefully spray a couple of light sprays of
motor spray inside the motor opening and apply a
small drop of bushing oil onto each of the two motor
bushings. See photo # 1 below.
Photo # 1
q 8) Using paper towels, wipe off the excess oil.
q 9) Slowly turn on the motor using the transmit-
ter throttle lever. Position the throttle lever to about
1/3 throttle and let the motor run. While the motor is
running, apply a light spray of motor spray inside the
motor opening once every minute, followed by a drop
of oil on each bushing. Do this until the battery is
fully discharged (i.e. the motor stops).
If you have chosen a on-off only motor con-
troller, complete the same process but only run
the motor in two minute intervals, letting the motor
cool between each interval.
Motor
Opening

8
q 10) After the battery has discharged and the mo-
tor has stopped, spray motor spray through the motor
opening until the fluid runs clear. Apply oil to both
of the bushings and wipe away all of the excess using
paper towels.
By completing these steps, you’ve seated the
motor bushings and brushes, tested the radio
system, and cycled the motor battery once. The mo-
tor battery should be cycled 3 times before the plane
is flown. Typically, nicads must be cycled 3-5 times
before they work to their maximum performance.
PARTS REQUIRED
WING ASSEMBLY
LAMINATING THE DIHEDRAL BRACES
q {2} Inboard Wing Panels
q {2} Outboard Wing Panels
q {1} Trim Tape (1 White, 2 Blue, 1 Red & White)
q {1} 15mm x 100mm Plastic Strip
q {4} Outboard Wing Panel Dihedral Braces
q {2} Inboard Wing Panel Dihedral Braces
q 1) Lay out the six dihedral braces onto your
workbench. Four of the braces are cut at a deeper
angle than the two others. These four are the dihe-
dral braces used to join the two outboard wing panels
to the two inboard wing panels and will be laminated
together to make two braces. The other two dihedral
braces are used to join the two inboard wing panels
and will be laminated together to make one brace.
See figure # 1 below.
Figure # 1
q 2) Mix up a small amount of Kwik Bond 5
Minute Epoxy. Working with the two inboard braces,
apply a thin layer of epoxy to only one side of only
one of the two braces.
For the epoxy to work properly, mix equal
amounts of part A and part B. Mix the two parts
together for about 45 seconds until they are both thor-
oughly mixed.
Photo # 2
q 4) Repeat steps # 2 - # 3 to laminate together
the four outboard dihedral braces. Remember to make
two sets. You should now have two sets of outboard
dihedral braces and one center dihedral brace.
q 5) After the epoxy has fully cured, use 220 grit
sandpaper with a sanding block and carefully sand
the edges of the three dihedral braces smooth and
straight. Be careful not to take off too much material.
q 6) Use a pen and label the two outboard dihe-
dral braces and the center dihedral brace. This will
help you keep from getting them mixed up.
The two braces cut at a deeper angle are for the
outboard wing panels. The remaining brace with
the shallower angle is for the center wing panels.
INSTALLING THE OUTBOARD DIHEDRAL BRACES
q 7) Using a ruler and a pen, locate and mark the
centerlines of the two outboard dihedral braces. Draw
one vertical line at this location on each side of both
of the braces. See photo # 3 below.
Photo # 3
q 3) Carefully place the brace, glue side down,
onto the second brace. Line up the edges of the two
braces and use clamps to hold them together tight.
Use a paper towel and rubbing alcohol to remove any
excess epoxy before it cures. See photo # 2 below.
Dihedral
Brace
Clamp
Dihedral Brace
Draw
Centerline
Dihedral
Brace
Dihedral
Brace
Clamp

9
q 8) Working with one outer wing panel and one
outer dihedral brace for now, test fit the dihedral
brace into the plywood box in the outer wing panel.
The brace should slide into the wing panel up to the
centerline. If it does not, remove the brace and
lightly sand the edges and tips of the brace until the
proper fit is obtained. See photo # 4 below.
Photo # 4
The dihedral brace is cut in the shape of a "V".
The "V" shape should face the top surface of
the wing (curved surface) when the brace is installed.
q 9) When satisfied with the fit of the dihedral
brace, remove it from the wing panel.
q 10) Mix a generous amount of Kwik Bond 5
Minute Epoxy. Apply a thin layer of epoxy inside
the plywood dihedral brace box and to only half of
the dihedral brace. Make sure to cover the top and
bottom as well as the sides, and use enough epoxy to
fill any gaps.
q 11) Slide the dihedral brace into the plywood
box up to the centerline. Remove any excess epoxy
before it dries using a paper towel and rubbing alco-
hol. Allow the epoxy to cure before proceeding.
q 12) Repeat steps # 8 - # 11 to install the second
outboard dihedral brace into the second outboard
wing panel.
JOINING THE OUTBOARD WING PANELS
q 13) Working with the right outboard wing panel
and the right inboard wing panel for now, test fit the
two wing panels together. With the inboard panel
flat on your workbench, the tip of the outer wing panel
should be 2-3/4” off the surface of the workbench.
This measurement should be taken at the trailing edge
of the outer panel where the tip begins. Use books or
a scrap piece of wood to hold the wing panel in the
proper position. It is also helpful to weight down the
inboard panel so it does not move. Magazines work
good for this. See figure # 2 at top right.
Figure # 2
The wing panels should fit together tight with
little or no gaps in the joint. If the joint is not
tight, remove the wing panels and lightly sand the
edges and tips of the dihedral brace. Test fit the wing
panels together once more. Repeat this until you are
satisfied with the fit of the wing panels.
q 14) Mix a generous amount of Kwik Bond 5
Minute Epoxy. Apply a thin layer of epoxy to the
exposed half of the dihedral brace, the inside of the
plywood box in the inboard wing panel and the entire
surface of both ribs. Make sure to use enough epoxy
to fill any gaps.
q 15) Slide the two wing panels together and care-
fully align them at the leading and trailing edges.
Align the wing panels as done in step # 13, keeping
the inboard panel flat and using a book or scrap wood
to hold the outboard panel at the proper height. Wipe
away any excess epoxy using a paper towel and rub-
bing alcohol and allow the epoxy to fully cure before
handling the wing.
After the epoxy has completely cured, use a ruler
and check the final dihedral angle of the out-
board panel. If it is not exactly 2-3/4”, that is okay.
When you join the opposite two panels together, make
sure that angle is the same angle as the first. To help
visualize this you can place the two sets of wing pan-
els next to each other to double check your work.
q 16) Repeat steps # 13 - # 15 to join the left out-
board wing panel and the left inboard wing panel.
Once that is complete you should have one right and
one left wing half.
JOINING THE WING HALVES
q 17) Using a ruler and a pen, locate and mark the
centerline of the center dihedral brace. Draw one ver-
tical line at this location on each side of the brace.
Outboard
Wing Panel
Dihedral
Brace
Flat Work Surface
Inboard Wing
Panel
Outboard
Wing Panel
2-3/4”

10
q 18) Working with the right wing half for now,
test fit the dihedral brace into the plywood box in
the root rib. The brace should slide into the wing up
to the centerline. If it does not, remove the brace
and lightly sand the edges and tips until the proper
fit is obtained.
The dihedral brace is cut in the shape of a "V".
The "V" shape should face the top surface of
the wing (curved surface) when the brace is installed.
q 19) When satisfied with the fit of the dihedral
brace, remove it from the wing half.
q 20) Mix a generous amount of Kwik Bond 5
Minute Epoxy. Apply a thin layer of epoxy inside
the plywood dihedral brace box and to only half of
the dihedral brace. Make sure to cover the top and
bottom as well as the sides, and use enough epoxy to
fill any gaps.
q 21) Slide the dihedral brace into the plywood
box up to the centerline. Remove any excess epoxy
before it dries using a paper towel and rubbing alco-
hol. Allow the epoxy to cure before proceeding.
q 22) Test fit the two wing halves together. With
the inboard panel of the left wing half flat on your
workbench, the joint in the right wing half should be
1-3/4” off the surface of the workbench. This mea-
surement should be taken at the trailing edge where
the outboard and inboard panels were joined. Use
books or a scrap piece of wood to hold the wing half
in the proper position. It is also helpful to weight
down the left wing half so it does not move. See
figure # 3 below.
Figure # 3
The wing halves should fit together tight with
little or no gaps in the joint. If the joint is not
tight, remove the wing halves and lightly sand the
edges and tips of the dihedral brace. Test fit the wing
halves together once more. Repeat this until you are
satisfied with the fit.
q 23) Mix a generous amount of Kwik Bond 5
Minute Epoxy. Apply a thin layer of epoxy to the
exposed half of the dihedral brace, the inside of the
plywood box in the root rib and the entire surface of
both root ribs. Make sure to use enough epoxy to fill
any gaps.
q 24) Slide the two wing halves together and care-
fully align them at the leading and trailing edges.
Align the wing halves as done in step # 22, keeping
the inboard panel flat and using a book or scrap wood
to hold the right wing half at the proper height. Wipe
away any excess epoxy using a paper towel and rub-
bing alcohol and allow the epoxy to fully cure before
handling the wing.
q 25) When the epoxy has fully cured, double
check all three wing joints. If any gaps are present,
mix a small amount of Kwik Bond 5 Minute Epoxy
and carefully fill any remaining gaps. Remove the
excess epoxy using a paper towel and rubbing alco-
hol and allow the epoxy to fully cure.
INSTALLING THE STRIPING TAPE
q 26) Using a modeling knife, cut the white self
adhesive trim tape into three 9” long pieces.
q 27) Turn the wing upside down. Remove the
paper backing from the trim tape and carefully apply
the tape over the three joints on the bottom of the
wing. Begin at the leading edge and carefully work
back to the trailing edge. Use a modeling knife to
remove the excess trim tape.
q 28) Turn the wing right side up. Remove the
paper backing from the blue trim tape and carefully
apply the tape over the two outboard joints on top of
the wing. Begin at the leading edge and carefully
work back toward the trailing edge. Use a modeling
to remove the excess material from the leading and
trailing edges.
q 29) Remove the paper backing from the red and
white piece of trim tape and carefully apply the tape
over the center section joint on top of the wing. Be-
gin at the leading edge and carefully work back to-
ward the trailing edge, aligning the red on the tape
with the red on the wing. Use a modeling to remove
the excess material from the leading and trailing edges.
Flat Work Surface
Left Wing
Half
Right Wing
Half
1-3/4”
(Portion of Left Wing Half Not shown for Clarity)

11
INSTALLING THE WING HOLD DOWN STRIP
q 30) Using a ruler and a pen, measure and mark
the center of the 15mm x 100mm white plastic strip.
q 31) Position the strip on top of the wing. The
back edge of the strip should be flush with the trail-
ing edge of the wing and the centerline of the strip
should be lined up with the centerline of the wing.
See photo # 5 below.
q 32) While holding the strip in place, use a pen
and carefully draw around the strip to outline it onto
the wing surface.
q 33) Remove the plastic strip. Using a modeling
knife, carefully remove the covering from just inside
the outline. Use 220 grit sandpaper and lightly sand
the bottom of the plastic strip to roughen the surface.
q 34) Mix up a small amount of Kwik Bond 5
Minute Epoxy. Apply a thin layer to the bottom side
of the strip and realign it on the wing. Remove any
excess epoxy using a paper towel and rubbing alco-
hol. Hold the strip in place using pieces of masking
tape until the epoxy has fully cured.
Photo # 5
PARTS REQUIRED
WING INSTALLATION
INSTALLING THE FRONT WING DOWELS
q {1} 6mm x 95mm Rear Wing Hold Down Dowel
q {2} 6mm x 32mm Front Wing Hold Down Dowels
q {2} Front Wing Hold Down Dowel Mounting Blocks
q 1) Using a modeling knife, remove the cover-
ing from over the two predrilled wing hold down
dowel holes in front of the wing saddle. One hole is
located on each side of the fuselage 4-7/8” behind the
front of the fuselage and 1/2” down from the top of
the fuselage.
q 2) Test fit one of the 6mm x 32mm front wing
hold down dowels into the predrilled hole in one
front wing hold down dowel mounting block. One
end of the dowel should be flush with the side of the
block. See photo # 6 below.
Photo # 6
q 3) When satisfied with the fit, remove the dowel
and mix a small amount of Kwik Bond 5 Minute Ep-
oxy. Apply a thin layer of epoxy into the predrilled
hole in the block. Reinstall the dowel, keeping one
end of the dowel flush with the side of the block. Re-
move any excess epoxy using a paper towel and rub-
bing alcohol and allow the epoxy to fully cure.
q 4) Insert the dowel and block assembly through
the predrilled hole from inside the fuselage. The
dowel slides through the predrilled hole in the side
of the fuselage and the block should be pushed firmly
against the fuselage side and the forward bulkhead.
See photo # 7 below.
Photo # 7
If you look carefully at the block, you will no-
tice that the top of the block is cut at an angle.
This angle matches the angle of the top of the fuse-
lage. Depending on which side of the block you in-
stalled the dowel into, will determine which side of
the fuselage the block is glued to. When you make
the second dowel and block assembly later, make sure
you install the dowel on the opposite side as the first.
This way you will have made one right and one left
assembly.
Plastic
Strip
Wing
Center
Section
Front Wing
Hold Down
Dowel
Hold Down
Dowel
Mounting
Block
Dowel
Should Be
Flush
Wing Dowel
Block
Wing Dowel
Forward
Bulkhead

12
q 5) Remove the assembly and mix a small amount
of Kwik Bond 5 Minute Epoxy. Apply a thin layer of
glue to the inside of the predrilled hole in the fuse-
lage side and to the gluing surfaces of the block.
Reinstall the block and remove any excess epoxy us-
ing a paper towel and rubbing alcohol. Allow the
epoxy to fully cure before proceeding.
q 6) Repeat steps # 2 - # 5 to assemble and install
the second front wing hold down dowel assembly.
INSTALLING THE REAR WING DOWEL
q 7) Using a modeling knife, remove the cover-
ing from over the two predrilled wing hold down
dowel holes in back of the wing saddle. One hole is
located on each side of the fuselage 13-3/4” behind
the front of the fuselage and 3/8” down from the top
of the fuselage.
q 8) Slide the 6mm x 95mm rear wing hold down
dowel through the predrilled holes and center the dowel.
The ends of the dowel should protrude from the fuse-
lage sides equal amounts. See photo # 8 below.
Photo # 8
q 9) When satisfied with the fit, place a mark on
each side of the dowel where it exits the fuselage.
Remove the dowel.
q 10) Mix up a small amount of Kwik Bond 5
Minute Epoxy. Apply a thin layer of epoxy to the
inside of the two predrilled holes. Slide the dowel
back into place and align the marks on the dowel with
the fuselage sides. Remove any excess epoxy using
a paper towel and rubbing alcohol. Allow the epoxy
to fully cure before proceeding.
INSTALLING THE WING
q 11) Using a ruler and a pen, locate the center-
line of the fuselage at both the front and the rear of
the wing saddle. Place one mark on the top of the
fuselage at the back edge of the wing saddle and one
mark on top of the forward bulkhead.
These two marks will help you align the wing
when you install it onto the fuselage. You may
wish to make these marks in permanent ink so you
can align the wing correctly each time you install the
wing. This will ensure the wing is aligned properly
every time you fly the airplane.
q 12) Place the wing onto the wing saddle. The
joint where the two wing halves were glued together
is considered the centerline of the wing. Align the
centerline of the wing at both the front and the rear of
the wing saddle with the two centerline marks you
made on the fuselage.
q 13) Using a couple of # 64 rubber bands, tem-
porarily install the wing. To properly install the rub-
ber bands, hook one over one of the front wing hold
down dowels, carefully pull it back over the wing and
hook it over the rear hold down dowel on the same
side. Install two rubber bands on each side for now.
PARTS REQUIRED
q {1} Horizontal Stabilizer w/Elevator & Hinges
HORIZONTAL STABILIZER
INSTALLATION
ALIGNING THE HORIZONTAL STABILIZER
q 1) Remove the elevator and hinges from the
horizontal stabilizer. Using a ruler and a pen, locate
the centerline of the horizontal stabilizer, at the trailing
edge, and place a mark. Use a triangle and extend this
mark, from back to front, across the top of the stabi-
lizer. Also extend this mark down the back of the trail-
ing edge of the stabilizer. See photo # 9 below.
Photo # 9
q 2) Using a modeling knife, carefully remove the
covering from the precut slot in the leading edge of
the stabilizer. The slot is located on the centerline
and is 1-3/16” long and 1/4” wide. Remove the cov-
ering from both the top and bottom of the slot.
Rear Wing Hold
Down Dowel
Draw
Centerline
Remove
Covering
(Top & Bottom)
Rear
Bulkhead

13
q 4) Place the stabilizer onto the stabilizer mount-
ing platform. The trailing edge of the stabilizer should
be even with the rear edge of the fuselage.
q 5) Install the wing onto the fuselage. Align the
centerline drawn on the top and the rear of the stabi-
lizer with the centerline marks drawn on the fuselage.
When those are aligned, hold the stabilizer in that po-
sition using masking tape. Align the horizontal sta-
bilizer with the wing. When viewed from the rear,
the horizontal stabilizer should be level with the wing.
If it is not level, use 220 grit sandpaper with a sand-
ing block and sand down the high side of the stabi-
lizer mounting platform until the proper alignment is
achieved. The tips of the stabilizer should also be
equal distance from the tips of the wing. See figures
# 4 and # 5 below.
q 3) Using a ruler and a pen, locate and mark the
centerline of the fuselage at both the front and the
rear of the stabilizer mounting platform. See photo
# 10 below.
Photo # 10
Figure # 4
Figure # 5
q 6) When you are satisfied with the alignment,
hold the stabilizer securely in place with masking tape,
but do not glue it in place at this time.
MOUNTING THE HORIZONTAL STABILIZER
q 7) With the stabilizer held firmly in place, use a
pen and draw lines onto the stabilizer where it and
the fuselage sides meet. Do this on both the right and
left sides on the bottom of the stabilizer.
q 8) Remove the stabilizer from the fuselage. Us-
ing the lines you just drew as a guide, carefully re-
move the covering from between them using a mod-
eling knife. See photo # 11 below.
Photo # 11
When cutting through the covering to remove
it, cut with only enough pressure to only cut
through the covering itself. Cutting into the balsa
structure may weaken it.
q 9) When you are sure that everything is aligned
correctly, mix up a generous amount of Kwik Bond 5
Minute Epoxy. Apply a thin layer to the bottom of
the mounting area on the bottom of the stabilizer and
to the top of the stabilizer mounting platform on the
fuselage. Set the stabilizer in place and realign.
Double check all of your measurements once more
before the epoxy cures. Hold the stabilizer in place
with masking tape and remove any excess epoxy us-
ing a paper towel and rubbing alcohol.
HINGING THE ELEVATOR
q 10) Remove the three plastic hinges from the el-
evator. Using 220 grit sandpaper, lightly sand the top
and bottom of each half of all three hinges.
Lightly sanding the hinge's gluing surfaces will
roughen the plastic increasing the bonding
strength between the epoxy and the hinge.
Stabilizer Mounting
Platform
Draw
Centerline
Draw
Centerline
Remove
Covering
Draw Line
Draw Line
A
A-1
A = A-1
B
B-1
B = B-1

14
q 11) Apply a couple of drops of lightweight ma-
chine oil to the pivot point of each hinge. See figure
# 6 below.
Figure # 6
Applying oil to the pivot point of the hinges will
prevent the epoxy from gluing the hinges solid
when they are installed.
q 12) Mix a small amount of Kwik Bond 5 Minute
Epoxy. Apply a thin layer of epoxy to the top and
bottom of only one half of each hinge. Slide the hinges
into the hinge slots in the elevator. Remove any ex-
cess epoxy using a paper towel and rubbing alcohol.
Insert each hinge into the elevator so the pivot
point is about halfway into the leading edge.
This will result in the proper hinge gap when the el-
evator is hinged to the stabilizer.
q 13) After the epoxy has set up, mix a second
small batch of Kwik Bond 5 Minute Epoxy. Apply a
thin layer to the top and bottom of the exposed half of
each hinge. Slide the elevator in place, making sure
each hinge slides into it's respective hinge slot. Push
the elevator firmly against the stabilizer. There should
be about a 1/32” hinge gap and there should also be
equal space between the tips of the elevator and the
stabilizer tips.
q 14) Remove any excess epoxy using a paper
towel and rubbing alcohol. Once the epoxy has fully
cured, any other excess epoxy can be carefully re-
moved from the hinge joint using a modeling knife.
PARTS REQUIRED
q {1} Vertical Stabilizer w/Rudder & Hinges
q {1} Molded Plastic Tail Fairing
VERTICAL STABILIZER
INSTALLATION
HINGING THE RUDDER
q 1) Hinge the rudder to the vertical stabilizer
using the same technique used to hinge the elevator.
ALIGNING THE VERTICAL STABILIZER
q 2) Set the vertical stabilizer on top of the hori-
zontal stabilizer and fuselage. The tab at the rear of
the vertical stabilizer fits in the precut slot in the hori-
zontal stabilizer. The bottom edge of the stabilizer
should also be firmly pushed against the top of the
horizontal stabilizer and the fuselage.
The bottom of the rudder should not touch the
top of the horizontal stabilizer. If it does, care-
fully sand the bottom of the rudder using 220 grit
sandpaper with a sanding block until there is suffi-
cient clearance.
q 3) While holding the vertical stabilizer firmly
in place, use a pen and draw a line on each side of
the vertical stabilizer where it meets the top of the
horizontal stabilizer. Also draw an outline on top of
the fuselage around the vertical stabilizer.
q 4) Remove the vertical stabilizer. Using a mod-
eling knife, remove the covering from below the lines
you drew. Also remove the covering from inside
the outline you drew on top of the fuselage. See
photo # 12 below.
Photo # 12
q 5) Set the vertical stabilizer back into place.
Using a triangle, check to ensure that the vertical
stabilizer is aligned 90º to the horizontal stabilizer.
See figure # 7 below.
The top of the rudder should be as close to the
tip of the vertical fin as possible without actu-
ally rubbing the bottom of the tip.
Figure # 7
Remove
Covering
Remove
Covering
Apply Oil to
Pivot Point
Hinge
Draw Outline
(Vertical Stabilizer
Shown in Box)
90º
FuselageHorizontal
Stabilizer
Vertical
Stabilizer

15
q 6) When you are sure that everything is aligned
correctly, mix up a generous amount of Kwik Bond
5 Minute Epoxy. Apply a generous layer to the slot
in the horizontal stabilizer and to the entire bottom
surface of the vertical stabilizer. Set the stabilizer
in place and realign. Double check all of your mea-
surements once more before the epoxy cures. Hold
the stabilizer in place with masking tape and remove
any excess epoxy using a paper towel and rubbing
alcohol. Allow the epoxy to fully cure before pro-
ceeding. See photo # 13 below.
MOUNTING THE VERTICAL STABILIZER
Photo # 13
INSTALLING THE TAIL FAIRING
q 7) Using a modeling knife, carefully cut out
the molded plastic tail fairing leaving 1/4” of mate-
rial around the entire perimeter to use as a gluing
surface. Also remove the material from the top of
the fairing so it can slide around the vertical stabi-
lizer. See photo # 14 below.
Photo # 14
q 8) Using a modeling knife, remove the cover-
ing from over the precut rudder pushrod exit slot in
the top of the fuselage. The slot is located on the
right top side of the fuselage (looking from the rear),
3-3/4” in front of the rudder hinge line. The slot is
3/4” long and 1/8” wide.
q 9) Trial fit the tail fairing in place. It should fit
tightly around the fuselage and the front and sides of
the vertical stabilizer. Use a modeling knife and 220
grit sandpaper to make any necessary adjustments to
obtain the proper fit.
You may find that the sides of the fairing ex-
tend beyond the trailing edge of the vertical sta-
bilizer. Use a modeling knife and cut the sides of the
fairing so they are flush with the trailing edge of the
vertical stabilizer before installing the fairing.
q 10) When satisfied with the fit, remove the fair-
ing and lightly sand the inside surfaces that will be
glued to the fuselage, horizontal stabilizer and verti-
cal stabilizer using 220 grit sandpaper.
q 11) Using a ruler and a pen, measure and mark
the location of the rudder pushrod exit slot onto the
plastic fairing.
q 12) Using a modeling knife, cut the slot in the
fairing to match the slot precut in the fuselage. See
photo # 15 below.
Photo # 15
q 13) Slide the fairing back into place. Double
check the placement of the slot and make any adjust-
ments necessary. While holding the fairing firmly
in place, carefully trace around it using a pen.
q 14) Using a modeling knife, carefully remove
the covering from inside the outline.
q 15) Mix a small amount of Kwik Bond 5
Minute Epoxy and apply a thin layer to the gluing
surfaces of the fairing. Slide the fairing into place
and remove any excess epoxy using a paper towel
and rubbing alcohol. Hold the fairing in place using
pieces of masking tape until the epoxy fully cures.
See photo # 16 below.
Photo # 16
Tail Fairing
Leave 1/4”
of Material
Cut Slot
Remove for
Vertical Stabilizer

16
PARTS REQUIRED
SERVO INSTALLATION
INSTALLING THE SERVO TRAY
q {1} Servo Tray
q {1} Servo Tray Support
q 1) Test fit the servo tray and the servo tray sup-
port into the fuselage. The support is installed into
the two precut notches in the bottom of the fuselage
sides. The servo tray fits into the corresponding
notches in the support and the rear bulkhead. See
photo # 17 below.
Photo # 17
It may be necessary to sand the edges of the
servo tray and/or servo tray support to obtain a
good fit. If so, use 220 grit sandpaper with a sanding
block. Remove small amounts at a time until a good
fit is obtained.
q 2) When satisfied with the fit, remove the tray
and the support. Mix Kwik Bond 5 Minute Epoxy.
Apply a generous amount of epoxy to the gluing sur-
faces of the support and the tray. Reinstall the parts
and allow the epoxy to fully cure.
INSTALLING THE SERVOS
q 3) Install the rubber grommets and brass collets
provided with your radio system onto two standard
servos. See figure # 8 below.
Figure # 8
q 4) Test fit the two servos into the servo tray. The
output shaft in each of the servos should face the
front of the airplane. The servos should be centered
within the mount and as close together as possible.
See photo # 18 at top right.
Photo # 18
Because the size of servos differ, you may need
to adjust the size of the precut opening in the
servo tray to fit your servos. If so, carefully use a
modeling knife.
q 5) Install the two servos using the wood screws
provided with your radio system. Drill 1/16” pilot
holes through the servo tray before installing the
screws. This will help prevent the wood from split-
ting and make it easier to install the screws.
PARTS REQUIRED
PUSHROD INSTALLATION
INSTALLING THE PUSHROD HOUSINGS
q {2} 2mm x 610mm Threaded Pushrods
q {2} 3mm x 640mm Nylon Pushrod Housings
q {1} 3mm x 55mm x 14mm Pushrod Support
q {1} 8mm x 20mm Clear Tubing
q {2} Metal Clevises
q {2} Nylon Control Horns w/ Backplates
q {4} 2mm x 15mm Machine Screws
q {2} Adjustable Servo Connector Assemblies
q {1} Hex Wrench
q 1) Using a modeling knife, remove the cover-
ing from over the precut elevator pushrod exit slot in
the fuselage. The slot is located on the left side of the
fuselage (looking from the rear), 6-1/2” in front of
the elevator hinge line and 3/4” down from the top of
the fuselage. The slot is 3/4” long and 1/8” wide.
q 2) Test fit the nylon pushrod housings into the
fuselage. Insert one housing through the rudder push-
rod exit slot and one housing through the elevator
pushrod exit slot.
q 3) Slide the two pushrod housings through the
fuselage and into the servo compartment. Using 220
grit sandpaper, lightly sand the last 1” of each of the
pushrod housings that extends beyond the outside
of the fuselage.
Servo
Tray
Servo Tray
Support
Output
Shaft
Rudder
Servo
Elevator
Servo
Servo
Rubber
Grommet
Brass
Collet

17
q 4) Pull the pushrod housings through the servo
compartment until 1/4” of each housing extends be-
yond the outside of the pushrod exit slots.
q 5) Mix a small amount of Kwik Bond 5 Minute
Epoxy. Carefully apply a small amount to the ends
of the pushrod housings where they exit the fuselage.
Use enough epoxy to fill any gaps and remove any
excess using a paper towel and rubbing alcohol. Al-
low the epoxy to fully cure before proceeding. See
photo # 19 below.
Photo # 19
q 6) Slide one pushrod housing through each of
the outer holes in the plywood pushrod support. Slide
the support over the housings until it is flush with the
rear bulkhead.
The pushrod housings should cross inside the
fuselage. Make sure the elevator pushrod hous-
ing exits the right hole in the pushrod support and
that the rudder housing exits the left hole.
q 7) With the pushrod support pushed firmly
against the rear bulkhead, use a modeling knife and
cut off the two housings 1/4” in front of the support.
See photo # 20 below.
Photo # 20
INSTALLING THE ELEVATOR CONTROL HORN
q 8) The centerline of the elevator control horn is
located on the bottom left side of the elevator (looking
from the rear) 1-1/8” out from the fuselage side. Posi-
tion the control horn so the clevis attachment holes
are directly in-line with the hinge line. The control
horn should also be perpendicular to the hinge line.
See figure # 9 below.
Figure # 9
q 9) When satisfied with the alignment, use a
5/64” drill bit, and the control horn as a guide, and
drill the two mounting holes through the elevator.
q 10) Mount the control horn to the elevator by
inserting the two 2mm x 15mm machine screws
through the control horn mounting base, through the
elevator, and into the backplate. Tighten the screws,
but do not overtighten them. You do not want to
crush the wood. See photo # 21 below.
Photo # 21
INSTALLING THE RUDDER CONTROL HORN
q 11) The centerline of the rudder control horn
is located on the right side of the rudder (looking
from the rear) 1/2” up from the bottom, at the hinge
line. Position the control horn so the clevis attach-
ment holes are directly in-line with the hinge line.
The control horn should also be parallel with the
top of the fuselage.
Do not install the rudder control horn perpen-
dicular to the hinge line or the pushrod will not
line up when it is installed later. The control horn
should be parallel to the top surface of the fuselage.
q 12) When satisfied with the alignment, use a
5/64” drill bit, and the control horn as a guide, and
drill the two mounting holes through the rudder.
Pushrod
Housing
Exit Slot
Pushrod
Support
Pushrod
Housing
Elevator
Control
Horn
Hinge
Line
Apply Epoxy
to These Joints
Pushrod
Housing
Control
Horn
Elevator
Backplate
Machine Screw

18
q 13) Mount the control horn to the rudder by in-
serting the two 2mm x 15mm machine screws
through the control horn mounting base, through the
rudder, and into the backplate. Tighten the screws,
but do not overtighten them. You do not want to
crush the wood. See photo # 22 below.
Photo # 22
INSTALLING THE ELEVATOR PUSHROD
q 14) Slide one threaded pushrod wire into the
elevator pushrod housing from the fuselage side. Note
that the wire has threads on one end of it. Slide the
plain end of the wire into the pushrod housing.
q 15) Using a modeling knife, cut the clear vinyl
tube into two 1/4” long pieces. Slide one piece of
tubing over one metal clevis. See figure # 10 below.
Figure # 10
This tubing will prevent the clevis from acci-
dentally opening during flight.
q 16) Thread the metal clevis onto the threaded
end of the pushrod wire. For security, thread the cle-
vis on no less than 5/16”.
q 17) Snap the clevis into the third hole out from
the base of the control horn. Move the elevator up
and down with your hand to test for free movement.
See photo # 23 below.
Photo # 23
q 18) Install one adjustable servo connector
through the second hole out from the center of one
servo arm. Enlarge the hole in the servo arm using
a 5/64” drill bit to accommodate the servo connec-
tor. Remove the excess material from the servo arm
using a modeling knife. See figure # 11 below.
Figure # 11
After installing the adjustable servo connector
apply a small drop of Kwik Bond Thick C/A to
the nut. This will prevent the connector from loosen-
ing during flight.
q 19) Loosen the set screw in the top of the ad-
justable connector and slide the servo connector/servo
arm assembly over the plain end of the elevator push-
rod wire.
q 20) Use a couple of pieces of masking tape to
hold the elevator in neutral.
q 21) Plug the elevator servo lead into the receiver.
Plug the battery into the motor controller and turn on
the radio system. Center the elevator trim tab on the
transmitter. Place the servo arm onto the servo. The
servo arm should be centered on the servo and point
towards the fuselage side.
q 22) With both the elevator and the servo arm cen-
tered, tighten the set screw in the adjustable servo
connector and remove the excess wire using wire cut-
ters. Remove the masking tape from the elevator and
install the servo arm retaining screw in the servo arm.
See photo # 24 below.
Photo # 24
Rudder
Control
Horn
Control
Horn
Clevis
Pushrod
Wire
Tubing
Pushrod
Wire
Pushrod
Housing
Servo
Connector
Hinge Line
Clevis
Clear Tubing
Servo
Arm
Set Screw
Connector
Body
Nut

19
INSTALLING THE RUDDER PUSHROD
q 23) Slide the second threaded pushrod wire into
the rudder pushrod housing from the top of the fuse-
lage. Note that the wire has threads on one end of it.
Slide the plain end of the wire into the housing.
q 24) Slide the second 1/4” piece of clear vinyl
tubing over the second metal clevis.
q 25) Thread the metal clevis onto the threaded
end of the pushrod wire. For security, thread the cle-
vis on no less than 5/16”.
q 26) Snap the clevis into the first hole out from
the base of the control horn. Move the rudder back
and forth with your hand to test for free movement.
See photo # 25 below.
Photo # 25
q 27) Install one adjustable servo connector through
the second hole out from the center of one servo arm.
Enlarge the hole in the servo arm using a 5/64” drill bit
to accommodate the servo connector. Remove the ex-
cess material from the arm. See figure # 12 below.
Figure # 12
After installing the adjustable servo connector
apply a small drop of Kwik Bond Thick C/A to
the nut. This will prevent the connector from loosen-
ing during flight.
q 28) Loosen the set screw in the adjustable con-
nector and slide the servo connector/servo arm as-
sembly over the plain end of the rudder pushrod wire.
q 29) Use a couple of pieces of masking tape to
hold the rudder in neutral.
q 30) Plug the rudder servo lead into the receiver.
Plug the battery into the motor controller and turn on
the radio system. Center the rudder trim tab on the
transmitter. Place the servo arm onto the servo. The
servo arm should be centered on the servo and point
towards the fuselage side.
q 31) With both the rudder and the servo arm cen-
tered, tighten the set screw in the adjustable servo
connector and remove the excess wire using wire cut-
ters. Remove the masking tape from the rudder and
install the servo arm retaining screw in the servo arm.
See photo # 26 below.
Photo # 26
q 32) While allowing the elevator and rudder
pushrods to stay in their natural positions, push the
plywood pushrod support firmly against the rear
bulkhead.
q 33) Glue the pushrod support to the rear bulk-
head using Kwik Bond Thick C/A. When the glue
has cured, glue both of the pushrod housings to the
pushrod support. Allow the glue to fully cure.
PARTS REQUIRED
MOTOR INSTALLATION
INSTALLING THE MOTOR
q {1} Electric Motor
q {2} Motor Mount Halves
q {2} 3mm x 8mm Machine Screws
q {4} 3mm x 12mm Machine Screws
q {4} 3mm Flat Washers
q {4} 3mm Nylon Insert Nuts
q 1) Fit the motor to the two metal motor mount
halves. The two halves clamp around the motor and
are held in place using two 3mm x 8mm machine
screws. Do not tighten the motor mount halves com-
pletely at this time.
The four mounting tabs on the motor mount
halves should face the back of the motor.
Control
Horn
Clevis
Tubing
Pushrod
Wire
Servo
Arm
Set Screw
Connector
Body
Nut

20
q 2) With the motor loosely in the motor mount,
twist the motor so the wires on the back of the motor
are perpendicular to the mounting tabs on the motor
mount. Slide the motor back so the front edge of the
motor is 3/4” in front of the motor mount halves.
Tighten the two machine screws to hold the motor
securely in place. See photo # 27 below.
Photo # 27
q 3) Place the motor assembly up against the front
of the firewall. The motor wires and tabs should slide
through the precut slot in the firewall and the motor
mounting tabs should be vertical.
q 4) To properly align the motor, center the motor
from left to right on the firewall. For the proper height,
center the back of the motor in the middle of the pre-
cut slot in the firewall. See photo # 28 below.
It is normal for the motor to be angled down.
The term for this angle is down-thrust. The
Whisper has 5º of down-thrust built into the firewall.
q 5) While holding the motor in position, mark
the locations of the four mounting holes onto the front
of the firewall.
q 6) Remove the motor from the firewall. Using
a 1/8” drill bit, drill four holes through the firewall at
the mounting hole locations.
q 7) Mount the motor to the firewall using four
3mm x 18mm machine screws, four 3mm flat wash-
ers and four 3mm nylon insert nuts. Slide the ma-
chine screws through the mounting tabs and holes in
the firewall, then install a flat washer and nylon
Photo # 28
Photo # 29
insert nut onto each screw. Tighten the screws com-
pletely to hold the motor mount securely in place.
q 8) Using a 1/4” drill bit, carefully drill three
holes through the firewall. These holes should be
located 3/4” up from the bottom of the fuselage. Two
of the holes are located 5/8” in from the fuselage
sides and one hole 1-1/8” from the fuselage side.
See photo # 29 below.
PARTS REQUIRED
COWL AND PROPELLER
INSTALLATION
JOINING THE COWL HALVES
q {2} Molded Plastic Cowl Halves, Right & Left
q {1} Nylon Propeller Hub
q {1} Nylon Spinner Cone
q {2} Propeller Blade Halves
q {1} Tapered Aluminum Hex Adapter
q {1} Threaded Adapter
q {1} Propeller Washer
q {1} Propeller Nut
q {3} 2mm x 12mm Smooth Shank Machine Screws
q {4} 2mm x 12mm Wood Screws
q 1) Test fit the cowl halves together. One half
has a molded recess that the opposite half glues on to.
When aligned properly the front and back edges of
the cowl should be even and the seam should be flush.
q 2) Hold the cowl halves together using strips of
masking tape taped along the outside of the entire
seam, both on the top and the bottom of the cowl. It
is important that the tape covers the entire seam.
q 3) Using Kwik Bond Thick C/A, glue the cowl
halves together from the inside. To do this prop-
erly, run a thin bead of glue along the entire seam
while allowing the glue to seep into the seam and bond
the parts together.
q 4) Allow the glue to thoroughly cure, then re-
move the masking tape.
Mounting
Tab
Motor
Wire
Mounting
Tab
Motor
Wire
Motor
Mount
Firewall
Drill
Holes
Firewall
3/4”
Motor
Machine
Screw
/