Page is loading ...

For Research Use Only. Not for use in diagnostic procedures.
Axiom™ 2.0 Assay 96-Array Format Manual
Workflow
USER GUIDE
for use with:
Axiom™ Arrays
Axiom™ 2.0 Reagent Kit
Catalog Numbers 901758
Publication Number MAN0018000
Revision B.0

For descriptions of symbols on product labels or product documents, go to thermofisher.com/symbols-definition.
The information in this guide is subject to change without notice.
DISCLAIMER
TO THE EXTENT ALLOWED BY LAW, LIFE TECHNOLOGIES AND/OR ITS AFFILIATE(S) WILL NOT BE LIABLE FOR SPECIAL, INCIDENTAL, INDIRECT, PUNITIVE,
MULTIPLE, OR CONSEQUENTIAL DAMAGES IN CONNECTION WITH OR ARISING FROM THIS DOCUMENT, INCLUDING YOUR USE OF IT.
Revision history
Important Licensing Information
This product may be covered by one or more Limited Use Label Licenses. By use of this product, you accept the terms and conditions of all applicable Limited
Use Label Licenses.
Corporate entity
Life Technologies | Carlsbad, CA 92008 USA | Toll Free in USA 1 800 955 6288
TRADEMARKS
All trademarks are the property of Thermo Fisher Scientific and its subsidiaries unless otherwise specified. Microsoft, and Excel are either registered trademarks or
trademarks of Microsoft Corporation in the United States and/or other countries. Vortex-Genie is a registered trademark of Scientific Industries, Inc. Jitterbug is a
trademark of Boekel Scientific. Eppendorf is a registered trademark of Eppendorf AG. Molecular Devices and SpectraMax are trademarks of Molecular Devices
Corporation. Pipet-Lite is a trademark of Rainin Instrument, LLC. Pipet-Aid is a registered trademark of Drummond Scientific Company. Bio-Rad, Microseal, DNA
Engine Tetrad, DNA Engine, and Hard-Shell are registered trademarks of Bio-Rad Laboratories, Inc.
©2023 Thermo Fisher Scientific Inc. All rights reserved.
Thermo Fisher Scientific Baltics UAB
V.A. Graiciuno 8, LT-02241
Vilnius, Lithuania
Products: Axiom™ 2.0 Reagent Kit
Affymetrix Pte Ltd
7 Gul Circle #2M-01
Keppel Logistics Building
Singapore 629563
Products: Axiom™ Array Plates
Table 1 Revision history of Pub. No. MAN0018000.
Revision Date Description
B.0 28 September 2023 Added information for GeneTitan MC Fast Scan Instrument.
A.0 19 May 2022 • Initial release in Thermo Fisher Scientific document control system.
Supersedes legacy Affymetrix publication number 702990.
• Add the following product options:
• MicroAmp EnduraPlate Optical 96-Well Clear Reaction Plates.
• Bio-Rad HSP9631, HSP9601, HSS9601, and HSS9641 PCR plates.
• Eppendorf DeepWell Plate 96 for microbiome assay use.
• ProFlex 96 well PCR System thermal cycler.
• Genomic DNA Standard (Ref 103) positive control, available for purchase
separately.
• Added information for the microbiome assay.
• Updated the gDNA input requirements and added the microbiome DNA
input requirements.

Axiom™ 2.0 Assay 96-Array Format Manual Workflow User Guide 3
Contents
CHAPTER 1 About the Axiom™ 2.0 Assay. . . . . . . . . . . . . . . . . . . . . . . 9
References . . . . . . . . . . . . . . . . . . . . . . . . . . . . . . . . . . . . . . . . . . . . . . . . . . . . . . . . . . . . . 10
Overview of the Axiom 2.0 Assay Manual Workflow Assay . . . . . . . . . . . . . . . . . . . . . . . . . . 10
Running multiple plate workflows. . . . . . . . . . . . . . . . . . . . . . . . . . . . . . . . . . . . . . . . . . . . 11
CHAPTER 2 Genomic DNA preparation and requirements. . . . . . . . . 12
Sources of genomic DNA . . . . . . . . . . . . . . . . . . . . . . . . . . . . . . . . . . . . . . . . . . . . . . . . . . . 12
General requirements . . . . . . . . . . . . . . . . . . . . . . . . . . . . . . . . . . . . . . . . . . . . . . . . . . . . . . 13
Special requirements . . . . . . . . . . . . . . . . . . . . . . . . . . . . . . . . . . . . . . . . . . . . . . . . . . . . . 14
Assessing the quality of genomic DNA Using 1% agarose E-gels . . . . . . . . . . . . . . . . . . 14
Genomic DNA extraction/purification methods . . . . . . . . . . . . . . . . . . . . . . . . . . . . . . . . . . . 15
Genomic DNA cleanup . . . . . . . . . . . . . . . . . . . . . . . . . . . . . . . . . . . . . . . . . . . . . . . . . . . . . 15
Genomic DNA preparation . . . . . . . . . . . . . . . . . . . . . . . . . . . . . . . . . . . . . . . . . . . . . . . . . . . 16
Duration . . . . . . . . . . . . . . . . . . . . . . . . . . . . . . . . . . . . . . . . . . . . . . . . . . . . . . . . . . . . . . . 16
Equipment, consumables and reagents required. . . . . . . . . . . . . . . . . . . . . . . . . . . . . . . . 17
1. Thaw samples and control . . . . . . . . . . . . . . . . . . . . . . . . . . . . . . . . . . . . . . . . . . . . . . . 18
2. Quantitate and dilute gDNA . . . . . . . . . . . . . . . . . . . . . . . . . . . . . . . . . . . . . . . . . . . . . . 18
3. Aliquot the diluted samples and the control . . . . . . . . . . . . . . . . . . . . . . . . . . . . . . . . . . 19
4. Freeze or proceed . . . . . . . . . . . . . . . . . . . . . . . . . . . . . . . . . . . . . . . . . . . . . . . . . . . . . 19
5. Create a GeneTitan Array Plate Registration file . . . . . . . . . . . . . . . . . . . . . . . . . . . . . . 20
CHAPTER 3 Preparation before you start . . . . . . . . . . . . . . . . . . . . . . 21
Required materials . . . . . . . . . . . . . . . . . . . . . . . . . . . . . . . . . . . . . . . . . . . . . . . . . . . . . . . . . 21
Axiom 2.0 Reagent Kit, arrays, and GeneTitan consumables required . . . . . . . . . . . . . . . 21
Consumables required . . . . . . . . . . . . . . . . . . . . . . . . . . . . . . . . . . . . . . . . . . . . . . . . . . . . 22
GeneTitan MC Instrument Consumables . . . . . . . . . . . . . . . . . . . . . . . . . . . . . . . . . . . . . . 25
Reagent kits . . . . . . . . . . . . . . . . . . . . . . . . . . . . . . . . . . . . . . . . . . . . . . . . . . . . . . . . . . . . 30
Equipment required . . . . . . . . . . . . . . . . . . . . . . . . . . . . . . . . . . . . . . . . . . . . . . . . . . . . . . 31
Requirements and recommendations . . . . . . . . . . . . . . . . . . . . . . . . . . . . . . . . . . . . . . . . . . 33
Room temperature . . . . . . . . . . . . . . . . . . . . . . . . . . . . . . . . . . . . . . . . . . . . . . . . . . . . . . . 33
Special requirements . . . . . . . . . . . . . . . . . . . . . . . . . . . . . . . . . . . . . . . . . . . . . . . . . . . . . 33
Control recommendations . . . . . . . . . . . . . . . . . . . . . . . . . . . . . . . . . . . . . . . . . . . . . . . . . 33

Contents
4Axiom™ 2.0 Assay 96-Array Format Manual Workflow User Guide
Plate requirements and recommendations for target preparation . . . . . . . . . . . . . . . . . . . 34
Thermal cycler consumables . . . . . . . . . . . . . . . . . . . . . . . . . . . . . . . . . . . . . . . . . . . . . . . 35
Equipment care and calibration . . . . . . . . . . . . . . . . . . . . . . . . . . . . . . . . . . . . . . . . . . . . . 35
Procedures . . . . . . . . . . . . . . . . . . . . . . . . . . . . . . . . . . . . . . . . . . . . . . . . . . . . . . . . . . . . . . 36
Guidelines for handling plates and reagents . . . . . . . . . . . . . . . . . . . . . . . . . . . . . . . . . . . 36
Sample quantitation . . . . . . . . . . . . . . . . . . . . . . . . . . . . . . . . . . . . . . . . . . . . . . . . . . . . . . 37
About the reagents and master mix preparation . . . . . . . . . . . . . . . . . . . . . . . . . . . . . . . . 37
Pipettes and pipetting. . . . . . . . . . . . . . . . . . . . . . . . . . . . . . . . . . . . . . . . . . . . . . . . . . . . . 38
Labeling GeneTitan hybridization and reagent trays . . . . . . . . . . . . . . . . . . . . . . . . . . . . . 39
CHAPTER 4 Manual target preparation. . . . . . . . . . . . . . . . . . . . . . . . 41
Stage 1: Amplify the genomic DNA . . . . . . . . . . . . . . . . . . . . . . . . . . . . . . . . . . . . . . . . . . . . 42
Duration . . . . . . . . . . . . . . . . . . . . . . . . . . . . . . . . . . . . . . . . . . . . . . . . . . . . . . . . . . . . . . . 42
Input required . . . . . . . . . . . . . . . . . . . . . . . . . . . . . . . . . . . . . . . . . . . . . . . . . . . . . . . . . . 42
Equipment, consumables and reagents required. . . . . . . . . . . . . . . . . . . . . . . . . . . . . . . . 43
1: Prepare for DNA amplification . . . . . . . . . . . . . . . . . . . . . . . . . . . . . . . . . . . . . . . . . . . . 44
2. Prepare the Denaturation Master Mix. . . . . . . . . . . . . . . . . . . . . . . . . . . . . . . . . . . . . . . 46
3. Add Denaturation Master Mix to samples . . . . . . . . . . . . . . . . . . . . . . . . . . . . . . . . . . . 46
4. Add Neutralization Solution to samples . . . . . . . . . . . . . . . . . . . . . . . . . . . . . . . . . . . . 47
5. Prepare and add the Amplification Master Mix . . . . . . . . . . . . . . . . . . . . . . . . . . . . . . . 47
6. Freeze or proceed . . . . . . . . . . . . . . . . . . . . . . . . . . . . . . . . . . . . . . . . . . . . . . . . . . . . . 48
Stage 2: Fragment and precipitate the DNA . . . . . . . . . . . . . . . . . . . . . . . . . . . . . . . . . . . . . 49
Duration . . . . . . . . . . . . . . . . . . . . . . . . . . . . . . . . . . . . . . . . . . . . . . . . . . . . . . . . . . . . . . . 49
Input required . . . . . . . . . . . . . . . . . . . . . . . . . . . . . . . . . . . . . . . . . . . . . . . . . . . . . . . . . . 49
Equipment, consumables and reagents required . . . . . . . . . . . . . . . . . . . . . . . . . . . . . . . 49
1: Prepare for fragmentation and precipitation . . . . . . . . . . . . . . . . . . . . . . . . . . . . . . . . . 50
2. Incubate samples in preheated ovens . . . . . . . . . . . . . . . . . . . . . . . . . . . . . . . . . . . . . . 52
3: Prepare Fragmentation Master Mix . . . . . . . . . . . . . . . . . . . . . . . . . . . . . . . . . . . . . . . . 53
4: Add Fragmentation Master Mix to Samples . . . . . . . . . . . . . . . . . . . . . . . . . . . . . . . . . 53
5: Add the Stop Solution to the Fragmentation Plate . . . . . . . . . . . . . . . . . . . . . . . . . . . . 54
6: Prepare and add Precipitation Master Mix . . . . . . . . . . . . . . . . . . . . . . . . . . . . . . . . . . . 55
7: Prepare and add isopropanol to Precipitation Plate . . . . . . . . . . . . . . . . . . . . . . . . . . . 55
8: Freeze the Precipitation Plate overnight. . . . . . . . . . . . . . . . . . . . . . . . . . . . . . . . . . . . . 56
Stage 3: Centrifuge and dry pellets, resuspension and hybridization preparation,
and sample QC . . . . . . . . . . . . . . . . . . . . . . . . . . . . . . . . . . . . . . . . . . . . . . . . . . . . . . . . . . . 57
Duration . . . . . . . . . . . . . . . . . . . . . . . . . . . . . . . . . . . . . . . . . . . . . . . . . . . . . . . . . . . . . . . 57
Input required . . . . . . . . . . . . . . . . . . . . . . . . . . . . . . . . . . . . . . . . . . . . . . . . . . . . . . . . . . 57
Equipment, consumables, and reagents required . . . . . . . . . . . . . . . . . . . . . . . . . . . . . . . 57
Stage 3A: Centrifuge the Precipitation Plate and dry the DNA pellet . . . . . . . . . . . . . . . . . . 59

Contents
Axiom™ 2.0 Assay 96-Array Format Manual Workflow User Guide 5
Stage 3B: Resuspension and hybridization preparation . . . . . . . . . . . . . . . . . . . . . . . . . . . . 61
1: Prepare for resuspension and hybridization . . . . . . . . . . . . . . . . . . . . . . . . . . . . . . . . . 61
2: Prepare DNA pellets and warm the resuspension buffer . . . . . . . . . . . . . . . . . . . . . . . . 61
3: Thaw and prepare the reagents . . . . . . . . . . . . . . . . . . . . . . . . . . . . . . . . . . . . . . . . . . . 62
4: Label tubes and reservoirs . . . . . . . . . . . . . . . . . . . . . . . . . . . . . . . . . . . . . . . . . . . . . . . 62
5: Add resuspension buffer to DNA pellets . . . . . . . . . . . . . . . . . . . . . . . . . . . . . . . . . . . . 62
6: Resuspension of DNA pellets . . . . . . . . . . . . . . . . . . . . . . . . . . . . . . . . . . . . . . . . . . . . 63
7: Prepare the Hybridization Master Mix . . . . . . . . . . . . . . . . . . . . . . . . . . . . . . . . . . . . . . 63
8: Prepare the Hyb-Ready Plate . . . . . . . . . . . . . . . . . . . . . . . . . . . . . . . . . . . . . . . . . . . . 63
9: Freeze or proceed. . . . . . . . . . . . . . . . . . . . . . . . . . . . . . . . . . . . . . . . . . . . . . . . . . . . . . 64
Stage 3C: (recommended) Perform quantitation and fragmentation QC checks . . . . . . . . . 65
1: Prepare for sample QC . . . . . . . . . . . . . . . . . . . . . . . . . . . . . . . . . . . . . . . . . . . . . . . . . 65
2: Perform QC checks. . . . . . . . . . . . . . . . . . . . . . . . . . . . . . . . . . . . . . . . . . . . . . . . . . . . . 66
3. Freeze or proceed . . . . . . . . . . . . . . . . . . . . . . . . . . . . . . . . . . . . . . . . . . . . . . . . . . . . . 66
Stage 4: Denature and hybridize the Hyb-Ready Plate . . . . . . . . . . . . . . . . . . . . . . . . . . . . . 67
Duration . . . . . . . . . . . . . . . . . . . . . . . . . . . . . . . . . . . . . . . . . . . . . . . . . . . . . . . . . . . . . . . 67
Required input from previous stage . . . . . . . . . . . . . . . . . . . . . . . . . . . . . . . . . . . . . . . . . . 67
Equipment, consumables, and reagents required . . . . . . . . . . . . . . . . . . . . . . . . . . . . . . . 67
1: Prepare for denaturation and hybridization . . . . . . . . . . . . . . . . . . . . . . . . . . . . . . . . . . 69
2: Prepare hybridization-ready samples that are stored at –20°C . . . . . . . . . . . . . . . . . . . 69
3: Prepare the GeneTitan MC Instrument . . . . . . . . . . . . . . . . . . . . . . . . . . . . . . . . . . . . . 69
4: Denature the Hyb-Ready Plate . . . . . . . . . . . . . . . . . . . . . . . . . . . . . . . . . . . . . . . . . . . 70
5: Prepare hybridization tray and load into GeneTitan MC Instrument . . . . . . . . . . . . . . . 71
Stage 5: Manually prepare reagent trays for the GeneTitan MC Instrument . . . . . . . . . . . . . 73
Equipment, consumables and reagents required. . . . . . . . . . . . . . . . . . . . . . . . . . . . . . . . 74
1: Prepare for GeneTitan reagent preparation . . . . . . . . . . . . . . . . . . . . . . . . . . . . . . . . . . 76
2: Prepare the Stain, Ligation and Stabilization Master Mixes . . . . . . . . . . . . . . . . . . . . . . 78
3: Aliquot master mixes and Axiom Hold Buffer into trays . . . . . . . . . . . . . . . . . . . . . . . . 81
CHAPTER 5 Array processing with the GeneTitan™ MC Instrument. . 86
Before using the GeneTitan MC Instrument . . . . . . . . . . . . . . . . . . . . . . . . . . . . . . . . . . . . . 86
Proper tray alignment and loading . . . . . . . . . . . . . . . . . . . . . . . . . . . . . . . . . . . . . . . . . . . 86
Stain trays and covers . . . . . . . . . . . . . . . . . . . . . . . . . . . . . . . . . . . . . . . . . . . . . . . . . . . . 89
E-mail and Telephone Notifications from the GeneTitan MC Instrument . . . . . . . . . . . . . 90
GeneTitan MC Instrument lamp . . . . . . . . . . . . . . . . . . . . . . . . . . . . . . . . . . . . . . . . . . . . . 91
Setup options for array plate processing . . . . . . . . . . . . . . . . . . . . . . . . . . . . . . . . . . . . . . 91
Aborting a process . . . . . . . . . . . . . . . . . . . . . . . . . . . . . . . . . . . . . . . . . . . . . . . . . . . . . . . 94
Stage 1: Create and upload a GeneTitan Array Plate Registration File . . . . . . . . . . . . . . . . . 95

Contents
6Axiom™ 2.0 Assay 96-Array Format Manual Workflow User Guide
Stage 2: Hybridization . . . . . . . . . . . . . . . . . . . . . . . . . . . . . . . . . . . . . . . . . . . . . . . . . . . . . . 96
Reagents required . . . . . . . . . . . . . . . . . . . . . . . . . . . . . . . . . . . . . . . . . . . . . . . . . . . . . . . 96
Setup the instrument . . . . . . . . . . . . . . . . . . . . . . . . . . . . . . . . . . . . . . . . . . . . . . . . . . . . . 96
Load an Axiom Array Plate and Hybridization Tray onto the GeneTitan™
MC Instrument . . . . . . . . . . . . . . . . . . . . . . . . . . . . . . . . . . . . . . . . . . . . . . . . . . . . . . . . 101
Load a second Axiom Array Plate and Hybridization Tray onto the GeneTitan
MC Instrument . . . . . . . . . . . . . . . . . . . . . . . . . . . . . . . . . . . . . . . . . . . . . . . . . . . . . . . . 106
Queue a second plate for scanning . . . . . . . . . . . . . . . . . . . . . . . . . . . . . . . . . . . . . . . . . 109
Status window prompts and actions required . . . . . . . . . . . . . . . . . . . . . . . . . . . . . . . . . . . 110
Stage 3: Ligate, wash, stain, and scan . . . . . . . . . . . . . . . . . . . . . . . . . . . . . . . . . . . . . . . . 112
Equipment, consumables, and reagents required . . . . . . . . . . . . . . . . . . . . . . . . . . . . . . 112
Proper installation of the GeneTitan tray consumables.. . . . . . . . . . . . . . . . . . . . . . . . . . 113
Load trays onto the GeneTitan MC Instrument . . . . . . . . . . . . . . . . . . . . . . . . . . . . . . . . 114
Continuing the workflow . . . . . . . . . . . . . . . . . . . . . . . . . . . . . . . . . . . . . . . . . . . . . . . . . . . 121
Shutting down the GeneTitan™ MC Instrument . . . . . . . . . . . . . . . . . . . . . . . . . . . . . . . . . . 122
CHAPTER 6 Process 3 Axiom™ array plates per week . . . . . . . . . . . 123
Overview of the 3-plate workflow for manual target preparation . . . . . . . . . . . . . . . . . . . . 123
Timing issues for manual target preparation . . . . . . . . . . . . . . . . . . . . . . . . . . . . . . . . . . 125
Timing issues for GeneTitan MC array processing. . . . . . . . . . . . . . . . . . . . . . . . . . . . . . 126
Changing oven temperatures for the 3-plate Workflow . . . . . . . . . . . . . . . . . . . . . . . . . 126
Thaw frozen Amplification Plates . . . . . . . . . . . . . . . . . . . . . . . . . . . . . . . . . . . . . . . . . . . . 127
Manual target preparation and array processing . . . . . . . . . . . . . . . . . . . . . . . . . . . . . . . . 127
Manual target preparation workflow—Day 1 . . . . . . . . . . . . . . . . . . . . . . . . . . . . . . . . . . 127
Manual target preparation workflow—Day 2 . . . . . . . . . . . . . . . . . . . . . . . . . . . . . . . . . . 129
Manual target preparation workflow—Day 3 . . . . . . . . . . . . . . . . . . . . . . . . . . . . . . . . . . 130
Manual target preparation workflow—Day 4 . . . . . . . . . . . . . . . . . . . . . . . . . . . . . . . . . . 131
Manual target preparation workflow—Day 5 . . . . . . . . . . . . . . . . . . . . . . . . . . . . . . . . . . 132
CHAPTER 7 Troubleshooting . . . . . . . . . . . . . . . . . . . . . . . . . . . . . . 133
GeneTitan Multi-Channel Instrument . . . . . . . . . . . . . . . . . . . . . . . . . . . . . . . . . . . . . . . . . . 133
Miscellaneous messages . . . . . . . . . . . . . . . . . . . . . . . . . . . . . . . . . . . . . . . . . . . . . . . . . 134
Failed messages . . . . . . . . . . . . . . . . . . . . . . . . . . . . . . . . . . . . . . . . . . . . . . . . . . . . . . . . 136
Fluidic diagnostic messages . . . . . . . . . . . . . . . . . . . . . . . . . . . . . . . . . . . . . . . . . . . . . . 136
Wash/Scan Resume . . . . . . . . . . . . . . . . . . . . . . . . . . . . . . . . . . . . . . . . . . . . . . . . . . . . . 141
Aborting a run . . . . . . . . . . . . . . . . . . . . . . . . . . . . . . . . . . . . . . . . . . . . . . . . . . . . . . . . . 141

Contents
Axiom™ 2.0 Assay 96-Array Format Manual Workflow User Guide 7
APPENDIX A Fragmentation quality control gel protocol . . . . . . . . . 142
Fragmentation quality control gel protocol . . . . . . . . . . . . . . . . . . . . . . . . . . . . . . . . . . . . . 142
Equipment Required . . . . . . . . . . . . . . . . . . . . . . . . . . . . . . . . . . . . . . . . . . . . . . . . . . . . 142
E-Gels and Reagents . . . . . . . . . . . . . . . . . . . . . . . . . . . . . . . . . . . . . . . . . . . . . . . . . . . . 142
Consumables . . . . . . . . . . . . . . . . . . . . . . . . . . . . . . . . . . . . . . . . . . . . . . . . . . . . . . . . . . 143
Dilute the TrackIt Cyan/Orange Loading Buffer . . . . . . . . . . . . . . . . . . . . . . . . . . . . . . . . 143
Dilute the 25 bp DNA Ladder . . . . . . . . . . . . . . . . . . . . . . . . . . . . . . . . . . . . . . . . . . . . . . 143
Fragmentation QC Gel Protocol . . . . . . . . . . . . . . . . . . . . . . . . . . . . . . . . . . . . . . . . . . . 143
APPENDIX B Sample quantitation after resuspension . . . . . . . . . . . 145
Equipment required . . . . . . . . . . . . . . . . . . . . . . . . . . . . . . . . . . . . . . . . . . . . . . . . . . . . . . . 145
Quantify the diluted samples . . . . . . . . . . . . . . . . . . . . . . . . . . . . . . . . . . . . . . . . . . . . . . . . 145
Install Axiom™ OD methods on the Multiskan™ Sky Microplate Spectrophotometer . . . . . 146
Use a Multiskan™ Sky session . . . . . . . . . . . . . . . . . . . . . . . . . . . . . . . . . . . . . . . . . . . . . . . 151
OD yield evaluation guidelines . . . . . . . . . . . . . . . . . . . . . . . . . . . . . . . . . . . . . . . . . . . . . . . 151
Plate reader guidelines for sample quantification . . . . . . . . . . . . . . . . . . . . . . . . . . . . . . . . 152
APPENDIX C Registering samples in GeneChip™
Command Console™. . . . . . . . . . . . . . . . . . . . . . . . . . . . . . . . . . . . . . 153
Creating a GeneTitan™ Array Plate Registration File . . . . . . . . . . . . . . . . . . . . . . . . . . . . . 153
APPENDIX D Deionization procedure for GeneTitan trays
and covers. . . . . . . . . . . . . . . . . . . . . . . . . . . . . . . . . . . . . . . . . . . . . . 156
Deionization procedure . . . . . . . . . . . . . . . . . . . . . . . . . . . . . . . . . . . . . . . . . . . . . . . . . . . . 157
Ion-indicator cap . . . . . . . . . . . . . . . . . . . . . . . . . . . . . . . . . . . . . . . . . . . . . . . . . . . . . . . . . 158
APPENDIX E GeneTitan™ Multi-Channel Instrument care . . . . . . . . 159
Cleaning and maintenance . . . . . . . . . . . . . . . . . . . . . . . . . . . . . . . . . . . . . . . . . . . . . . . . . 159
Monthly . . . . . . . . . . . . . . . . . . . . . . . . . . . . . . . . . . . . . . . . . . . . . . . . . . . . . . . . . . . . . . 159
Every 6 months . . . . . . . . . . . . . . . . . . . . . . . . . . . . . . . . . . . . . . . . . . . . . . . . . . . . . . . . 159
Servicing the outer enclosure fan filters . . . . . . . . . . . . . . . . . . . . . . . . . . . . . . . . . . . . . . . 160
Cleaning schedule . . . . . . . . . . . . . . . . . . . . . . . . . . . . . . . . . . . . . . . . . . . . . . . . . . . . . . 160
Cleaning procedure . . . . . . . . . . . . . . . . . . . . . . . . . . . . . . . . . . . . . . . . . . . . . . . . . . . . . 160
Replacing the bottle filters . . . . . . . . . . . . . . . . . . . . . . . . . . . . . . . . . . . . . . . . . . . . . . . . . . 161
Removing and inspecting the filter . . . . . . . . . . . . . . . . . . . . . . . . . . . . . . . . . . . . . . . . . 162
Replacing the filter . . . . . . . . . . . . . . . . . . . . . . . . . . . . . . . . . . . . . . . . . . . . . . . . . . . . . . 162
Replacing the xenon lamp in the GeneTitan™ MC Instrument . . . . . . . . . . . . . . . . . . . . . . . 163

Contents
8Axiom™ 2.0 Assay 96-Array Format Manual Workflow User Guide
Lamp life/imaging device status notices . . . . . . . . . . . . . . . . . . . . . . . . . . . . . . . . . . . . . 163
Removing the xenon lamp . . . . . . . . . . . . . . . . . . . . . . . . . . . . . . . . . . . . . . . . . . . . . . . . 164
Replacing the lamp. . . . . . . . . . . . . . . . . . . . . . . . . . . . . . . . . . . . . . . . . . . . . . . . . . . . . . 165
Resetting the lamp counter . . . . . . . . . . . . . . . . . . . . . . . . . . . . . . . . . . . . . . . . . . . . . . . 166
Troubleshooting . . . . . . . . . . . . . . . . . . . . . . . . . . . . . . . . . . . . . . . . . . . . . . . . . . . . . . . . . . 167
Log files . . . . . . . . . . . . . . . . . . . . . . . . . . . . . . . . . . . . . . . . . . . . . . . . . . . . . . . . . . . . . . 167
GCC log files for GeneTitan™ MC Instrument Systems . . . . . . . . . . . . . . . . . . . . . . . . . . 168
Insufficient disk space notice . . . . . . . . . . . . . . . . . . . . . . . . . . . . . . . . . . . . . . . . . . . . . 169
APPENDIX F Safety. . . . . . . . . . . . . . . . . . . . . . . . . . . . . . . . . . . . . . 170
Chemical safety . . . . . . . . . . . . . . . . . . . . . . . . . . . . . . . . . . . . . . . . . . . . . . . . . . . . . . . . . . 171
Biological hazard safety . . . . . . . . . . . . . . . . . . . . . . . . . . . . . . . . . . . . . . . . . . . . . . . . . . . . 172
APPENDIX G Documentation and support . . . . . . . . . . . . . . . . . . . . 173
Related documentation . . . . . . . . . . . . . . . . . . . . . . . . . . . . . . . . . . . . . . . . . . . . . . . . . . . . 173
Customer and technical support . . . . . . . . . . . . . . . . . . . . . . . . . . . . . . . . . . . . . . . . . . . . . 174
Limited product warranty . . . . . . . . . . . . . . . . . . . . . . . . . . . . . . . . . . . . . . . . . . . . . . . . . . 175

Axiom™ 2.0 Assay 96-Array Format Manual Workflow User Guide 9
1About the Axiom™ 2.0 Assay
The Axiom™ Solution consists of a technology platform that includes assay
biochemistry, automated and manual target preparation options, multiple array plate
formats, and array processing on the GeneTitan™ MC or GeneTitan™ MC Fast Scan
Instrument. This solution has applications in human genetics research, basic and
applied agriculture research, and microbiome research.
For human genotyping applications, we conducted an empirical screen of genomic
content from dbSNP (http://www.ncbi.nlm.nih.gove/projects/SNP/). The screen
included markers from HapMap and the 1000 Genomes Project as well as other
sources, using HapMap phase 3 samples and/or the original 270 HapMap samples. All
of this information has gone into creating a proprietary database of validated markers
that can be interrogated using the Axiom™ Human Genotyping Solution. There are
multiple arrays available for use with the Axiom Human Genotyping Solution which
leverage the content of this proprietary Thermo Fisher Scientific database.
For agriculture applications, the Axiom™ Agrigenomics Genotyping Solution is
capable of genotyping samples using DNA extracted from leaves and seeds. The use
of DNA microarrays for easy, cost-effective genotyping of single nucleotide
polymorphisms (SNPs) and insertion/deletion polymorphisms (indels) plays an
important role in genotype-trait association studies and marker-assisted selection in
both plant and animal breeding programs.
For microbiome research, Axiom™ Microbiome Solution enables researchers to detect
all known microorganisms in a sample with a single assay. Using Axiom assay
biochemistry, Axiom™ Microbiome Solution interrogates non-polymorphic sequences
in both family-conserved and target-specific regions from NCBI database sequences.
Axiom Microbiome Array detects over 12,000 species including archaea, bacteria,
fungi, protozoa, and viruses. The array content is sample type agnostic, suitable for
applications in nutrigenomics, agrigenomics, and animal research and modeling.
The Axiom 96-Format Solution utilizes the Axiom assay biochemistry, array
configuration and processing, and manual target preparation. This solution has
applications in human disease research and basic and applied agriculture research.
The Axiom 2.0 assay for 96 samples uses Axiom™ 2.0 Reagent Kit (Table 8 on page 30).
The Axiom Solution offers a choice of innovative, pre-designed or custom myDesign™
arrays. “Off-the-shelf” human genotyping arrays cover more populations than any
other technology and are available for discovery of disease-associated markers and
drug response variants or for population genetics. These arrays have optimized
designs enabling combined GWAS, replication and fine-mapping in one study. For
applied agriculture research, pre-designed arrays are available for numerous species.
Axiom Microbiome Array is available as a pre-designed array for the detection of
microorganisms. Pre-designed Axiom arrays deliver cost-effective discovery power
with the most recent genomic content. For a complete list of supporting human
NOTE: In this chapter and throughout the document, the instructions and
consumables for the GeneTitan™ MC Instrument are applicable to the GeneTitan™ MC
Fast Scan Instrument.

Chapter 1 About the Axiom™ 2.0 Assay
Overview of the Axiom 2.0 Assay Manual Workflow Assay
10 Axiom™ 2.0 Assay 96-Array Format Manual Workflow User Guide
1
genetics research, agrigenomics genotyping, and microbiome research products visit
www.thermofisher.com.
Axiom™ myDesign™ Genotyping Arrays allow you to select your own content,
enabling you to include markers relevant for your specific study. Markers for my
Design arrays can be chosen from many sources including, but not limited to, SNPs
from the Axiom™ Genomic Database; sequencing initiatives; or your own personally
selected variants. From whole-genome to targeted variant studies, Axiom myDesign
Arrays enable rapid advances in genetics research.
In summary, the Axiom Genotyping Solution is a product line that provides catalog
arrays that:
• Optimized arrays for high coverage, cost-effective genetics and microbiome
studies
• Automated and manual target preparation which includes methods for DNA
amplification, fragmentation, purification and resuspension of the target in
hybridization cocktail.
• Hands-free processing of array plates on the GeneTitan™ MC or GeneTitan™ MC
Fast Scan Instrument
• Automated software packages for stream-lined analysis of all Axiom arrays.
References 1. Klein RJ, Zeiss C, Chew EY, et al.: Complement factor H polymorphism in age-
related macular degeneration. Science 2005, 308:385–89
2. Hindorff LA, Junkins HA, Mehta JP, and Manolio TA.: A Catalog of Published
Genome-Wide Association Studies. Available at: www.genome.gov/
gwastudies. Accessed 09/28/2009.
Overview of the Axiom 2.0 Assay Manual Workflow Assay
Running the Axiom 2.0 Assay requires the following sets of steps:
1. Genomic DNA Preparation--Resulting in samples that meet requirements spelled
out in Chapter 2, "Genomic DNA preparation and requirements" on page 12.
2. Target Preparation of the samples (see Chapter 4, "Manual target preparation" on
page 41).
3. Array Processing, done with
• GeneTitan™ MC or GeneTitan™ MC Fast Scan Instrument
• GeneTitan Instrument Control software
• GCC Portal software
See Chapter 5, "Array processing with the GeneTitan™ MC Instrument" on
page 86.
A list of the required equipment and supplies for running the Axiom 2.0 Assay manual
target preparation can be found in the Axiom™ 2.0 Assay Manual Workflow Site
Preparation Guide, Pub. No. MAN0018132.

Axiom™ 2.0 Assay 96-Array Format Manual Workflow User Guide 11
Chapter 1 About the Axiom™ 2.0 Assay
Overview of the Axiom 2.0 Assay Manual Workflow Assay 1
Running multiple
plate workflows
Thermo Fisher Scientific provides workflows that allow you to run a set of samples and
array plates through the protocol using a minimum of personnel and a forty-hour
week. The timing of steps is critical, whether using automated target preparation or
manual target preparation because of the following constraints:
• Incubation after DNA Amplification is 23 hours, ± 1 hour.
• Hybridization in the GeneTitan Instrument is 23.5 hours.
• Reagent trays for wash/stain/imaging must be prepared as hybridization finishes
• Limits to when a second hybridization tray and array plate can be loaded into the
GeneTitan™ MC or GeneTitan™ MC Fast Scan Instrument.
These limitations require careful timing.
The details are covered in Chapter 6, "Process 3 Axiom™ array plates per week" on
page 123

12 Axiom™ 2.0 Assay 96-Array Format Manual Workflow User Guide
2Genomic DNA preparation and
requirements
The general requirements for genomic DNA (gDNA) sources and extraction methods
are described in this chapter. The success of this assay requires uniform amplification
of the genome starting with relatively intact gDNA. To achieve this, the gDNA must
be of high quality, and must be free of contaminants that can affect the enzymatic
reactions to be performed.
For this protocol, you will use the Axiom™ 2.0 Reagent Kit (Cat. No. 901758). Axiom™
Genomic DNA Standard (Ref. 103) (Cat. No. 951957) is available for purchase
separately. This DNA meets the requirements outlined below, and is included for use
as a control. The size and purity of sample gDNA can be compared with those of the
control DNA to assess sample quality. The control DNA should also be used routinely
as an experimental positive control and for troubleshooting purposes.
Assay performance can vary for gDNA samples that do not meet the general
requirements described below. However, the reliability of any given result should be
assessed in the context of overall experimental design and goals.
The genomic DNA requirements and preparation are described in the following
sections:
•"Sources of genomic DNA"
•"General requirements" on page 13
•"Genomic DNA extraction/purification methods" on page 15
•"Genomic DNA cleanup" on page 15
•"Genomic DNA preparation" on page 16
Sources of genomic DNA
The following sources of human gDNA have been successfully tested in the
laboratories at Thermo Fisher Scientific for DNA that meets the above requirements.
• Blood
• Saliva
• Cell line
• WGA pre-amplified DNA: Genomic DNA amplified with the REPLI-g® Kit (a
whole genome amplification kit; QIAGEN, Cat. No. 150025) has been tested
successfully with the Axiom 2.0 Reagent Kit Assay. The REPLI-g Kit was used to
amplify 20 ng genomic DNA, and the resulting yields were quantitated by a
PicoGreen® assay. The amplified products (either 100 or 200 ng amplified DNA as
required according to the Axiom array type) were used (without purification) as
IMPORTANT! Note for Axiom™ Microbiome Array users: For guidance on DNA
sample preparation and requirements for the Axiom Microbiome Array, see
Section 1, Chapter 2 “DNA Preparation and Requirements” of the Axiom™ Microbiome
Solution User Guide (Pub. No. 703408).

Axiom™ 2.0 Assay 96-Array Format Manual Workflow User Guide 13
Chapter 2 Genomic DNA preparation and requirements
General requirements 2
the input DNA sample in the subsequent Axiom 2.0 Assay steps. The stability of
this amplified product to storage and repeated cycles of freeze/thaw have not
been evaluated by Thermo Fisher Scientific.
Success with other types of samples will depend on quality (degree of degradation,
level of purity, etc.) and quantity of gDNA extracted.
The following sources of bovine gDNA have been successfully tested in the
laboratories at Thermo Fisher Scientific for DNA that meets the requirements below:
• Blood
• Semen
• Nasal swab
• Hair bulbs
• Ear punch tissue
The following sources of plant gDNA have been successfully tested and meet the
requirements:
• Seeds
• Leaves
The following sources of microbial gDNA and cDNA from RNA viruses have been
successfully tested and meet the requirements:
• Stool
Success with other types of samples depends on quality (degree of degradation, level
of purity, and so on) and quantity of gDNA extracted.
General requirements
• Starting DNA must be double-stranded for the purpose of accurate concentration
determination.
• DNA must be of high purity.
DNA should be free of DNA polymerase inhibitors. Examples of inhibitors
include high concentrations of heme (from blood) and high concentrations of
chelating agents (i.e., EDTA). The gDNA extraction/ purification method should
render DNA that is generally salt-free because high concentrations of particular
salts can also inhibit enzyme reactions. DNA purity is indicated by OD260/OD280
and OD260/OD230 ratios. The OD260/OD280 ratio should be between 1.8 and 2.0 and
the OD260/OD230 ratio should be greater than 1.5. We recommend that DNA
samples that do not meet these criteria be cleaned up as described under
"Genomic DNA cleanup" on page 15.
• DNA must not be degraded.
The approximate average size of gDNA can be assessed on a 1% agarose gel using
an appropriate size standard control. Approximately 90% of the DNA must be
greater than 10 Kb in size. Control DNA can be run on the same gel for side-by-
side comparison.
Note: DNA derived from formalin-fixed paraffin-embedded (FFPE) blocks should not be used
with this assay.

Chapter 2 Genomic DNA preparation and requirements
General requirements
14 Axiom™ 2.0 Assay 96-Array Format Manual Workflow User Guide
2
Special
requirements
Pre-amplification area
Precautions are required when manipulating genomic DNA to avoid contamination
with foreign DNA amplified in other reactions and procedures. It is recommended that
genomic DNA manipulations are performed in a dedicated pre-amplification room or
area separate from the main laboratory.
This pre-amplification area should have a dedicated set of pipettes and plasticware. If
no dedicated area is available, use of a dedicated bench or a dedicated biosafety hood
and dedicated pipettes is suggested. If no dedicated bench or biosafety hood is
available, a set of dedicated pipettes is recommended.
Ideally, this pre-amplification area would be separate from the amplification staging
area described in Chapter 3, on page 33, however these areas can be combined due to
space and equipment limitations.
Assessing the
quality of genomic
DNA Using 1%
agarose E-gels
We recommend this quality control step to asses the quality of the gDNA before
starting the assay.
Equipment and reagents recommended
Guidelines for preparing the genomic dna plate for gel analysis
• Loading a DNA mass of 10 ng to 20 ng per well is recommended. If lower
amounts are loaded, omission of the loading dye is recommended in order to
improve visualization. Loading 25 ng gDNA per well can improve the image.
• Add 3 µL of 0.1X of RediLoad dye to each sample.
• Bring each sample to a total volume of 20 µL using H2O (for example, if the
volume of genomic DNA is 5 µL, add 3 µL of RediLoad, and bring to 20 µL total
by adding 12 µL of H2O).
• Seal, vortex, then centrifuge.
To run a 48-lane 1% agarose E-Gel
1. Insert the two 48 well 1% Agarose E-Gels into the electrophoresis unit.
2. Remove 2 combs.
3. Load 20 µL from the above plate onto two 48 well 1% agarose E-Gels.
4. Load 15 µL of diluted High Range DNA Marker (1:3 dilution or ~0.34 X from
stock) into all marker wells (as needed).
5. Fill all empty wells with water.
Table 1 E-Gel™ and reagents required
Item Cat. No.
E-Gel™ Power Snap Plus Electrophoresis Device G9110
E-Gel Power Snap Plus Camera G9200
Safe Imager Viewing Glasses S37103
E-Gel® 48 1% agarose gels G8008-01
RediLoad™750026
E-Gel® 96 High Range DNA Marker 12352-019

Axiom™ 2.0 Assay 96-Array Format Manual Workflow User Guide 15
Chapter 2 Genomic DNA preparation and requirements
Genomic DNA extraction/purification methods 2
6. Run the gel for ~27 minutes.
When run time is reached (the ladder band reaches the end of the lane), the system will
automatically shut off. The gel is then ready for imaging.
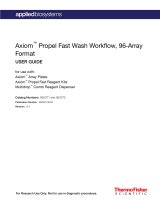
Figure 1 shows gel images of intact gDNA (that is suitable for use in the Axiom 2.0
Assay) and degraded gDNA samples. Customers whose gDNA is degraded (similar to
the image in Figure 1) should perform a test experiment to investigate the performance
of their samples in the Axiom assay before beginning any large scale projects.
Genomic DNA extraction/purification methods
Genomic DNA extraction and purification methods that meet the general
requirements outlined above should yield successful results. Methods that include
boiling or strong denaturants are not acceptable because the DNA would be rendered
single-stranded and can no longer be accurately quantitated using a PicoGreen-based
assay.
Genomic DNA cleanup
If a gDNA preparation is suspected to contain inhibitors, the following cleanup
procedure can be used:
1. Add 0.5 volumes of 7.5 M NH4OAc, 2.5 volumes of absolute ethanol (stored at
–20°C), to gDNA.
2. Vortex and incubate at –20°C for 1 hour.
3. Centrifuge at 12,000 x g in a microcentrifuge at room temperature for 20 minutes.
4. Remove supernatant and wash pellet with 80% ethanol.
5. Centrifuge at 12,000 x g at room temperature for 5 minutes.
6. Remove the 80% ethanol and repeat the 80% ethanol wash one more time.
7. Resuspend the pellet in reduced EDTA TE Buffer (10 mM Tris-HCl pH 8.0,
0.1 mM EDTA).
Figure 1 Gel images showing intact gDNA and degraded gDNA.

Chapter 2 Genomic DNA preparation and requirements
Genomic DNA preparation
16 Axiom™ 2.0 Assay 96-Array Format Manual Workflow User Guide
2
Genomic DNA preparation
This step needs to be done before proceeding with the DNA amplification stages.
The genomic DNA (gDNA) you will process using the Axiom 2.0 Assay should meet
the general requirements listed earlier in this chapter. The amount of gDNA depends
on which Axiom array will be used in the downstream protocol. All human Axiom
arrays (except the Axiom™ Genome-Wide Pan-African Array Set) require a total of
100 ng. The Axiom Genome-Wide Pan-African Array Set requires a total of 300 ng, or
100 ng per array (there are 3 arrays in the Axiom Genome-Wide Pan-African Array
Set). Diploid plants and animals require 150 ng per array and polyploid plants and
animals require 200 ng per array. For Axiom Microbiome Arrays, a total of 50 ng of
gDNA is required per array.
Prepare gDNA:
"1. Thaw samples and control"
"2. Quantitate and dilute gDNA".
"3. Aliquot the diluted samples and the control"
"4. Freeze or proceed"
"5. Create a GeneTitan Array Plate Registration file"
Duration Thirty to 60 minutes for reagents to thaw and 30 minutes for setup.
Table 2 Input requirements for Axiom 2.0 Assay.
Sample type Volume per
well
Input mass
per well
gDNA
concentration
Human 20 µL 100 ng 5 ng/µL
Diploid plants and animals 20 µL 150 ng 7.5 ng/µL
Polyploid plants and animals 20 µL 200 ng 10 ng/µL
Stool 20 µL 50 ng 2.5 ng/µL
Note: For detection of RNA viruses, RNA must be reverse transcribed to yield input amenable
to Axiom target preparation using the protocol outlined in Section 1, Chapter 3 of the Axiom™
Microbiome Solution User Guide (Pub. No. 703408).

Axiom™ 2.0 Assay 96-Array Format Manual Workflow User Guide 17
Chapter 2 Genomic DNA preparation and requirements
Genomic DNA preparation 2
Equipment,
consumables and
reagents required
Equipment and consumables
The equipment and consumables listed in Table 3 are required for this stage.
Reagents
The reagents listed in Table 4 are required for this stage.
Unless otherwise indicated, all materials are available through thermofisher.com.
Table 3 Equipment and consumables required for "Genomic DNA preparation".
Quantity Item
As required Adhesive seals for plates
1 Ice bucket, filled with ice
1 each Pipettes:
• Single channel P10 or P20
• Optional: multichannel P10 or P20
As required Pipette tips
1 Deepwell plate:
• For Axiom Genotyping: ABgene 96 Square Well Storage;
Cat. No. AB-0932 or Eppendorf 96 Deepwell Plate, 2,000 µL;
Eppendorf, Cat. No. 951033481.
• For Axiom Microbiome: Eppendorf 96 Deepwell Plate, 2,000 µL;
Eppendorf, Cat. No. 951033481.1
1This is the only plate supported for Axiom microbiome use. Using a different plate type can result in
assay failure.
1 Plate centrifuge
1 Plate spectrophotometer
(required only if no OD measurements available for samples)
1 Vortexer
Table 4 Reagents required for "Genomic DNA preparation".
Reagent Source
Genomic DNA Standard (includes Axiom™ Genomic DNA Standard
(Ref.103) for use as a positive control), –20°C
951957
Reduced EDTA TE Buffer (10 mM Tris-HCl pH 8.0, 0.1 mM EDTA) MLS
Positive control gDNA (if genotyping non-Human samples)
No template control (if assaying microbial samples)

Chapter 2 Genomic DNA preparation and requirements
Genomic DNA preparation
18 Axiom™ 2.0 Assay 96-Array Format Manual Workflow User Guide
2
1. Thaw samples
and control
Thaw the components listed below to room temperature:
• gDNA samples
• gDNA positive control sample. For human and microbiome studies, use Axiom
Reference Genomic DNA 103.
To thaw, either:
• Place items on benchtop for 1 hour
• Thaw in a water bath:
a. Fill a small plastic dish with ultra-pure water. Do not overfill as the level of
the water should not overflow when the sample tubes or plates are placed in
the bath.
b. Thaw the sealed sample plate and reference sample for 30 minutes.
c. Remove the sample plate and/or sample tube from the water bath, then wipe
dry using laboratory tissues. Ensure that the outside is completely dry before
opening the sample plate or tube to minimize any contamination, which can
lead to reaction failure.
2. Quantitate and
dilute gDNA
Note: Do not dilute the Reference Genomic DNA 103 control. It is already at a working
concentration.
1. Gently vortex (50% maximum) and centrifuge the gDNA and gDNA positive
control sample (if not using Axiom Reference Genomic DNA 103).
2. Recommendation: quantitate each sample (for example, using the Quant-iT™
PicoGreen® dsDNA Kit).
3. Using reduced EDTA TE buffer, dilute each sample to a concentration of:
• 5 ng/µL for human DNA samples
• 7.5 ng/µL for diploid plant and animal DNA samples
• 10 ng/µL for polyploid plant and animal DNA samples
• 2.5 ng/µL for stool samples
4. Seal, vortex and centrifuge.

Axiom™ 2.0 Assay 96-Array Format Manual Workflow User Guide 19
Chapter 2 Genomic DNA preparation and requirements
Genomic DNA preparation 2
3. Aliquot the
diluted samples and
the control
Next, the samples and control are placed in the following deep well plate for target
preparation:
Axiom genotyping
For Axiom genotyping arrays, use the ABgene 96 Square Well Storage Plate, Cat. No.
AB-0932 or Eppendorf 96 Deepwell Plate, 2,000 µL; Eppendorf, Cat. No. 951033481.
Aliquot diluted samples and control gDNA into the ABgene 96 Square Well Storage
Deepwell Plate:
1. Aliquot 20 µL of each diluted gDNA sample (this should be the equivalent of 100
to 200 ng of gDNA, as required by the sample type) reserving at least 1 empty
well if planning to include a positive control.
Note: Thermo Fisher Scientific recommends including at least 1 positive control
on each plate.
2. If including a positive control, aliquot 20 µL of gDNA control to the empty well
reserved in Step 1.
3. Seal and centrifuge.
Axiom Microbiome
• For Axiom™ Microbiome Arrays, use the Eppendorf™ 96 Deepwell Plate,
2,000 µL; Cat. No. 951033481. This plate is the only plate supported for Axiom
microbiome use. Using a different plate type may result in assay failure.
Aliquot diluted samples and controls into the Eppendorf Deepwell Plate for 96-format
manual target preparation
1. Aliquot 20 µL of each diluted gDNA sample. This should be the equivalent of
50 ng of gDNA, as required.
2. Aliquot the controls:
• Positive control: Aliquot 20 µL of the Reference Genomic DNA 103 control into
its designated well.
• Negative control: Aliquot 20 µL of no template control (elution buffer or
reduced EDTA TE buffer) into its designated well.
3. When including cDNA templates (see Section 1, Chapter 3, “cDNA Synthesis for
RNA Samples” in the Axiom™ Microbiome Solution User Guide, Pub. No. 703408)
first transfer 2.5 µL of Reduced EDTA TE Buffer to the sample plate. Then add
17.5 µL of cDNA template generated.
4. Seal and centrifuge.
Note: Thermo Fisher Scientific requires including Axiom Reference Genomic
DNA 103 as a positive control and the use of a no template control on each plate.
4. Freeze or
proceed
At this point you can:
• Store the sample plate at –20°C, or
• Proceed to DNA Amplification for Manual Target Preparation. See Chapter 4,
"Manual target preparation" on page 41.
Note: For samples to be processed on the Axiom Genome-Wide Pan-African Array Set,
3 identical deep well plates of 100 ng gDNA per well should be made
Note: You can leave the gDNA sample plate at room temperature if proceeding immediately
to DNA Amplification.

Chapter 2 Genomic DNA preparation and requirements
Genomic DNA preparation
20 Axiom™ 2.0 Assay 96-Array Format Manual Workflow User Guide
2
5. Create a
GeneTitan Array
Plate Registration
file
GeneTitan Array Plate Registration files contain information that is critical for:
• Data file generation during imaging.
• Tracking the experimental results for each sample loaded onto an array plate.
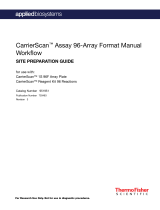
Detailed instructions for creating this file are located in Appendix C, "Registering
samples in GeneChip™ Command Console™" on page 153. See also Figure 2 for a
screen shot showing an example of a GeneTitan Array Plate Registration file.
1. Open GCC Portal Samples, and select:
a. GeneTitan Array Plate Registration.
b. The array plate format.
c. Click Download.
2. Enter a unique name for each sample and any additional information.
3. Save the file.
The array plate barcode will not be scanned until you are ready to load the array plate
and samples onto the GeneTitan MC Instrument for processing.
IMPORTANT! It is very important to create and upload a GeneTitan Array Plate
Registration file with your sample information before loading the array plate and
hybridization tray in the GeneTitan Instrument. We recommend that you create (but
not upload) this file at the same time you prepare your plate of genomic DNA. When
your samples are ready for hybridization, you will scan the array plate barcode and
upload the file to GeneChip Command Console (GCC).
Figure 2 Example of a GeneTitan Array Plate Registration file.
Assigned sample names are populated in
column G and H.
/