KJ09100, KJ09103, KJ09107
Jeep TJ, ZJ Coil Spring Spacer Instructions
www.DaystarWeb.com
Tech Support Contact Info
Phone: 623.907.0081
Fax: 623.907.0088
841 South 71st Avenue
Phoenix, AZ 85043
Instruction Sheet P10438-03
Page 1 of 2
© 2006 Daystar Products International Inc.
(NOT BE USED WITH A LIFT OR ALTERED SUSPENSION)
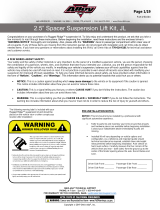
XJ Front
Figure 1
Figure 2
Front Instructions
1. Jack the front of the vehicle with the floor jack under the differential and place
jack stands under the frame just behind the lower control arm frame mounts.
Leave the jack stands high enough to let the floor jack down and still have the
front tires suspended in the air. Keep the floor jack under the differential with
slight pressure for support. Figure 3
2. Remove the front tires and wheels and disconnect the lower sway bar end links
from the differential. See figure 1.
3. Disconnect the lower shock mounts. See figure 2.
4. Disconnect the tie rod ends with a suitable tool.
5. Remove the clamps from the springs. (if equipped)
6. Disconnect the track bar from the axle.
7. Lower the jack carefully. Watch the brake lines for overextending.
8. Remove the coil springs and the bump stops. Label the springs as to which
side they were removed, Left and Right so that they are reinstalled in the side
in which they were removed. Figure 4
9. Remove the bump stop-mounting cup as shown in figure 3. (ZJ & TJ only)
10. If doing a 1” lift, remove the factory rubber isolator and replace with new 1 ¾ “
spacers. If doing a 1 ¾” lift, leave the factory isolators or replace with part
number KJ09108 (3/4” spacers) then add new 1 ¾” spacers. If doing a 2 ¾” lift,
remove the factory isolators and put 2 of the 1 ¾” spacers on one side. See
figure 4.
11. Reinstall the bump stop-mounting cup.
12. Install the bump stops and reinstall the coil spring in the same location as
removed. See figure 5. Figure 5
13. Raise the front differential and make sure that the coil springs are in their
saddles and reconnect the track bar to the axle.
14. Reconnect the lower sway bar end links at the differential and the tie rod ends.
15. Reconnect the front lower shock mounts and install the tires and wheels.
16. Lower the vehicle to the ground.
17. Torque all bolts to factory specs and recheck after 500 miles.

KJ09100, KJ09103, KJ09107
Jeep TJ, ZJ Coil Spring Spacer Instructions
www.DaystarWeb.com
Tech Support Contact Info
Phone: 623.907.0081
Fax: 623.907.0088
841 South 71st Avenue
Phoenix, AZ 85043
Instruction Sheet P10438-03
Page 2 of 2
© 2006 Daystar Products International Inc.
Rear Instructions
1. Jack the rear of the vehicle with the floor jack under the differential and place
jack stands under the frame just in front of the lower control arm frame
mounts. Leave the jack stands high enough to let the floor jack down and still
have the rear tires suspended in the air. Keep the floor jack under the
differential with slight pressure for support.
TJ Rear
Figure 1
Figure 2
2. Remove the rear tires and wheels.
3. Disconnect the sway bar end links from the differential. See figure 1.
4. Disconnect the lower shock mounts and disconnect the rear track arm at the
axle. See figure 2.
5. Lower the rear differential so that the springs come loose. Make sure to
watch the brake line, lowering too far could cause damage.
6. Remove the rear coil springs and the bump stops from the bump stop
mounting cups. See figure 3. Figure 3
7. Remove the bump stop mounting cup. ZJ & TJ only. See figure 4.
8. Install the coil spring spacer onto the upper mount and reinstall the bump
stop mounting cup. See figure 5.
9. Install the bump stops and reinstall the coil spring in the same location as
removed.
10. Raise the rear differential and make sure that the coil springs are in their
saddles.
11. Reconnect the rear track arm and the rear lower sway bar end links. Figure 4
12. Reconnect the rear lower shock mounts and install the tires and wheels.
13. Lower the vehicle to the ground.
14. Torque all bolts to factory specifications and recheck after 500 miles.
WARNING
This vehicle has been modified to enhance its performance. The steering, braking
and handling of this vehicle will differ from standard passenger cars and trucks, This
vehicle handles differently from an ordinary vehicle in driving conditions which may occur
on streets, highways and off road.
Avoid unnecessary abrupt maneuvers, sudden stops, sharp turns and other driving
conditions that could cause loss of control, possibly leading to a roll over or other
accident that could result in serious injury or death to driver and passengers.
If larger tires are installed the speedometer will read lower than the vehicles actual
speed. DRIVE WITH CARE, REDUCE SPEED
AND WEAR SEAT BELTS AT ALL TIMES.
This kit should be installed by a professional mechanic.
Figure 5
/