Quadratec Maximum Duty 2.5" Coil Spring Suspension Lift Kit Installation guide
- Type
- Installation guide

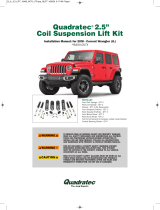
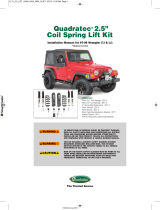
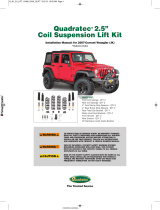
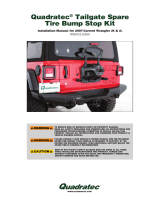
Quadratec® 2.5" Suspension Lift
Installation Manual: For Jeep Wranglers JT #16400-1819
FRONT COIL SPRING QTY 2
REAR COIL SPRING QTY 2
FRONT SWAY BAR LINKS QTY 2
REAR SWAY BAR LINKS QTY 2
FRONT BUMP STOP SPACERS QTY 2
FRONT SHOCK QTY 2
REAR SHOCK QTY 2
HARDWARE BOX: KIT QTY 1
PARTS LIST
Make sure you park the vehicle on a level concrete or asphalt surface. Many times a vehicle
is not level (side-to-side) from the factory, but is usually not noticed until a lift kit has been
installed which makes the difference more visible. Using a measuring tape, measure the front &
rear (both sides) from the ground up to the center of the fender opening above the axle. Record
this information below for future reference.
Driver Side Front: _________ Passenger Side Front:_________
Driver Side Rear: __________ Passenger Side Rear:__________

A FEW WORDS ABOUT PRODUCT SAFETY:
Your Quadratec Jeep Lift Kit is intended to enhance the utility and enjoyment of your off road capable vehicle. Follow
safety information and installation recommendations. Throughout these instructions is important safety information
that is generally preceded by one of three signal words indicating the relative risk of injury, property damage or
adverse consequence.
The signal words mean:
A HAZARDOUS SITUATION WHICH, IF NOT AVOIDED, COULD RESULT IN DEATH OR
SERIOUS INJURY. YOU CAN BE KILLED OR SERIOUSLY HURT IF YOU DON'T FOLLOW
INSTRUCTIONS.
CAREFUL ATTENTION IS REQUIRED TO THIS INSTRUCTION OR OPERATION BUT DOES
GENERALLY NOT RELATE TO PERSONAL INJURY. DAMAGE TO YOUR QUADRATEC®
PRODUCT OR OTHER PROPERTY MAY RESULT IF YOU DON'T FOLLOW INSTRUCTIONS.
A HAZARDOUS SITUATION WHICH, IF NOT AVOIDED, COULD RESULT IN A MINOR OR
MODERATE INJURY. YOU CAN BE MODERATELY HURT AND ALSO MAY SUFFER PROPERTY
DAMAGE IF YOU DON'T FOLLOW INSTRUCTIONS.
BEFORE YOU BEGIN INSTALLATION:
Congratulations on your purchase of Quadratec® Lift Kit for your Jeep® Wrangler. This custom Lift Kit has
been designed for protection, long life, and great looks. When unpacking, check to make sure all parts are included
and not damaged due to shipping. If any part is missing or broken, please call Customer Service at 800-745-6037
as soon as possible. Thank you again for your purchase and let’s start the installation process.
READ ALL SAFETY MESSAGES AND ALWAYS WEAR SAFETY GLASSES WHEN WORKING
WITH TOOLS.
THIS PRODUCT IS INSTALLED UNDERNEATH THE VEHICLE AND REQUIRES ACCESS TO
THE UNDERSIDE. WE RECOMMEND USING A VEHICLE LIFT SUCH AS THOSE FOUND IN
MOST REPAIR SHOPS TO ACCESS THIS PART OF THE VEHICLE. ALWAYS USE CAUTION
WHEN WORKING UNDER YOUR VEHICLE.
WE ALSO RECOMMEND THAT YOU HAVE A HELPER NEARBY AS SOME OF THE STEPS
OUTLINED BELOW WILL BE MUCH EASIER WITH THE HELP OF ANOTHER SET OF HANDS.
TO REDUCE RISK OF SERIOUS INJURY OR PROPERTY DAMAGE:
READ ALL SAFETY MESSAGES AND UNDERSTAND ALL INSTRUCTIONS AND PROCEDURE
NOTICES BEFORE ATTEMPTING TO INSTALL OR USE THIS PRODUCT.
PARK THE VEHICLE ON FLAT, LEVEL GROUND AND SET THE EMERGENCY BRAKE. ALWAYS
SUPPORT FRAME RAILS USING JACK STANDS
RISK OF EYE INJURY! SAFETY GLASSES MUST BE WORN AT ALL TIMES WHILE INSTALLING
OR MAINTAINING THIS PRODUCT. TORQUE AND RECHECK FASTENERS AFTER 250 MILES
AND FREQUENTLY THEREAFTER. DO NOT USE IF DAMAGED.
NOTICE
NOTICE
NOTICE
NOTICE
2
READ CAREFULLY
HAVE A QUALIFIED ALIGNMENT CENTER ALIGN THE VEHICLE TO THE FACTORY
SPECIFICATIONS.
AFTER INSTALLATION IS COMPLETE:

3
2.5" KIT PART LIST
FRONT BUMP STOPS
FRONT BUMP STOP SPACER QTY 2
X 2 BUTTON HEAD BOLT QTY 2
SAE WASHER QTY 2
COARSE THRD N/I LOCK NUT QTY 2
REAR SWAY BAR LINKS
BLACK HOURGLASS BUSHING QTY 4
CRUSH SLEEVE / 1.25 LONG QTY 4
12MM X 65 METRIC BOLT QTY 2
USS FLAT WASHER QTY 6
12MM METRIC N/I LOCK NUT QTY 2
FRONT SWAY BAR LINKS
CRUSH SLEEVE / 1.50 LONG QTY 4
USS FLAT WASHER QTY 4
12MM X 70MM METRIC BOLT QTY 2
12MMN 12MM METRIC N/I LOCK NUT QTY 2
REQUIRED TOOLS
Safety Glasses
Pliers
Wrench
Ratchet
Measuring Tape
18mm Socket
19mm Socket
21mm Socket
22mm Socket
24mm Socket
8mm Socket
10mm Socket
13mm Socket
15mm Socket
Socket
Hex Key Socket
Jack Stands
Floor Jack

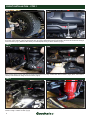
Put on safety glasses. Park your vehicle on flat level ground. Set the emergency brake and block the rear tires. Raise
the front of the vehicle, support the frame rails, and front differential using jack stands. Remove the front tires using a
22mm socket. (Fig 1) Remove the factory front skid plate using a 13mm socket. (Fig 2)
FIG 1 FIG 2
STEP 2
Remove the factory front sway bar end links using a 6mm hex key socket and 18mm socket. (Fig 3) Next, remove the
factory front track bar using a 21mm socket. (Fig 4)
FIG 3 FIG 4
STEP 3
Disconnect the factory drag link from the factory pitman arm using a 21mm socket. (Fig 5) Remove the factory front
shocks using a 18mm socket. (Fig 6)
FIG 5 FIG 6
4
FRONT INSTALLATION - STEP 1

5
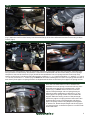
Disconnect the factory front brake line brackets from the factory front lower control arms using a 15mm socket.
(Fig 7) Mark the location of the factory front driveshaft flange at the front differential and disconnect using a 15mm
socket. (Fig 8)
Disconnect the wiring harness from the passenger side factory front upper control arm using pliers. Disconnect the
wiring harness from the factory 4wd actuator. Lower the front differential and remove the factory front coil springs.
Use pliers to remove the vent hose. (Fig 9) Install the new Quadratec front coil springs and new front bump stop
spacers to the factory front bump stop pads using the supplied " x 2 " button head bolts, " washers, " nuts a
" hex key socket and " socket. (Fig 10) NOTE: Be sure when installing the new front coil springs that the tabs of
each factory front upper coil spring isolators are aligned with the holes of the factory front upper coil spring mounts.
STEP 4
STEP 5
FIG 7 FIG 8
FIG 9 FIG 10
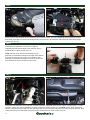
STEP 6
Raise the front differential in order to load the new
Quadratec front coil springs. Connect the factory front
driveshaft using the factory hardware with a 15mm
socket. (Fig 11) NOTE: There has been occasional
reports of the passenger side coil spring having an
inward bow after installation on taller lifts. If so, the
factory upper coil spring isolator can be rotated 180
degrees. Mark the factory position of the passenger
side factory upper coil spring isolator. Remove the two
alignment pins on top of the passenger side factory
upper coil spring isolator using diagonal cutting pliers
or similar tool. Rotate the passenger side factory upper
coil spring isolator so the thicker portion is on the inside
toward the frame.
FIG 11

Connect the factory front driveshaft using factory hardware an a 15mm socket. Connect the factory drag link to the
factory pitman arm using the factory hardware and a 21mm socket. (Fig 12) Connect the factory hose to the front
differential using pliers. Connect the wiring harness to the factory 4wd actuator and passenger side factory upper
control arm. (Fig 13)
STEP 7
FIG 12 FIG 13
STEP 8
Install the new Quadratec front shocks using the
supplied polyurethane bushings, steel sleeves, factory
hardware and a 18mm socket. (Fig 14)
NOTE: The new front shocks use the larger inside
diameter polyurethane bushings and longer steel sleeves
for the front upper shock mounts. The smaller inside
diameter polyurethane bushings are used on the shorter
steel sleeves for the front lower shock mounts.
FIG 14
STEP 9
FIG 15
Install the new Quadratec front sway bar end links using the suppliead steel sleeves, 12mm x 70mm bolts, " USS
washers, 12mm nuts, factory hardware, a 18mm socket and 19mm socket. (Fig 15) NOTE: On the driver side of the
vehicle, install the factory lower bolt with the large washer to the bushing side of the new front sway bar end link. Next,
install the factory front skid plate using the factory hardware and a 13mm socket. (Fig 16)
FIG 16
6

7
STEP 10
FIG 17 FIG 18
Install the front tires using a 22mm socket and lower the front of the vehicle to the ground. (Fig 17) Reinstall the front
track bar to the frame using the factory hardware and a 21mm socket.
Front installation is now complete. (Fig 18)
FIG 1 FIG 2
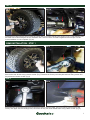
Block the front tires. Raise the rear of the vehicle, support the frame rails and rear differential using jack stands.
Remove the rear wheels using a 22mm socket. (Fig 1) Remove the factory rear sway bar end links using a 6mm hex
key socket and 18mm socket. (Fig 2)
FIG 3 FIG 4
STEP 2
Disconnect the factory rear track bar from the frame using a 21mm socket. (Fig 3) In order to gain access to the
factory rear upper shock mounting bolts, remove the factory rear lower fender liners using a 8mm socket. (Fig 4)
REAR INSTALLATION - STEP 1

STEP 3
FIG 5 FIG 6
Remove the factory rear shocks using a 21mm socket / wrench. (Fig 5) Remove the rear factory brake line bracket
with a 13mm socket / wrench to allow for ample amount of slack in brake lines for installation of rear coil springs.
(Fig 6)
8
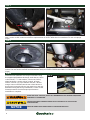
STEP 4
FIG 7 FIG 8
Install the factory rear coil spring isolators & factory rear coil springs. (Fig 7) Install the rear shocks using a 21mm
socket. The rear shocks must be mounted with the "body end" at the rear differential & the "rod end" at the frame.
(Fig 8)
STEP 6
FIG 10
Install the new Quadratec rear sway bar end links using
the supplied polyurethane bushings, steel sleeves, 12mm
x 65mm bolts, " USS washers, 12mm nuts, factory
upper hardware, a 18mm socket / wrench, & 19mm
socket / wrench. (Fig 10) Install the rear tires / wheels
using a 22mm socket & lower the rear of the vehicle to
the ground. Connect the factory rear track bar to the rear
differential using the factory hardware & a 21mm socket.
Please proceed to check all torque specifications.
Installation is complete.
AFTER THE FIRST 100 MILES, CHECK ALL HARDWARE FOR THE PROPER TORQUE AND
PERIODICALLY THEREAFTER.
HAVE THE HEADLIGHTS READJUSTED TO THE PROPER SETTINGS.
HAVE A QUALIFIED ALIGNMENT CENTER ALIGN THE VEHICLE TO THE FACTORY
SPECIFICATIONS.
NOTICE

9
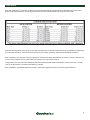
FINAL NOTES:
After the installation is complete, double check that all nuts and bolts are tight. Refer to the following chart for the
proper torque specifications. do not tighten the nuts and bolts where thread lock compound was used.
With the vehicle placed on the ground, cycle the steering lock to lock and inspect the steering, suspension, brake lines,
front and rear drivelines, fuel lines and wiring harness for proper operation, tightness and adequate clearance.
After installation, the drag link must be adjusted to center the steering wheel before the vehicle is driven. Failure to do
so will cause computer errors, odd handling characteristics, & poor performance.
If larger tires (10% more than the OEM diameter) are installed, speedometer recalibration will be necessary. Contact
your local Jeep dealer or an authorized dealer for details.
After installation, a qualified alignment facility is required to align the vehicle to the factory specifications.

Your Quadratec® branded accessories are covered by the following Limited Warranty provided exclusively by
Quadratec, Inc., 1028 Saunders Lane, West Chester PA 19380.
This Limited Warranty is the only warranty made in connection with your purchase. Quadratec neither assumes nor
authorizes any vendor, retailer or other person or entity to assume for it any other obligation or liability in connection
with this product or Limited Warranty. This Limited Warranty does not apply and is not cumulative to any accessory
or part distributed by Quadratec for which the Manufacturer provides a separate written warranty. All warranty
claims require proof that the “WARNING” decal included with this product is properly displayed in the passenger
compartment.
What is Covered:
Subject to the terms, exclusions and limitations herein and with respect only to Quadratec branded accessories first
sold in the United States, Quadratec warrants to the initial retail purchaser only that your Quadratec accessory shall be
free of defects in material and workmanship: for a period of three (3) years from date of retail purchase.
This Limited Warranty is not assignable and shall terminate upon sale of the vehicle upon which the Quadratec
accessory is installed or other transfer to third persons.
All other warranties are hereby disclaimed, except to the extent prohibited by applicable law in which case any implied
warranty of merchantability or fitness for a particular purpose on this product is limited to three (3) years from date
of initial retail sale. Quadratec reserves the rights to: (a.) require invoice or other proof your accessory is within the
terms of this Limited Warranty as a condition of warranty service and, (b.) make future revisions to this product and
Limited Warranty without prior notice or obligation to upgrade your product.
What is Not Covered:
Your Quadratec Limited Warranty does not cover products or parts Quadratec determines to have been damaged by
or subjected to: (a.) installation damage, alteration, modification, combination with other parts, failure to maintain or
improper repair or service, (b.) normal wear & tear, cosmetic damage or damage from moisture or water immersion,
(c.) Acts of God, accidents, misuse, negligence, inadequate mounting or impact with vehicle(s), obstacles or other
aspects of the environment, (d.) theft, vandalism or other intentional damage.
Remedy Limited to Repair/Replacement:
The exclusive remedy provided hereunder shall, upon Quadratec inspection and at our option, be either repair or
replacement of product or parts (new or refurbished) covered under this Limited Warranty. Customers requesting
warranty consideration should first contact Quadratec to obtain a RGA number (610-701-3336). All labor, removal,
shipping and installation costs are customer’s responsibility.
Other Limitations - Exclusion of Damages - Your Rights Under State Law:
In consideration of the purchase price paid, neither Quadratec nor any independent Quadratec distributor/licensee are
responsible for any time loss, rental costs, or for any incidental, consequential, punitive or other damages you may
have or incur in connection with any part or product purchased. Your exclusive remedy hereunder for covered parts is
repair/replacement as described above.
This Limited Warranty gives you specific rights. You may also have other rights that vary from state to state.
For example, some states do not allow limitations of how long an implied warranty lasts and /or do not allow the
exclusion or limitation of incidental or consequential damages, so the limitations and exclusions herein may not apply
to you.
©Quadratec, Inc. 2022. All Rights Reserved.
A4 Version 7/8/22
Instructions Part #12999.3275
Quadratec® Exclusive Three Year Limited Warranty
-
 1
1
-
 2
2
-
 3
3
-
 4
4
-
 5
5
-
 6
6
-
 7
7
-
 8
8
-
 9
9
-
 10
10


Quadratec Maximum Duty 2.5" Coil Spring Suspension Lift Kit Installation guide
- Type
- Installation guide
Ask a question and I''ll find the answer in the document
Finding information in a document is now easier with AI
Related papers
-
 Quadratec Maximum Duty 2.5" Coil Spring Suspension Lift Kit Installation guide
-
 Quadratec 16116 0203 Installation guide
-
 Quadratec Maximum Duty 2.5" Coil Spring Suspension Lift Kit Installation guide
-
 Quadratec 3.5” Coil Spring Suspension Kit Installation guide
-
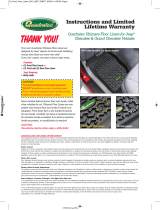
 Quadratec Flashlight Holder Installation guide
-
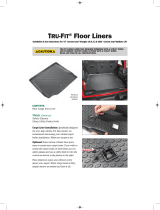 Quadratec Tru-Fit® Floor Liner Triple Combo Installation guide
-
 Quadratec 2.5” Coil Spring Suspension Kit Installation guide
-
 Quadratec Aluminum Roof Rack Installation guide
-
 Quadratec 16400 0041 Installation guide
-
 Quadratec Ultimate All Weather Front Floor Liners Installation guide


Other documents
-
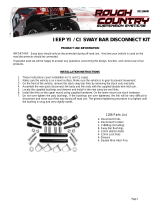 Rough Country 1188 Installation guide
-
 CARNIVORE Spare Tire Reinforcement Bracket Kits Installation guide
-
 Rough Country 3.25in Suspension and Spacer Lift Kit Installation guide
-
 Rough Country 1113 Installation guide
-
 Rough Country 6in Suspension Lift Kit Installation guide
-
 Rough Country 4in Suspension Lift Kit Installation guide
-
 Rough Country 4in Suspension Lift Kit Installation guide
-
Lynx Complete Arm Kit Installation guide
-
-


