Page is loading ...

Before beginning the installation, read these instructions & the enclosed driver’s WARNING NOTICE
thoroughly & completely. Also affix the WARNING decal in the passenger compartment in clear view
of all occupants. Please refer to the Parts List to insure that all parts & hardware are received prior
to disassembly of the vehicle. If any parts are found to be missing, contact SKYJACKER® Customer
Service at 318-388-0816 to obtain the needed items. If you have any questions or reservations
about installing this product, contact SKYJACKER® Technical Assistance at 318-388-0816.
Make sure you park the vehicle on a level concrete or asphalt surface. Many times a vehicle is not
level (side-to-side) from the factory, but is usually not noticed until a lift kit has been installed which
makes the difference more visible. Using a measuring tape, measure the front & rear (both sides)
from the ground up to the center of the fender opening above the axle. Record this information
below for future reference.
Driver Side Front: Passenger Side Front:
Driver Side Rear: Passenger Side Rear:
Important Notes:
• After installation, the drag link must be adjusted to center the steering wheel before the vehicle is
driven. Failure to do so will cause computer errors, odd handling characteristics, & poor
performance.
• If larger tires (10% more than the OEM diameter) are installed, speedometer recalibration will be
necessary. Contact your local Jeep dealer or an authorized dealer for details.
• After installation, a qualified alignment facility is required to align the vehicle to the OEM
specifications.
Jeep Gladiator JT
2.5" Suspension Lift
Installation Instructions
www.skyjacker.com
I-G250 7-19 Pg 1
Required Tools List:
• Safety Glasses
• Metric & SAE Sockets / Wrenches
• Metric & SAE Hex Key Sockets / Wrenches
• Pliers
• Floor Jack
• Jack Stands
• Measuring Tape
• Torque Wrench

Pg 2I-G250
Component Box Breakdown:
Part #: G250PBLT / G250PMLT / G250RPBLT / G250RPMLT / G251PBLT /
G251PMLT / G251RPBLT / G251RPMLT
Item # Description Qty Item # Description Qty
JL23FS-DR FRONT D/R L/T COIL SPRING 2 B8386 FRONT BLACK MAX SHOCK 2
(Included w/ G250 & G251) (Included w/ G250PB, G250RPB,
G24FS-DR FRONT D/R L/T COIL SPRING 2 G251PB, & G251RPB)
(Included w/ G250R & G251R) M9386 FRONT M95 MONOTUBE SHOCK 2
JTG10RMS-S REAR METAL COIL SPACER 2 (Included w/ G250PM, G250RPM,
(Included w/ G250 & G250R) G251PM, & G251RPM)
G210RS-DR REAR D/R L/T COIL SPRING 1 B8396 REAR BLACK MAX SHOCK 2
(Included w/ G251 & G251R) (Included w/ G250PB, G250RPB,
G215RS-DR REAR D/R L/T COIL SPRING 1 G251PB, & G251RPB)
(Included w/ G251 & G251R) M9396 REAR M95 MONOTUBE SHOCK 2
H-BOX G251 HWDR BOX: G250 / G251 KITS 1 (Included w/ G250PM, G250RPM,
G251PM, & G251RPM)
Hardware Box Breakdown:
Part # H-BOX G251
Item # Description Qty Item # Description Qty
SBE4028-L FRONT SWAY BAR END LINK 2 HB-JTGSBER HDWR BAG: REAR END LINKS 1
SBE506-L REAR SWAY BAR END LINK 2 HB-SBENB03 HDWR BAG: FRONT END LINKS 1
HB-BSS3020 HDWR BAG: FRT BUMP STOPS 1 I-G250 INST SHEET: G250 / G251 KITS 1
Hardware Bag Breakdown:
Part # HB-BSS3020
Item # Description Qty Item # Description Qty
BSS3020-S FRONT BUMP STOP SPACER 2 38SAEW 3/8 SAE WASHER 2
38X234BHB 3/8 X 2 3/4 BUTTON HEAD BOLT 2 38CTN 3/8 COARSE THRD N/I LOCK NUT 2
Part # HB-SBENB03
Item # Description Qty Item # Description Qty
141509 CRUSH SLEEVE / 1.50 LONG 4 716USSW 7/16 USS FLAT WASHER 4
12X70MMB 12MM X 70MM METRIC BOLT 2 12MMN 12MM METRIC N/I LOCK NUT 2
Item # Description Qty Item # Description Qty
HG58125-K BLACK HOURGLASS BUSHING 4 716USSW 7/16 USS FLAT WASHER 6
403712 CRUSH SLEEVE / 1.25 LONG 4 12MMN 12MM METRIC N/I LOCK NUT 2
12X65MMB 12MM X 65 METRIC BOLT 2
Part # HB-JGTSBER

Pg 3I-G250
Front Installation:
1. With the vehicle on flat level ground, set the emergency brake, & block
the rear tires / wheels.
2. Raise the front of the vehicle, support the frame rails, & front differential
using jack stands.
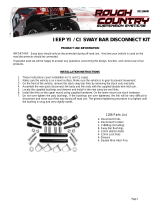
3. Remove the front tires / wheels using a 22mm socket. (See Photo # 1)
4. Remove the OEM front skid plate using a 13mm socket / wrench. (See
Photo # 2)
5. Remove the OEM front sway bar end links using a 6mm hex key socket
/ wrench & 18mm socket / wrench. (See Photo # 3)
6. Disconnect the OEM front track bar from the frame using a 21mm socket
/ wrench. (See Photo # 4)
7. Disconnect the OEM drag link from the OEM pitman arm using a 21mm
socket / wrench. (See Photo # 5)
8. Remove the OEM front shocks using a 18mm socket / wrench. (See
Photo # 6)
9. Disconnect the OEM front brake line brackets from the OEM front lower
control arms using a 15mm socket / wrench. (See Photo # 7)
Photo # 1
Photo # 2
Photo # 3
Photo # 4
Photo # 5 Photo # 6
Photo # 7

Pg 4I-G250
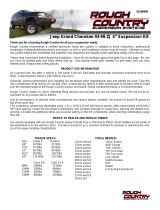
10. Mark the location of the OEM front driveshaft / flange at the front
differential & disconnect using a 15mm socket / wrench. (See Photo # 8)
11. Disconnect the wiring harness from the passenger side OEM front upper
control arm using pliers.
12. Disconnect the wiring harness from the OEM 4WD acuator. (See Photo
# 9)
13. Disconnect the OEM vent hose from the front differential using pliers.
14. While checking for appropriate slack in ABS lines, brake lines, differential
vent hose, & etc. Lower the front differential & remove the OEM front coil
springs.
15. Install the new Skyjacker front coil springs & new Skyjacker front bump
stop spacers to the OEM front bump stop pads using the supplied 3/8" x
2 3/4" button head bolts, 3/8" washers, 3/8" nuts, a 7/32" hex key socket
/ wrench, & 9/16" socket / wrench. (See Photo # 10) Note: Be sure
when installing the new front coil springs that the tab of each OEM front
upper coil spring isolator aligns with the hole of each OEM front upper
coil spring mount.
16. Raise the front differential in order to load the new Skyjacker front coil
springs & connect the OEM front driveshaft using the OEM hardware &
a 15mm socket / wrench. (See Photo # 8)
17. Connect the OEM drag link to the OEM pitman arm using the OEM
hardware & a 21mm socket / wrench. (See Photo # 5)
18. Connect the OEM vent hose to the front differential using pliers.
19. Connect the wiring harness to the OEM 4WD acuator. (See Photo # 9)
20. Connect the wiring harness to the passenger side OEM front upper
control arm.
21. Connect the OEM front brake line brackets to the OEM front lower
control arms using the OEM hardware & a 15mm socket / wrench. (See
Photo # 7)
22. Install the new Skyjacker front shocks using the supplied polyurethane
bushings, steel sleeves, OEM hardware & a 18mm socket / wrench.
Note: The new front shocks use the larger inside diameter polyurethane
bushings / longer steel sleeves for the front upper shock mounts & the
smaller inside diameter polyurethane bushings / shorter steel sleeves
for the front lower shock mounts. (See Photo # 11)
Photo # 8
Photo # 9
Photo # 10
Photo # 11
Upper
Shock Mount

Pg 5I-G250
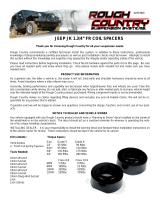
23. Install the new Skyjacker front sway bar end links using the supplied
steel sleeves, 12mm x 70mm bolts, 7/16" USS washers, 12mm nuts,
OEM hardware, a 18mm socket / wrench, & 19mm socket / wrench.
(See Photo # 12) Note: On the driver side of the vehicle, install the
OEM lower bolt with the large washer to the bushing side of the new
front sway bar end link.
24. Install the OEM front skid plate using the OEM hardware & a 13mm
socket / wrench. (See Photo # 2)
25. Install the front tires / wheels using a 22mm socket & lower the front of
the vehicle to the ground. (See Photo # 1)
26. Connect the OEM front track bar to the frame using the OEM hardware
& a 21mm socket / wrench. (See Photo # 4) Note: Slightly turning the
steering wheel will help align the OEM front track bar with the frame
mount.
Rear Installation:
1. Block the front tires / wheels, raise the rear of the vehicle, support the
frame rails, & rear differential using jack stands.
2. Remove the rear tires / wheels using a 22mm socket. (See Photo # 13)
3. Remove the OEM rear sway bar end links using a 6mm hex key socket
/ wrench & 18mm socket / wrench. (See Photo # 14)
4. Disconnect the OEM rear track bar from the rear differential using a
21mm socket / wrench. (See Photo # 15)
5. Remove the OEM rear shocks using a 21mm socket / wrench. (See
Photo # 16)
6. While checking for appropriate slack in ABS lines, brake lines, differential
vent hose, & etc. Lower the rear differential & remove the OEM rear coil
springs.
Photo # 12
Photo # 13
Photo # 14
Photo # 15
Photo # 16

Pg 6I-G250
7. G250 Kits: Install the new Skyjacker rear coil spring spacers to the OEM
rear coil spring mounts using the supplied 1/4" x 3/4" bolts & a 7/16"
wrench. (See Photo # 17)
8. G250 Kits: Install the OEM rear coil spring isolators & OEM rear coil
springs. Note: Be sure when installing the OEM rear coil spring isolators
that the tab of each OEM rear upper coil spring isolator aligns with the
hole of each new Skyjacker rear coil spring spacer.
9. G251 Kits: Install the new Skyjacker 2-Stage Variable Rate rear coil
springs. Note: The new rear coil springs are side specific. The shorter
new rear coil spring will be installed on the driver side of the vehicle &
the longer new rear coil spring will be installed on the passenger side of
the vehicle. See the list below for specific new rear coil spring part # &
location information. Also, be sure when installing the new rear coil
springs that the tab of each OEM rear upper coil spring isolator aligns
with the hole of each OEM rear upper coil spring mount.
Skyjacker 2-Stage Variable Rate Rear Coil Spring Locations:
Driver Side Rear Part #: G210RS-DR (Shorter Rear Coil Spring)
Passenger Side Rear Part #: G215RS-DR (Longer Rear Coil Spring)
10. Raise the rear differential in order to load the new Skyjacker rear coil
springs & install the new Skyjacker rear shocks using the supplied
polyurethane bushings, steel sleeves, OEM hardware & a 21mm socket
/ wrench. (See Photo # 18)
11. Install the new Skyjacker rear sway bar end links using the supplied
polyurethane bushings, steel sleeves, 12mm x 65mm bolts, 7/16" USS
washers, 12mm nuts, OEM upper hardware, a 18mm socket / wrench, &
19mm socket / wrench. (See Photo # 19)
12. Install the rear tires / wheels using a 22mm socket & lower the rear of the vehicle to the ground. (See
Photo # 13)
13. Connect the OEM rear track bar to the rear differential using the OEM hardware & a 21mm socket /
wrench. (See Photo # 15)
Final Notes:
• After the installation is complete, double check that all nuts & bolts are tight. Refer to the following
chart for the proper torque specifications. (Do not retighten the nuts & bolts where thread lock
compound was used.)
Photo # 17
Photo # 18
Photo # 19

Pg 7I-G250
• With the vehicle placed on the ground, cycle the steering lock to lock & inspect the steering,
suspension, brake lines, front & rear drivelines, fuel lines, & wiring harnesses for proper operation,
tightness, & adequate clearance.
• Have the headlights readjusted to the proper settings.
• Have a qualified alignment center align the vehicle to the OEM specifications.
• After the first 100 miles, check all hardware for the proper torque & periodically thereafter.
Seat Belts Save Lives, Please Wear Your Seat Belt.
Optional HD OEM Replacement Steering Stabilizers Available:
7008 HD OEM Replacement Steering Stabilizer - White Steering Damper
8008 HD OEM Replacement Steering Stabilizer - Black Steering Damper
9008 HD OEM Replacement Steering Stabilizer - Silver Steering Damper
Optional Dual Steering Stabilizer Kits Available:
7208 Dual Steering Stabilizer Kit - White Steering Dampers
8208 Dual Steering Stabilizer Kit - Black Steering Dampers
9208 Dual Steering Stabilizer Kit - Silver Steering Dampers
Optional Front / Rear Adjustable Track Bars Available:
JLFTBA18 Front Adjustable Track Bar / 1"- 4.5" Lift
JTGRTBA20 Rear Adjustable Track Bar / 1"- 4.5" Lift
TORQUE SPECIFICATIONS
INCH SYSTEM
Bolt Size Grade 5 Grade 8
5/16 15 FT LB 20 FT LB
3/8 30 FT LB 35 FT LB
7/16 45 FT LB 60 FT LB
1/2 65 FT LB 90 FT LB
9/16 95 FT LB 130 FTLB
5/8 135 FT LB 175 FT LB
3/4 185 FT LB 280 FT LB
METRIC SYSTEM
Bolt Size Class 8.8 Class 10.9
6MM 5 FT LB 9 FT LB
8MM 18 FT LB 23 FT LB
10MM 32 FT LB 45 FT LB
12 MM 55 FT LB 75 FT LB
14MM 85 FT LB 120 FT LB
16MM 130 FT LB 165 FT LB
18MM 170 FT LB 240 FT LB
• The above specifications are not to be used when the bolt is being installed with a bushing.

Pg 8I-G250
Optional HD Front / Rear Upper & Lower Control Arms Available:
JL24LLF HD Front Lower Control Arms - Set / 1"- 4.5” Lift
GULR24 HD Rear Upper Control Arms - Set / 1"- 4.5” Lift
JLL24F-SX Single Flex Front Lower Control Arms - Pair / 1"- 6” Lift
GLL24R-SX Single Flex Rear Lower Control Arms - Pair / 1"- 6” Lift
JLULF26-SX Single Flex Front Upper Control Arms - Pair / 1"- 6” Lift
GULR24-SX Single Flex Rear Upper Control Arms - Pair / 1"- 6” Lift
Optional Accessories:
JLOSM Front Outboard Shock Mounting Brackets
SBE4238 Front Double Disconnect Sway bar End Links / 2"- 3" Lift
SBE4258 Front Double Disconnect Sway bar End Links / 3.5"- 6" Lift
/