
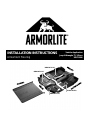
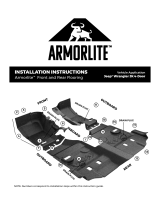
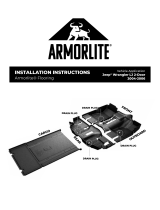
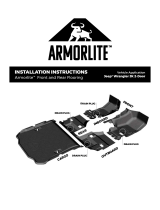
INSTALLATION INSTRUCTIONS
Armorlite® Flooring
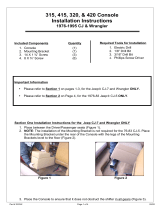
Vehicle Application
Jeep® Wrangler TJ 2-Door
1997-2006
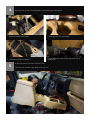
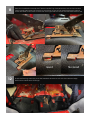
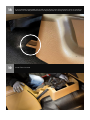
DRAIN PLUG
DRAIN PLUG
DRAIN PLUG
DRAIN PLUG

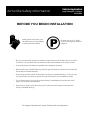
Armorlite Safety Information
CAUTION
Vehicle Application
Jeep® Wrangler TJ 2-Door
1997-2006
READ BEFORE INSTALLING
•DO NOT install Armorlite flooring on top of any existing flooring product, including
factory or aftermarket systems, floor mats, carpets or linings of any type.
•Armorlite flooring fit could be compromised if installed over a spray-in floor liner due to
the additional thickness.
•Do NOT install any floor coverings or mats on top of Armorlite, as it will hinder your
Armorlite floor’s performance and create a potentially dangerous situation with loose
mats.
•Install Armorlite flooring in the proper locations using existing retention points as
illustrated in enclosed instructions or visit www.GoArmorlite.com/installation for
installation video.
•Vehicle pedals need to be inspected for full freedom of movement after installation and
before each use. DO NOT DRIVE VEHICLE IF ANY INTERFERENCE EXISTS AT ANY
TIME.
•If the flooring is removed for cleaning, follow the installation instructions when
reinstalling to ensure proper fit.
•Armorlite flooring is engineered and designed to fit the vehicle make and model you
purchased.
•DO NOT INSTALL in any other vehicle make or model.
•Check the fit of Armorlite flooring after it is serviced to ensure it remains securely
installed.
•Warnings label and instructions should be kept with the owner’s manual of your
vehicle.
For support please visit www.GoArmorlite.com/support

Armorlite Safety Information
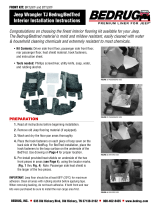
BEFORE YOU BEGIN INSTALLATION
Vehicle Application
Jeep® Wrangler TJ 2-Door
1997-2006
•Bring your Armorlite product inside the night before or for at least an hour to let it
warm up. This will allow for the material to be more flexible for an easier install.
•A second person will help to expedite the installation process.
•Remove factory installed flooring, drain plugs and retainer clips that coincide with
Armorlite purchased product.
•Drain plugs can be found underneath the factory installed flooring - front (2), rear
(2). Instructions for drain plug removal can be found in the installation steps.
•For full instructions on how to remove factory installed flooring there are third
party online resources available.
•Save clips or other cover and trim parts if you intend to keep and reinstall the
factory installed flooring.
For support please visit www.GoArmorlite.com/support
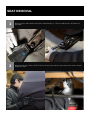
Wear gloves to protect your
hands from any sharp edges
in and around the seats.
Ensure the car is in “Park,”
and the emergency brake is
applied.

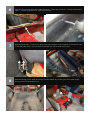
SEAT REMOVAL
1
2
Remove front seats bolts. There are a total 8 bolts ( 2 - T50 torx bolt and 6 - M13 bolts (3
per seat).
Remove the front seats. NOTE: Prior to removing the driver seat, disconnect wire harness
under the seat.

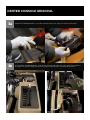
CENTER CONSOLE REMOVAL
3a MANUAL TRANSMISSION - Unscrew manual shift knob. Pop out manual shift boot.
3b AUTOMATIC TRANSMISSION –Pull off the shift handle. Pop out the auto shifter plate by
prying from the rear edge. Remove the light bulb located in the auto shift panel.

4Remove the center console panel by removing the 6 M10 bolts.
5Pull out the entire center console cover.
TIP: Shift the transfer case shift lever into “4L”
1 - M10 bolt under shift panel 1 - M10 bolt in front cupholder
2 - M10 bolts inside storage bin 2 - M10 bolts on outer passenger side wall of
storage bin

6Remove Front Driver Side Wire Harness Cover –There are a total of 3 - Philips head plastic
clips, 1 –Lock 6 washer and 3 - wire harness clips.
7Remove Rear Seat –Unlatch the driver side rear bracket. Lever is found on the driver side
of the rear seat. Pull it up to unlatch. Fold seat up, shift to side and lift out
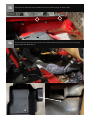
8Remove factory Front, Mid, and Cargo carpets. Begin by undoing the two metal snaps
found on each side and pull out.

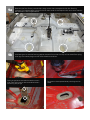
9a Remove the four factory metal drain plug covers that correspond with the flooring
cutouts. The inboard drain plugs found on each side of the Jeep are the ones that need to
be removed - see images below.
9b Use heat gun to remove factory gasket material from over the top of the metal floor plug,
then pry the metal plug out with a flat head screwdriver.
Drain plugs have two tabs located on each
side. Tabs will need to be considered when
removing the plugs.
To protect the exposed area painting can be
used.

FLOORING INSTRUCTIONS - ASSEMBLY
10
Prior to installing the rear floor section, identify if you have a long console then determine
if that console style is type “A” or type “B”. Make the necessary cutouts for the long center
console. Carefully make cuts with a sharp utility knife.
NOTE: This step is not required if you have a short console without the armrest.
TYPE “A” - 1-PC LONG
CONSOLE
Cutout “a” is for the 1-pc long
console with attachment
screws inside the storage bin.
TYPE “B” - 2-PC LONG
CONSOLE
Cutout “b” is for the 2-pc long
console with attachment
screws inside the rear
cupholders.
CUTOUT “C”
If you want to keep the bottle jack in factory
location cutout “c” on the passenger side needs
to be cut off.

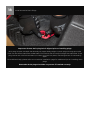
11 Start the installation around the E-brake handle. Pay close attention to the wire harness
routing and make sure the flooring is not sitting on top of the metal bracket all around.
Use a flat head screw driver to tuck the flooring under the center console attachment tab.
12 Push the flooring around the roll bar/seatbelt retractor and tuck the outboard edge
behind the metal door sill flange.
Good No Good

14 Push the flooring all the way to the front while carefully guiding the wing into the tight
gap under the HVAC duct.
13 Clip the wire harness onto the backside of the metal flange on driver side

15
Align holes on the floor with the firewall studs (# and location vary by model year) and
tuck the outboard edges under the metal door sill flange. Move the flooring until the
drain plug hole on flooring is aligned with the hole on the body. be sure that floor is
pushed behind the gas pedal bracket and resting against the firewall.
NOTE: the holes are larger to incorporate variations in location over many years and not to
be concerned if studs are not perfectly centered.
Cover up the wire harness cover stud with the
included plastic cap –Driver side only
17
Tuck the outboard edge of the flooring under the metal flange and behind the wire
harness
16

Important: Ensure drain plug hole is aligned prior to installing plugs.
With plug lid open use both hands and your upper body weight to push plugs through Armorlite
floor into the sheet metal floor underneath. Ensure that the ribs snap through the metal floor. If the
plug comes out with little resistance, or does not push into place, check alignment of hole and try
again.
For additional help, please refer to our website installation page for additional tips on installing drain
plugs.
Remember drain plugs should be very secure if installed correctly.
18 Install Armorlite Drain Plugs

19
Depending on the model and usage, make the additional cutouts as shown in following
images.
NOTE: To reduce the risk of injury, use a sharp blade, always cut away from your body, and
make multiple passes instead of trying to cut all the way through at once.
20 Feed seatbelts thru the various cutouts.
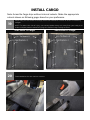
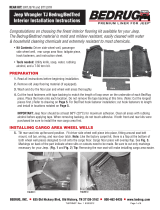
INSTALL CARGO
Note: Armorlite Cargo ships without internal cutouts. Make the appropriate
cutouts shown on following pages based on your preference.
1997-2002 TJ Cargo 2003-2006 TJ Cargo

18 If your console is equipped with a tab on the driver front side, remove it prior to installing
console. This can be performed with multiple passes of a sharp razor knife, or a hack saw.
19 Install Floor Console

20 Tighten screws in the below order.
2. Inside bin - 2 bolts1. Cupholder - 1 bolt
21 Install Manual shift boot and knob / Install Auto shift panel, light, and handle –reverse of
removal
4. Near shifter - 1 bolt3. Passenger side - 2 bolts

22 Install Front and Rear Seats - Reverse of removal

LIMITED LIFETIME WARRANTY
Armorlite flooring products are backed by a limited lifetime warranty for materials and workmanship,
which means that our products are guaranteed not to break, tear, or deform under normal use. This
limited warranty only applies when the product is correctly installed and used in the type of vehicle
listed in the product description.
LENGTH OF WARRANTY
The warranty will remain in effect while the original purchaser of the Armorlite product owns the
vehicle in which the product is installed. The warranty is not transferrable, which means that the
warranty will terminate if you sell or otherwise give the product to someone else.
WHAT THIS WARRANTY DOES NOT COVER
Certain common sense damages to the product are NOT covered by this limited lifetime warranty:
• Intentional damage;
• Damage resulting from an accident;
• Unreasonable use or neglect;
• Improper service, installation, or removal;
• Damage resulting from product modifications;
• Damage to product prior to installation; and
• Damage, fading or discoloration from excessive wear and tear and/or excessive exposure.
HOW TO MAKE A WARRANTY CLAIM
If you have a valid warranty claim, you must follow the warranty return instructions in the “Warranty
Process” section below.
HOW STATE LAW APPLIES
Armorlite’s express warranties are limited to those expressly stated in this agreement. Armorlite
makes no other express representations or warranties, express or implied, regarding the products,
including regarding merchantability, suitability, originality, or fitness for a particular purpose, and any
such warranties are expressly disclaimed. Any implied warranties, including without limitation the
implied warranties of merchantability and fitness for a particular purpose, shall be limited to the
duration of this limited warranty.
In no event will Armorlite be liable, whether in contract or tort (including negligence) for damages in
excess of the purchase price of the product, or for any indirect, incidental, special or consequential
damages of any kind, or otherwise to the fullest extent these damages may be disclaimed by law.
Some jurisdictions do not allow the limitation or exclusion of incidental or consequential damages, or a
limitation on the length of an implied warranty, so the above limitations or exclusions may not apply to
you. This warranty gives you specific legal rights, and you may also have other rights that vary from
one jurisdiction to another.
WARRANTY PROCESS
Visit our support page and fill out the form to submit a warranty claim. You will be required to upload
images to demonstrate proof of a manufacturing defect. Upon receiving your claim an investigation will
occur and may take up to 4-8 business days to be completed.
If the warranty claim is approved, you will be provided with a replacement product. If your product
model has been discontinued, you will be provided with another product of similar composition and
price. Armorlite will ship your replacement product at no cost.
SHIPPING
You may be required to return product(s) for a more thorough investigation.
A Return Merchandise Authorization Number (RMA#) will be provided at this time. Armorlite will
cover return shipping costs and provide you with a pre-paid shipping label. Please write the RMA#
on the outside of the box. The product must be cleaned and returned to its original box or equivalent
packaging. Packaging must be in good condition. Armorlite is not responsible for lost or damaged
packages.
All products must be shipped to:
Armorlite, Inc. - Warranty
1506 East Main Street
P. O. Box: 669
Old Fort, NC 28762

GOARMORLITE.COM
-
 1
1
-
 2
2
-
 3
3
-
 4
4
-
 5
5
-
 6
6
-
 7
7
-
 8
8
-
 9
9
-
 10
10
-
 11
11
-
 12
12
-
 13
13
-
 14
14
-
 15
15
-
 16
16
-
 17
17
-
 18
18
-
 19
19


Armorlite B1016047-BLK1-AA Installation guide
- Type
- Installation guide
- This manual is also suitable for
Ask a question and I''ll find the answer in the document
Finding information in a document is now easier with AI
Related papers
-
 Armorlite B1006714BR Installation guide
-
 Armorlite Replacement Flooring in Mesa Smoke Installation guide
-
 Armorlite B1010024-BLK1-AA Installation guide
-
 Armorlite Flooring Kits Installation guide
-
 Armorlite Flooring Kits Installation guide
-
 Armorlite B1006714BR Installation guide
-
 Armorlite B1019612-BLK1-AA Installation guide
-
 Armorlite B1014933-BLK1-AA Installation guide
-
 Armorlite B1019115-BLK1-AA Installation guide
-
 Armorlite Drain Plug Set Installation guide


Other documents
-
 Husky Liners 20741 Installation guide
-
 Von Schweikert Audio VR-4jr User manual
-
Southwire 61023123 Specification
-
Southwire 56482201 Specification
-
-
 Vertically Driven Products Deluxe Round Nose Padded Console Installation guide
-
 Vertically Driven Products Round Nose Padded Console Installation guide
-
 Bedrug BTLJ04R Installation guide
-
Southwire 25464905 Operating instructions
-
 Bedrug BRTJ97R Installation guide


