Page is loading ...

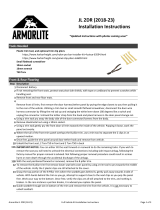
INSTALLATION INSTRUCTIONS
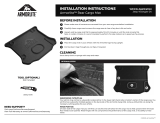
Armorlite® Wheelhouse Covers (L/R)
Vehicle Application
Jeep® Wrangler JK 4-Door
Snap fit connector plug
(provided in kit)
Tail piece
Main piece

©2022 Armorlite
Armorlite® Wheelhouse Covers (L/R) Vehicle Application
Jeep Wrangler JK 4-Door
CAUTION
READ BEFORE INSTALLING
• DO NOT install Armorlite wheelhouse covers on top of existing factory carpet wheelhouse covers.
• Armorlite wheelhouse cover fit could be compromised if installed over a spray-in liner due to the
additional thickness.
• Install Armorlite wheelhouse covers in the proper locations using existing retention points as
illustrated in enclosed instructions or visit www.GoArmorlite.com/installation for installation video.
• If the wheelhouse covers are removed for cleaning, follow the installation instructions when
reinstalling to ensure proper fit.
• Armorlite products are engineered and designed to fit the vehicle make and model you purchased.
DO NOT INSTALL in any other vehicle make or model.
• Warnings label and instructions should be kept with the owner’s manual of your vehicle.
BEFORE YOU BEGIN INSTALLATION
Wear gloves to protect your
hands from any sharp edges
in and around the seats.
Ensure the car is in “Park,” and the
emergency brake is applied.
P
• For instructions on how to remove factory installed wheelhouse covers there
are third-party online resources available.
NO TOOLS REQUIRED
VISIT www.GoArmorlite.com/installation FOR A DETAILED INSTRUCTIONAL VIDEO.
Note: Step numbers in the video may not match printed instructions.

©2022 Armorlite
WHEELHOUSE COVERS INSTRUCTIONS
2
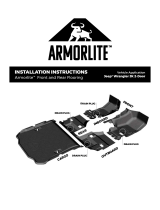
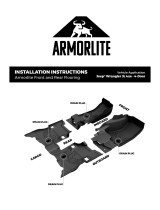
Begin by installing the tail section. Tuck the top edge under the sheet meal trim. Tuck the bottom edge
under the plastic trim. To assure proper alignment you will need to position yourself in the rear-cargo area
by the swing gate. Note: when installing driver side wheelhouse product ensure the wire harness and
washer hose are fed between the cut slots.
3
Remove the wheelhouse factory carpet on
both the driver and passenger sides.
12
Wipe down the sheet metal surface to
remove dirt and debris. Use water and mild
dish soap for stubborn stains.
2

©2022 Armorlite
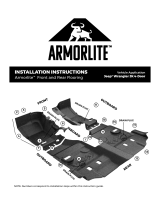
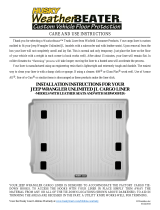
Position yourself at the rear passenger door. Place the main section over the wheelhouse. Make sure the
bottom section properly sits under the seat. Note: Slightly folding down the passenger seat could help
with alignment and placement. If the seat is folded down too much it could block the part from properly
aligning and nesting the trim edge at the bottom.
4
Tuck the main section’s top edge under the sheet meal trim and tuck the bottom edge under the avail-
able plastic trim.
7
Use the supplied snap fit connector plug
to secure the main piece and tail piece
together.
6
Align the hole between the main and tail
pieces.
5

©2022 Armorlite
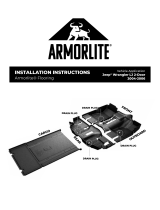
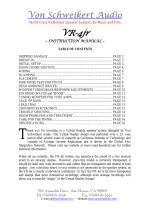
Repeat the same steps on the opposite side.
9
Push the cover far enough so the side of
the ridge touches the plastic trim. This
will prevent the wheelhouse covers from
popping.
8
To ensure alignment
10
A. If you own an Armorlite cargo mat the wheelhouse
covers tuck under the cargo mat. It is designed to nest
with it for optimal water management.
B. If you do not have the Armorlite cargo mat, make
sure the finished edge on the Armorlite wheelhouse
covers follow the contour of your vehicle’s wheelhouse
and lies flat against the cargo floor.

©2022 Armorlite
Armorlite flooring products are backed by a limited lifetime warranty for materials and workmanship,
which means that our products are guaranteed not to break, tear, or deform under normal use. This
limited warranty only applies when the product is correctly installed and used in the type of vehicle
listed in the product description.
LENGTH OF WARRANTY
The warranty will remain in effect while the original purchaser of the Armorlite product owns the vehicle
in which the product is installed. The warranty is not transferrable, which means that the warranty will
terminate if you sell or otherwise give the product to someone else.
WHAT THIS WARRANTY DOES NOT COVER
Certain common sense damages to the product are NOT covered by this limited lifetime warranty:
• intentional damage;
• damage resulting from an accident;
• unreasonable use or neglect;
• improper service, installation, or removal;
• damage resulting from product modifications;
• damage to product prior to installation; and
• damage, fading or discoloration from excessive wear and tear and/or excessive exposure.
HOW TO MAKE A WARRANTY CLAIM
If you have a valid warranty claim, you must follow the warranty return instructions in the “Warranty
Process” section below.
HOW STATE LAW APPLIES
Armorlite’s express warranties are limited to those expressly stated in this agreement. Armorlite makes
no other express representations or warranties, express or implied, regarding the products, including
regarding merchantability, suitability, originality, or fitness for a particular purpose, and any such
warranties are expressly disclaimed. Any implied warranties, including without limitation the implied
warranties of merchantability and fitness for a particular purpose, shall be limited to the duration of this
limited warranty.
In no event will Armorlite be liable, whether in contract or tort (including negligence) for damages in
excess of the purchase price of the product, or for any indirect, incidental, special or consequential
damages of any kind, or otherwise to the fullest extent these damages may be disclaimed by law.
Some jurisdictions do not allow the limitation or exclusion of incidental or consequential damages, or a
limitation on the length of an implied warranty, so the above limitations or exclusions may not apply to
you. This warranty gives you specific legal rights, and you may also have other rights that vary from one
jurisdiction to another.
WARRANTY PROCESS
Visit our support page and fill out the form to submit a warranty claim. You will be required to upload
images to demonstrate proof of a manufacturing defect. Upon receiving your claim an investigation will
occur and may take up to 4-8 business days to be completed.
If the warranty claim is approved, you will be provided with a replacement product. If your product
model has been discontinued, you will be provided with another product of similar composition and
price. Armorlite will ship your replacement product at no cost.
SHIPPING
You may be required to return product(s) for a more thorough investigation.
A Return Merchandise Authorization Number (RMA#) will be provided at this time. Armorlite will
cover return shipping costs and provide you with a pre-paid shipping label. Please write the RMA#
on the outside of the box. The product must be cleaned and returned to its original box or equivalent
packaging. Packaging must be in good condition. Armorlite is not responsible for lost or damaged
packages.
All products must be shipped to:
Armorlite, Inc. - Warranty
1506 East Main Street
P. O. Box: 669
Old Fort, NC 28762
LIMITED LIFETIME WARRANTY
/