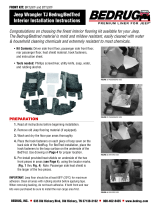
Congratulations on choosing the finest interior flooring kit available for your Jeep.
The Bedrug/Bedtred material is mold and mildew resistant, easily cleaned with water
& household cleaning chemicals and extremely resistant to most chemicals.
• Kit Contents: Driver side wheel well, passenger
side wheel well, rear cargo area floor, tailgate piece,
hook fasteners, and instruction sheet.
• Tools needed: Utility knife, soap, water, rubbing
alcohol, and a T-30 torx bit.
Jeep Wrangler TJ Bedrug/BedTred
Interior Installation Instructions
PreParation
1. Read all instructions before beginning installation.
2. Remove old Jeep flooring material (if equipped).
3. Wash and dry the floor pan and wheel well areas thoroughly.
4. Cut the hook fasteners with tape backing to match the length of loop sewn on the underside of each BedRug
piece. Place the hook onto each location. Do not remove the tape backing at this time. (Note: Cut the longest
pieces first.) Refer to drawing on Page 5. For BedTred hook fastener installation; cut hook fasteners to length
and install in locations notated on Page 5.
IMPORTANT: Jeep floor should be at least 68°F (20°C) for maximum adhesion. Clean all areas with rubbing
alcohol before applying tape. When removing backing, do not touch adhesive. If both front and rear kits were
purchased be sure to install the rear cargo area first.
REAR KIT: BRTJ97R and BTTJ97R
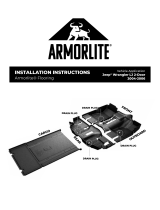
installing Cargo area Wheel Wells
5. Tilt rear seat into up/forward position. Fit driver side wheel well piece into place, fitting around seat belt
mount, roll bar, wiring, and rear door latch. Note: Like the factory carpet kit, there is a flap at the bottom of
both wheel well pieces designed to roll onto the cargo floor. Cargo floor piece will overlap flap. See Fig. 3.
Markings on back of the part indicate where slits or cutouts need to be made. Be sure to cut only markings
necessary for your Jeep. (Fig. 1 and Fig. 2) Tip: Removing the rear seat will make installing cargo area easier.
FIGURE 1: FIGURE 2:
BEDRUG, INC. n 635 Old Hickory Blvd, Old Hickory, TN 37138-3162 n 800-462-8435 n www.bedrug.com
TJ97RINST Rev. 1 8/30/2012
Page 1 of 6

Jeep Wrangler TJ Bedrug/BedTred Interior Installation Instructions
FIGURE 3: FIGURE 4:
6. Next pull up bottom of side piece behind seat to access hook fastener. Clean surface with alcohol then
remove the film backing and roll the part back into place. Firmly press the top surface to ensure adhesive
attachment. (Fig. 3 and Fig. 4)
FIGURE 5: FIGURE 6:
7. Now pull down the top of the wheel well piece to access the hook fastener. (Fig. 5) Clean the surface
with alcohol then remove the film backing and roll the part back into place making sure to tuck under wiring
harness where necessary. (Fig. 6) Firmly press the top surface to ensure adhesive attachment.
8. Now lift up on the front of the wheel well piece, clean surface with alcohol remove the tape backing
and press firmly back into place. (Fig. 7) Repeat steps for the rear door opening. (Fig. 8)
FIGURE 7: FIGURE 8:
BEDRUG, INC. n 635 Old Hickory Blvd, Old Hickory, TN 37138-3162 n 800-462-8435 n www.bedrug.com
1” FLAP
ON FLOOR
TJ97RINST Rev. 1 8/30/2012
Page 2 of 6

Jeep Wrangler TJ Bedrug/BedTred Interior Installation Instructions
FIGURE 9:
9. Repeat steps 5 thru 8 for the passenger side
wheel well. Note the cutout necessary on the
passenger side only for the rear door sensor.
(Fig. 9)
FIGURE 10: FIGURE 11:
installing Cargo area Floor
Note: For jeeps with a rear seat, trimming will be necessary to fit around seat mount and seat belt
attachment points. There are score lines on the back of the part to use as a guide.
10. With the rear seat in the up position, or removed, place the floor piece into position. (Fig. 10)
Cut holes in center of floor piece if seat belts are present. Lift the floor piece from the rear and
pull the seat belts thru the holes. (Fig. 11)
11. If tie downs are preferred to be accessible, cut holes and slits as desired using score lines on the
underside of floor or cut out using your tie downs as a guide. (Fig. 12)
12. Now pull up floor piece from rear of vehicle to access the hook fastener. Clean surface with alcohol
then remove the film backing from all of the locations behind the rear seat and roll the floor back into
place. Firmly press the top surface to ensure adhesive attachment. (Fig. 13 and Fig. 14)
FIGURE 12: FIGURE 13: FIGURE 14:
BEDRUG, INC. n 635 Old Hickory Blvd, Old Hickory, TN 37138-3162 n 800-462-8435 n www.bedrug.com
TJ97RINST Rev. 1 8/30/2012
Page 3 of 6

Jeep Wrangler TJ Bedrug/BedTred Interior Installation Instructions
13. Now repeat the process for the hook fastener in front of the rear seat where the two floor pieces meet.
(Fig. 15)
Note: If both front and rear kits are being installed the floor piece in the rear passenger area
should overlap the wheel well pieces and the rear floor piece.
installing tailgate PieCe
14. Remove the metal or plastic cap covering the door latch. Clean surface with alcohol then remove film
backing from the tailgate piece and attach to the tailgate. Firmly rub entire surface to ensure good
attachment. (Fig. 16) Reinstall the cap over the latch and the tailgate piece in the latch area.
Note: If the tailgate piece covers any screw holes, you will need to puncture holes thru the piece in order
to reinstall screws for the latch cover.
FIGURE 15:
FIGURE 16:
BEDRUG, INC. n 635 Old Hickory Blvd, Old Hickory, TN 37138-3162 n 800-462-8435 n www.bedrug.com
TJ97RINST Rev. 1 8/30/2012
Page 4 of 6

Jeep Wrangler TJ Bedrug/BedTred Interior Installation Instructions
BEDRUG, INC. n 635 Old Hickory Blvd, Old Hickory, TN 37138-3162 n 800-462-8435 n www.bedrug.com
BeDtreD hooK & looP PlaCeMent
Note: Cargo floor has high cycle loop fasteners pre-installed at the factory in locations noted on the drawing.
Apply hook fasteners to these pre-installed loop fasteners.
TJ97RINST Rev. 1 8/30/2012
Page 5 of 6

BEDRUG
®
CLEANING INFORMATION
The mildew resistant BedRug foam will not absorb liquids. The engineered polypropylene fiber top surface resists
stains and deterioration from most acids, chemicals, gas and oils, etc. Therefore, by following the cleaning
instructions below, your BedRug will remain serviceable for as long as you own your vehicle.
Cleaning your BedRug
is easy:
1. A vacuum, broom, brush or compressed air can be used to remove dirt, grime, sand, mulch etc. Due to
the fact that water will not harm the BedRug, pressure washing is also an effective way to clean a
soiled BedRug.
2. Although most acids will not harm the BedRug, baking soda should be applied immediately to
neutralize the acid to ensure the safety of the paint on the vehicle.
3. To clean tougher jobs such as gasoline, oil, chemicals, acid spills or leaks from your BedRug use
detergent soap with degreaser and water, then rinse thoroughly. This detergent soap is used in most car
wash locations with pressure washing equipment. The BedRug polypropylene closed-cell foam will
not absorb water and the polypropylene fiber dries in minutes.
If you have additional questions, call BedRug Inc. customer service at 800-462-8435.
Retain this cleaning information with your vehicle owner’s manual for future reference.
LIMITED WARRANTY
BedRug Inc. warrants BedRug
®
and BedTred
TM
products for Jeep vehicles for three years from the original date of
purchase. Warranty is limited to the original purchaser and is not transferable. Product is warranted to be free from
defects in materials and workmanship. The warranty is void if the product has been damaged by accident,
unreasonable use, neglect, improper service/installation/removal, modifications, acts of God, normal wear and tear,
or other causes not arising out of defective materials or workmanship. Consequential and incidental damages are
not covered under this warranty. Warranty does not cover labor, the cost of shipping, or cost of returning the
product for warranty service or inspection. The terms of this warranty may vary from state to state. You may have
rights under specific state laws that differ from the terms of this warranty. Proof of purchase will be required for
warranty service. Product should be cleaned before return. A return authorization number must be obtained prior
to returning any product. For warranty instructions, returns, and packaging contact BedRug Inc. Customer Service
at 800-462-8435.
Retain this warranty information with your vehicle owner’s manual for future reference
PRODUCT REGISTRATION
Thank you for purchasing your BedRug product! We would appreciate it if you would take a few minutes to
register your purchase. Registration allows us to provide, with your permission, important updates, service
information, helpful hints or warranty service should you ever require technical support. BedRug offers the option
of returning product registration forms electronically, rather than having to fill them out by hand. You can be
assured that BedRug does not share or sell the information you provide. Save a copy of your sales receipt. Activate
your warranty by registering your product online at http://www.bedrug.com/customer-service/product-
registration.html or by scanning the QR code. You will need the 6-digit lot and date code found on the underside of
the tailgate, see label example below.
TJ97RINST Rev. 1 8/30/2012
Page 6 of 6
/