Page is loading ...

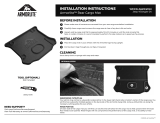
Plastic trim tool, and optional trim clip pliers
https://www.harborfreight.com/nylon-pry-bar-installer-kit-4-piece-63594.html
https://www.harborfreight.com/panel-clip-pliers-63699.html
Small flathead screwdriver
10mm socket
16mm wrench
T50 Torx
Step Description
1Disconnect battery.
2
If not removing the front seats, protect seat pivot side shields, with tape or cardboard to prevent scratches while
handling seat.
3Remove front and rear floor mats.
4
Remove front sill trim, first remove the door harness/tether panel by prying the edge closest to you then pulling it
to the rear of the vehicle. Utilizing a trim tool or small smooth flathead screwdriver, disconnect the door wire
harness connector by lifting the red tab up and swinging the white lever down 180 degrees like a switch and
unplug the connector. Unhook the tether strap from the hook and place harness in the door panel storage net.
5Using a trim tool pry away the body side of the door connector/harness from the body.
6Remove sheetmetal nut using a 10mm socket.
7
Using a trim tool gently pry the front door sill trim towards the inside of the vehicle. Popping it loose, work the
panel out evenly.
8
Where the tail of the front trim panel overlaps the B pillar trim, use a trim tool to separate the 2 clips in an
upward motion.
9Once free, guide the trim panel around door tether hook and remove from vehicle.
10 Unbolt the front seat, 2 Torx T50 in front and 2 Torx T50 in back
11A
IMPORTANT NOTICE: You can either tilt the seat forward or rearward to do the remaining tasks. If you wish to
remove the seat you will need to unhook the electrical connections including side impact airbag, following the
factory manual for proper removal is advised. Not following proper removal procedure could result in serious
harm or even death through the accidental discharge of the airbags.
11B With the seat positioned forward or removed, remove the B pillar trim.
12
To remove the B pillar trim first remove lower seat belt cover panel by using a trim tool to pry towards the middle
of the vehicle. Verify the 2 plastic clips are still attached to the cover.
13
Grasp the top portion of the B Pillar trim where the seatbelt goes behind it, gently pull away towards inside of
vehicle. With hands behind the trim as you go, attempt to support close to the next clips as you pop the panel
free. Work your way to the bottom. Once free, verify the clips are all still attached to the trim, and nothing is
broken. In the rare instance a portion breaks, it is advised you replace the panel.
14
Guide seatbelt through slot in bottom of the trim and remove the trim from the vehicle, it is not necessary to
unbolt seatbelt.
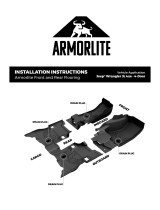
JL 2DR (2018-23)
Installation Instructions
*Updated instructions with photos coming soon*
Tools Needed
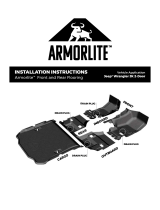
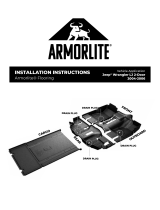
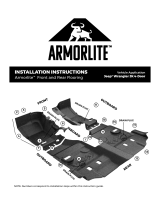
Front & Rear Flooring
Armorlite JL 2DR (18-23) Full Vehicle Kit Installation Instructions Page 1 of 3

Step Description
15
Using a trim tool or flathead screwdriver, remove the console bolt covers , 2 front, 2 rear. Using a 10mm socket
unscrew bolts and place in a tray to reuse later.
16 Gently lift up on the console, but do not remove.
17 Remove front and rear carpet.
18
IMPORTANT STEP: Remove the plastic floor mat posts and washers by unscrewing with a 16mm socket or
wrench, 2 are located in each of the front floor boards and 2 located in the rear, do not worry about the threaded
post left behind, the Armorlite floor is designed to work with it in place and will not affect fit or wear. Not
removing the plastic caps will result in misalignment of the floor, causing plugs to not fully install or stay in place.
19 Install the Armorlite front flooring.
20a
It is advised to direct the front floor under the center portion of the dash first using a trim tool to guide it up into
place under the edge of the dash. Also guiding the holes over the hold down studs.
20b
Then lay the rest of the floor down onto the sheetmetal, run your hand around the perimeter making sure no
brackets or wire harnesses are preventing the floor from aligning into place.
21
IMPORTANT STEP: Verify that the floor drain plug openings are perfectly aligned to the drain plug hole. You
should see an even sliver of the sheet metal in the opening. Repeat step 20 if hole does not align, do not proceed
until these are aligned.
22
IMPORTANT STEP: Once your front floor is aligned in position insert the drain plugs into the holes with the lid
open, use considerable force to evenly work plug into the sheetmetal. Be sure to get 2 ribs evenly through the
metal, use your finger through the hole to verify, in some cases you can see from underneath or from the vantage
of just under the rocker panel using a flashlight. Plugs should not be easily removed if installed properly.
23 If not done already, remove rear bench seat, consult factory manual for procedure.
24 Install the rear flooring.
25
With seats move forward out of the way, or removed. Start with positioning the rear flooring across the vehicle,
pulling floor down around the console.
26
Put one hand down on the center of the rear Armorlite floor holding it down while your other hand or a partner
lifts up on the console. Once the console is above the floor set it back down into position.
27
Follow the perimeter of the rear floor pushing it down firmly into place making sure nothing is impeding it from
sitting into place. Align the drain plug opening ensuring an even sliver of the sheet metal floor is showing.
28 Install plug following step 22.
29 Proceed to installation of Wheelhouse covers, if you did not purchase wheelhouse covers skip to step 39.
Front & Rear Flooring (cont.)
Armorlite JL 2DR (18-23) Full Vehicle Kit Installation Instructions Page 2 of 3

Step Description
30a
Remove cargo eyelets and panel, first pry up center of cargo eyelet to uncover bolt, using Torx remove bolts,
remove eyelets and carpeted panel they reside in.
30b If you have a Mopar trail rail system remove bolts and remove entire rail.
31 If B pillar trim not already removed refer to Step 12 before proceeding.
32 Remove carpet wheelhouse covers.
33 Install Armorlite Wheelhouse covers, feeding them through seat belt and tucking under rear plastic trim.
34 Wheelhouse cover should overlap the previously installed rear floor.
35
Reinstall B Pillar trim by orientating panel to align the clips to the holes in the sheetmetal. Push into place using
light taps to engage clips. If clips do not go in easy, use a flashlight and carefully and visually watch them line up
before applying pressure.
36
Install Cargo tie down panel or trail rail system in reverse order of removal, these panels are designed to overlap
the wheelhouse cover and hold in place.
37 Install grommets at bottom front of wheelhouse covers snaping onto plastic studs.
38 Proceed to Cargo Mat installation.
Step Description
39
With rear seat removed, test fit cargo mat into position, it should lay on top of the rear floor section, wheelhouse
covers etc.
40
The Cargo mat comes with scribe lines that can be cut out for your specific needs. Refer to the graphic to identify
which parts you would like to cut out (graphic coming soon)
If equipped with a factory sub there is a scribe line around the Armorlite logo. But it is advised that you test the
sound quality of the subwoofer before cutting the floor. Many customers have indicated that the performance
was not lost, and that they appreciated the additional coverage and protection.
41
If reinstalling your rear seat, be advised the extra material may require a little extra force to get the back to lock
into place, we suggest a good slam or sitting on it with the front attached to engage rear latches.
42
Once installed be sure the cargo mat is in the proper location and not too far back which would interfere with the
tailgate and cause issues closing in the future.
43
If you did not install wheelhouse covers, now is the time to reinstall your B pillar trim, if already in place proceed
to step 45.
44a
Reinstall B Pillar trim by orientating panel to align the clips to the holes in the sheetmetal. Push into place using
light taps to engage clips. If clips do not go in easy, use a flashlight and carefully and visually watch them line up
before applying pressure.
44b
Bolt down center console, you may need to apply pressure down on the rear of the console to align bolt holes
before installing. Finish the installation in reverse order of removal.
45
Install front door sill trim, inspect the clips on the back side and familiarize your self with where and how they
attach to the vehicle, if clips are in place and in good shape position trim into place starting with the front going
over the door tether and the bolt stud, then connect the rear 2 clips to the B pillar trim engaging those in a
downward motion, then aligning clips pull trim toward the outside of the vehicle into position giving it light taps
and working your way to the front. Make sure the bottom of the trim makes it over the bead in the Armorlite
floor.
46
Install sheet metal nut with 10mm socket, then clip body harness back into sheet metal, take door harness attach
tether then make electrical connection same as removal.
47 Position seats into place and reinstall bolts to factory specs.
48 Test that door electronics are functioning correctly and close, be sure seat moves as it should.
49
Taking smooth side of grommets, click them through the holes onto the studs at the top of the transmission
hump, and at front of floors.
50
Put hands on hips and enjoy looking at your freshly installed Armorlite floor, wipe forehead and enjoy
beverage of your choosing.
Cargo Mat
Wheelhouse Covers
Armorlite JL 2DR (18-23) Full Vehicle Kit Installation Instructions Page 3 of 3
/