Page is loading ...

RF Lamp Dimmer
RRD-3LD
120 V 50 / 60 Hz
Typical power consumption*: 0.3 W
Installation Instructions
Please Read Before Installing
Symptom Probable Cause and Action
Light does not turn ON, but
LEDs on Lamp Dimmer are ON
Switch on lamp is turned OFF
•
Turn lamp switch to full ON.
Lightbulbs are burned out or not installed
•
Replace or install lightbulbs.
Dioded lightbulbs
•
If dioded lightbulbs are being used,
replace with non-dioded lightbulbs.
Light does not turn ON, and
LEDs on Lamp Dimmer are OFF
Circuit breaker is OFF
•
Turn circuit breaker ON.
Cord is not plugged in
•
Plug cord into wall outlet as shown
in Installation.
Lamp Dimmer does not dim
properly or lights flicker
Lamp has an integral dimmer
•
Use lamp without an integral dimmer.
3-way switch on lamp is not set to full ON
•
Turn 3-way switch on lamp to full ON
Dimmers, keypads, shades/
drapes do not respond
Improper programming
•
Program according to the system
Setup Guide.
Out of RF range
•
Reposition to be within 30 ft (9 m)
of an RF signal repeater
Lamp Dimmer is warm Solid-state control dissipation
•
Solid-state dimmers internally dissipate
about 2% of the total connected load.
It is normal for dimmers to feel warm to
the touch during operation.
Load Specifications:
Lamp
Dimmer
Load
Type
Min.
Load
Max.
Load
RRD-3LD
Incand. 10 W 300 W
MLV 10 W / VA
200 W /
300 VA
Returning Lamp Dimmers to Factory Settings
Note: Returning a Lamp Dimmer to its Factory Settings will
remove the Lamp Dimmer from the system and erase all
programming.
1. Triple-tap and hold the tapswitch. DO NOT release after
third tap.
2. Continue to hold the tapswitch on the third tap until LEDs
start to scroll up and down quickly (approximately 3
seconds).
3. Release the tapswitch and immediately triple-tap it again.
The LEDs will scroll up and down slowly. When the LEDs
stop scrolling, the Lamp Dimmer has been returned to
Factory Settings.
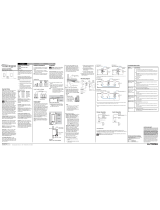
Installation
1. Find a suitable location for the RF Lamp Dimmer.
Place the RF Lamp Dimmer in a convenient and
accessible location.
2. Turn lamp OFF and unplug lamp cord from wall outlet.
3. Plug lamp cord into the RF Lamp Dimmer plug.
4. Plug RF Lamp Dimmer into any standard wall outlet.
5. Turn lamp switch ON and operate RF Lamp Dimmer.
WARNING: Shock hazard. To avoid risk of electrical shock, unplug Lamp
Dimmer when changing light bulbs. Changing light bulbs with the power
on could result in personal injury or death.
WARNING: Shock hazard. To avoid risk of electrical shock, do not open,
cut cord, or rewire device. Modification of the device can result in per-
sonal injury or death.
Note: This is a POLARIZED cord. It has a polarized
plug (one blade is wider than the other) and outlet (one slot
is wider than the other).
The polarized plug is not intended to be mated with
nonpolarized outlets (having both slots the same size).
A polarized outlet is intended to mate with a polarized plug
in only one way (the longer slot with the wider blade).
Status LEDs
Indicate light level; glow softly as
night light when lamp is off
Tapswitch
Tap on/off; double-tap for full on;
press and hold (while ON) for
10-second long fade-to-off
Dimming Rocker
Press to Brighten
Press to Dim
English
NOTICE: To avoid overheating and possible damage to other equipment, do
not use to control motor-operated or transformer-supplied appliances or other
non-lighting loads.
Codes: Install in accordance with all local and national electrical codes.
Environment: Ambient operating temperature: 32 °F to 104 °F
(0 °C to 40 °C), 0% to 90% humidity, non-condensing. Indoor use only.
Cord: The cord length is 6 ft (1.8 m).
Cleaning: To clean, wipe with a clean damp cloth. DO NOT use any chemical
cleaning solutions.
Lamp Type: Lamp Dimmers are designed for use with incandescent,
magnetic low-voltage, and tungsten halogen lightbulbs only. Do not use to
control fluorescent lightbulbs or table lamps with an integral dimmer or touch
lamps. For lamps with integral 3-way switches, switch should be set to full on
position. Lamp Dimmers may not work with dioded lightbulbs.
Low-voltage Applications: Use Lamp Dimmers with magnetic (core and
coil) low-voltage lamps only. Not for use with electronic (solid-state) low-
voltage lamps. Operation of a low-voltage circuit with lightbulbs inoperative or
removed may result in transformer overheating and premature failure. Lutron
strongly recommends the following:
•
Do not operate low-voltage circuits without operative lightbulbs in place.
•
Replace burned-out lightbulbs as soon as possible.
•
Use transformers that incorporate thermal protection or fused transformer
primary windings to prevent transformer failure due to overcurrent.
RF Device Placement: RF dimmers, switches, keypads and shades/
drapes must be located within 30 ft (9 m) of an RF signal repeater. For
systems without an RF signal repeater, all RF dimmers, switches, keypads
and shades/drapes must be located within 30 ft (9 m) of each other. Remote
dimmers and switches are not required to be within a specific range.
Typical power consumption test conditions: Load is off, nightlight
mode enabled.
Important Notes
Local Operation
Pressing the Tapswitch on the Lamp Dimmer will alternately turn the lights
ON and OFF.
The ON level will be the level previously set using the Dimming Rocker to the
right of the Tapswitch. The LED that is glowing slightly brighter than the others
indicates the level to which the lights will turn ON. Press and hold the top or
bottom of the Dimming Rocker to raise or lower the light level. Double-tapping
the Tapswitch will turn the lights ON to full. Pressing and holding the Tapswitch
for 1/2 second (while ON) activates a 10-second long fade-to-off.
Note: Refer to the system Setup Guide for additional
troubleshooting suggestions.
Lamp Dimmer
Lutron, RadioRA, and the sunburst logo are registered trademarks and RadioRA 2 is a trademark of Lutron Electronics Co., Inc.
©2010 Lutron Electronics Co., Inc.
Warranty: For warranty information, please see the warranty
enclosed with the product, or visit www.lutron.com/resiinfo
*
Lutron Elec tron ics Co., Inc.
7200 Suter Road Coopersburg, PA 18036-1299
Made and print ed in the U.S.A. 05/10 P/N 044-163 Rev. B
Technical Assistance:
U.S.A. / Canada: 1.800.523.9466
Mexico: +1.888.235.2910
Other Countries: +1.610.282.3800
24 hours a day, 7 days a week.
Troubleshooting Guide
Use these instructions to install the
model numbers listed above. For system
setup instructions and tools visit:
www.lutron.com/radiora2
WARNING: Entrapment hazard. To avoid the risk of entrapment,
serious injury, or death, these controls must not be used to control
equipment which is not visible from every control location or which
could create hazardous situations such as entrapment if operated
accidentally. Examples of such equipment which must not be
operated by these controls include (but are not limited to) motorized
gates, garage doors, industrial doors, microwave ovens, heating pads,
etc. It is the installer’s responsibility to ensure that the equipment being
controlled is visible from every control location and that only suitable
equipment is connected to these controls. Failure to do so could result
in serious injury or death.
/