Page is loading ...

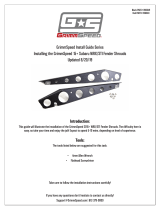
GrimmSpeed Install Guide Series
Installing the GrimmSpeed 08-14 WRX/STI BroTie
Hella Horn Bracket and Wiring Harness
Updated 7/12/15
Introduction: This guide will illustrate the installation of the GrimmSpeed BroTie Horn
Bracket on an 08-14 WRX/STI. The difficulty here is easy, so take your time and enjoy the
job! Because some models require the removal of the front bumper, expect to spend 45-
60min, depending on your level of experience.
Tools: The tools listed below are suggested for this task. Optional tools are noted.
- Flathead and Philips Screwdriver
- 10mm, 12mm, 14mm Sockets
- 3/8in Ratchet
Tips: Take your time removing your front bumper, if necessary, and use caution when
testing the horns, as they’re extremely loud. Keep bumper clips for each part of the bumper
separate, to remember which clips go where.
Procedure Part 1 (Bumper Removal):
1. Begin by collecting your tools and popping your hood.
2. We’ll start by removing the front bumper to gain access to the core support and
OEM horn harness. Locate and remove the four (4) large plastic pop clips that hold

the top of the bumper to the core support. A flathead screwdriver will pop the
center of the clip up for easy removal.
3. Next, on the driver’s side, locate the four clips holding the bumper to the fender (1)
and fender liner (3). Hold the outside of the clip from rotating and use a philips
screwdriver to ‘unscrew’ the center portion. You don’t need to remove it all the way,
just until you feel the clip loosen enough for removal.
4. Repeat this procedure on the passenger’s side of the vehicle.
5. You may be able to access the clips below the bumper without raising the vehicle,
depending on your ride height. If not, raise the front end of the vehicle using
jack/jackstands or ramps. A could of wide boards will work as well.
6. Locate the six (6) clips around the edge of the bumper and starting from one side,
remove each of them. Use caution not to break the clips, as sand, salt and road
debris can cause them to be tighter and more brittle than when new.
7. With these clips removed, the bumper can now be removed. It’s helpful to have a
second set of hands here, although it can be done alone. At each end of the bumper,
where it meets your headlight/fender, pull away from the car to release the tension
clips holding it on.
8. If your vehicle is equipped with fog lights, be sure to disconnect these harnesses
before pulling the bumper too far from the vehicle.
Procedure Part 2 (Horn Bracket Installation):
1. Next, we’ll prepare our Hella Horns for installation. Remove the small black brackets
from the back of each hella horn. These can be stubborn sometimes and we’ve found
that putting the brackets in a vise will ease in removal of the 14mm bolt on the rear
of the horn. We will not be reusing those brackets.
2. Now, remove the bolt holding the OEM horn to the center beam, disconnect the
wiring connector and set aside.
3. Remove the bolt in the center of the center beam, just below the hood latch.
4. Hold the BroTie in place on the center beam and determine which orientation works
best for your vehicle. Once you’ve identified which side faces forward, make a note
of it and return to your workbench to install the horns.
5. Using the 14mm bolts supplied with the horns, attach the horns to each side of the
bracket. Each side of the bracket has three slotted mounting features for maximum
adjustability. You may choose to make changes to the mounting location after you
replace the bumper and see where they sit within the grill, so plan accordingly.
6. Finally, using the supplied hardware, bolt the BroTie/Horn assembly to the center
beam. You should be able to use two of the three provided bolts for firm mounting
that will not rotate with vibration. Do not tighten these fully, yet.

Procedure Part 3 (Wiring):
1. With the horns and BroTie in place, it’s time to begin wiring. For the 02-14
WRX/STI, the factory horn connects to the harness with a single positive lead, so in
the GrimmSpeed wiring kit, two small harnesses are included. Select the harness
that has a ring terminal on the end.
2. Remove the center bolt that holds the BroTie to your car, place the bolt through the
ring terminal and then reinstall the bolt. This provides the ground path for your
horns, through the bolt and into the chassis. You can now tighten both bolts.
3. On the harness that was just connected, push each of the female terminals over one
spade connector on each horn. Polarity isn’t important. On some cars, you may need
to bend the spade terminals on the horns down a bit for easy fitment, depending on
where you’ve placed the horns.
4. Next, use the longer harness and connect each of the two female terminals to the
remaining spade connector on each horn. The other end of this harness has a
shielded male terminal. This should fit snuggly over the factory horn connecter. If
your factory connector has irregularities from the molding process, you may need to
trim back the shielding, which will not cause issues.
5. Finally, test the horns! Be sure that nobody is in front of the car (even as a joke!), as
the horns can be extremely loud. If everything is working well, ensure that the
harnesses are tucked away nicely and then go ahead and reinstall your front
bumper in reverse order from Part 1.
That’s it! You should be all set to go. Check the assembly periodically to make sure
everything is still snug.
Don’t hesitate to contact us directly with any questions!
[email protected] | 612-379-0000
/