Page is loading ...

GrimmSpeed Install Guide Series
Installing the GrimmSpeed BRZ/FR-S Master Cylinder Brace
Updated 11/1/12
Introduction: This guide will illustrate the installation of the GrimmSpeed Master
Cylinder Brace on your BRZ/FR-S. The difficulty here is relatively low, so take your
time and enjoy the job!
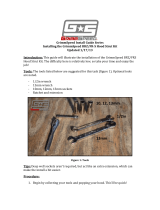
Tools: The tools listed below are suggested for this task (figure 1). Optional tools
are noted.
- 15mm, 12mm, 10mm wrenches
- 5mm allen
Figure 1: Tools
Tips: You may choose to tighten the two 10mm bolts into the strut tower after
installing the red cap (but before tensioning) to ensure that you’ve got everything
aligned the way you want. Not usually necessary though, so you’ve got plenty of
adjustability in the brace.
Procedure:
15mm, 12mm, 10mm wrenches
5mm Allen

1. Begin by collecting your tools and popping your hood. This’ll be quick!
2. Begin by removing your driver’s side triangulation bar using a 12mm
wrench. You’ll remove three (3) nuts and one (1) bolt. This isn’t absolutely
necessary, but makes the job quicker and easier. Set it aside.
3. Remove the 10mm bolt holding your fuel line bracket to the strut tower and
push it aside. If there’s a black sticker present over the rearmost threaded
hole, remove that as well.
Figure 2: Prep area
4. Next, slide your GrimmSpeed bracket into place. Begin by installing both of
the supplied 10mm bolts finger tight to ensure that you don’t cross thread
either. Starting the with the bolt closest to the master cylinder helps to hold
the brace in place while you move the fuel line bracket back into place, above
the brace. Once you’ve got both started, go ahead and tighten them down.
Remove 10mm bolt
Remove sticker

Figure 3: Installing bracket
5. Next, we’ll install the tensioner rod and machined cap. The tensioning rod
will help you preload the brace a bit and the red cap helps distribute the
extreme forces of the master cylinder across the back of the casting. The
figure below shows the final assembly. Begin by getting everything loosely in
place. Next, hold the allen key end of the stud and use a 15mm wrench to
tighten the nut on the master cylinder side of the brace. Once the cap is
pushing against the brace, complete one full additional rotation of the nut to
preload the brace.
Install 10mm bolts

Figure 4: Setting tension
6. Lastly, continue holding the 5mm allen while you use your 15mm wrench to
tighten the front nut, locking the whole assembly into place.
That’s it! You should be all set to go. Take it for a spin and enjoy your new brakes.
Check the assembly periodically to make sure everything is still snug.
Tighten here first
5mm Allen
/