Page is loading ...

1
Product Category
IMPORTANT:
Go to www.extron.com for the
complete user guide and installation
instructions before connecting the
product to the power source.
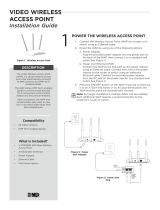
WAP 100AC Wireless Access Point • Setup Guide
Overview
The Extron WAP 100AC wireless access point is easily installed and supports the full spectrum of Wi-Fi channels. For more complete
procedures, see the WAP 100AC User Guide at www.extron.com.
Setup Overview and Checklist
Get Ready
Obtain the following network information about the WAP 100AC from your network administrator:
DHCP status (on or off). If DHCP is off, you also require:
IP address
(default 192.168.1.1)
Subnet mask
(default 255.255.255.0)
Gateway
User name — by default, this is admin.
Password
NOTES:
• The factory configured passwords for all accounts on this device have been set to the device serial number.
Passwords are case sensitive.
• If the device is reset to default settings, the password will be the default password configuration. The default
password is extron.
Make a note of the MAC address. This can be found on the WAP 100AC rear panel label.
Mount and Cable the WAP 100AC
ATTENTION:
• Do not power on the WAP 100AC until you have read the Attention in the Power Supply section of the WAP 100AC User
Guide.
• Ne branchez pas le WAP 100AC avant d’avoir lu la mise en garde dans la section «sources d’alimentation» du WAP
100AC User Guide.
Decide where to mount the WAP 100AC
Prepare the mounting site. Do not nish mounting the unit until all the cables are in place.
Use Ethernet cable to connect the WAP 100AC to a power injector or the network.
If you are not using Power over Ethernet (PoE), connect a 12 VDC power power supply.
NOTE: The WAP 100AC can use a 12 VDC, minimum 1.0 A power supply or a PoE+ (802.3at compliant) power injector.
Extron recommends using PoE.
Complete the mounting of the WAP 100AC.
Set up the WAP 100AC for Network Communication
Connect the PC that you will use for setup to the same Ethernet subnetwork as the WAP 100AC.
Use the WAP 100AC Web pages to congure the WAP 100AC network settings.
Mounting
ATTENTION:
• All structural steps and electrical installation must be performed by qualied personnel in accordance with local and
national building codes and electrical codes.
• Toute étape structurelle et installation électrique, doit être effectuée par un personnel qualié, conformément aux codes
du bâtiment, aux codes incendie et sécurité, et aux codes électriques, locaux et nationaux.

2
WAP 100AC Wireless Access Point • Setup Guide
Consider the Mounting Location
Consider these issues to determine a suitable position to mount the WAP 100AC for optimal performance:
• Walls, ceilings, and objects such as ling cabinets can decrease signal strength. Take into account the number, thickness,
and location of walls and ceilings.
• Wireless signals are weakened less by dry wall than many other materials, such as brick or metal.
• Interference from electrical devices that generate RF noise (for example, microwaves or cordless phones) can also weaken
the signal.
• Two or more WAP 100AC units can be used to wirelessly connect networks or to enlarge the wireless area beyond the area
that can be served by a single access point.
Mounting to a Solid Ceiling or Wall
Wall or
Solid Ceiling
1
2
3
4
5
Turn the WAP 100AC about 90°
clockwise to lock it in position.
Figure 1. Mounting the WAP 100AC to a Solid Ceiling or Wall
Extron provides a wall mounting hardware kit that includes:
• Two wall plugs
• Mounting bracket
• Two P3.5 x 32 screws • Two P2.6 x 12 screws
To mount the unit, follow these instructions:
1. Drill two holes 2.76 inches (70 mm) apart.
2. Screw in the wall plugs (
1
).
3. Attach the mounting bracket (
2
) to the ceiling using the
P3.5 x 32 screws (
3
).
4. Insert the P2.6 x 12 screws (
4
) into the mounting holes
on the top of the WAP 100AC (
5
). Leave enough of the
screws exposed to insert the heads into the mounting
bracket.
If you need extra space between the WAP 100AC and
the mounting bracket, use the spacers and long screws
from the T-rail mounting kit (see Mounting to a Dropped
Ceiling on the following page).
5. Connect the cables. The WAP 100AC can use a PoE
injector (recommended by Extron) or a 12 VDC desktop
power supply.
ATTENTION:
• Do not connect either power supply before
reading the Attention notications in the Power
Supply section of the WAP 100AC User Guide.
• Ne branchez pas de sources d’alimentation
externes avant d’avoir lu les mises en garde
dans la section «sources d’alimentation» du
WAP 100AC User Guide.
• Disconnect power from either power supply
before making any connections.
• Débranchez de sources d’alimentation externes
avant d’effectuer n’importe quelles connexions.
6. Insert the heads of the P2.6 x 12 screws (see step 4) into
the holes in the mounting bracket.
7. Turn the WAP 100AC about 90° clockwise to lock it into
place.
8. Power on the PoE injector or 12 VDC power supply.
You are now ready to congure the WAP 100AC (see
Configuring the WAP 100AC on page 5).

3
Product Category
Mounting to a Dropped Ceiling
2
3
4
1
Figure 2. Mounting the WAP 100AC to a dropped ceiling
To mount the unit, follow these instructions:
1. Decide whether you need the 9/16 inch or 15/16 inch T-rail connectors and whether you need to use the spacers to
accommodate ceiling tiles.
If you do not need the spacer, use the shorter (P2.6 x 10) screws. If you require the spacers, use the longer (P2.6 x 25) screws.
2. Connect the cables. The WAP 100AC can use a PoE injector (recommended by Extron) or a 12 VDC desktop power supply.
ATTENTION:
• Do not connect either power supply before reading the Attention notications in the Power Supply section of the
WAP 100AC User Guide.
• Ne branchez pas de sources d’alimentation externes avant d’avoir lu les mises en garde dans la section «sources
d’alimentation» du WAP 100AC User Guide.
• Disconnect power from either power supply before making any connections.
• Débranchez de sources d’alimentation externes avant d’effectuer n’importe quelles connexions.
3. Align the T-rail clips (gure 3,
2
) with the T-rail (
1
) and
press the unit until the clips snap into place.
4. Power on the PoE injector or 12 VDC power supply.
You are now ready to congure the WAP 100AC (see
Configuring the WAP 100AC on page 5).
Extron provides a mounting
hardware kit that includes:
1
Two P2.6 x 10 screws
2
Two P2.6 x 25 screws
— used with spacers.
3
Two 9/16 inch (1.43
cm) T-rail connectors
Two 15/16 inch (2.38
cm) T-rail connectors
(not shown)
4
Two Spacers
1
1
1
2
2
2
3
3
3
Figure 3. Attaching the WAP 100AC to a T-rail
Kensington Lock
For added security, once the installation is complete, attach a Kensington Security Lock (not provided) to the metal-reinforced slot
on the top of the unit (see gure 3,
3
). Follow the instructions that are provided by the manufacturer to install the lock.

4
WAP 100AC Wireless Access Point • Setup Guide
Rear Panel Features
AAA
B
B
B
C
C
CD
D
DE
E
E
Figure 4. WAP 100AC Rear Panel
A
Ethernet input — Accepts an input from a LAN or a power injector.
NOTES:
• The WAP 100AC can use a 12 VDC, minimum 1.0 A power supply or a PoE power injector. Extron recommends
using PoE.
• Do not use both the 12 VDC power supply and power injector at the same time.
ATTENTION:
• Do not connect either power supply before reading the Attention notications in the Power Supply section of the
WAP 100AC User Guide.
• Ne branchez pas de sources d’alimentation externes avant d’avoir lu les mises en garde dans la section «sources
d’alimentation» du WAP 100AC User Guide.
NOTES: When using shielded twisted pair cable in bundles or conduits, consider the following:
• Limit the use to no more than two pass-through points, which may include patch points, punch down connectors,
couplers and power injectors. If these pass-through points are required, use shielded couplers and punch-down
connectors.
• Do not exceed 40% ll capacity in conduits.
• Do not comb the cable for the rst 20 meters, where cables are straightened, aligned, and secured in tight bundles.
• Loosely place cables and limit the used of tie wraps or hook-and-loop fasteners.
• Keep twisted pair cables separate from AC power cables.
If you are using a 12 VDC power input, connect the WAP 100AC directly to a network switch or router.
If you are using a PoE power injector, connect an Ethernet cable from the WAP 100AC Ethernet input to the power injector.
B
12 VDC power input — Power supplies must be purchased separately.
Extron recommends using a PoE power injector. If you wish to use a power supply, connect a 12 VDC, minimum 1.0 A power
supply with a DC plug to the power input. See www.extron.com for suitable models.
C
Mounting holes (2) — Used to mount the unit to a wall or ceiling (see Mounting on page 1).
D
Cable guide — Ensures cables for power and network connections do not get damaged.
E
Kensington security lock — For added security, attach a Kensington Security Lock (not provided) to the metal-reinforced slot
on the top of the unit. Follow the instructions that are provided by the manufacturer to install the lock.

5
Product Category
Front Panel Features
A
A
A
B
B
BC
C
CD
D
DE
E
EF
F
F
Figure 5. WAP 100AC Front Panel
A
Reset button — Resets all user settings and reverts back to the factory
default state. To carry out this reset, press the reset button for over 10
seconds.
B
WPS LED — Indicates Wi-Fi Protected Setup is enabled.
C
WLAN 5G LED —Lights green to indicate that the 5 GHz frequency is in
use (IEEE standard 802.11a, n, ac).
D
WLAN 2.4G LED — Lights blue to indicate that the 2.4 GHz frequency is
in use (IEEE standard 802.11b, g, n).
E
Ethernet Port LED — Lights blue to indicate that the unit is connected to
a network.
F
Power LED — Lights orange to indicate that the unit is receiving power.
Configuring the WAP 100AC
To congure the WAP 100AC, access the internal Web Pages:
1. Ensure the WAP 100AC is powered on and connected to a network.
2. Open a web browser on a PC connected to the same subnetwork as the WAP 100AC.
3. Enter the IP address of the WAP 100AC in the address bar. By default this is 192.168.1.1.
4. The Login dialog opens (see gure 6).
NOTES:
• The factory configured passwords for all accounts on this device have
been set to the device serial number. Passwords are case sensitive.
• If the device is reset to default settings, the password will be the default
password configuration. The default password is extron.
5. Click Login.
The Device Status page opens:
Figure 6. WAP 100AC Login Dialog Box
1
1
1
2
2
2
3
3
34
4
45
5
5
Figure 7. WAP 100AC Web Pages
1
Menu — Allows you to navigate to the
appropriate Web page.
2
Language — Allows you to select the
language in which the Web pages are
presented.
3
Changes — Shows the number of
changes made to the Web pages.
4
Reset — Gives you the option to Reboot
the Device, Restore to Factory
Defaults, or Restore to User
Defaults.
5
Logout — Shuts down the current session
and exits from the Web pages.
For information about using the Web pages to congure the WAP 100AC, to set up a wireless network, and to implement network
security measures, see the WAP 100AC User Guide, which is available at www.extron.com.

/