
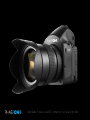
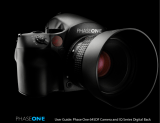
User Guide: Phase One 645DF+ Camera and IQ2 Series Digital Back

2

3

4
1.0 Introduction 8
1.1 Warranty 9
1.2 Installation and Activation of Software 9
1.3 Activation and Deactivation of Capture One 10
1.4 Screen Calibration 11
2.0 The 645DF+ Camera and IQ2 Digital Back System 12
2.1 The Camera System includes 12
2.2 Warranty and Services 13
2.3 Charging the Batteries for the IQ2 Digital Back 14
2.4 Camera Batteries (AA and rechargeable Li-ion battery) 15
2.5 Sleep Mode 16
2.6 Attach and Remove Lens 17
2.7 Adjusting the Strap 18
2.8 Attaching the IQ2 Back 19
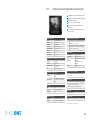
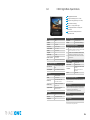
2.9 Names of Parts and Functions (Nomenclature) 20
2.10 The Displays 21
2.11 Displays, Abbreviations and Electronic Dial Operation 22
2.12 The Buttons on the Back 23
2.13 LED Lights 23
2.14 Setting Date and Time 24
2.15 Setting Diopter 24
Replacing the Diopter Correction Lens 25
2.16 Eyepiece Shutter 25
3.0 Basic Functions 28
3.1 Setting ISO 28
3.2 Setting White Balance 28
3.3 Getting started: Setting the Shutter Release, Focus, Exposure
and Metering modes 29
3.4 Measuring Light – Exposure Metering 31
3.5 Focus Mode 32
3.6 Auto focus or Manual focus 34
3.7 Using Focus Lock and Infrared Focusing 36
3.8 Drive Dial 37
3.9 Exposure Modes 38
3.10 Flash Photography 43
3.11 Flash Compensation Settings 46
4.0 Introduction to the IQ2 Series Digital Back 49
4.1 Quick Start (shooting untethered) 50
4.2 General Hardware Setup 51
4.3 Indicator Lights 52
4.4 Indicators 52
4.5 Tethered and Untethered Operations 53
4.6 CF Card Usage 55
4.7 Secure Storage System (3S) 56
4.8 Formatting your Memory Card 57
5.0 Navigating the IQ2 User Interface and Menu System 58
5.1 Menu Buttons 59
5.2 Shortcuts 59
5.3 Touch Screen Operation 60
5.4 ISO 61
5.5 White Balance 62
5.6 Custom White Balance 63
5.7 Live View 64
6.0 Play Mode 67
6.1 Play Mode Views 68
6.2 Play Mode: Context Menu 69
6.3 Info Bar 70
6.4 Play Mode Navigation 70
6.5 Zoom 70
6.6 Delete and Rating 71
6.7 Delete in Thumbnail View 72
6.8 Grid 73
6.9 Tools 75
7.0 Menu 78
7.1 645DF+ (Camera Custom Functionality from 7.1 to 7.1.28 ) 79
7.1.1 Setup C1, C2 or C3 79
7.1.2 Exposure Program 79
Contents

5
7.1.3 AF Area 79
7.1.4 Light Metering 79
7.1.5 Custom Function Set 80
7.1.6 Setup Custom A, B or C 80
7.1.7 EV Step 80
7.1.8 Lens Change 80
7.1.9 Sleep Timer 80
7.1.10 Battery Type 81
7.1.11 Bracketing 81
7.1.12 Front / Rear Dial 81
7.1.13 Rear Dial in P-mode 81
7.1.14 Dial Direction 81
7.1.15 AEL / AFL button 82
7.1.16 Release Button 82
7.1.17 AEL 82
7.1.18 AFL 83
7.1.19 M-Mode AEL 83
7.1.20 AF Assist Light 83
7.1.21 Flash Sync 84
7.1.22 Beep 84
7.1.23 Shutter in Tv/Av/P 84
7.1.24 Shutter in M/X 85
7.1.25 AF priority 85
7.1.26 Active Custom Set 86
7.1.27 Restore to Default 86
7.1.28 About System 86
7.2 Format Card 87
7.3 WiFi 87
WiFi (Cont.) 88
7.4 Power Management 90
Display Off Time 90
Battery Charging 90
Auto Power Down 90
Power-Up and Down from 645DF+ 91
7.5 Check Disk 91
7.6 Storage Mode 91
7.7 File Format 92
7.8 Camera Mode 92
7.9 Shutter Latency 92
7.10 Image Orientation 92
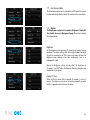
7.11 Auto Preview Mode 93
7.12 Display 93
Brightness 93
Display Off Time 93
Splash Screen 94
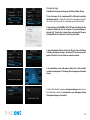
Background Image 95
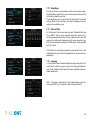
7.13 Ready Beep 96
7.14 Date And Time 96
7.15 Language 96
7.16 Restore to Default 97
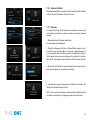
7.17 Firmware 97
Restore Firmware 98
Dump Log 98
7.18 About 98
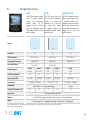
8.0 IQ2 Series Digital Back Overview 99
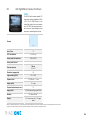
8.1 IQ280 Digital Back Specications 101
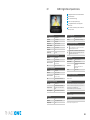
8.2 IQ260 Digital Back Specications 102
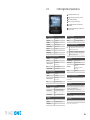
8.3 IQ260 Achromatic Digital Back Specications 103
8.4 IQ250 Digital Back Sepcifcations 104
9.0 Advanced 645DF+ Camera Functions 106
9.1 Exposure Compensation 106
9.2 AE Lock 107
9.3 Metered-Value Difference Indicator 108
9.4 Auto Bracketing 109
9.5 Taking Photos with the Mirror Up 111
9.6 Mirror Up Delay 112
9.7 Bulb Mode & Long Exposure 113
9.8 Camera Display Light 113
9.9 Self-Timer Mode 115
9.11 Interval Photography 116
9.12 Depth of Field 117
9.13 Infrared Photography 118
9.14 Custom Function 119
9.15 Types of Custom Functions 120
9.16 Custom Dial Modes C1, C2 or C3 124

6
9.17 Lenses and Multi Mount 125
9.18 Functions of the Phase One Lens 125
9.19 Function of the Phase One Lens Adaptor 125
9.20 List of Alternative Lenses 126
10.0 Maintenance 127
10.1 Changing the Focusing Screen 127
10.2 Battery Socket 128
10.3 Tripod/Electronic Shutter Release Contact 128
10.4 Camera Display Error-Notication 129
10.5 Lens Maintenance 130
10.6 Back Maintenance 130
10.7 IR Filter on the CCD 130
10.8 645DF+ Camera Body Specications 131
10.9 Phase One 645DF+ Housing Specication 132
11.0 Software 133
11.1 To Import Images... 133
12.0 Main Accessories 134
13.0 End User Support Policy 138
13.1 Web Resources 139
14.0 Appendix: Open Platform 141
Double Exposure Protection 141
14.1 IQ2 Back and Phase One 645DF/DF+ 142
14.2 More Details: Phase One and Mamiya 645 Series Cameras 143
Power Management and Shutter Latency 143
Studio Flash Sync on the Camera Body 143
Image Orientation 143
Mirror Up 144
Viewnder Masking 144
15.0 IQ2 Back for Mamiya RZ67 145
15.1 Mounting IQ2 Back on the Mamiya RZ67 145
15.2 Viewnder Masking 146
15.3 More Details: Mamiya RZ67 147
Mode Selector 147
Shutter Latency Setting Mamiya RZ PRO II 147
Studio Flash Sync on the RZ lens 147
Mirror Up 147
Double Exposure 147
16.0 IQ2 Back for Hasselblad V Series 148
16.1 Mounting the IQ2 Back on a Hasselblad V Series 148
16.2 Mounting a Viewnder Mask on a Hasselblad V Series Camera 149
16.3 More Details: Hasselblad V Series 150
Sync Cable 150
Flash Lead Connection 150
Mirror Up and Shutter Latency Setting 150
Tethered Capture 150
16.4 Hasselblad 555 ELD 151
Shutter Latency Setting 151
Motor Cable on Hasselbl ad 555 ELD 151
16.5 Hasselblad 553 ELX 152
Cable Connections 152
Shutter Latency Setting 152
16.6 Hasselblad 501 CM and 503 CW without Winder 153
Shutter Latency Setting 153
16.7 Hasselblad 503 CW with Winder CW 153
16.8 Cables shipped with IQ2 back for Hasselblad V 154
17.0 IQ2 Back for Hasselblad H Series 155
17.1 Mounting the IQ Back on a Hasselblad H Series 155
17.2 Viewnder Masking 156
17.3 More Details: Hasselblad H Series 157
Camera Display 157
ISO Settings 157
Auto Exposure 157
Viewnder Information 158
Double Exposure Protection 158
Image Orientation 158

7
Flash Lead Connection 159
17.4 Cables Shipped with IQ back for Hasselblad H 159
18.0 IQ2 Back for Contax 645 160
18.1 Mounting the IQ Back on a Contax 645 160
18.2 Viewnder Masking 161
18.3 More Details: Contax 645 162
Exposure Modes 162
ISO Settings 162
Double Exposure Protection 162
TTL ash 163
Image Orientation 163
18.4 Flash Lead Connection 163
18.5 Cables Shipped with IQ back for the Contax 645 164
19.0 IQ2 Back for View Cameras 165
Phase One Sleeping Architecture 165
19.1 Using the 2-shot Release 166
19.2 Using the 1-shot Release 166
19.3 Phase One FlexAdaptor 167
19.4 Shutter Latency Settings for the FlexAdaptor and Other
Technical Camera Adaptors 167
20.0 List of Focusing Screens and Viewnder Masks 168
20.1 Full Frame Focusing Screens or with Engraved Masking 168
20.2 Viewnder Masks 168
21.0 Live View 169
21.1 Starting Live View 170
21.2 White Balance 171
21.3 Quality and Brightness 171
21.4 Zoom 172
21.5 Grid 172
21.6 Auto Stop and Start 172
21.7 Accessories 173
21.8 Live View Camera Support 174
View Cameras 174
Phase One 645AF/645DF/645DF+ 174
Hasselblad H1/ H2 174
Hasselblad V 175
Mamiya RZ67 Pro II/Pro IID 175
Contax 645 175
Notices 176
FCC Regulations 177

8
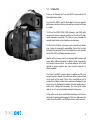
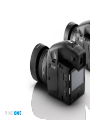
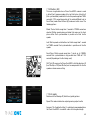
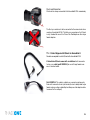
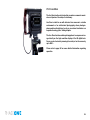
1.0 Introduction
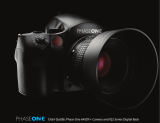
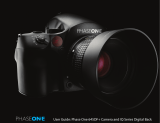
Thank you for choosing the Phase One 645DF+ camera and the IQ2
Series digital back solution.
The Phase One 645DF+ and IQ2 Series digital is the most powerful
digital camera solution whether you are working on location or tethered
in a studio.
The Phase One IQ280, IQ260, IQ260 Achromatic and IQ250 digital
camera backs feature maximum resolutions of 80, 60 and 50 high-
quality megapixels respectively. This series sets new standards for
medium format camera system handling and performance.
The Phase One IQ2 Series system gives you the absolute best solution
when it comes to image quality and workow. Capture One has been
optimized for shooting with Phase One IQ digital backs, and is available
for both Mac OS X and Windows operating systems.
Together with the IQ series backs this professional RAW converter and
image editing software will deliver the World’s highest image quality
with excellent color and detail. The software comprises all the tools
required to capture, organize, edit, share and print images for an
efcient workow.
The Phase One 645DF+ camera delivers incredible versatility with
support for what is arguably the widest array of focal plane and leaf
shutter lenses on the market. Phase One is committed not only to
provide the best digital solution for the professional photographer, but
also to ensure the photographer’s freedom of choice regarding lenses,
bodies, back, software and accessories. The entire system comes
ready to use in its own customized weatherproof camera case.
At Phase One we are always committed to providing you with the best
solution for the professional photographer. This Users Guide covers the
specic Phase One 645DF+ and IQ2 Series features and functionality.

9
We sincerely hope you will enjoy working with this innovative camera
platform and IQ2 Series digital back.
1.1 Warranty
Please read the enclosed warranty certicate. Should any problem
occur, please contact your local dealer (place of purchase) to facilitate
a repair. DO NOT try to repair the camera yourself. An unauthorized
attempt to repair the camera will terminate the warranty.
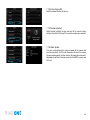
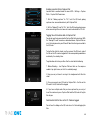
1.2 Installation and Activation of Software
An Internet connection is needed to install Capture One.
Install on Mac:
Capture One software includes an easy-to-use installer that will install
all the software necessary to run the application on Mac OS X 10.5.8
or later.
To install the software follow the procedure below:
1. Either load the Capture One DVD, or download the application from
the Phase One website: www.phaseone.com.
2. Open the Capture One disk image.
3. Read and accept the license agreement presented.
4. Drag the Capture One icon to the Applications folder.
5. Open Capture One from your Applications folder.
Install on Windows:
Capture One includes an easy-to-use installer that will install all the
software you need to run the application on a Windows based com-
puter.
To install the software follow the procedure below:
1. Either load the Capture One DVD, or download the application from
the Phase One website: www.phaseone.com.
2. Run the executable software install le.
3. Read and accept the license agreement presented.
4. Follow the on-screen instructions to complete the installation.
N.B. Capture One will initiate installation of Microsoft® .NET Frame-
work 3.0 if you don’t already have it installed on your computer.

10
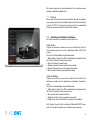
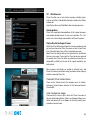
1.3 Activation
An Internet connection is needed to activate and update
Capture One.
1. Open the license activation dialogue box via the menu Capture
One>License.
2. Enter your License code and personal details in the required elds.
(You should have received an email with your Capture One license code
or it will be in the original software packaging that you purchased).
3. Once you have entered the information press the ‘Activate’ button
and your software will be validated by Phase One’s activation server.
Your software is now activated and ready for use.
Troubleshooting
If you are experiencing problems activating the software, follow the in-
structions provided in the application, read the software manual en-
closed or visit our website for inspiration and troubleshooting:
http://www.phaseone.com/support
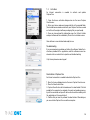
Deactivation of Capture One
An Internet connection is needed to deactivate Capture One.
1. Open the license dialogue box via the menu Capture One>License.
2. Press the Deactivate button.
3. Capture One will return to trial mode once it is deactivated. If the trial
period for the computer has expired, all current and pending process-
ing will be cancelled, and you will not be able to continue working with
the application until you reactivate it.
4. Conrm that you want to perform the deactivation. After doing so,
you can activate Capture One on another computer.

11
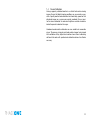
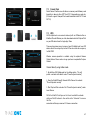
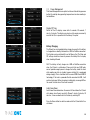
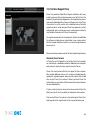
1.4 Screen Calibration
Having a properly calibrated monitor is a critical factor when viewing
images. Ensure that digital viewing conditions are as accurate as pos-
sible. A quality monitor and calibration tool should help guarantee that
displayed images on a screen are precisely rendered. Once a moni-
tor has been calibrated, the color and brightness controls should be
locked to prevent inadvertent changes.
Hardware-based monitor calibrators are now available at reasonable
prices. The process is simple, quick and enables images to be viewed
with condence. Many higher level monitors have internal calibrating
software that works with professional calibration devices for ultimate
accuracy.

12
2.0 The 645DF+ IQ2 Camera System
The Phase One Camera system is created to provide as much exibility
and openness as possible.
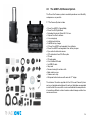
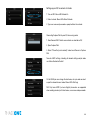
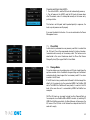
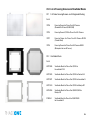
2.1 The Camera System includes
• Phase One 645DF+ Camera Body
• Phase One IQ2 Digital Back
• Schneider Kreuznach 80mm LS f/2.8 Lens
• Capture One Pro 8 software
• 2 lens wrappings
• 2 digital back batteries
• Dual DB battery charger
• 2 Phase One 645DF+ rechargeable Li-Ion batteries
• Phase One 645DF+ rechargeable Li-Ion battery charger
• Sync cable for technical camera
• LCC calibration kit and 10x10cm plate
• CF card
• CF card reader
• 4.5m FireWire 800 cable
• 3m USB3.0 cable
• Grey card
• Sensor cleaning kit and lens cloth
• Body and lens caps
• Camera neck strap
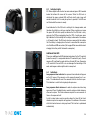
• Waterproof roller hard case with room for 17” laptop
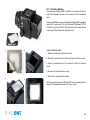
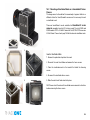
The interior of the roller supplied with the IQ2 based Camera System
can be customized and congured. An extra set of dividers are provided
inside the lid of the case, which can be used to divide the compartments
into smaller or different sections to make an ideal storage solution for a
camera and lenses.

13
2.2 Warranty and Services
The IQ2 Camera System comes with a 5 Year Warranty and
5 Year Uptime Guarantee covering all items in the system:
IQ2 digital back, 645DF+ camera body, Phase One Lenses,
Schneider Kreuznach lenses and Vertical Grip.
5 Year Warranty
What is it?
• Free repair during warranty period
• Exchange for new in case of DOA
Warranty covers:
• IQ2 Camera System*
• 645DF+
• IQ2 digital back
• Optional Phase One Lenses
• Optional Schneider Kreuznach Lenses
• Optional Vertical Grip
IQ2 digital backs
Conditions
Warranty covers defects in materials and workmanship, and is
limited to 250.000 captures.
Warranty is personal and not transferrable
Customer pays freight to Phase One
Phase One Pays freight to customer
*Warranty is only in effect, if end-user is registered on the order
via OLS or via mail to order desk - If end-user is not registered,
the reseller carries the responsibility beyond 1 Year Classic
Warranty.
5 Years Uptime Guarantee
What is it?
Loaners sent within 24 hours
Uptime Guarantee covers:
• IQ2 Camera System*
• 645DF+
• IQ2 digital back
• Phase One Lenses
• Schneider Kreuznach Lenses
• Vertical Grip
IQ2 digital backs
Conditions
In some countries it is not possible to get the Uptime Guarantee.
(China, South Americas, Mexico, Russia, Middle East etc. –
please ask order desk)
Uptime Guarantee is personal and not transferrable
Phase One Pays freight to Customer
Customer pays freight to Phase One
*Uptime Guarantee is only in effect, if end-user is registered
on the order via OLS or via mail to order desk - If user is not
registered, the reseller carries the responsibility for the loeaner.

14
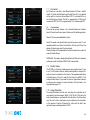
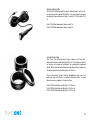
2.3 Charging the Batteries for the IQ2 Digital Back
Charge the batteries as soon as the camera system has been unpacked.
The Value Added roller case is delivered with two 7.2 volt Lithium-Ion
batteries and a duo-charger.
Although only one battery can be used in the IQ back at a time, it is
recommended to charge both batteries fully before you start.
Always keep a battery in the IQ back even when shooting tethered to
a computer via a FireWire or USB connection. (Go to page 84 for more
details about charging the battery while tethered to a computer).
The battery charger can adapt to voltages within a range of 110 to 250
volts.
It comes with an international set of power adaptors (located in the
suitcase utility compartment). Please select the appropriate one that
ts your outlet and slide it in from the top to mount it in place securely.
Connect the unit to the outlet and charge the batteries (approximately
2.5 to 3 hours).
After the rst initial charge, the batteries can be charged one at a time.
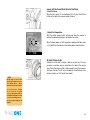
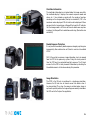
Purchasing Extra Batteries
The Phase One IQ back comes with two batteries. Phase One
recommends the Canon BP 915 (with more than 2500 mAh) if you need
to purchase extra batteries.
Some third party batteries may not t into the digital back’s battery
compartment due to differences in the tolerances. Do not try to force
a battery into the compartment. When pressing the battery release
button it should slide in without being hindered.
Warning!
• Only use the Charger to charge the specied batteries
• Do not allow charger to get wet or get exposed to moisture
• Keep the Charger out of reach of children
• Once charging is completed, unplug the charger from power source
• Only use the original mains adaptor 12V DC or car lead
• Never apply excessive force when connecting or disconnecting a battery or contact plate.
• Keep all contacts clean.
• Do not force down any of the contacts.
• Do not short-circuit the contacts.
• Never store the battery connected to the charger for an extensive period of time.
• Do not expose to excessive heat or naked ame.
• Do not dismantle or carry out any alteration to the product
• Do not attempt to eat or swallow the battery

15
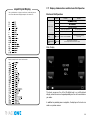
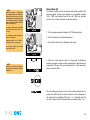
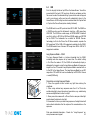
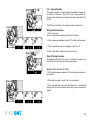
2.4 Camera Batteries
Set the shutter release mode selector lever to L (to turn the power off).
Use six AA alkaline or rechargeable batteries. NiCd or NiMH batteries
should only be used in the camera body if CF04 is set on rechargeable.
1. Lift the battery case lock lever, turn it counter clockwise and pull out
the battery holder.
2. Insert fresh AA batteries with the + and - ends as shown in the
illustration.
3. Return the battery holder to its case and lock it by turning the lever
clockwise. Make sure it is rmly attached.
N.B. Ensure that the batteries are placed with proper polarity.
Rechargeable Li-ion Battery
The Phase One Rechargeable Li-Ion battery Kit for 645DF+ is included
with the Phase One 645DF+ camera body as standard. (Part #70513)
Please go to page 112 for more information about setting battery type
in custom function 4.
The Value Added kit includes 2 batteries + 1 charger. The Classic kit
includes 1 battery + 1 charger.
N.B. The rechargeable Li-Ion battery can be used instead of AA batter-
ies with the Phase One 645DF. The uptime of one fully charged Li-ion
battery is up to 3 times longer than using standard Alkaline batteries.
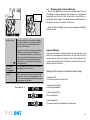
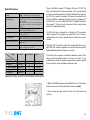
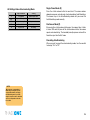
Checking the Battery Power
Set the Drive dial lever to S (to turn the power on).
Check the battery condition in the lower left corner of the top LCD
screen.
Always use six new batteries of the same type when replacing batter-
ies. Do not mix different types of batteries or use old batteries with new
ones. The camera will not function without a power source.
Never throw out batteries. When a battery does not work, please dis-
pose of it at an appropriate recycling center.
C
S
L
M.UP
The batteries are sufciently charged.
There is little power remaining. Have
new batteries on hand. Camera will still
operate.
There is very little power remaining.
Camera will not operate. Set the shutter
release mode selector lever to “L” (to
turn the power off) and replace the
batteries with new ones.
When the batteries are emptied for
power, “batt” ashes on the main
LCD and the viewnder’s LCD when
the shutter release button is pressed.

16
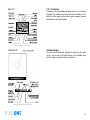
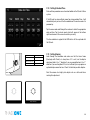
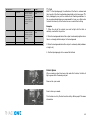
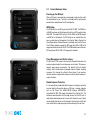
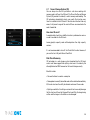
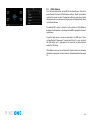
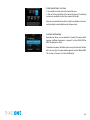
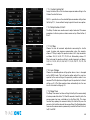
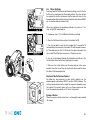
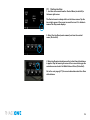
2.5 Sleep Mode
The camera’s power is switched on when the shutter release mode
selector is set to S, C or M.UP. In order to prevent the camera’s batteries
from discharging, sleep mode is automatically entered if no operations
are performed for a specic period of time while the power is ON (with
exposure metering status maintained).
In sleep mode, operating the shutter button or a function setting button
restores power ON status.
In sleep mode, the external LCD screens are not active, only the marks
shown in the gure are displayed. (These marks appear in program AE
mode.)
1. Battery life of the originally supplied batteries is dependent on
storage conditions.
2. Blots and ngerprints on battery terminals may cause loose
connection and corrosion. Wipe them off before loading the batteries.
3. It is advised to carry spare batteries in remote or foreign locations.
4. Battery performance decreases in low temperatures. Keep them
warm when in cold climates or locations. External battery case PE401
is available as an optional accessory.
5. Store the batteries in a cool and dry place, away from direct sunlight.
6. Remove the batteries from the camera body when they will not be
used for a long time.
7. Replace the batteries with new ones as soon as they are exhausted.
Liquid leakage from the battery may damage the camera.
8. Read the warnings on the batteries for their handling.
NOTE:
For the purpose of the descriptions
and explanations provided in these
instructions, it is assumed that the
camera’s power is on.

17
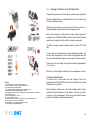
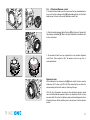
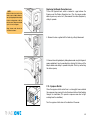
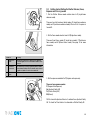
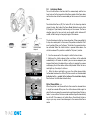
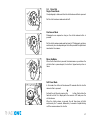
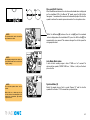
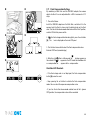
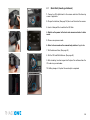
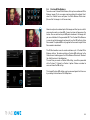
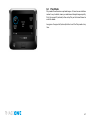
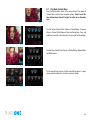
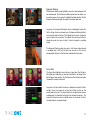
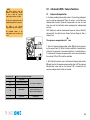
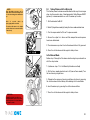
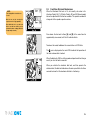
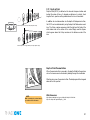
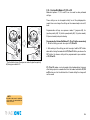
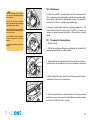
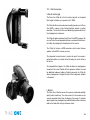
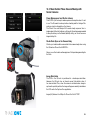
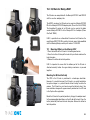
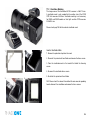
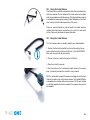
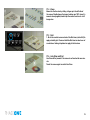
2.6 Attach and Remove a Lens
1. Remove the front body cap in the same way that you would remove a
lens; push the lens release button [A] backward and then turn the front
body cap or the lens itself counter clockwise and lift out.
2. Align the white alignment dot of the lens [B] (on the shiny ange) with
the camera’s white dot [C]. Mount the lens and rotate it clockwise until
it clicks into place.
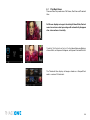
3. To remove the front lens cap, squeeze the shiny sections together
and lift out. (See image far left). To remove rear lens cap turn it
counterclockwise.
Remove a Lens
While sliding the lens release button[A] back, rotate the lens counter
clockwise until it stops, and lift it off. After removing the lens from the
camera body, protect both ends by attaching the caps.
N.B. Oil, dust, ngerprints or water on the electronic contacts could
result in malfunction or corrosion. Wipe such impurities off with a clean
piece of cloth. Do not tap the distance ring or other rotating parts when
attaching the lens. When installing a lens, do not press the lens release
button.
MF
80mm
1:28
AF
22
22
11
11
4
4
ft
m
A
80mm
1:28
MF
AF
11
4
4
22
22
20
0
5
ft
m
C
B
80mm
1:28
MF
AF
11
11
4
4
22
22
20
0
5
A
11
11
4
4
22
22
20
ft
m

18
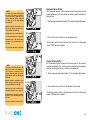
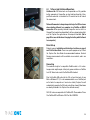
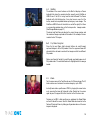
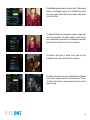
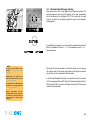
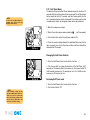
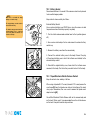
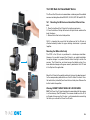
Attach a Leaf Shutter Lens
Leaf shutter lenses are equipped with an internal shutter. Leaf shutter
lenses are capable of high shutter speeds up to 1/1600 on IQ Series
backs with ash synchronization, which is particularly useful for ll-in
ash photography in bright ambient shooting conditions.
When a leaf shutter lens is attached and the leafshutter is used and the
letters LS will appear in the main LCD screen.
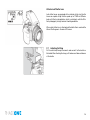
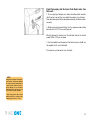
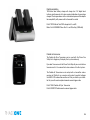
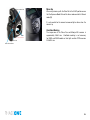
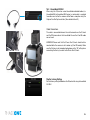
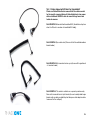
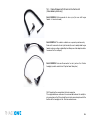
2.7 Adjusting the Strap
Put the neck strap through the mounts and secure it to the buckle as
illustrated. After attaching the strap, pull it and ensure it does not loosen
at the buckle.

19
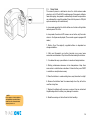
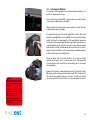
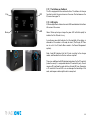
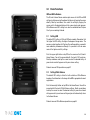
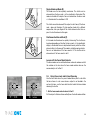
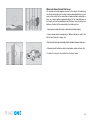
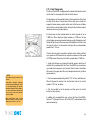
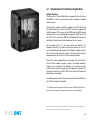
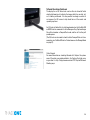
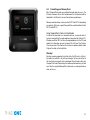
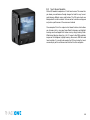
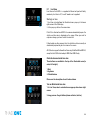
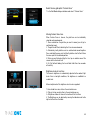
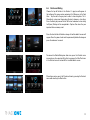
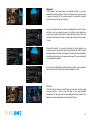
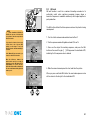
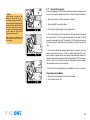
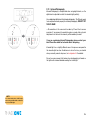
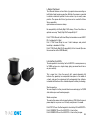
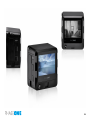
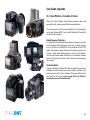
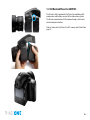
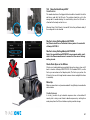
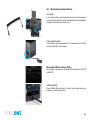
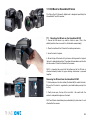
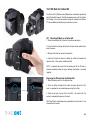
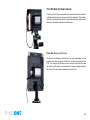
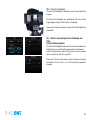
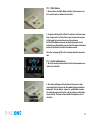
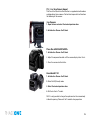
2.8 Attaching the IQ2 Back
The IQ back is fully integrated with the camera body and functions as a
part of the whole camera system.
Ensure that the Phase One 645DF+ camera mirror is up and the shutter
is open when no digital back is attached.
When attaching the IQ back to the camera body the shutter will close
and the mirror comes back down.
First remove the cover on the IQ back and 645DF+ camera. Next, slide
forward the lever [1] and push in button [2], and ensure that the bottom
part of the IQ back is placed correctly in the lower locking mechanism
on the back of the camera body before the upper locking mechanism is
pressed together. Failure to do this can cause an error with the camera
body where the shutter will continuously open and close. If this occurs,
remove the IQ back. Make sure the camera body is powered and press
button [2] while mounting the digital back.
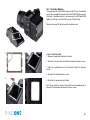
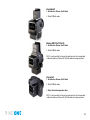
Please be aware that the shutter should be in the correct starting
position (shutter open). If this is not the case, attach and remove the
IQ back again to make sure that the camera body gets in the correct
starting position.
Remove the IQ back by sliding forward the lever [1], pushing in button
[2], and by gently pulling away the top of the back rst. Be careful with
the contacts and protective glass on the back. Your IQ back should
always be protected by its plate when it is not attached to the camera.
NOTE:
When transporting the system, it
is important to make sure that the
mirror is locked up in the shipping
position.
To ship the system, rst detach the
digital back, and then remove the
battery from the camera body. Now
replace the digital back.
The mirror will stay locked-up in the
shipping position, until the battery
is re-attached.

20
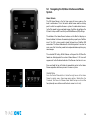
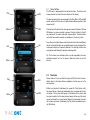
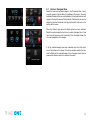
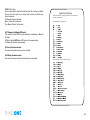
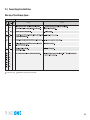
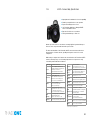
2.9 Names of Parts and Functions (Nomenclature)
Rubber Eye Piece
Digital Back
Auto Exposure Lock Button
AEL Exposure Metering button
Self Timer Button
Interval Button
Main LCD Backlight Button
Exposure Metering Mode Button
Focus Point Selector Button
Set Button
Flash Auto Adjustment
Select Button
Exposure Compensation Button
Auto Bracketing Button
Eyepiece Shutter Lever
Main LCD
Rear Dial
Strap Lug
Front Dial
Shutter Release Button
Drive Dial
Depth of Field Preview Button
Lens Mount Alignment Mark
Electronic Contacts
Mirror*
*Do not touch the mirror
Exposure Mode Dial
Hot Shoe
Diopter Adjustment Lens (Standard Accessory)
External Power Socket
Battery Case Lock Lever
Battery Case
Tripod Socket
Auto Focus Assist Light
Self Timer Lamp
Auto Focus -
Lock Button
Focus Mode Selector Lever
Lens Release Button
Diopter Adjustment Dial
Strap Lug
Synchro Terminal
Electronic Shutter Release Contact
AEL Exposure
Metering button
Page is loading ...
Page is loading ...
Page is loading ...
Page is loading ...
Page is loading ...
Page is loading ...
Page is loading ...
Page is loading ...
Page is loading ...
Page is loading ...
Page is loading ...
Page is loading ...
Page is loading ...
Page is loading ...
Page is loading ...
Page is loading ...
Page is loading ...
Page is loading ...
Page is loading ...
Page is loading ...
Page is loading ...
Page is loading ...
Page is loading ...
Page is loading ...
Page is loading ...
Page is loading ...
Page is loading ...
Page is loading ...
Page is loading ...
Page is loading ...
Page is loading ...
Page is loading ...
Page is loading ...
Page is loading ...
Page is loading ...
Page is loading ...
Page is loading ...
Page is loading ...
Page is loading ...
Page is loading ...
Page is loading ...
Page is loading ...
Page is loading ...
Page is loading ...
Page is loading ...
Page is loading ...
Page is loading ...
Page is loading ...
Page is loading ...
Page is loading ...
Page is loading ...
Page is loading ...
Page is loading ...
Page is loading ...
Page is loading ...
Page is loading ...
Page is loading ...
Page is loading ...
Page is loading ...
Page is loading ...
Page is loading ...
Page is loading ...
Page is loading ...
Page is loading ...
Page is loading ...
Page is loading ...
Page is loading ...
Page is loading ...
Page is loading ...
Page is loading ...
Page is loading ...
Page is loading ...
Page is loading ...
Page is loading ...
Page is loading ...
Page is loading ...
Page is loading ...
Page is loading ...
Page is loading ...
Page is loading ...
Page is loading ...
Page is loading ...
Page is loading ...
Page is loading ...
Page is loading ...
Page is loading ...
Page is loading ...
Page is loading ...
Page is loading ...
Page is loading ...
Page is loading ...
Page is loading ...
Page is loading ...
Page is loading ...
Page is loading ...
Page is loading ...
Page is loading ...
Page is loading ...
Page is loading ...
Page is loading ...
Page is loading ...
Page is loading ...
Page is loading ...
Page is loading ...
Page is loading ...
Page is loading ...
Page is loading ...
Page is loading ...
Page is loading ...
Page is loading ...
Page is loading ...
Page is loading ...
Page is loading ...
Page is loading ...
Page is loading ...
Page is loading ...
Page is loading ...
Page is loading ...
Page is loading ...
Page is loading ...
Page is loading ...
Page is loading ...
Page is loading ...
Page is loading ...
Page is loading ...
Page is loading ...
Page is loading ...
Page is loading ...
Page is loading ...
Page is loading ...
Page is loading ...
Page is loading ...
Page is loading ...
Page is loading ...
Page is loading ...
Page is loading ...
Page is loading ...
Page is loading ...
Page is loading ...
Page is loading ...
Page is loading ...
Page is loading ...
Page is loading ...
Page is loading ...
Page is loading ...
Page is loading ...
Page is loading ...
Page is loading ...
Page is loading ...
Page is loading ...
Page is loading ...
Page is loading ...
Page is loading ...
Page is loading ...
Page is loading ...
Page is loading ...
Page is loading ...
-
 1
1
-
 2
2
-
 3
3
-
 4
4
-
 5
5
-
 6
6
-
 7
7
-
 8
8
-
 9
9
-
 10
10
-
 11
11
-
 12
12
-
 13
13
-
 14
14
-
 15
15
-
 16
16
-
 17
17
-
 18
18
-
 19
19
-
 20
20
-
 21
21
-
 22
22
-
 23
23
-
 24
24
-
 25
25
-
 26
26
-
 27
27
-
 28
28
-
 29
29
-
 30
30
-
 31
31
-
 32
32
-
 33
33
-
 34
34
-
 35
35
-
 36
36
-
 37
37
-
 38
38
-
 39
39
-
 40
40
-
 41
41
-
 42
42
-
 43
43
-
 44
44
-
 45
45
-
 46
46
-
 47
47
-
 48
48
-
 49
49
-
 50
50
-
 51
51
-
 52
52
-
 53
53
-
 54
54
-
 55
55
-
 56
56
-
 57
57
-
 58
58
-
 59
59
-
 60
60
-
 61
61
-
 62
62
-
 63
63
-
 64
64
-
 65
65
-
 66
66
-
 67
67
-
 68
68
-
 69
69
-
 70
70
-
 71
71
-
 72
72
-
 73
73
-
 74
74
-
 75
75
-
 76
76
-
 77
77
-
 78
78
-
 79
79
-
 80
80
-
 81
81
-
 82
82
-
 83
83
-
 84
84
-
 85
85
-
 86
86
-
 87
87
-
 88
88
-
 89
89
-
 90
90
-
 91
91
-
 92
92
-
 93
93
-
 94
94
-
 95
95
-
 96
96
-
 97
97
-
 98
98
-
 99
99
-
 100
100
-
 101
101
-
 102
102
-
 103
103
-
 104
104
-
 105
105
-
 106
106
-
 107
107
-
 108
108
-
 109
109
-
 110
110
-
 111
111
-
 112
112
-
 113
113
-
 114
114
-
 115
115
-
 116
116
-
 117
117
-
 118
118
-
 119
119
-
 120
120
-
 121
121
-
 122
122
-
 123
123
-
 124
124
-
 125
125
-
 126
126
-
 127
127
-
 128
128
-
 129
129
-
 130
130
-
 131
131
-
 132
132
-
 133
133
-
 134
134
-
 135
135
-
 136
136
-
 137
137
-
 138
138
-
 139
139
-
 140
140
-
 141
141
-
 142
142
-
 143
143
-
 144
144
-
 145
145
-
 146
146
-
 147
147
-
 148
148
-
 149
149
-
 150
150
-
 151
151
-
 152
152
-
 153
153
-
 154
154
-
 155
155
-
 156
156
-
 157
157
-
 158
158
-
 159
159
-
 160
160
-
 161
161
-
 162
162
-
 163
163
-
 164
164
-
 165
165
-
 166
166
-
 167
167
-
 168
168
-
 169
169
-
 170
170
-
 171
171
-
 172
172
-
 173
173
-
 174
174
-
 175
175
-
 176
176
-
 177
177


Phase One 645 DF+ and IQ2 Series Digital Back User manual
- Category
- Bridge cameras
- Type
- User manual
Ask a question and I''ll find the answer in the document
Finding information in a document is now easier with AI
Related papers
-
 Phase One IQ 2 Series User guide
-
 Phase One 645 DF Quick start guide
-
 Phase One 645 DF+ Quick start guide
-
 Phase One 645 DF+ User guide
-
PhaseOne 645 User manual
-
-
 Phase One iQ Series User guide
-
 Phase One iQ Series Quick start guide
-
 Phase One p Series User manual
-
 Phase One P+ Series User manual


Other documents
-
Mamiya 645DF Instructions Manual
-
-
Acer CP-8531 Owner's manual
-
-
 Promaster FM650 Electronic Flash User manual
-
Techart LM-EA9 User manual
-
-
Mamiya Leaf DM System User manual
-
Contax N1 Owner's manual
-
 SimPure TDS Meter Digital Water Tester, TDS Meter, EC Meter & Temperature Meter 3 in 1, User guide

