Page is loading ...

Copyright July 18, 2018
Grace Company
(Reproduction Prohibited)
Version 1.3
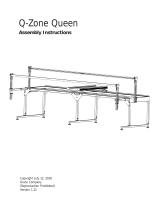
Q-Zone Queen
Table Accessory Assembly Instructions

|Table of Contents Q-Zone Queen Table Accessory
Table of Contents .............................................................................................................................................................................i
Warranty
Warranty Information ................................................................................................................ii
Parts List
Parts List.................................................................................................................................iii
Preparation
Step 1 - Preparation ................................................................................................................. 1
Assembly
Step 2 - Table Accessory Support Installation ............................................................................. 3
Step 3 - Plastic Table Surface Installation ................................................................................... 4
Step 4 - Sewing Machine and Rail Installation ............................................................................ 10
i

?
1-800-264-0644
Warranty Information for your Q-Zone Queen Table Acces-
sory
The Q-Zone Queen Table Accessory has a One-Year limited warranty on all parts. The
Grace Company will repair or replace, at its discretion, any part with problems due to
our manufacturing or defects in materials. This warranty does not cover parts damaged
through misuse, improper storage, improper assembly, loss, natural events, and willful
destruction. Parts must be returned to the Grace Company, shipping prepaid, before
we can repair or replace them. We will promptly return the repaired/replaced part at
our expense if done within a year of the purchase date.
ii

|Parts List Q-Zone Queen Table Accessory
Parts List Box 1
iii
Plastic Table Surface -
Section 1 (1)
Plastic Table Surface -
Section 2 (2)
Plastic Table Surface -
Section 3 (1)
Table Accessory
Support (8)
Plastic Table Surface -
Section 4 (1)

If you have purchased a Q-Zone Queen Frame and Table
Accessory together, Complete the Q-Zone Queen Frame
Assembly Instructions prior to proceeding with the
assembly of the Table Accessory.
iv
|Preparation Q-Zone Queen Table Accessory

1-1 Clean the upper surfaces of the Track Support
and Legs to rid them of any lint, dust, or oil.
Clean
Clean
Step 1 - Preparation
Tools Needed:
4mm Allen Wrench
1-2 Move the Carriage to the far right side of the frame and secure with the Channel Lock.
1
|Preparation Q-Zone Queen Table Accessory

2-1 Remove the (2) M6 x 10mm Connector Bolts
from the far left end of the frame and set aside.
2-2 Using the (2) M6 x 10mm Connector Bolts from Step 2-1 install (1) Table Accessory Support.
M6 x 10mm
Connector Bolt
M6 x 10mm
Connector Bolt
M6 x 10mm
Connector Bolt
M6 x 10mm
Connector Bolt
Table Accessory
Support
Table Accessory
Support (8)
Parts Needed:
Step 2 - Table Accessory Support Installation
Tools Needed:
4mm Allen Wrench
22
|Assembly Q-Zone Queen Table Accessory

M6 x 10mm
Connector Bolt
M6 x 10mm
Connector Bolt
Table Accessory
Support
2-4 Repeat Steps 2-1 and 2-2 for the remaining (7) Table Accessory Supports.
Note: It is advised that you do one Table Accessory Support at a time to avoid from the track
supports becoming misaligned.
2-3 Move the Carriage to the far left side of the frame and secure with the Channel Lock.
|Assembly Q-Zone Queen Table Accessory
3

3-1 Remove the paper backing from the double
faced tape on the Plastic Table Surface Section 1.
Remove paper
backing
Plastic Table
Surface
Section 1 (1)
Parts Needed:
Step 3 - Table Accessory Support Installation
Plastic Table
Surface
Section 2 (2)
Plastic Table
Surface
Section 3 (1)
Plastic Table
Surface
Section 4 (1)
3-2 Move the Carriage to the far right side of the frame and secure with the Channel Lock.
4
|Assembly Q-Zone Queen Table Accessory

3-4 Remove the paper backing from the double
faced tape on (1) of the Plastic Table Surface
Section 2.
Table Accessory
Support
Plastic Table
Surface Section 1
Remove paper
backing
Track
Track
|Assembly Q-Zone Queen Table Accessory
3-3 Align the Plastic Table Surface Section 1 with the center of the Table Accessory Support making
sure the edge of the Plastic Table Surface is parallel with the Track Supports.
Note: Center the Table Surface between the Track.
5

3-6 Remove the paper backing from the double
faced tape on the Plastic Table Surface Section 3.
Table Accessory
Support
Plastic Table
Surface Section 2
Remove paper
backing
|Assembly Q-Zone Queen Table Accessory
3-5 Position the Plastic Table Surface Section 2 against the Plastic Table Surface Section 1 making
sure the edge of the Plastic Table Surface is parallel with the Track Supports.
Note: Center the Table Surface between the Track.
Track
Plastic Table
Surface Section 1
6

3-8 Move the Carriage to the far left side of the
frame and secure with the Channel Lock.
3-9 Remove the paper backing from the double
faced tape on (1) of the Plastic Table Surface
Section 2.
Table Accessory
Support
Plastic Table
Surface Section 3
Remove paper
backing
Track
Track
|Assembly Q-Zone Queen Table Accessory
3-7 Position the Plastic Table Surface Section 3 against the Plastic Table Surface Section 2 making
sure the edge of the Plastic Table Surface is parallel with the Track Supports.
Note: Center the Table Surface between the Track.
Plastic Table
Surface Section 2
7

3-11 Remove the paper backing from the double
faced tape on the Plastic Table Surface Section 4.
Table Accessory
Support
Plastic Table
Surface Section 2
Remove paper
backing
|Assembly Q-Zone Queen Table Accessory
3-10 Position the Plastic Table Surface Section 2 against the Plastic Table Surface Section 3 making
sure the edge of the Plastic Table Surface is parallel with the Track Supports.
Note: Center the Table Surface between the Track.
Track
Track
Plastic Table
Surface Section 3
8

Plastic Table
Surface Section 4
|Assembly Q-Zone Queen Table Accessory
3-12 Position the Plastic Table Surface Section 4 against the Plastic Table Surface Section 2 making
sure the edge of the Plastic Table Surface is parallel with the Track Supports.
Note: Center the Table Surface between the Track.
Track
Track
Plastic Table
Surface Section 2
3-13 Press down on all edges of the Plastic Table Surfaces to make sure the double faced tape is
secure.
9

10

The Grace Company
2225 South 3200 West
Salt Lake City, UT 84119
Phone: 1-800-264-0644
www.graceframe.com
/