Page is loading ...

Quick Reference Guide
8000-2656-02, Rev. A (Pages 6) AMERICAN DYNAMICS PRODUCTS 1
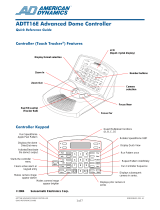
1 ADTT32E Enhanced TOUCH TRACKER
®
Overview
A
B
C
D
1
2
3
4
5
6
7
8
9
0
P
e
e
l
I
n
f
o
O
n
O
u
t
p
u
t
O
f
f
C
l
ea
r
M
e
n
u
I
r
i
s
C
l
o
s
e
O
p
e
n
F
l
i
p
V
i
e
w
P
a
t
t
e
r
n
R
e
p
e
a
t
P
a
t
t
e
r
n
S
e
q
P
r
e
v
i
o
u
s
N
e
x
t
New and Improved Features
The enhanced TOUCH TRACKER allows you to customize
the following features:
• LCD backlight brightness
• Volume control for key click
• Turn key click On or Off
In addition, the following features have changed to
improve the usability and reliability of the Touch Tracker:
• Larger, hard plastic keys
− Number keys
− Function keys
− Camera and Monitor keys (with icons)
• New Tracker Ball and mechanism
− Eliminates need for calibration
• Microswitch zoom and focus keys
• Updated color scheme
Displays the dome's
ID code.
Toggles the state o
f
the dome's output.
Initiates the currently selected
dome's Apple Peel pattern.
Displays currently selected
camera, monitor, Quick View o
r
Pattern number. Also displays
system prompts and messages.
Flips the SpeedDome
180º.
Calls up a Quick View.
Calls up a Pattern one time.
Repeats a Pattern indefinitely.
Initiates the Sequence.
Steps forwards and backwards
through the installed cameras in
se
q
uential order.
Calls up video from a
specific camera.
Controls the camera's
focus function.
Controls the camera's pan and tilt
function. Also allows you to interface
with the menu.
Controls the camera's
zoom function.
Calls up a specific monitor.
A
lso cycles through installed
monitors.
Opens or closes the camera's
iris, making the picture on the
monitor appear darker or lighter.
Starts the menu.
Clears active alarm or
the last keypad entry
Enters the number of the
Camera, Monitor, Quick View,
Pattern or Output.

2 QUICK REFERENCE GUIDE
ADTT32E / AD32 ENHANCED TOUCH TRACKE
R
8000-2656-02, REV.
A
LCD Menu
Define Sequence
Setup View
Record Pattern
Auto Alarm Ack
Alarm Actions
Tog Zoom / Focus
Show Sys Info
Reset Dome
Port Settings
Tog Primary / 2nd
Ping Dome / TTR
Set Time/Date
Event Setup
Event Timers
Camera Titles
Monitor Setup
Select Language
Adjust V-phase
Adj Backlighting
Adj Keyclick Vol
Keyclick ON/OFF
Using the Menu
Press the Menu button on the keypad to invoke the
menu. This scrollable menu appears on the LCD. Only
two menu selections are visible at one time on the LCD.
Move the Tracker Ball up and down to scroll through the
menu selections. To select the item on the top line of the
LCD, press the Zoom button (or press button A). To
select the item on the bottom line of the LCD, press the
Focus button (or press button B).
Apple Peel
The “Apple Peel” consists of three revolutions of camera
panning, with tilt starting at the ceiling line. Each
revolution tilts down approximately 30°. The Apple Peel
provides you with a complete view of the area.
APPLE PEEL PATTERN
Note: If the Sensornet-to-RS-422 code converter is
being used, pressing Peel will run Pattern 3 (if Pattern 3
has been programmed).
Select a Camera
Enter the number of the camera whose video you want
to display, then press
(Camera button).
Sequence through the
Cameras
To display video from the 32 cameras—one at a time—
in sequential order, press the Previous and Next
buttons. Each time you press Previous, video from the
previous camera is displayed. Each time you press
Next, video from the next camera is displayed.
Select a Monitor
Enter the number (1-5) of the monitor where you want to
display camera video, then press
(Monitor
button).
“Flip” the SpeedDome
To flip the currently selected SpeedDome 180° in the
opposite direction, press Flip.
Run “Apple Peel”
To instruct the currently selected SpeedDome to run the
Apple Peel pattern, press Peel.
The Apple Peel pattern repeats itself indefinitely until
you issue a camera command (pan, tilt, zoom or focus)
to the dome running the pattern.
Note: If the Sensornet-to-RS-422 code converter is
being used, pressing Peel will run Pattern 3 (if Pattern 3
has been programmed).
Clear an Alarm
To clear the alarm whose information currently appears
on the LCD press Clear.

ADTT32E / AD32 ENHANCED TOUCH TRACKER
8000-2656-02, REV. A
QUICK REFERENCE GUIDE 3
Control Dome Outputs
1. Refer to the Dome Configuration Worksheet to see
which output devices are connected to which domes,
and what the on / off states are for those devices.
2. Enter the number of the camera whose output
device you want to turn on or off, then press
Camera.
3. Press the number of the output device (1 - 4) that
you want to turn activate or deactivate.
4. Pressing Output On activates the output device;
pressing Output Off deactivates the output device.
Control Switcher Output
To control the output device connected to the video
matrix switcher, press Output On or Output Off.
Display Quick Views
Note: SpeedDome Ultra III/DeltaDome and newer
domes supports 96 views. Other domes support only
four views.
1. Enter the number of the camera whose Quick View
you want to display, then press Camera.
2. Press the number of the Quick View you want to
display (1 - 96), then press View.
Run Patterns
1. Press the number of the camera whose Pattern you
want to display, then press Camera.
2. Press the number of the Pattern you want to display
(1 - 3), then press Pattern to run the Pattern once.
Press Repeat Pattern if you want the Pattern to
repeat itself indefinitely.
If you select a repeating Pattern, the Pattern repeats
itself until you issue a camera command (pan, tilt zoom
or focus) to the dome running the Pattern.
Run Sequences
Note: Each TOUCH TRACKER can have its own sequence.
To initiate the pre-defined Sequence, press Seq. The
Sequence repeats itself indefinitely until you press Seq
or Clear.
Define Quick Views
Note: SpeedDome Ultra III/DeltaDome and newer
domes support 96 views. Other domes support only four
views.
1. On the monitor, display the picture for which you
want to create a Quick View.
2. Press Menu, then select Setup View.
3. Press the number buttons (1 - 96) that you want to
assign to this Quick View, then press Zoom or
Focus to save.
Define Patterns
1. On the monitor, display the picture that you want to
be the starting point of the Pattern.
2. Press Menu, then select Record Pattern.
3. Press the number (1 - 3) that you want to assign to
this pattern.
4. Move the camera around, then zoom and focus as
necessary to create a logical camera pattern.
If you make a mistake during programming and no
longer want to program the pattern, press Clear.
5. When you finish creating the pattern, press Next.
SpeedDome LT Auto Pan
Programming
1. On the monitor, display the picture that you want to
be the starting point of the Auto Pan.
2. Press Menu, then select Record Pattern.
3. Press the number 1 on the keypad.
4. Move the camera to the end point, then press Next.
Define Sequences
Note: Each TOUCH TRACKER can have its own
sequence.
1. Press Menu, then select Define Sequence.
2. Scroll through the list of events using the Tracker
Ball until the event you want to define or re-define
appears on the LCD.
3. In the Cam field, use the number buttons to type the
camera number for the event (use 2 digits).
4. In the Act field, indicate the kind of Action you are
specifying for this event. Press View for a Quick
View; press Pattern for a Pattern. For a fixed shot,
press Clear to leave this field blank.
5. If this is a Quick View or Pattern, use the number
buttons to select the number of Quick View or
Pattern.
6. In the Dur field, indicate the duration time for this
event (use the number buttons).
7. Repeat steps 2 through 6 for each event in the
sequence. Press Menu when complete.

4 QUICK REFERENCE GUIDE
ADTT32E / AD32 ENHANCED TOUCH TRACKE
R
8000-2656-02, REV.
A
Adjust LCD Backlighting
1. Press Menu to display the LCD Menu. Use the
Tracker Ball to scroll through the choices.
2. Press Zoom or Focus to select Adj Backlighting.
3. Press Next to make the backlighting brighter; press
Previous to make the backlighting dimmer.
Adjust Key Click Volume
1. Press Menu to display the LCD Menu. Use the
Tracker Ball to scroll through the choices.
2. Press Zoom or Focus to select Adj Keyclick Vol.
3. Press Previous to make the volume softer; press
Next to make the volume louder.
Turn Key Click On / Off
1. Press Menu to display the LCD Menu. Use the
Tracker Ball to scroll through the choices.
2. Press Zoom or Focus to select Key Click On/Off.
3. Press Next to turn the key click on or off. The current
setting appears on the LCD.
− If the key click is on, Keyclick ON appears on
the LCD.
− If the key click is off, Keyclick OFF appears
on the LCD.
Set Language
1. Press Menu to display the LCD Menu. Use the
Tracker Ball to scroll through the choices.
2. Press Zoom or Focus to select Select Language.
3. Use the Tracker Ball to scroll through the available
languages, and press Zoom or Focus to select the
correct language.
The following languages are supported:
− English
− French
− German
− Italian
− Portuguese
− Spanish
Using On-Screen Forms
The following procedures use special forms that appear
on Monitor 1. These forms permit you to set the system
date/time, configure monitors, assign camera names,
and schedule events.
When using the on-screen forms, the following TOUCH
TRACKER components are used:
• The Tracker Ball or Next button moves the cursor
around the screen.
• The Zoom or Focus buttons cycle through available
choices. These buttons also enter data into the
selected fields.
• Use the number buttons to enter numeric entries,
such as system time and date.
• The Menu button returns TOUCH TRACKER control
to the LCD.
Setting System Date/Time
1. Press the Menu button.
2. Select Set Time/Date.
The Set Time and Date form appears on Monitor 1.
3. The cursor appears in the Date Format field. Press
the zoom or focus button to cycle through the
available choices: MM-DD-YY, DD-MM-YY, or YY-MM-DD.
4. Use the Tracker Ball or Next button to move the
cursor to the Date field. Use the number buttons to
enter the month, date, and year in 2-digit format.
Press zoom or focus to accept the entry after each
2-digit segment of the date is entered.
5. Use the Tracker Ball or Next button to move the
cursor to the Time field. Use the number buttons to
enter the correct time in 24-hour format.
6. Use the Tracker Ball or Next button to move the
cursor to the Day of Week field. Press the zoom or
focus button to cycle through the available choices.
7. When finished entering the date and time
information, press Menu twice to resume camera
control mode.
Assigning Camera Names
1. Press the Menu button.
2. Select Camera Titles.
The Camera Naming form appears on Monitor 1.
3. Using the Tracker Ball, move the cursor to the
Camera Number field. Press zoom or focus until the
correct camera number appears on the screen.
4. Using the Tracker Ball or Next button, move the
cursor to the Title field.
5. Move the Tracker Ball to highlight the character in
the Character Selection field that will be used in the
name for the camera. Press zoom or focus to select
the character.
If you make a typing mistake, use the Next button to
move around the Title field.

ADTT32E / AD32 ENHANCED TOUCH TRACKER
8000-2656-02, REV. A
QUICK REFERENCE GUIDE 5
6. The selected character now appears in the selected
position of the Title field.
7. Repeat steps 5 and 6 until you have named the
camera.
8. Repeat steps 3 through 6 for each camera you want
to name.
9. When finished naming cameras, press Menu twice
to return to camera control mode.
Setting Up Monitors
For each of the 5 monitors, you can choose to display
the date, time and name of the selected camera.
1. Press the Menu button.
2. Select Monitor Setup.
The Monitor Setup form appears on Monitor 1.
3. Use the Tracker Ball or press the Next button to
position the cursor in the Monitor field. Press the
zoom or focus button until the correct monitor
number appears.
4. Move the cursor to the Time Date field. Press zoom
or focus to cycle through the available choices. If
you want the time and date to appear on the screen,
select On. If you do not want the time and date to
appear on the screen, select Off.
5. Move the cursor to the Title Display field. Press
zoom or focus to cycle through the available
choices. If you want the camera names to appear on
the monitor, select On; if you do not want camera
names to appear on the monitor, select Off.
6. Move the cursor to the Brightness field. Press zoom
or focus to cycle through the available choices. The
range for the text brightness setting is 1 (darkest) to
8 (brightest).
7. Repeat steps 3 through 6 for each monitor you want
to configure.
8. When finished setting up monitors, press Menu
twice to return to camera control mode.
Configuring Timed Events
There are two parts to configuring timed events: setting
up events and scheduling events.
Setting Up Events
1. Press the Menu button.
2. Select Event Setup.
The information appears on the LCD.
3. Move the Tracker Ball up and down to scroll between
the available events. When the correct event number
appears, continue with step 4.
4. Use the number buttons to enter the monitor number
(1-5) where the Timed Event will be shown.
5. Use the number buttons to enter the camera number
(1-32) whose video will appear on the selected
monitor.
6. The default event is a Quick View. If you do not want
a Quick View, press the Pattern or Seq button to
change this field.
7. If you are setting up a Quick View or Pattern to be
the Timed Event, use the number buttons to enter
the correct Quick View (01-96) or Pattern (1-3) for
the selected camera.
8. If you want to program other timed events, repeat
steps 3 through 7.
9. When finished programming events, press Menu
twice to resume camera control mode.
Scheduling Events
1. Press the Menu button.
2. Select Event Timers.
The information appears on Monitor 1.
3. If this is a new time slot, use the Tracker Ball or Next
button to move the cursor to the Time field, and
continue with step 4. If this is not a new time slot,
move the cursor to Edit Timers, and continue with
step 5.
4. Use the number buttons to enter the 2 digits for the
hour (in 24-hour format) for the event you are
scheduling, then press zoom or focus. Use the
number buttons to enter the 2 digits for the minutes,
then press zoom or focus.
5. The cursor automatically moves to Edit Timers.
Press zoom or focus to select. The Set Event
Timer form appears on the screen.
6. Move the cursor to appropriate day field when you
want the event to run. Enter the number (1-32) for
the pre-defined event, then press zoom or focus.
The events are those defined during the Setting Up
Events procedure.
7. When you have finished scheduling pre-defined
events for this time slot, move the cursor to Previous
Menu then press zoom or focus.
8. Move the cursor to Enable Timer, then press zoom
or focus. The events picked in step 6 will now run at
the scheduled time.
9. If you want to configure pre-defined events for
another time slot, move the cursor to Next Timer,
then press zoom or focus. Repeat steps 3 through 8
for each time slot you want to configure.
10. When you finish scheduling events, press Menu
twice to resume camera control mode.
Clearing Scheduled Events
If you need to stop events from running on a regular
basis, do the following:
1. Press the Menu button.
2. Select Event Timers.
The information appears on Monitor 1.
Is this the time slot that you want to clear? If so,
continue with step 4. Do you want to clear a different
time slot? If so, continue with step 3.
3. Move the cursor to Next Timer, then press zoom or
focus until the time slot you want to clear appears
on line 2.
4. Move the cursor to Clear Timer, then press zoom or
focus.
5. If there are other time slots you want to clear, repeat
steps 3 and 4.

6 QUICK REFERENCE GUIDE
ADTT32E / AD32 ENHANCED TOUCH TRACKE
R
8000-2656-02, REV.
A
6. When finished clearing events, press Menu twice to
return to camera control mode.
Disabling Timed Events
If you need to temporarily stop scheduled events from
running, do the following:
1. Press the Menu button.
2. Select Event Timers.
The information appears on Monitor 1.
Is this the time slot that you want to disable? If so,
continue with step 4. Do you want to disable a
different time slot? If so, continue with step 3.
3. Move the cursor to Next Timer, then press zoom or
focus until the time slot you want to disable appears
on line 2.
4. Move the cursor to Disable Timer, then press zoom
or focus.
5. If there are other time slots you want to disable,
repeat steps 3 and 4.
6. When finished disabling events, press Menu twice to
return to camera control mode.
Changing Scheduled Time Slots
If you need to change the time for scheduled events, do
the following:
1. Press the Menu button.
2. Select Event Timers.
The information appears on Monitor 1.
Is this the time slot that you want to change? If so,
continue with step 4. Do you want to change a
different time slot? If so, continue with step 3.
3. Move the cursor to Next Timer, then press zoom or
focus until the time slot you want to change appears
on line 2.
4. Move the cursor to Change Timer To HH:MM, then
press zoom or focus.
5. Use the number buttons to enter the 2-digit hour in
24-hour format, then press zoom or focus to enter.
Use the number buttons to enter the minutes, then
press zoom or focus to enter.
6. If there are other time slots you want to change,
repeat steps 3 through 5.
7. When finished changing event times, press Menu
twice to return to camera control mode.
American Dynamics, AD, Touch Tracker and the AD logo are
trademarks of Sensormatic Electronics Corporation. Other
product names (if any) mentioned herein may be trademarks
or registered trademarks of other companies.
No part of this guide may be reproduced in any form without
written permission from Sensormatic Electronics Corporation.
BSL 7/99
/