Page is loading ...

V
iew Mana
g
er 16 Plus
USER'S QUICK GUIDE
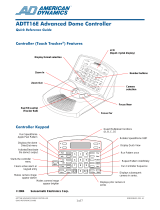
Displays the Dome's ID Code.
Initiates the currently selected
SpeedDome's Apple Peel
pattern.
Toggles the state of the
dome's output.
Invokes the menu.
Displays currently selected
camera number, Quick View
number or Pattern number.
Also displays system prompts
and messages.
Clears the last keypad entry
or active alarm.
Opens or closes the camera's iris,
making the picture on the monitor
appear darker or lighter.
Flips the currently
selected SpeedDome
180° .
Calls up a Quick View.
Calls up video from a specific
camera.
Calls up a Pattern one time.
Repeats a Pattern indefinitely.
Initiates the Sequence.
Enables you to step through
the installed cameras—one at a
time—in sequential order.
Controls the camera's zoom function.
Can be swapped with focus.
Sequences through the available
monitor display modes: 2x2, 3x3,
4x4, and full-screen.
Controls the camera's focus function.
Can be swapped with zoom.
Controls the camera's pan and tilt function.
Also allows you to interface with the menu.
Menu
Calibration
Define Sequence
Setup View
Record Pattern
Alarm Actions
Config Devices
Reset Dome
Select Language
Tog Primary / 2nd
Tog Zoom / Focus
Adjust V-Phase
Show Sys Info
Ping Dome / TTR
Press the Menu button on the keypad to
invoke the menu. This scrollable menu is
displayed on the LCD. Only two menu
selections are visible at one time on the
LCD.
Move the Tracker Ball up and down to
scroll through the menu selections. To
select the item on the top line of the LCD
(in this example Define Sequence), press
the button on the left side of the Touch
Tracker. To select the item on the bottom
line of the LCD (in this example Setup
View) press the button on the right side of
the Touch Tracker.
Apple Peel
The “Apple Peel” is comprised of three
revolutions of camera panning, with tilt
starting at the ceiling line. Each revolution
tilts down approximately 30°. The Apple
Peel will provide you with a complete view
of the area.
APPLE PEEL PATTERN
8000-1011-01, Rev. E CCTV PRODUCTS

User's Quick Guide
View Manager 16 Plus
Select a Camera
Press the number of the camera whose video
you want to display full-screen, then press
Camera.
Sequence through
the Cameras
To display all of the available cameras—one at
a time—in sequential order, press the Previous
and Next buttons. Each time you press Previous,
the previous camera is displayed. Each time
you press Next, the next camera is displayed.
“Flip” the
SpeedDome
To flip the currently selected SpeedDome 180°
in the opposite direction, press Flip.
Run “Apple Peel”
To instruct the currently selected SpeedDome
to run the Apple Peel pattern, press Peel.
The Apple Peel pattern will repeat itself
indefinitely until you issue a camera command
(pan, tilt, zoom or focus) to the dome running
the pattern.
Clear an Alarm
To clear the alarm whose information is
currently displayed on the LCD press Clear.
Control Dome
Outputs
1. Refer to the Dome Input / Output chart to
see which outputs are connected to which
domes, and what the on / off states are for
those domes.
2. Press the number of the camera whose
output you want to turn on or off, then press
Camera.
3. Press the number of the output (1 - 4) that
you want to turn on or off.
4. Press Output On to turn the Output on; press
Output Off to turn the Output off.
Select the Monitor
Display Format
If you are connected to a quad splitter or
multiplexer, you can specify the monitor display
format:
• Full-screen
•
•
•
2X2 (for quad splitters and 4, 9, and 16-
camera multiplexers).
3X3 (for 9 and 16-camera multiplexers)
4X4 (for 16 camera multiplexers)
Press Display to sequence through the available
display formats. For quad splitters, the Display
button switches between Quad A (cameras 1-4)
and Quad B (cameras 5-8).
Display a Quick
View
Note: SpeedDome Ultra III supports 96 views.
Other domes support only 4 views.
1. Press the number of the camera whose
Quick View you want to display, then press
Camera.
2. Press the number of the Quick View you
want to display (1-96), and then press View.
Define a Quick
View
Note: SpeedDome Ultra III supports 96 views.
Other domes support 4 views.
1. On the monitor, display the picture that you
want to create a quick view of.
2. Press Menu.
3. Select Setup View.
4. Press the number buttons (1-96) that you
want to assign to this Quick View, then
press Zoom or Focus to save.
Run a Pattern
1. Press the number of the camera whose
Pattern you want to display, then press
Camera.
2. Press the number of the Pattern you want to
display (1 - 3), then press Pattern (if you
want the pattern to run one time only) or
Repeat Pattern (if you want the Pattern to
repeat itself indefinitely).
If you select a repeating Pattern, the Pattern will
repeat itself until you issue a camera command
(pan, tilt zoom or focus) to the dome running the
Pattern.
Define a Pattern
1. On the monitor, display the picture that you
want to be the starting point of the Pattern.
2. Press Menu and select Record Pattern.
3. Press the number (1 - 3) that you want to
assign to this pattern.
4. Move the camera around, zoom, and focus
as necessary to create a logical camera
pattern.
If you make a mistake during programming
and no longer want to program the pattern,
press Clear.
5. When you are finished creating the pattern,
press Next.
SpeedDome LT Auto
Pan Programming
1. On the monitor, display the picture that you
want to be the starting point of the Auto
Pan.
2. Press Menu and select Record Pattern.
3. Press the number 1 on the keypad.
4. Move camera to the end point, then press
Next.
When you select Pattern 1 for this dome, the
camera will pan smoothly from side-to-side until
another camera command is issued.
Run the Sequence
To initiate the pre-defined Sequence, press Seq.
The Sequence will repeat itself indefinitely until
you press Seq or Clear.
Define the
Sequence
1. Press Menu. Select Define Sequence.
2. Use the Tracker Ball to scroll through the
list of events until the event you want to
define or re-define is displayed on the LCD.
3. In the Cam field, indicate which camera this
event was defined on (use the number
buttons).
4. In the Act field, indicate the kind of Action
you are specifying for this event. Press View
for a Quick View; press Pattern for a Pattern.
For a fixed shot, press Clear to leave this
field blank.
5. If the action is a Quick View or Pattern,
enter the specific Quick View or Pattern
number (use the number buttons).
6. In the Dur field, indicate the duration time
for this event (use the number buttons).
7. Repeat steps 2 through 6 for each event to
be defined in the sequence.
8000-1011-01, Rev. E
/