Rev-A-Shelf 53TM-1850GSCDM2-FL Operating instructions
- Type
- Operating instructions

Top mount
waste container
Top mount
waste container
Top mount
waste container
Top mount
waste container
Top mount
waste container
Top mount
waste container
Top mount
waste container
Top mount
waste container
Top mount
waste container
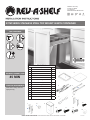
INSTALLATION INSTRUCTIONS: 53TM STAINLESS STEEL TOP MOUNT WASTE CONTAINER
12400 Earl Jones Way
Louisville, KY 40299
rev-a-shelf.com
Customer Service: 800-626-1126
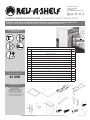
53TM SERIES STAINLESS STEEL TOP MOUNT WASTE CONTAINER
TOOLS REQUIRED:
45 MIN
ESTIMATED ASSEMBLY TIME:
CARE AND MAINTENANCE:
Clean with a damp cloth and
wipe parts dry.
I-53TM-0317
3 4
6
21
7
10
5
8
9
3
32
#2
#2
11 12
Parts List
No. Description Qty
1 Metal Box 1
2 Lid 1
3 Slides 2
4 Slide Covers 2
5 Lid Holders 2
6 Door Mounting Brackets 2
7 Door Mounting Covers 2
8 Plugs 4
9 Waste Bins 2
10 #8x1/2” Pan Head Screws 12
11 #8x5/8” Flathead Screws 8
12 M4x5 Machine Screws 4
13 #6x1/2” Flathead Screws 6
14 1/4-28x1/2” Machine Screws 2
13
14

Customer Service: 800-626-1126 | rev-a-shelf.com
2
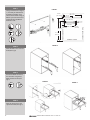
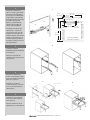
Using measurements in Figure
1, mark and pre-drill holes for
lid holders and slides. Then
attach each lid holder using (3)
#8x1/2” pan head screws and
each slide using (4) #8x5/8”
athead screws.
STEP 1
Place the slide covers over the
slides (See Fig 2).
STEP 2
Extend the slides and mount
the metal box using the (4)
M4x5 machine screws (See
Fig 3).
STEP 3
Place the (4) plugs over the
cylindrical screws (See Fig 4).
STEP 4
FIGURE 1
FIGURE 3
FIGURE 2
FIGURE 4
#2
CABINET FLOOR
CABINET OPENING
CABINET REAR WALL
22-1/4”
(565 mm)
19”
(483 mm)
1-1/2” (38 mm)
1-1/4” (32 mm)
11/16”
(17 mm)
11-5/16”
(287 mm)
9-5/16”
(237 mm)
18-11/16”
(221 mm)
#2
Top mount
waste container
3
32
1-1/4”
(32 mm)

INSTALLATION INSTRUCTIONS: 53TM STAINLESS STEEL TOP MOUNT WASTE CONTAINER 3
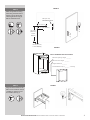
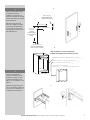
FIGURE 5
FIGURE 7
Mark and pre-drill mounting
holes using measurements in
gures 5 and 6. Attach door
mounting brackets using (6)
#6x1/2” athead screws.
Align the door brackets to the
slide covers and attach with (2)
1/4-28x1/2” machine screws
and washers (See Fig 7).
STEP 5
STEP 6
#2
14-11/16”
(373 mm)
+ Door
Overlay
1-7/8” (48 mm)
2-1/2” (64 mm)
5/8” (16 mm)
BETWEEN HOLES
13/16” (21 mm)
+ Door Overlay
3
32
1) Make sure that your unit is securely installed into your cabinet. Remove the cabinet door and
hinges to begin to mount your door.
2) Using the (4) provided screws and nuts, attach the L-Brackets to your slide.
Note: Depending on your particular basket design L-Bracket will mount on either inside or
outside of wire.
3a) Attach the door brackets to the outside of the L-brackets using the (4) provided screws.
Inside wire shown
4)
Aplique cinta de doble lado a los soportes de la puerta. Sujete la puerta del gabinete a los
soportes mientras trata de mantener la puerta a nivel. No se preocupe si la puerta se mueve un
poco, esto puede ser ajustado. La cinta de doble lado sujetara la puerta en su lugar mientras usted
atornilla los soportes a la puerta del gabinete.
Mettez du ruban adhésif double sur les supports de porte. Fixez la porte de l’armoire aux
supports tout en essayant de maintenir la porte à niveau. Ne vous inquiétez pas si elle n’est pas
tout à fait à niveau, tout cela peut être ajusté. Le ruban adhésif double tiendra la porte en place
pendant que vous vissez les supports sur la porte de l’armoire.
3c) Se proveen espaciadores de plástico si es que los soportes de la puerta necesitan ser extendi-
dos para alcanzar la porción gruesa de la puerta.
Des espaceurs en plastique sont fournis si les supports de porte doivent être étendus plus loin
pour atteindre la partie épaisse de la porte.
3b) Cada puerta de gabinete es diferente, pero asegúrese de que el soporte de la puerta se alinea
con la porción gruesa de la puerta del gabinete. Esto asegurará que los tornillos no se atraviesen ni
dañen su puerta.
Chaque porte d’armoire est diérente, mais assurez-vous que le support de porte s’aligne avec
la partie épaisse de la porte de l’armoire. Cela permettra d’assurer que les vis ne vont pas passer
à travers et endommager votre porte.
Measure Opening Height ________
Measure Door Height ________
Height Difference ________
Divide Difference by 2 ________ = Overlay
FIGURE 6
#2
HOW TO DETERMINE YOUR DOOR OVERLAY:

Customer Service: 800-626-1126 | rev-a-shelf.com
4
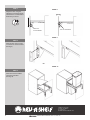
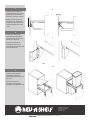
Place the door mount covers
over the door mount brackets
(See Fig 9).
STEP 8
Place the lid on the holders
and insert waste bins.
(See Fig 10).
STEP 9
12400 Earl Jones Way
Louisville, KY 40299
rev-a-shelf.com
Customer Service: 800-626-1126
Adjust the door using the
adjustment screws (See Fig 8)
until the door is centered and
ush with your frame.
STEP 7
FIGURE 8
FIGURE 9
FIGURE 10
VERTICAL
ADJUSTMENT
TILT ADJUSTMENT
#2

INSTALLATION INSTRUCTIONS: 53TM STAINLESS STEEL TOP MOUNT WASTE CONTAINER 5
Top mount
waste container
Top mount
waste container
Top mount
waste container
Top mount
waste container
Top mount
waste container
Top mount
waste container
Top mount
waste container
Top mount
waste container
Top mount
waste container
12400 Earl Jones Way
Louisville, KY 40299
rev-a-shelf.com
Customer Service: 800-626-1126
MONTAJE SUPERIOR DE CONTENEDOR DE BASURA DE ACERO INOXIDABLE DE LAS SERIES 53TM
POUBELLE EN ACIER INOXYDABLE DE LA SERIE 53TM AVEC MONTAGE PAR LE HAUT
45 MIN
I-53TM-0317
3 4
6
21
7
10
5
8
9
3
32
#2
#2
11 12
LISTA DE PARTES / LISTE DES PIÈCES
Descripción / La description
#
1
Caja Metálica / Boîte en métal
1
2
Tapa / Couvercle
1
3
Deslizantes / Coulisses
2
4
Cubiertas Deslizantes / Couvercles des coulisses
2
5
Sujetadores de la Tapa / Supports de couvercle
2
6
Soportes de Montaje para Puerta / Supports de Montage de Porte
2
7
Cubiertas de Montaje para Puerta / Couvercles de Montage de Porte
2
8
Tapones / Fiches
4
9
Contenedores de Basura / Poubelles
2
10
Tornillos de Cabeza de Sartén del #8x1/2” / Vis à tête cylindrique #8x1/2”
12
11
Tornillos de Cabeza plana del #8x5/8” / Vis à tête plate #8x5/8”
8
12
Tornillos de Máquina M4x5 / Vis machine M4x5
4
13
Tornillos de Cabeza Plana del #6x1/2” / Vis à tête plate #6x1/2”
6
14
Tornillos de Máquina de 1/4-28x1/2” / Vis machine 1/4-28x1/2”
2
13
14
INSTRUCCIONES DE INSTALACIÓN / LES INSTRUCTIONS D’INSTALLATION
Herramientas requeridas:
Outils Requis:
Tiempo estimado de ensamblado
Durée de l’installation:
Limpie con un paño húmedo y
seque las partes.
Lubrique los puntos de los
pivotes como sea necesario.
Nettoyer avec un chiffon
humide et essuyer pour sécher
complètement. Lubriez les points de
pivotement si nécessaire
Cuidado/ Entretien:
Page is loading ...

INSTALLATION INSTRUCTIONS: 53TM STAINLESS STEEL TOP MOUNT WASTE CONTAINER 7
5
7
Marque y pre taladre oricios
de montaje usando las
medidas en las guras 5 y 6.
Sujete los soportes de montaje
usando seis tornillos de cabeza
plana del #6x1/2”.
Marquez et pré-percez les
trous de montage en utilisant
les mesures des Illustrations
5 et 6. Fixez les supports de
montage de porte avec 6 vis à
tête plate #6x1/2”.
Alinee los soportes de la
puerta a las cubiertas de los
deslizantes y sujete con dos
tornillos de máquina de 1/4-
28x1/2” y con arandelas (ver la
gura 7).
Alignez les supports de porte
aux couvercles des coulisses et
xez avec 2 vis 1/4-28x1/2” et
rondelles (voir l’Illustration 7).
5
6
14-11/16”
(373 mm)
+ PUERTA
SOBREPUESTA
APPLIQUÉ DE LA
PORTE
1-7/8” (48 mm)
2-1/2” (64 mm)
5/8” (16 mm)
ENTRE ORIFICIOS
ENTRE LES TROUS
13/16” (21 mm)
+
PUERTA SOBREPUESTA
APPLIQUÉ DE LA PORTE
1) Make sure that your unit is securely installed into your cabinet. Remove the cabinet door and
hinges to begin to mount your door.
2) Using the (4) provided screws and nuts, attach the L-Brackets to your slide.
Note: Depending on your particular basket design L-Bracket will mount on either inside or
outside of wire.
3a) Attach the door brackets to the outside of the L-brackets using the (4) provided screws.
Inside wire shown
4)
Aplique cinta de doble lado a los soportes de la puerta. Sujete la puerta del gabinete a los
soportes mientras trata de mantener la puerta a nivel. No se preocupe si la puerta se mueve un
poco, esto puede ser ajustado. La cinta de doble lado sujetara la puerta en su lugar mientras usted
atornilla los soportes a la puerta del gabinete.
Mettez du ruban adhésif double sur les supports de porte. Fixez la porte de l’armoire aux
supports tout en essayant de maintenir la porte à niveau. Ne vous inquiétez pas si elle n’est pas
tout à fait à niveau, tout cela peut être ajusté. Le ruban adhésif double tiendra la porte en place
pendant que vous vissez les supports sur la porte de l’armoire.
3c) Se proveen espaciadores de plástico si es que los soportes de la puerta necesitan ser extendi-
dos para alcanzar la porción gruesa de la puerta.
Des espaceurs en plastique sont fournis si les supports de porte doivent être étendus plus loin
pour atteindre la partie épaisse de la porte.
3b) Cada puerta de gabinete es diferente, pero asegúrese de que el soporte de la puerta se alinea
con la porción gruesa de la puerta del gabinete. Esto asegurará que los tornillos no se atraviesen ni
dañen su puerta.
Chaque porte d’armoire est diérente, mais assurez-vous que le support de porte s’aligne avec
la partie épaisse de la porte de l’armoire. Cela permettra d’assurer que les vis ne vont pas passer
à travers et endommager votre porte.
Mida la Altura de la Apertura / Mesurez la hauteur d’ouverture ________
Mida la Altura de la Puerta / Mesurez la hauteur de la porte ________
Diferencia de la Altura / Différence de hauteur ________
Divida la Diferencia entre 2 / Divisez la
Différence par 2 ________ = Puert-a sobrepuesta / Appliqué de la porte
6
CÓMO DETERMINAR LA PUERTA SOBREPUESTA:
COMMENT DÉTERMINER VOTRE APPLIQUÉ DE PORTE:
Page is loading ...
-
 1
1
-
 2
2
-
 3
3
-
 4
4
-
 5
5
-
 6
6
-
 7
7
-
 8
8


Rev-A-Shelf 53TM-1850GSCDM2-FL Operating instructions
- Type
- Operating instructions
Ask a question and I''ll find the answer in the document
Finding information in a document is now easier with AI
in other languages
Related papers
-
Rev-A-Shelf PSCSL-2414SC-CR-1 Instruction Sheet
-
-
-
-
Rev-A-Shelf 53WC-1527SCDM-217 Installation guide
-
-
-
-
-


