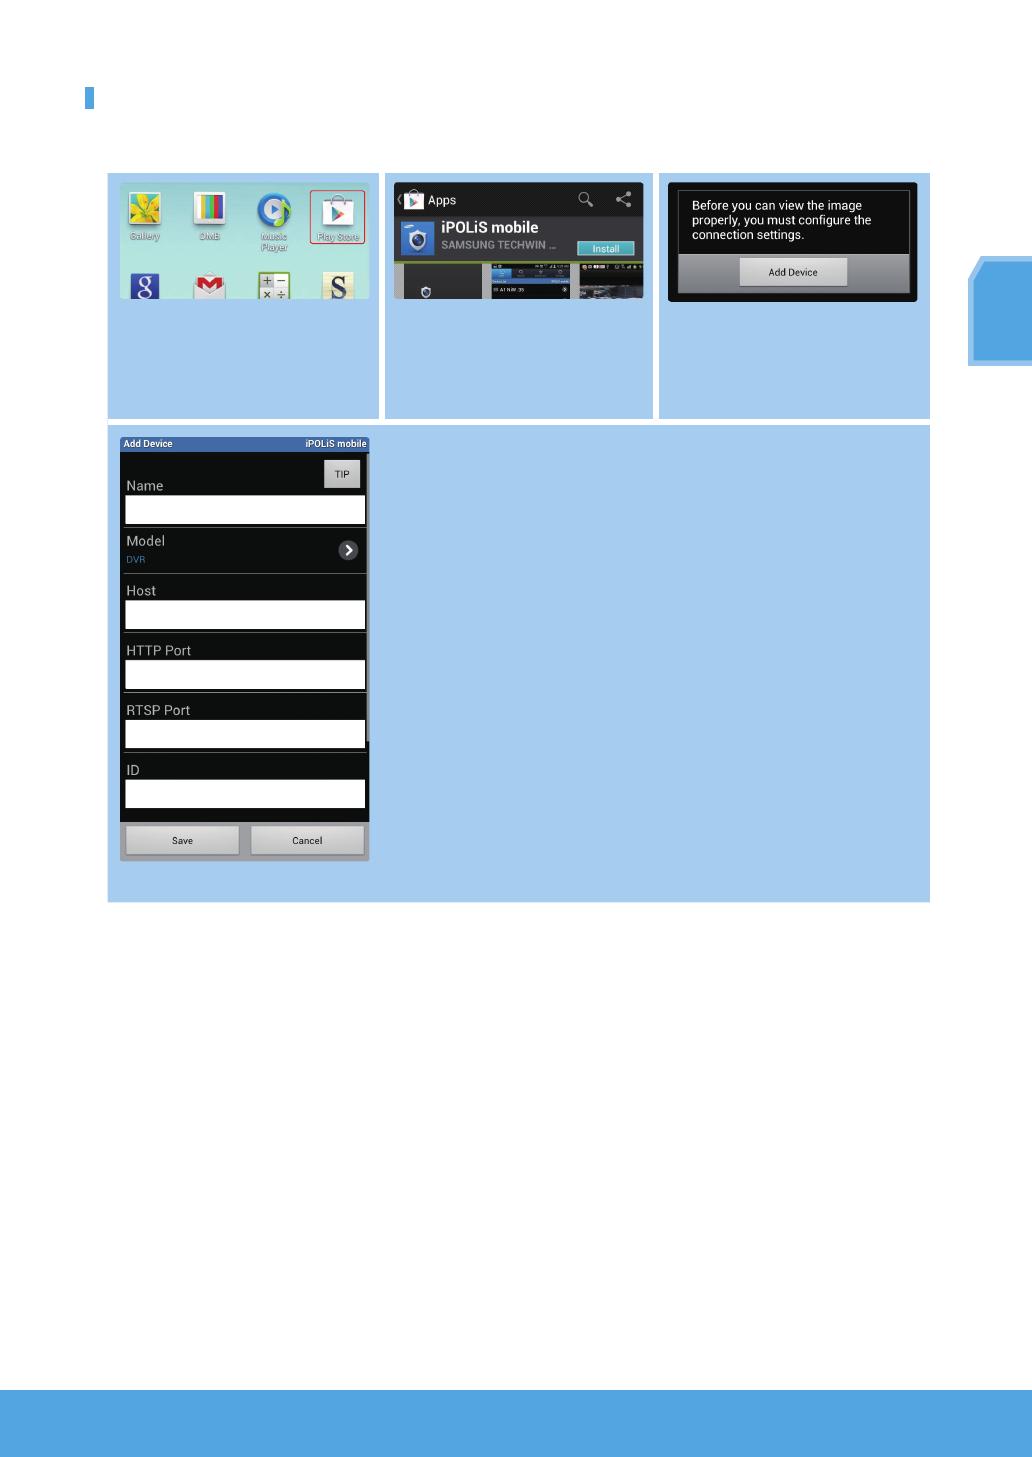
Samsung SDS-P5102 User manual

Category
Security access control systems
Type
User manual
English _1
English
SAMSUNG ALL-IN-ONE SECURITY SYSTEM
KIT MODEL
SDS-P3042
/
P4042
/
P4082/
P5082
/
P5102
/
P5122
DVR MODEL
SDR-3102
/
4102
/
5102
Quick Start Guide
Thank you for purchasing a Samsung DVR Security System.
Follow the simple steps in this guide to set up and start using your new system.
If you have any questions or need help installing your new product please contact our free technical support.
Telephone: 1-877-349-3149
9am - 9pm EST, Monday - Friday
Internet: http://www.samsungsv.com
INSTALLING YOUR SYSTEM
M
` Images may differ depending on the model.
4CH DVR
Front
Rear
1
Connect a mouse
4
Connect the DC adaptors
2
Connect a camera
5
Connect to a network router
3
Connect a monitor
POWER REC NETWORK
1
IN1
IN3
IN4
AUDIO IN
AUDIO OUT
VGA
LAN
IN2
HDMI
eSATA
VIDEO IN
LAN
USB
RS485
DC12V
2
3
4
5
2_ English
8CH DVR
Rear
16CH DVR
Rear
Connecting the DVR to Live monitoring
Front
IN1
IN3
IN4
AUDIO IN
AUDIO OUT
VGA
LAN
IN2
HDMI
eSATA
VIDEO IN
LAN
USB
RS485
DC12V
3
2
4
5
IN1
IN3
IN4
AUDIO IN
AUDIO OUT
VGA
LAN
RS485
IN2
HDMI
DC 12 V
USB
eSATA
VIDEO IN
3
4
2
5
POWER REC NETWORK
1 Connect a mouse
English _3
English
Rear
2 Connect an BNC camera
VGA
LAN
RS485
IN1
CH1 CH2 CH3 CH4 CH5 CH6 CH7 CH8
CH9 CH10 CH11 CH12 CH13 CH14 CH15
IN2
IN3 IN4
AUDIO INVIDEO IN
HDMI DC 12 V
USB
eS ATA
AUDIO OUT
CH16
VGA
LAN
RS485
IN1
CH1 CH2 CH3 CH4
CH5 CH6 CH7 CH8
IN2
IN3 IN4
AUDIO INVIDEO IN
HDMI DC 12 V
USB
eS ATA
AUDIO OUT
VGA
LAN
RS485
IN1
CH1 CH2
CH3 CH4
IN2
IN3 IN4
AUDIO INVIDEO IN
HDMI DC 12 V
USB
eS ATA
AUDIO OUT
4 Connect a monitor
5 Connect the DC adaptors (DVR)
3 Connect the DC adaptors (Camera)
6 Connect to a network router
4_ English
VIEW THE LAUNCHER MENU
The Launcher menu appears on the bottom of the live screen.
1.
In Live mode, right-click to display the context menu and select
<Show Launcher>.
2.
Move the cursor to the bottom and click a desired item in the
Launcher menu.
M
` If no input is entered for 10 seconds, the menu will disappear.
` The Launcher menu can be accessed only by using the mouse.
` Screen mode may vary depending on the DVR supported channel.
1
Date/Time
5
Zoom
9
Play
2
Screen Mode
6
PTZ
0
Record
3
Menu Expansion Button
7
Alarm
4
Audio
8
Freeze
SYSTEM SETTING
Time Setting
1.
Right click on the mouse and select main menu.
2.
In the login window, enter the password and click <OK>.
J The initial administrator ID is admin and the password should be set
when logging in for the first time.
Set password for your wireless network if you use the product with a
wireless router. Being not protected with password or using the default
wireless router password may expose your video data to potential threat.
Please change your password every three months to safely protect
personal information and to prevent the damage of the information theft.
Please, take note that it’s a user’s responsibility for the security and any
other problems caused by mismanaging a password.
3.
Click on Date/Time/Language. Set time and date.
2013-01-01
01:10:25
2013-01-01
01:10:25
1 2 3 4 5 6 7 8 90
English _5
English
4.
After filling in the information, Click <OK>.
Network Setting
Connection Mode
1.
Click on Network and select <Connection Mode>.
If there occur a problem with Connection Mode, check the connection
as “Installing your system” on page 1.
If you still have a problem, contact the nearest service center for more
information.
2.
Under <Interface> Tab.
Check <IP Type> is set to <DHCP> as default.
If it connected successfully, you can see the success comment
J If you know Static IP information from your router, please select
<Static IP> and enter IP address, Gateway, and Subnet Mask etc.
M
`
Please refer to the Router Guide in provided CD when you use a static IP.
3.
Under <Port> Tab.
J Write down <Device Port> and <HTTP Port>.
1 IP Address
2 Device Port 3 HTTP Port
4.
When completing the setting, click <OK>.
1
2
3
6_ English
SETTING UP SAMSUNG iPOLiS DDNS
Since you will be accessing the DVR remotely, let’s setup your Samsung iPolis account first using the PC.
Go to Your PC
1.
Open your browser and go to http://www.samsungipolis.com and click
<LOGIN>.
2.
You first need to create an account.
Click <SIGN UP>.
3.
Follow-the account registration instructions on the website.
4.
After completing the account registration, login to your account.
J Write down your User ID and Password below.
1 ID 2 Password
5.
Add your DVR to your account. Click <PRODUCT REGISTRATION>.
6.
Create a name (Product ID) for your DVR. Use 4 to 20 alphanumeric
characters without spaces. Select classification, model number of the
DVR and click <REGISTRATION>.
J Model Number
4CH DVR : SDR-3102 (SDS-P3042)
8CH DVR : SDR-4102 (SDS-P4042, SDS-P4082)
16CH DVR : SDR-5102 (SDS-P5082, SDS-P5102, SDS-P5122)
7.
After registration, you should see your product in the list.
J Write down the product ID below.
3 Product ID
8.
Click <LOGOUT> to close the Web Page.
1
2
sdr-5102HOME
sdr-5102
sdr-5102HOME
sdr-5102
3
English _7
English
Go back to DVR
1.
From network tab, click on <DDNS>.
2.
Under DDNS Site, select <iPOLiS>.
3.
Under Product ID, enter the product ID you created on the Samsung
iPOLiS website.
Under Quick Connect, select <Use> and click <OK>.
J Write down the DDNS Host address:.
1 DDNS Host Address
If the connection was not successful, your router may not be
supporting UPNP.
For more information on enabling UPNP on your router, please see
User manual.
1
8_ English
REMOTE MONITORING
From a Windows computer
1.
Open Windows Internet Explorer and go to http://www.samsungipolis.
com and click <LOGIN>.
2.
Login with the user ID and password you wrote down earlier.
3.
Click < >.
4.
You will be asked to install the active X plug-in.
5.
Enter the user ID and password for the DVR.
J If the screen to the bottom right does not appear, check if the DVR set is
connected properly with a valid IP address.
6.
Now, you can install the cameras and place the cameras where they are
needed.
sdr-5102HOME
sdr-5102
English _9
English
USING A SMARTPHONE
For Android Phone
1 Visit Play Store to Download the
Samsung iPOLiS mobile app.
SDR-3100
2 Search for Samsung iPOLiS.
3 Launch the iPOLiS mobile app add the
DVR.
Tap on the menu icon and tap <Add
Device>.
SDR-5102
www.samsungipolis.com/sdr-5102
80
4524
admin
4 Register the DVR to the iPOLiS mobile.
J Name : Create a name for the DVR you are adding
Model : Select the DVR
Host : If you are using Samsung iPOLiS DDNS, enter the DDNS Host Address you
wrote down earlier. (Page 6, 7)
It should be www.samsungipolis.com/Product ID
HTTP Port : Enter the HTTP Port you wrote down earlier.
RTSP Port : Enter the last port number of Device Port you wrote down earlier.
ID : Default ID is <admin>. If you change before, please enter changed ID.
Password : If you changed before, please enter changed Password.
Camera : Select the cameras you want to view.
J The initial administrator ID is admin and the password should be set when
logging in for the first time.
Set password for your wireless network if you use the product with a wireless
router. Being not protected with password or using the default wireless router
password may expose your video data to potential threat.
Please change your password every three months to safely protect personal
information and to prevent the damage of the information theft.
Please, take note that it’s a user’s responsibility for the security and any other
problems caused by mismanaging a password.
10_ English
For iPhone
1 Visit App Store to Download the
Samsung iPOLiS mobile app.
Install
SAMSUNG TECHWIN C...
Utilities
2 Search for Samsung iPOLiS. 3 Launch the iPOLiS mobile app add the
DVR.
At the Add Device pop-up, tap <OK>.
SDR-5102
DVR
www.samsungipolis.com/s...
80
4524
4 Register the DVR to the iPOLiS mobile.
M
` For more information of each item, refer to For Android Phone”.
RECORDING AND PLAYBACK
1.
Press the [MENU] button on the remote control.
Use the left/right button (◄►) to select <Record>.
Use the up/down buttons (▲▼) to move to <Recording Schedule>,
and press [ENTER] button.
2.
Set each of the Record Schedule options.
To change the setting, set the channel then select the time and date you
want to record and click <OK>.
The default is as shown.
Color Part Names Functions
White No Recording No schedule / event recording
Orange Continuous Scheduled recording only
Blue Event Event recording only
Green Both(Cont&Evnt) Both scheduled / event recordings
English _11
English
To change the record quality & resolution, select <REC Quality &
Resolution>.
System Record Size Possible FPS
NTSC
CIF 352 × 240
OFF, 1~30
2CIF 704 × 240
4CIF 704 × 480
WD1: 960 x 480
PAL
CIF 352 × 288
OFF, 1~25
2CIF 704 × 288
4CIF 704 × 576
WD1: 960 x 576
3.
In Live mode, click <Search> in the right-click menu.
Select <Time Search> in the <Search> menu.
Select a desired date in the calendar, and a desired timeline in the Time
bar, and press the <Play> button if you want to watch the recorded
video.
J The colored line indicates types of the recording data.
If you want to play a time specific data, enter an exact time.
4.
If you have set the event recording, you can play a desired scene using
the <Event Search> function. In Live mode, click <Search> in the right-
click menu. Select <Event Search> in the <Search> Menu.
Set a desired date in the calendar and the result will be listed on the
table. Select one you wish to view and press the <Play> button.
5.
You can change the play speed or channel, or stop the playback using
the onscreen button bar.
  • Page 1 1
  • Page 2 2
  • Page 3 3
  • Page 4 4
  • Page 5 5
  • Page 6 6
  • Page 7 7
  • Page 8 8
  • Page 9 9
  • Page 10 10
  • Page 11 11

Samsung SDS-P5102 User manual

Category
Security access control systems
Type
User manual

Ask a question and I''ll find the answer in the document

Finding information in a document is now easier with AI