Kofax Process Director AP 7.9 User guide
- Category
- Networking
- Type
- User guide
This manual is also suitable for

PROCESS DIRECTOR
Web Application User Guide
Version: 7.5
Date: 2018-11-16

© 2018 Kofax. All rights reserved.
Kofax is a trademark of Kofax, Inc., registered in the U.S. and/or other countries. All other trademarks are the property of
their respective owners. No part of this publication may be reproduced, stored, or transmitted in any form without the
prior written permission of Kofax.

ReadSoft PROCESS DIRECTOR 7.5 Web Application User Guide
3
Table of Contents
About PROCESS DIRECTOR ..................................................................................................................... 7
Getting started ............................................................................................................................................. 8
Start PROCESS DIRECTOR..................................................................................................................... 8
Worklist ...................................................................................................................................................... 9
Worklist selection screen ......................................................................................................................... 10
Start-up selection screen ......................................................................................................................... 11
Document list ........................................................................................................................................... 12
Document detail ....................................................................................................................................... 13
Use search help ....................................................................................................................................... 14
Use the calendar ..................................................................................................................................... 16
Use text field suggestions........................................................................................................................ 16
Document statuses .................................................................................................................................. 17
Workflow status icons .............................................................................................................................. 17
System messages ................................................................................................................................... 19
Create and edit documents ...................................................................................................................... 20
Create a document .................................................................................................................................. 20
Create a document from an external file ................................................................................................. 20
Edit a document ....................................................................................................................................... 20
Upload line items from an external file .................................................................................................... 21
Entry templates ........................................................................................................................................ 21
Copy a document .................................................................................................................................... 22
Delete a document .................................................................................................................................. 23
Split documents ....................................................................................................................................... 23
Notes, texts and attachments .................................................................................................................. 24
Add and view notes ................................................................................................................................. 24
Add and view texts .................................................................................................................................. 25
Add and view attachments ...................................................................................................................... 26
Check and post documents ..................................................................................................................... 29
Check a document ................................................................................................................................... 29
Reject a document ................................................................................................................................... 29
Post a document ...................................................................................................................................... 30
Link a document to an existing SAP document ....................................................................................... 30
Reverse a document ............................................................................................................................... 31

ReadSoft PROCESS DIRECTOR 7.5 Web Application User Guide
4
Use workflows ........................................................................................................................................... 32
Start a workflow ....................................................................................................................................... 32
Add and remove processors ................................................................................................................... 33
Recall a workflow ..................................................................................................................................... 35
Recall Accounts Payable documents ...................................................................................................... 35
View workflow status ............................................................................................................................... 35
Approve documents ................................................................................................................................. 36
Approve line items ................................................................................................................................... 37
Reject documents .................................................................................................................................... 37
Forward documents ................................................................................................................................. 37
Send and answer queries ........................................................................................................................ 38
Change personal settings ........................................................................................................................ 40
Change user data and password ............................................................................................................ 40
Change user settings ............................................................................................................................... 40
Assign substitutes .................................................................................................................................... 41
Accounts Payable ..................................................................................................................................... 43
About the Worklist ................................................................................................................................... 43
Process documents ................................................................................................................................. 43
View purchase order data........................................................................................................................ 44
View vendor data ..................................................................................................................................... 44
Enter one-time vendor data ..................................................................................................................... 45
Add accounting data ................................................................................................................................ 45
Create invoices ........................................................................................................................................ 46
Save an invoice as a template ................................................................................................................ 46
Accounts Receivable ................................................................................................................................ 48
Create an Accounts Receivable document ............................................................................................. 48
Process Accounts Receivable documents .............................................................................................. 50
Clear a Payment Advice .......................................................................................................................... 50
Archiving .................................................................................................................................................... 52
Process archive documents .................................................................................................................... 52
Asset management ................................................................................................................................... 53
Create an asset acquisition request ........................................................................................................ 53
Create an asset retirement request ......................................................................................................... 54
Create an asset transfer request ............................................................................................................. 55
Customer Orders ....................................................................................................................................... 57

ReadSoft PROCESS DIRECTOR 7.5 Web Application User Guide
5
Process customer orders ......................................................................................................................... 57
Electronic Bank Statements..................................................................................................................... 59
Process electronic bank statements ........................................................................................................ 59
Clear an item ........................................................................................................................................... 60
Financial Postings .................................................................................................................................... 61
Create a financial posting ........................................................................................................................ 61
Change the posting type.......................................................................................................................... 63
G/L Account Postings .............................................................................................................................. 63
Customer Postings .................................................................................................................................. 66
Goods Receipts ......................................................................................................................................... 69
Create a goods receipt ............................................................................................................................ 69
Process goods receipts ........................................................................................................................... 70
Invoice Block and Cancelation ................................................................................................................ 73
Create a block/unblock request ............................................................................................................... 73
Cancel an invoice .................................................................................................................................... 73
Master Data Maintenance ......................................................................................................................... 75
Create an asset master maintenance request ........................................................................................ 75
Create a cost center maintenance request ............................................................................................. 77
Create a customer master maintenance request .................................................................................... 78
General ledger accounts ......................................................................................................................... 80
Create a profit center maintenance request ............................................................................................ 81
Vendors ................................................................................................................................................... 82
Order Confirmations ................................................................................................................................. 86
Create an order confirmation ................................................................................................................... 86
Process order confirmations .................................................................................................................... 87
Payment Approvals ................................................................................................................................... 89
Process payment approvals .................................................................................................................... 89
Requisitions ............................................................................................................................................... 91
Create a requisition document ................................................................................................................ 91
Enter header data .................................................................................................................................... 91
Enter line items ........................................................................................................................................ 92
Enter account assignments ..................................................................................................................... 95
Save a document ..................................................................................................................................... 96

ReadSoft PROCESS DIRECTOR 7.5 Web Application User Guide
6
About this guide
This guide is intended for users who are creating and processing PROCESS DIRECTOR documents in
the Web Application. A separate guide is available for users of the SAP user interface.
Note: PROCESS DIRECTOR can be configured to meet individual customer requirements. This guide
describes a typical PROCESS DIRECTOR installation and therefore the descriptions may not correspond
exactly with your installation. Some features may not be available for all process types, and your user
rights may restrict which features you are allowed to use.

ReadSoft PROCESS DIRECTOR 7.5 Web Application User Guide
7
About PROCESS DIRECTOR
PROCESS DIRECTOR is an application running in SAP that can create, receive and process different
types of business documents in SAP. It can also be accessed via a web browser interface (the
PROCESS DIRECTOR Web Application).
PROCESS DIRECTOR improves your ability to optimize document-driven or request-driven processes in
SAP. Document-driven processes are initiated by the need to process existing documents, usually from
external sources. Examples of such documents are delivery notes, sales orders, remittance advices, etc.
Request-driven processes are initiated by the need to process requests for action, usually from internal
sources. Examples of such requests are purchase requisitions, changes to master data, corrections to FI
postings, etc.
PROCESS DIRECTOR offers the following standard process types:
Accounts Payable
Accounts Receivable
Archiving
Asset Acquisition
Asset Retirement
Asset Transfer
Customer Orders
Electronic Bank Statements
Financial Postings
Goods Receipts
Invoice Block and Cancelation
Master Data Maintenance
Order Confirmations
Payment Approvals
Requisitions
In addition, customers can configure their own process types.

8
Getting started
This chapter explains how to start PROCESS DIRECTOR and provides information about the user
interface.
Start PROCESS DIRECTOR
To start PROCESS DIRECTOR, complete the following steps.
1. In a web browser, enter the PROCESS DIRECTOR address (URL) that is supplied by your system
administrator. It may look similar to the following address:
http://your.intranet:8080/pdweb-app/init.do.
2. In the logon screen, enter your user name and password. These are supplied by your system
administrator. If you already have an SAP user name and password, you can log on with these.
Note: Depending on the configuration of your system, you may be logged on automatically with your
Windows user name and password.
3. If your system has been configured to use more than one language, from the Language selection list,
select the language of the user interface. Default means that the standard PROCESS DIRECTOR
language will be used, and Browser means that the language setting of your web browser will be
used.
4. Click the Log on button.
The PROCESS DIRECTOR start page is displayed.
The start page displays the Worklist and a Quick Start menu, or a selection screen, if these have been
configured. The Quick Start menu provides rapid access to frequently used document lists and actions,
and to your user profile. Which options are available in this menu depends on your system configuration.
If no Quick Start menu is provided, you must click a Worklist category to display and work with
documents. If a selection screen is displayed, you must enter selection criteria.

ReadSoft PROCESS DIRECTOR 7.5 Web Application User Guide
9
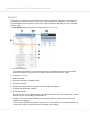
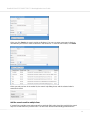
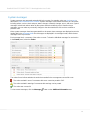
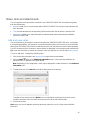
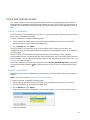
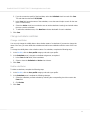
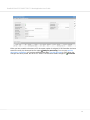
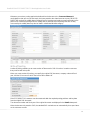
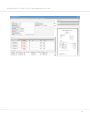
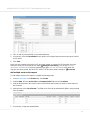
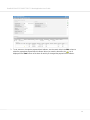
Worklist
The Worklist is a navigation area that allows you to quickly view different categories of documents. The
illustration here shows a sample PROCESS DIRECTOR installation; the categories in your installation
may have different names and there may be more or fewer categories, depending on your configuration
and user rights.
The User profile category enables you to change your personal settings.
1. Refresh the Worklist.
This updates the Worklist, the document list and the document detail view with the latest changes.
Note that changes to a document are not visible to others until the document is saved.
2. Display the start page.
3. Hide the Worklist.
4. Display the Worklist in a floating window.
5. Display the Worklist.
6. Expand and collapse Worklist categories to show or hide subcategories.
7. Currently selected Worklist category.
8. Resize the Worklist.
Move the mouse over the right hand edge of the Worklist area until the cursor changes into a double-
sided arrow, then click and drag to the desired size.
9. Number of documents currently displayed in the Worklist category / Total number of documents
available in this category.
These numbers will differ, for example, if you have filtered the Worklist, or your administrator has set
a limit on the number of documents that are displayed in this category.

ReadSoft PROCESS DIRECTOR 7.5 Web Application User Guide
10
Note that the number of documents in a Worklist category may or may not represent the sum of the
number of documents in its subcategories, depending on how the Worklist is configured and on your
user rights.
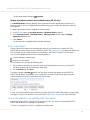
10. Click to open the selection screen to filter the Worklist.
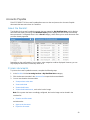
If your system has been configured to access more than one SAP system, the Worklist will be sorted
either by SAP system then process type, or by process type then SAP system.
Worklist sorted by SAP system
Worklist sorted by process type
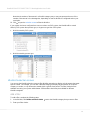
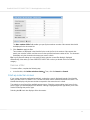
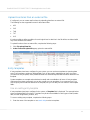
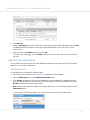
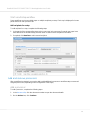
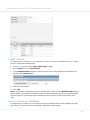
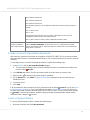
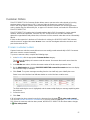
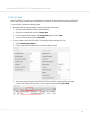
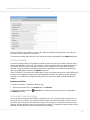
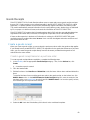
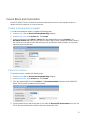
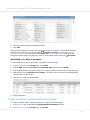
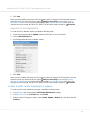
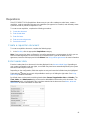
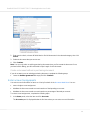
Worklist selection screen
You can use the Worklist selection screen to filter Worklist categories to display only documents that meet
specific criteria. For example, you can filter a Worklist category to display only documents for a specific
company or vendor, or only documents created within a specific time period. The filter criteria that are
available are set by your system administrator. Different filter criteria may be available for different
Worklist categories.
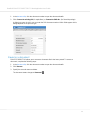
Add a filter
To add a filter, complete the following steps.
1. In the Worklist, click Define selection criteria next to the Worklist category that you want to filter.
2. Enter your filter criteria.

ReadSoft PROCESS DIRECTOR 7.5 Web Application User Guide
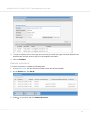
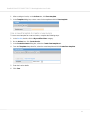
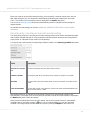
11
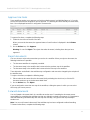
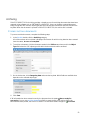
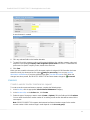
The Max. number of hits field enables you specify the maximum number of documents that should
be displayed in the document list.
3. Click Search to apply the filter.
Two numbers are displayed in the Worklist for the node: the first is the number of documents that
match your selection criteria, and the second is the specified maximum number of hits. The document
list displays only the documents that meet your search criteria.
Tip: In your personal settings you can specify that the selection screen filter dialog is displayed
automatically, either when you start PROCESS DIRECTOR or when you double-click on a Worklist
category.
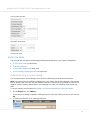
Remove a filter
To remove a filter, complete the following step.
In the Worklist, click Define selection criteria . Then, click first Reset then Search.
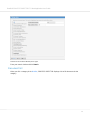
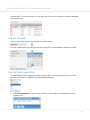
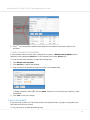
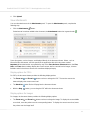
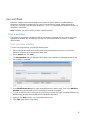
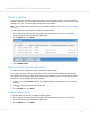
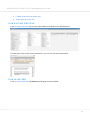
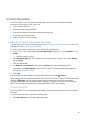
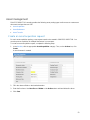
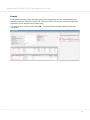
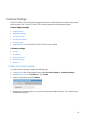
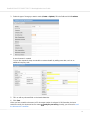
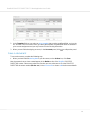
Start-up selection screen
If your system has been configured accordingly, a selection screen is displayed instead of the Worklist
when you start PROCESS DIRECTOR. You must first enter search criteria and execute the search. The
Worklist then displays only documents that correspond to the entered search criteria.
The selection screen lists all the available process types. Select the corresponding check boxes for the
process types you want displayed in the Worklist. Clicking a highlighted process type allows you to enter
criteria for filtering that process type.
Selecting the All check box displays all the documents.


ReadSoft PROCESS DIRECTOR 7.5 Web Application User Guide
13
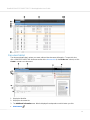
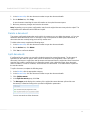
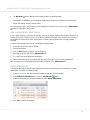
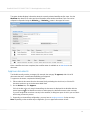
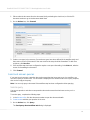
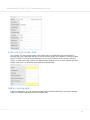
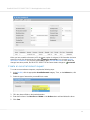
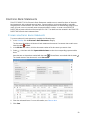
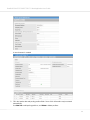
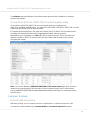
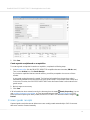
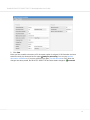
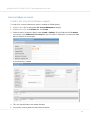
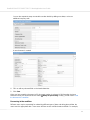
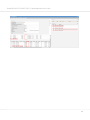
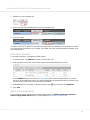
Document detail
The document detail view is where you create, edit and view document information. To open this view,
click a PROCESS DIRECTOR document number in the document list (in the PD doc. no. column) or click
Create to create a new document.
1. Display the Worklist.
2. Display the document list.
3. The Additional information area. What is displayed here depends on which button you click:
Attachments

ReadSoft PROCESS DIRECTOR 7.5 Web Application User Guide
14
Notes
Messages
Audit trail
If attachments or notes are present in the document, the icon has a green border .
Note: Depending on the configuration, notes may be displayed in a table instead of in the Additional
information area.
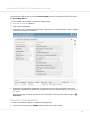
4. Title bar with arrows for browsing to the previous/next documents.
5. Actions bar.
6. Hidden data panel. To hide a panel of data, click on the small arrow to the left of the data panel
name. To display the panel again, click this button.
7. Header data, divided into panels.
Note: Depending on the configuration, the header data may be displayed in tabs instead of data
panels. Also, when there are multiple text area fields in the header, you can configure to display them
as single line input fields, which when you click, display the regular size text area (in a popup).
8. Arrows for browsing through the data panels.
9. Line items Actions bar.
10. Line items.
11. Additional tables, such as Accounts or Purchase order items.
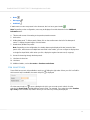
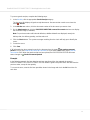
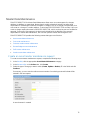
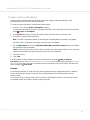
Use search help
Some fields have search help available to assist you in finding the right value. When you click in a field for
which search help is available, the search help icon is displayed.
Click the search help icon to open a dialog box in which you can enter search criteria. Use the
selection list Search help to display different search fields. For example, if you select the option Vendors
by Country in this selection list, fields in which you can search by country are displayed.

ReadSoft PROCESS DIRECTOR 7.5 Web Application User Guide
15
When you click Search, the search results are displayed. You can now enter more search criteria to
narrow down your search or make a selection in the results list. To clear all search fields, click Reset.
When you select an item in the results list, the search help dialog closes and the selected value is
entered in the field.
Add the search result to multiple lines
If several lines need the same value entered in a particular field, select those lines and click the search
help icon on that field in any of those lines. The other lines will also automatically get filled with the

ReadSoft PROCESS DIRECTOR 7.5 Web Application User Guide
16
selected value. To select all the lines, you can select the check box on the header, instead of individually
selecting each line.
Use the calendar
Fields in which dates can be entered display the calendar button.
Click the calendar button and select the date in the calendar. The selected date is entered in the field.
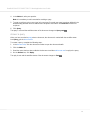
Use text field suggestions
Some text fields provide a suggestion list with the values that you previously entered. When you start
typing in such a field, the suggestion list is automatically displayed.
Select Edit suggestions to open a popup, in which you can modify or reset (delete) the current
suggestion list.

ReadSoft PROCESS DIRECTOR 7.5 Web Application User Guide
17
Select Clear suggestions to clear the list of suggestions for this field.
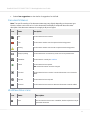
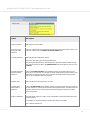
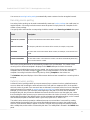
Document statuses
Note: The specific meaning of the document status may vary slightly depending on the process type.
Move the mouse cursor over an icon in the document list to display a tooltip with the exact status
description. Note that some statuses do not apply to all process types.
Icon
Status
Description
New
The document has been created.
Error
The document contains errors that prevent it from being posted.
Warning
The document contains errors that do not prevent it from being posted.
Ready for posting
The document does not contain any errors and can be posted to SAP.
In workflow
The document is currently in a workflow.
Posted
The document has been posted.
Note: Posted documents cannot be changed.
Canceled
The document has been canceled. Canceled documents can no longer be
edited.
Rejected
The document has been rejected.
Reversed
The document has been reversed. Reversed documents cannot be edited.
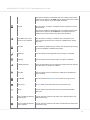
Workflow status icons
Icon
Status
Description
Sent
The document has been sent to a workflow, but the recipient has not yet
opened the document.

ReadSoft PROCESS DIRECTOR 7.5 Web Application User Guide
18
This status is applied to all workflow steps. For example, when the first
step has been approved, the Sent status is displayed when the recipient
of the second step has not yet opened the document.
In work
The document is currently in a workflow and the recipient has opened
the document.
This status is applied to all workflow steps. For example, when the first
step has been approved, the In work status is displayed when the
recipient of the second step has also opened the document.
In workflow, the current
processor is a substitute
The document is currently in a workflow. The current processor is
processing the document in his capacity as substitute for the original
processor.
Overdue
The workflow or workflow step is overdue. The due date for processing
is set in the workflow or workflow step settings.
Approved
The document has been approved and is no longer in a workflow.
Rejected
The document has been rejected and is no longer in a workflow.
Partially approved
Some document items have been approved, others have been rejected.
The document is no longer in a workflow.
Recalled
The document has been recalled from a workflow. The workflow has
been cancelled.
Forwarded
The document has been forwarded to another user for processing.
Query sent
A query about the document has been sent to another user.
Query
A query about the document has been received from the workflow
processor.
Query answered (status for
query sender)
A query has been answered. This status icon is displayed to the user
who sent the query.
Query answered (status for
query recipient)
A query has been answered. This status is displayed to the person who
received the query.

ReadSoft PROCESS DIRECTOR 7.5 Web Application User Guide
19
System messages
System messages are generated automatically by the system, for example, when you check or post a
document or send a document to a workflow. System messages communicate the history of a document,
including actions such as check and post, status changes, ownership changes, errors, and more. System
messages include both actions taken by the system and actions taken by users. Based on these
messages, you can make any necessary changes to the document before it is sent to a workflow or
posted to SAP.
When system messages have been generated for a document, these messages are displayed next to the
header data in the document detail view. Messages are displayed in chronological order, with the latest
messages at the top of the list.
Each message line is a summary of the action or event. To view the individual messages for each action
in the Events panel, select the Action.
The colored icons indicate whether the action that resulted in the message was successful or not:
The action resulted in errors. Documents with errors cannot be posted to SAP.
The action resulted in warnings. Documents with warnings can be posted.
The action was successful.
To view current messages, click the Messages button on the Additional information area.

20
Create and edit documents
This topic briefly explains how to create, copy, edit and delete documents. Detailed information on
creating and editing documents for specific process types can be found in the chapter for the relevant
process type.
Create a document
To create a document, complete the following step.
In the document list, on the Actions bar, click Create.
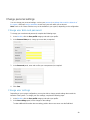
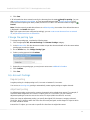
Create a document from an external file
If configured, you can create new PROCESS DIRECTOR documents by uploading data from an external
file. Both header and line item data can be uploaded.
The following external file formats are supported:
ASC
CVS
TAB
TXT
XLS
Note: The system may be configured to upload only line items that fulfil certain conditions.
To create a document from an external file, complete the following steps.
1. Click File upload from list.
2. In the Choose file upload ID popup, upload an external file.
Edit a document
Note: You cannot edit documents that have been posted, that are assigned to a different user in a
workflow, or that are currently being edited by another user.
To edit a document, complete the following steps.
1. In the document list, click the PROCESS DIRECTOR document number (PD doc. no.) to open the
document details.
Page is loading ...
Page is loading ...
Page is loading ...
Page is loading ...
Page is loading ...
Page is loading ...
Page is loading ...
Page is loading ...
Page is loading ...
Page is loading ...
Page is loading ...
Page is loading ...
Page is loading ...
Page is loading ...
Page is loading ...
Page is loading ...
Page is loading ...
Page is loading ...
Page is loading ...
Page is loading ...
Page is loading ...
Page is loading ...
Page is loading ...
Page is loading ...
Page is loading ...
Page is loading ...
Page is loading ...
Page is loading ...
Page is loading ...
Page is loading ...
Page is loading ...
Page is loading ...
Page is loading ...
Page is loading ...
Page is loading ...
Page is loading ...
Page is loading ...
Page is loading ...
Page is loading ...
Page is loading ...
Page is loading ...
Page is loading ...
Page is loading ...
Page is loading ...
Page is loading ...
Page is loading ...
Page is loading ...
Page is loading ...
Page is loading ...
Page is loading ...
Page is loading ...
Page is loading ...
Page is loading ...
Page is loading ...
Page is loading ...
Page is loading ...
Page is loading ...
Page is loading ...
Page is loading ...
Page is loading ...
Page is loading ...
Page is loading ...
Page is loading ...
Page is loading ...
Page is loading ...
Page is loading ...
Page is loading ...
Page is loading ...
Page is loading ...
Page is loading ...
Page is loading ...
Page is loading ...
Page is loading ...
Page is loading ...
Page is loading ...
Page is loading ...
-
 1
1
-
 2
2
-
 3
3
-
 4
4
-
 5
5
-
 6
6
-
 7
7
-
 8
8
-
 9
9
-
 10
10
-
 11
11
-
 12
12
-
 13
13
-
 14
14
-
 15
15
-
 16
16
-
 17
17
-
 18
18
-
 19
19
-
 20
20
-
 21
21
-
 22
22
-
 23
23
-
 24
24
-
 25
25
-
 26
26
-
 27
27
-
 28
28
-
 29
29
-
 30
30
-
 31
31
-
 32
32
-
 33
33
-
 34
34
-
 35
35
-
 36
36
-
 37
37
-
 38
38
-
 39
39
-
 40
40
-
 41
41
-
 42
42
-
 43
43
-
 44
44
-
 45
45
-
 46
46
-
 47
47
-
 48
48
-
 49
49
-
 50
50
-
 51
51
-
 52
52
-
 53
53
-
 54
54
-
 55
55
-
 56
56
-
 57
57
-
 58
58
-
 59
59
-
 60
60
-
 61
61
-
 62
62
-
 63
63
-
 64
64
-
 65
65
-
 66
66
-
 67
67
-
 68
68
-
 69
69
-
 70
70
-
 71
71
-
 72
72
-
 73
73
-
 74
74
-
 75
75
-
 76
76
-
 77
77
-
 78
78
-
 79
79
-
 80
80
-
 81
81
-
 82
82
-
 83
83
-
 84
84
-
 85
85
-
 86
86
-
 87
87
-
 88
88
-
 89
89
-
 90
90
-
 91
91
-
 92
92
-
 93
93
-
 94
94
-
 95
95
-
 96
96


Kofax Process Director AP 7.9 User guide
- Category
- Networking
- Type
- User guide
- This manual is also suitable for
Ask a question and I''ll find the answer in the document
Finding information in a document is now easier with AI
Related papers
-
Kofax Process Director 7.9 User guide
-
-
-
-
-
-
-
-
-
Other documents
-
 DOC-BOX 10111 User manual
-
Horizon Fitness XF40 Exploded Diagram
-
I.R.I.S. IRISPCapture for Invoice USB, 3000Invoices/ year, v8.0, EN Datasheet
-
Microsoft 271-01863 Datasheet
-
Southbend Counter Steamer User manual
-
Canon CR-180 Quick start guide
-
Signify Supply Chain Management Owner's manual
-
Kodak T6000 User manual
-
 DOC-BOX 10118 Specification

