Unitech PA966 User manual
- Category
- Handheld mobile computers
- Type
- User manual
This manual is also suitable for

PP
PP
P
A966 / PA966 / P
A966 / PA966 / P
A966 / P
A967A967
A967A967
A967
PP
PP
P
oror
oror
or
table Ttable T
table Ttable T
table T
erminalerminal
erminalerminal
erminal
User's ManualUser's Manual
User's ManualUser's Manual
User's Manual

PA966/967 User's Manual
Software Keyboard (Windows CE Keyboard) . . . . . . . . . . . . . . . . . . . . . . 11
Using the Built-In Scanner . . . . . . . . . . . . . . . . . . . . . . . . . . . . . 12
Scan2Key . . . . . . . . . . . . . . . . . . . . . . . . . . . . . . . . . . 12
Modifying the Scanner Settings . . . . . . . . . . . . . . . . . . . . . . . . . . . 12
Settings . . . . . . . . . . . . . . . . . . . . . . . . . . . . . . . . . 13
Bar Code Symbologies . . . . . . . . . . . . . . . . . . . . . . . . . . . 13
2D Symbologies . . . . . . . . . . . . . . . . . . . . . . . . . . . . 14
Data Options . . . . . . . . . . . . . . . . . . . . . . . . . . . . . 14
Prefix . . . . . . . . . . . . . . . . . . . . . . . . . . . . . . . 14
Suffix . . . . . . . . . . . . . . . . . . . . . . . . . . . . . . . 14
Replace Suffix with Carriage Return . . . . . . . . . . . . . . . . . . . . . 15
Transmit Function Code . . . . . . . . . . . . . . . . . . . . . . . . . 15
Proximity Reading Options . . . . . . . . . . . . . . . . . . . . . . . . . 15
Scanning Options . . . . . . . . . . . . . . . . . . . . . . . . . . . . .15
Imaging Options . . . . . . . . . . . . . . . . . . . . . . . . . . . . .16
Power Management Options . . . . . . . . . . . . . . . . . . . . . . . . . 16
Timeout To Sleep . . . . . . . . . . . . . . . . . . . . . . . . . . . 16
Imager Idle Timeout . . . . . . . . . . . . . . . . . . . . . . . . . . 16
Illumination Intensity . . . . . . . . . . . . . . . . . . . . . . . . . . 16
Chapter 1. - Introduction . . . . . . . . . . . . . . . . . . . . . . . . . . . . . . . 1
Unitech PA966 & Accessories . . . . . . . . . . . . . . . . . . . . . . . . . . . 2
Tour of the Unitech PA966 . . . . . . . . . . . . . . . . . . . . . . . . . . . . . 3
First Steps with the Unitech PA966 . . . . . . . . . . . . . . . . . . . . . . . . . 4
. . . . . . . . . . . . . . . . . . . . . . . . . . . . 6First Operation of the PA966
Chapter 2. - Using the Keypad and Scanner . . . . . . . . . . . . . . . . . . . . . . . . 9
Keypad . . . . . . . . . . . . . . . . . . . . . . . . . . . . . . . . . . . 9
Enable Log . . . . . . . . . . . . . . . . . . . . . . . . . . . . . 17
Re-Open Scanner After Resume Power . . . . . . . . . . . . . . . . . . . 17
Power On Delay . . . . . . . . . . . . . . . . . . . . . . . . . . . . 17
Miscellaneous Options . . . . . . . . . . . . . . . . . . . . . . . . . . . 17
Auto-Scan . . . . . . . . . . . . . . . . . . . . . . . . . . . . . . 18
Show Data Only . . . . . . . . . . . . . . . . . . . . . . . . . . . . 18
1D Scanning . . . . . . . . . . . . . . . . . . . . . . . . . . . . . .18
Test . . . . . . . . . . . . . . . . . . . . . . . . . . . . . . . . . . . 18
Opening the Windows CE Keyboard. . . . . . . . . . . . . . . . . . . . . . . . 11
Keying-in Characters . . . . . . . . . . . . . . . . . . . . . . . . . . . . . 11
International Character Support
. . . . . . . . . . . . . . . . . . . . . . . . . 11
Moving the Keyboard
. . . . . . . . . . . . . . . . . . . . . . . . . . . . . 11
Closing the Keyboard
. . . . . . . . . . . . . . . . . . . . . . . . . . . . . 11
Press the ON/OFF Key
. . . . . . . . . . . . . . . . . . . . . . . . . . . . 6
Adjust Screen Brightness
. . . . . . . . . . . . . . . . . . . . . . . . . . . 6
Calibrate the PA970 . . . . . . . . . . . . . . . . . . . . . . . . . . . . . 6
Set Time Zone, Date, and Time . . . . . . . . . . . . . . . . . . . . . . . . . 7
Flash Memory
. . . . . . . . . . . . . . . . . . . . . . . . . . . . . . . 8
Keypad Layout
. . . . . . . . . . . . . . . . . . . . . . . . . . . . . . . 10
Useful Hotkeys
. . . . . . . . . . . . . . . . . . . . . . . . . . . . . . . 11
Installing the Battery Pack
. . . . . . . . . . . . . . . . . . . . . . . . . . . 4
Supplying Power to the PA966 . . . . . . . . . . . . . . . . . . . . . . . . . 5
Charging the Main and Backup Batteries for the First Time
. . . . . . . . . . . . . . . 5
Using the Stylus . . . . . . . . . . . . . . . . . . . . . . . . . . . . . . 6
Protective Screen Film
. . . . . . . . . . . . . . . . . . . . . . . . . . . . 6

PA966/967 User's Manual
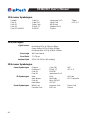
Laser Information . . . . . . . . . . . . . . . . . . . . . . . . . . . . . . . . . 49
European Conformity Statement . . . . . . . . . . . . . . . . . . . . . . . . . . . . 49
Canadian Compliance Statement . . . . . . . . . . . . . . . . . . . . . . . . . . . . 49
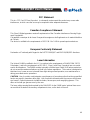
FCC Statement
. . . . . . . . . . . . . . . . . . . . . . . . . . . . . . . . . .
49
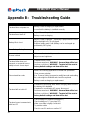
Appendix B - Troubleshooting Guide. . . . . . . . . . . . . . . . . . . . . . . . . . . 48
Appendix A - Technical Specifications . . . . . . . . . . . . . . . . . . . . . . . . . . 43
Reset Sequence Number . . . . . . . . . . . . . . . . . . . . . . . . 19
Show Sequence Number . . . . . . . . . . . . . . . . . . . . . . . . 19
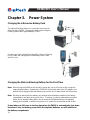
Chapter 3. - Power System . . . . . . . . . . . . . . . . . . . . . . . . . . . . . . 24
Charging the Lithium-Ion Battery Pack . . . . . . . . . . . . . . . . . . . . . . . . 24
Charging the Main and Backup Battery for the First Time . . . . . . . . . . . . . . . . . . 24
25Power Status Indication. . . . . . . . . . . . . . . . . . . . . . . . . . . . . .
Checking Main and Backup Battery Status . . . . . . . . . . . . . . . . . . . . . . .26
How to Save Battery Power . . . . . . . . . . . . . . . . . . . . . . . . . . . . 26
Backlight Setting . . . . . . . . . . . . . . . . . . . . . . . . . . . . . . . . 27
Warm Boot / Cold Boot . . . . . . . . . . . . . . . . . . . . . . . . . . . . . . 27
Charging Considerations . . . . . . . . . . . . . . . . . . . . . . . . . . . . . 28
Storage and Safety Precautions . . . . . . . . . . . . . . . . . . . . . . . . . . . 28
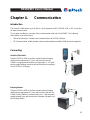
Chapter 4. - Communication . . . . . . . . . . . . . . . . . . . . . . . . . . . . . 29
Introduction . . . . . . . . . . . . . . . . . . . . . . . . . . . . . . . . . . 29
Connecting . . . . . . . . . . . . . . . . . . . . . . . . . . . . . . . . . . 29
ActiveSync . . . . . . . . . . . . . . . . . . . . . . . . . . . . . . . . . . 30
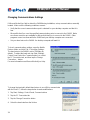
Changing Communications Settings . . . . . . . . . . . . . . . . . . . . . . . . . 34
Synchronization . . . . . . . . . . . . . . . . . . . . . . . . . . . . . . . . 35
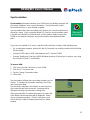
Installing and Removing Software . . . . . . . . . . . . . . . . . . . . . . . . . . 37
InBox . . . . . . . . . . . . . . . . . . . . . . . . . . . . . . . . . . . . 37
Save to File . . . . . . . . . . . . . . . . . . . . . . . . . . . . . 20
Clear Window. . . . . . . . . . . . . . . . . . . . . . . . . . . . . 20
Enable Scan . . . . . . . . . . . . . . . . . . . . . . . . . . . . . 21
2D Scanning . . . . . . . . . . . . . . . . . . . . . . . . . . . . . .21
Auto-Scan . . . . . . . . . . . . . . . . . . . . . . . . . . . . . . 21
Image Scanning . . . . . . . . . . . . . . . . . . . . . . . . . . . . 22
Save Image . . . . . . . . . . . . . . . . . . . . . . . . . . . . . 22
To Kpd . . . . . . . . . . . . . . . . . . . . . . . . . . . . . . . . . . 22
Scan2Key . . . . . . . . . . . . . . . . . . . . . . . . . . . . . . .22
Version . . . . . . . . . . . . . . . . . . . . . . . . . . . . . . . . . . 23
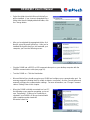
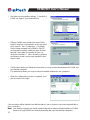
Installing Microsoft ActiveSync
. . . . . . . . . . . . . . . . . . . . . . . . . . 30
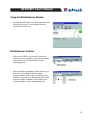
Using the Mobile Devices Window
. . . . . . . . . . . . . . . . . . . . . . . . . . 33
Mobile Devices Features
. . . . . . . . . . . . . . . . . . . . . . . . . . . . 33
What Gets Synchronized
. . . . . . . . . . . . . . . . . . . . . . . . . . . 36
Changing Synchronization Options
. . . . . . . . . . . . . . . . . . . . . . . . 36
Sending and Receiving E-Mail with InBox
. . . . . . . . . . . . . . . . . . . . . . 37
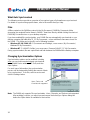
Sending Mail Remotely . . . . . . . . . . . . . . . . . . . . . . . . . . . . 38
Setting Up Remote Mail
. . . . . . . . . . . . . . . . . . . . . . . . . . . . 38
Work Remotely
. . . . . . . . . . . . . . . . . . . . . . . . . . . . . . . 38
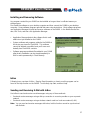
Receiving Messages
. . . . . . . . . . . . . . . . . . . . . . . . . . . . . 39
Sending Messages
. . . . . . . . . . . . . . . . . . . . . . . . . . . . . 39
Wireless Communication . . . . . . . . . . . . . . . . . . . . . . . . . . . . . 40
Bluetooth Setup
. . . . . . . . . . . . . . . . . . . . . . . . . . . . . . . 40
Bluetooth ActiveSync
. . . . . . . . . . . . . . . . . . . . . . . . . . . . . 41

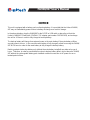
NOTICE
This unit is equipped with a battery pack and backup battery. It is possible that the Unitech PA966/
967 may not immediately power-on due to battery discharge as a result of storage.
In the above situation, plug the PA966/967 to the RS232 or USB cable, or place the unit into the
Unitech PA966/967 Cradle (with 12V/2A AC-DC adapter, part number 1010-601478), and recharge
the unit for 16 hours in order to fully charge its backup battery.
The backup battery will charge from external power or the main battery if the main battery still has
enough power to turn on. In the event the main battery is fully charged, refrain from using the PA966/
967 for 16 hours in order for the main battery to fully charge the backup battery.
Backing-up data via backup battery only (without the main battery installed) may take as long as 4
hours. Therefore, in order to prevent data loss due to backup battery failure, do not leave the PA966/
967 without the rechargeable battery pack installed or without connection to AC power for an ex-
tended period of time.
PA966/967 User's Manual

1
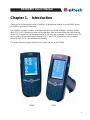
PA966/967 User's Manual
Thank you for purchasing the Unitech PA966/967 (subsequently referred to as the PA966, unless
the PA967 is specifically referenced).
Your PA966 is a rugged, compact, and lightweight palm-size mobile computer. It utilizes the Win-
dows CE 4.2 .NET operating system, and incorporates either an internal laser bar code scanning
device (for 1D scanning) or an imaging module (for 2D scanning or imaging) as well as a color LCD
touch screen, a 36 key alphanumeric keypad, and CF and PCMCIA expansion slots to support
Bluetooth, WiFi, GPRS, and additional functionality.
This product reference guide will assist in the setup and use of your PA966.
Chapter 1. Introduction
PA966
PA967

2
PA966/967 User's Manual
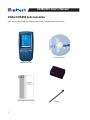
Unitech PA966 & Accessories
After opening the PA966 box, please make sure the following items are present:
Battery Pack
User Guide CD
Stylus
PA966 Main Unit
Quick Reference Guide

3
PA966/967 User's Manual
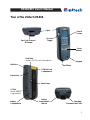
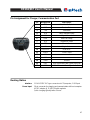
Tour of the Unitech PA966
Keypad
Touch
Screen
Bar Code Scanner /
2D Imager
Cursor
Buttons
Scanner
Trigger
On/Off Key
Stylus
Cold Start
(inside PCMCIA Card Compartment)
IrDA Port
Reset Hole
CF Slot
(inside Battery
Compartment)
PCMCIA Card
Compartment
Hand Strap
Battery
Compartment
Latches
Battery
Compartment
Charging /
Communication Port

4
PA966/967 User's Manual
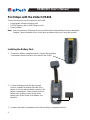
Position the battery pack with the recessed
contacts towards the bottom right side of the
battery (to line up with the battery contacts in the
battery compartment). Insert and fully seat the
battery pack, making sure the shape of the
battery pack fits the shape of the battery com-
partment.
2.
3. Re-attach the battery compartment door with the battery compartment latches.
First Steps with the Unitech PA966
There are three ways to provide power to the PA966:
Note:
Docking Station
•
RS232/Charging cable or USB/Charging cable
•
Rechargeable Lithium-Ion battery pack
•
Installing the Battery Pack
Remove the battery compartment door using the flip-out battery
compartment latches located on the bottom of the PA966.
1.
Data you enter may not be properly stored until the built-in backup battery has been adequately
charged. Please remember to turn on the back-up battery before you charge the terminal.

5
PA966/967 User's Manual
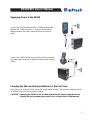
Or place the PA966 into the Docking Station, after connecting
the power supply between an electrical outlet and the Docking
Station.
Connect the RS232/Charging Cable or USB/Charging Cable
between the PA966 and your PC, and then connect the AC
adapter between the cable’s power jack and an electrical
outlet.
Supplying Power to the PA966
Charging the Main and Backup Batteries for the First Time
It may take up to 16 hours to fully charge the empty backup battery. The first time charge should be
for at least 16 hours to insure a proper charge.
CAUTION: Operating the PA966 for the first time without the AC adapter, and without fully
charging the backup battery may result in loss of data stored in RAM memory.

6
PA966/967 User's Manual
Protective Screen Film
The PA966 screen ships with a protective plastic film. You may remove this if desired by peeling
from one corner. The screen will be more susceptible to scratching without the film, but will be more
readable, and the touchscreen will work better.
First Operation of the Unitech PA966
Press the ON/OFF Key
The Unitech PA966 welcome screen appears. The Windows CE
®
screen
will appear shortly thereafter.
Adjust Screen Brightness
Press [FUNC] key and Cursor key to increase or increase screen brightness.
Using the Stylus
CAUTION:
To write data into a field on a form, use the stylus to print the letters
or numbers. Use very light pressure.
3.
To make a choice from a menu, lightly tap the tip of the stylus on
that choice.
2.
Hold the stylus as you would a pencil.1.
Never use anything other than the PA966’s stylus on the screen.
Using another object as a stylus could cause permanent damage.
Calibrate the PA966
The PA966 will prompt you to calibrate the unit by tapping a sequence of
screen locations. Tap gently but firmly. When you have completed the
series of taps, press the [ENT] key to confirm it or press the [ESC] key to
cancel it.
This screen will automatically appear when the unit is powered-on for the
first time or after the system is reset. This screen can also be accessed
at any time by pressing the hot key [FUNC] and the [ESC] key.

7
PA966/967 User's Manual
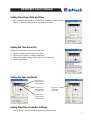
Exiting Date/Time Properties Settings
Tap OK or the X (cancel) button at upper-right corner to exit.
Setting the Year and Month
Tap here to
popup a list
of months
Setting Time Zone, Date, and Time
After Calibrating the PA966, the “Date/Time Properties” dialog box will
appear. Follow the steps below to set the date and time.
Setting the Time Zone first
Follow the steps below to set up your time zone.
1. Tap the location arrow to see a list of cities.
2. Choose your location (or nearest listed one).
3. Select the Daylight Savings Time check box, if necessary.
4. Tap the Apply button.
Tap the Left or
Right arrows to
scroll the month
Tap here to
directly change
the year setting
Tap the up or
down arrows to
scroll the year

8
PA966/967 User's Manual
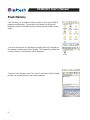
Flash Memory
Flash Memory is a re-writable location in which to store up to 64 MB of
programs and data files. The benefit of this feature is that files and
programs saved in Flash Memory are unaffected by the PA966’s power
status.
To access the contents of Flash Memory, simply select My Computer on
the desktop and then select Flash Storage. The programs and data files
currently stored in Flash Memory will be displayed.
To save to Flash Storage, select File, Save To, and select Flash Storage
just like you would select any other storage medium.

9
PA966/967 User's Manual
Chapter 2.
[ENT]
The Enter key is used to initiate a process or confirm a selection made by
the user.
[TAB]
The Tab key is used to toggle between data fields or to place the cursor at
pre-determined places in a programming or word processing application.
[FUNC]
The Function key is used to perform alternative key functions.
[ Back space] The Backspace key is used to erase previously input characters.
[ESC]
The Escape key will perform the same function as tapping the CANCEL
button or the X icon on the touch screen.
ON/OFF
When the unit is off, pressing the ON/OFF key will turn the unit on.
Alternatively, when the unit is on, this key must be pressed and held down
for about two seconds in order to turn the unit off.
[Alpha]
The Alpha key is used to toggle between Numberic and Alpha Mode.
Use the Func key to toggle caps in Alpha Mode.
[Cursor]
The Cursor key is used to navigate among applications.
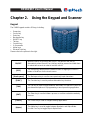
Using the Keypad and Scanner
Please refer to the picture to the right.
•
•
•
•
•
•
•
•
•
•
Keypad
The PA966 keypad contains 36 keys, including:
Esape key
Cursor key
Enter key
Backspace key
ON/OFF key
Tab key
Function key
0~9 numerals
Alpha keys
Decimal Point key

10
PA966/967 User's Manual
Keypad Layout
When the PA966 boots, the default condition is Alpha Mode off.
When the Apha Mode is toggled on, use the Func key to toggle caps on and off.
1
a
2
b
3
c
d
4
e
5
f
6
g
+
h
%
i
BkS
p
Key
7
j
8
k
9
l
-
m
.
n
@
o
0
p
(
q
*
r
[
s
t
"
u
,
v
[
w
/
x<
y
=
z
Del
Esc
Ente
r
Position
Escape
Func Up
Alpha Off (default)
Backspace
Enter
1
2
3
Tab
4
5
6
+
%
7
8
9
-
.
@
0
(
*
Space
“
,
[
/
<
=
Delete
Backspace
Escape
Enter
Backspace
Escape
Enter
Backspace
Escape
Enter
Func UpFunc Down Func Down
Alpha On
F1
F2
F3
`
F4
F5
F6
^
Backlight
F7
F8
F9
_
;
!
$
)
#
Space
‘
?
]
\
>
&
~
a
b
c
d
e
f
g
h
i
j
k
l
m
n
o
p
q
r
s
t
u
v
w
x
y
z
A
B
C
D
E
F
G
H
I
J
K
L
M
N
O
P
Q
R
S
T
U
V
W
X
Y
Z

11
PA966/967 User's Manual
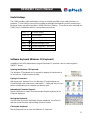
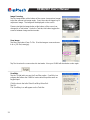
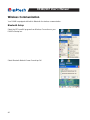
Software Keyboard (Windows CE Keyboard)
In addition to the 966’s alphanumeric keypad, Windows CE provides a touch screen keypad in
QWERTY format.
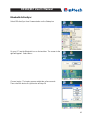
Closing the Keyboard:
Tap the keyboard icon to close the Windows CE keyboard.
Moving the Keyboard:
Use the stylus to point to the title bar (the bar displaying “Input Panel”)
and then move the stylus without lifting it from the screen.
International Character Support:
Tap the [áü] button to switch from the standard English keyboard to the
European keyboard.
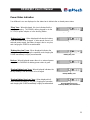
Useful Hotkeys
The PA966 provides eight combination hot keys to activate specified screen setting functions or
programs. These hotkeys are useful for toggling the backlight and adjusting screen contrast when
the menu-driven operation is disabled. Below is the list of hotkeys. To use them, press and hold the
[FUNC] key in combination with the corresponding second key.
Func + 7
Func + 8
Func + 9
Func +
Func +
Func +
Func +
Scanner setting
Power status
System information
LCD backlight on/off
Keypad backlight on/off
Display brightness - increase
Display brightness - decrease
Keying-in Characters:
After tapping the “keyboard” icon, the Windows CE keyboard pops up.
Character input is the same as on a standard PC. Simply tap the on-screen
button corresponding to the character you want to input.
Opening the Windows CE Keyboard:
The Windows CE keyboard can be opened by tapping the keyboard icon
on the task bar. (Refer to picture at right).

12
PA966/967 User's Manual
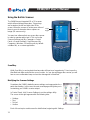
Using the Built-in Scanner
You must run software that can access the scanner
in order to operate and/or test it. This can be the
Scanner Settings tool (My Computer > Control
Panel > Scanner Settings), Scan2Key.exe (My
Computer > Windows > Scan2Key.exe; by default
a hidden file), or a custom application.
The PA966 has an integrated 1D or 2D scanner
which will read all major barcodes. Trigger keys
are located on the left and right sides of the
screen. When the scanner is active press either of
these to scan for barcode data or capture an
image (2D scanner only).
Left
Trigger
Right
Trigger
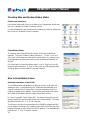
Scan2Key
While Scan2Key is running data from barcodes will input as a keypad entry. To test, open the
WordPad text editor and note the cursor location. As you aim and trigger the scanner you will
hear a scan confirmation beep and see the data appear in WordPad.
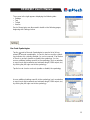
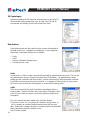
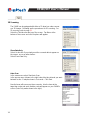
Modifying the Scanner Settings
Sometimes the PA966’s default scanner settings are inappropriate for a
particular situation. In this case, the next several pages will guide you in
customizing you PA966’s scanner output.
In Control Panel, click Scanner Settings to run the settings utility.
The screen to the right appears with the following tabs:
Each of these topics are discussed in detail below, beginning with Settings.
Settings
Test
To Kpd
Version
•
•
•
•

13
PA966/967 User's Manual
Each of these topics are discussed in detail on the following pages,
beginning with Settings, below.
The screen to the right appears displaying the following tabs:
Settings
Test
To Kpd
Version
•
•
•
•
Access additional settings specific to the symbology (such as whether
to send check digit, maximum and minimum length, ISBN output, etc.)
by clicking the plus sign next to the symbology.
Tap the box to check or uncheck (enable or disable) the symbology.
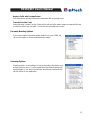
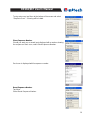
Bar Code Symbologies
Tap the + next to Barcode Symbologies to reveal a list of all sup-
ported 1D barcode symbologies. A check in the box next the symbol-
ogy indicates it is currently enabled (i.e. can be scanned.) Tap the box
to check or uncheck (enable or disable) the symbology. You can
access additional settings specific to the symbology (such as whether
to send check digit, maximum and minimum length, ISBN output, etc.)
by clicking the plus sign next to the symbology.

14
PA966/967 User's Manual
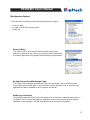
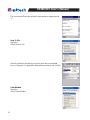
Prefix
Double click on Prefix to setup a special string that will be output before every scan. This can be
any alphanumeric string or a special character (see Suffix below). For alphanumeric strings
simply type the characters into the text field. Special characters like Tab use brackets surround-
ing a letter to indicate what the prefix should be. For example a Tab would be <t> (see picture
for chart of special characters that appears on screen while entering prefix).
Key in the special character stated in the Set Data window.
For instance, enter “<r>” (no quotes) to include a carriage return, or
“<t>” (no quotes) to include a tab before and/or after the bar code
data. Enter text or numbers directly if you want the bar code preceded
and/or followed by specific numbers or text.
Tap OK when finished.
Suffix
Suffix is set up exactly like prefix, but follows immediately after the
scanned data. Please note that suffix comes before Terminator, which
is the very last character output (see Scanning Options below to set
Terminator).
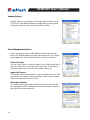
Data Options
Data Options deals with the output from the scanner that applies to
the data of all scans - regardless of symbology - or even magnetic
stripe data. Data option settings are as follows:
•
•
•
•
Prefix
Suffix
Replace suffix with carriage return
Transmit function code
Symbology settings for 2D barcodes work the same as those for 1D.
Take note that some symbologies such as EAN have 1D and 2D
counterparts and settings for one will not effect the other.
2D Symbologies

15
PA966/967 User's Manual
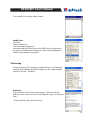
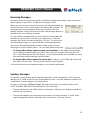
Transmit Function Code
Some barcodes contain Function Codes which will cause the reader output a command like tab
or new line, rather than just data. Check this box to enable these codes.
Replace Suffix with Carriage Return
Check this box to quickly overwrite the terminator with a carriage return
If you have installed a proximity reader module into your PA966 you
can use this option to enable and disable the reader.
Proximity Reading Options
Scanning Options
Scanning options cover settings for the functionality of the reader such
as timing and accuracy. For most applications the default settings will
be appropriate, if you want to know more about these settings please
call our offices for an explanation

16
PA966/967 User's Manual
Imaging Options
Imaging options cover settings for the image capture features of the
2D scanner. Again default settings are appropriate for most applica-
tions and should you wish to know more call our offices.
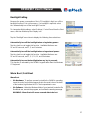
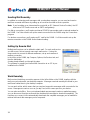
Imager Idle Timeout
This setting controls how long after a scan the reader will go into “idle”
mode which is in between active and sleep in terms of power usage.
Return from idle mode is nearly instant.
Power Management Options
Power management options affect battery life and scanner perfor-
mance, the default settings are usually appropriate but if you require
greater battery life from your device this is one way to achieve it.
Timeout To Sleep
You can set this option to have the reader go into “sleep mode” which
uses less power after not being used for some time. There will be a
slight delay before the next scan as the reader “wakes up.”
Illumination Intensity
This setting controls how bright the light used to scan barcodes will
be. Lowering this value will decrease scanner performance (distance
and time) but increase battery life.
Page is loading ...
Page is loading ...
Page is loading ...
Page is loading ...
Page is loading ...
Page is loading ...
Page is loading ...
Page is loading ...
Page is loading ...
Page is loading ...
Page is loading ...
Page is loading ...
Page is loading ...
Page is loading ...
Page is loading ...
Page is loading ...
Page is loading ...
Page is loading ...
Page is loading ...
Page is loading ...
Page is loading ...
Page is loading ...
Page is loading ...
Page is loading ...
Page is loading ...
Page is loading ...
Page is loading ...
Page is loading ...
Page is loading ...
Page is loading ...
Page is loading ...
Page is loading ...
Page is loading ...
Page is loading ...
-
 1
1
-
 2
2
-
 3
3
-
 4
4
-
 5
5
-
 6
6
-
 7
7
-
 8
8
-
 9
9
-
 10
10
-
 11
11
-
 12
12
-
 13
13
-
 14
14
-
 15
15
-
 16
16
-
 17
17
-
 18
18
-
 19
19
-
 20
20
-
 21
21
-
 22
22
-
 23
23
-
 24
24
-
 25
25
-
 26
26
-
 27
27
-
 28
28
-
 29
29
-
 30
30
-
 31
31
-
 32
32
-
 33
33
-
 34
34
-
 35
35
-
 36
36
-
 37
37
-
 38
38
-
 39
39
-
 40
40
-
 41
41
-
 42
42
-
 43
43
-
 44
44
-
 45
45
-
 46
46
-
 47
47
-
 48
48
-
 49
49
-
 50
50
-
 51
51
-
 52
52
-
 53
53
-
 54
54


Unitech PA966 User manual
- Category
- Handheld mobile computers
- Type
- User manual
- This manual is also suitable for
Ask a question and I''ll find the answer in the document
Finding information in a document is now easier with AI
Related papers
Other documents
-
Support myCharge User manual
-
M3 Mobile MC-6200S User manual
-
 SmarTerminal RQKSMARTCOMPACT User manual
-
Juniper Mesa User manual
-
Revo IT9000 User manual
-
Symbol Technologies P D T 8 1 0 0 S E R I E S User manual
-
Symbol PDAs & Smartphones PDT 8100 User manual
-
LXE MX9 Reference guide
-
LXE MX3X Reference guide
-
