Page is loading ...

Gelcoat Shower and Tub Shower
Installation Instructions
Thank you for purchasing Praxis Bathware. For best
results, please read and follow all directions carefully.
PRE-INSTALLATION PLANNING
1. Please do not store units out of doors.- Keep out of
sunlight and exposure to weather.
2. Review
Figures 1, 2 and 3 to make sure alcove
materials. Fire rated materials must be installed prior to
unit installation.
3.
Access to drain and supply connections should be
provided so that these connections may bemade after
the unit has been installed. Inside dimensions of framing
permit installation.Framing must be solidly fastened to
4. Each manufactured unit is made with the intent of
being shimmed upon installation. This compensates for
any settling or slope that may have occured at the job
inside a plastic bag.The shims need to be placed under
the unit after it is put into place and is being leveled.
INSTALLATION PROCEDURE
1. Make certain your stud framing alcove is sized
correctly and is square and plumb. You may prefer to
complete framing of the back wall and the plumbing end
wall then frame out theopposite end wall after the unit
has been set.
2. Finish rough plumbing, but leave unstrapped at
this stage. Find drain line and trap locations as shown
in the applicable Framing Diagram. Refer to Framing
permit clearance and allow connection of the drain
assembly.
3. Locate supply lines for mixing valves, spout, and
shower. The shower head may be positioned through the
Tools you might need for proper installation
• Galvanized Nails or Screws
• Large Level
• Hammer or Screw Gun
• Shims
• Adhesive
Blocking
at Unit
Height.
(optional)
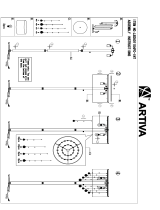
Figure 1
14”
14”
7”
7”
Figure 2
Room Height.
Blocking at
Unit Height.
(optional)
14” x 7” Cutout For Drain And
Overflow Connection For
Tub/Showers.
Minimum 6” Diameter Opening For
Drain Connection on Showers
Showers and Tub/Showers
with Center Drain
Showers and Tub/Showers
with End Drain
Room Height.
Neo Angle Showers
14” x 7” Cutout For Drain
And Overflow Connection
For Tub/Showers.
Minimum 6” Diameter Opening For
Drain Connection on Showers
Figure 3

Gelcoat Shower and Tub Shower
Installation Instructions
CARE AND CLEANING
Do not use caustic or abrasive cleaners on the unit.
Avoid harsh abrasive or gritty scouring powders.To
clean the unit, simply use a household liquid detergent
with a soft sponge or cloth and warm water. More
persistent stains,tar, or paint can be removed with
mineral spirits. Remove excess plaster by scraping with
a sharpened soft wood stick. Avoid wire brushes, metal
scrapers or tools. Restore dull areas by rubbing with an
automotive type body cleaning compound.
wall of the unit or in the wall above. Measure and mark
using the appropriate size hole saw.
4.
on unit according to the manufacturers instructions. Apply
a bead of silicone caulk, or plumber’s putty around the
5. Now move unit into place. Position the unit at
the open end of the framed pocket. Align the lower edge
of the apron in approximate position and tilt back into
place.
6. Plumb and level the unit in two directions: Place
a level on top of the apron or shower dam and along
provided shims under the unit as described the Pre-
Installation Planning section.
7. Place shims under the unit after it is put into place and
as it is being leveled. Apply an adhesive to the bottom
of each shim to permanenty secure into place. To ensure
shims must be used on each unit. See Figure 4 for
additional details.
8. If there is any space between the bottom of the apron
leveling compound.
9. Mount unit to framing with 6d galvanized nails
vertically, and to all studs horizontally. Drilling holes for
fasteners is recommended.
10. Make connections to supply and drain lines. Strap all
.
11. Install wallboard along unit. Wallboard should
mounting screws or nails. See Figure 5
CAUTION
Use of a RUBBER FLOOR MAT is not recommended,
however, if you choose to do so, please remove after each
use and dry both the mat and the unit. Use of a
rubber
void your warranty.
Support Wedges
Place Support Wedges
Figure 4
Place the shims under the bottom back edge of
the unit after it is put into place and leveled.
Apply an adhesive to the bottom of each shim to
permanenty secure it in place. A minimum of two
shims must be used on each unit to ensure
proper support and a solid base.
Wallboard
Small Gap
Apply Caulking
Framing
Studs
Install and Finish Wall Board
Shower Wall
Fasteners
At Studs
Figure 5
Install wallboard so it covers the mounting flanges of
the bathing unit. Leave a small gap between the
finished surface of the bathing unit and edge of the
e gap.ht llif ot gnikluac ylppA .draob llaw
Fasten wallboard to framing studs. Tape seams and
finish wall board as typical.
Praxis Companies LLC
435 Industrial Road I Savannah, Tennessee 38372 I Tel: (800) 443 7269 I Fax: (731) 925 0379
www.praxiscompanies.com
Praxis Companies, LLC Copyright 2010 PN /0410/GCG
www.ellasbubbles.com

10/12/16 Rev.1.0
INSTALLATION INSTRUCTIONS
SU-2062-5570-11-40
SU-2062-5570-25-40

1
This product is heavy and may require two people to install.
1/4"
1/8"
5/16"
Inspect the product immediately upon receipt for transit damage, missing packs/parts or
manufacturing fault. Damage reported later will not be accepted. Handle the product with care
avoiding knocks and shock loading to all sides and edges of the glass.
Read these instructions carefully before start of installation.
Special care should be taken when drilling walls to avoid hidden pipes or electrical cables.
Note: This product is heavy and may require two people to install.
After use, your shower should be cleaned with soap and water. This is particularly important in hard
water districts where insoluble lime salts maybe deposited and allowed to build up. Cleaners of a
gritty or abrasive nature should not be used. Care should be taken to avoid contact with strong
chemicals, they can be used but with caution, if in doubt contact the manufacturer of the cleaner in
question.
Keep these instructions for aftercare and customer service details.

2
Assembly Drawing
1
2
3
1pc
2pcs
2pcs
Wall Jambs
Door Panels
Bottom Horizontal Rail
PACKING LIST
PART #
Q’TY
DESCRIPTION
PART #
Q’TY
DESCRIPTION
1pc
4sets
Screw M4x3/8"
Screws ST4x1 3/8"
9
10
2pcs
6pcs
6
8
4
5
7
6sets
1set
1pc
Top Horizontal Rail
Bumper Blocks x 6
Stopper Blocks x 6
11
15
14
16
13
12
6pcs
1pc
2pcs
2pcs
6pcs
10pcs
Wall Plugs
Knob
Screw ST4x9/16"
Screw nut
Washers
Screw Caps
Bottom Guide
Roller Bracket Assembly
Towel Bar
4
6
12
12
16
8
9
10
10
11
11
12
13
1
2
3
3
13
12
2
14
5
5
7
15

3
Installation Steps
Step 1
Step 2
B
A
A
Measure the bottom rail with a tape
measure. Cut the length according to
installer's recommendation.
B
1
4
Measure the top rail with a tape
measure. Cut the length according to
installer's recommendation.
SIDE VIEW
1/4"
A B
1
3
11
10
12
5
13
Screw
ST4x1 3/8"
B
B
A

4
Step 3
Step 4
1/8"
4
3
A
9
12
17
SIDE VIEW
A
A
A
B
8
15
7
2
2
15
C
C
C
7

5
Step 5
Step 6
A1 A2
8
4
SIDE VIEW
Screw
ST4x9/16"
A
6
12
14
A1
A2
A

6
Step 7
24
HOURS
/