Page is loading ...

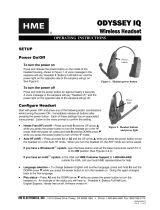
Figure 2.
Correct wearing
of headset
base of
microphone
boom
HS400
Headset
OPERATING INSTRUCTIONS
The HS400 Headset is a compact, wireless headset intended for use with the HME Wireless Drive-
Thru Audio System 400. The following instructions provide the proper use and care of the HS400.
I. HS400 HEADSET FEATURES
II. HOW TO WEAR THE HS400 HEADSET
•• Wear microphone on right or left side
•• Wear microphone near side of mouth
•• To adjust microphone position hold microphone
boom at base and pivot boom up or down
HM ELECTRONICS, INC.
14110 Stowe Drive, Poway, CA 92064 USA • Phone: 1-800-848-4468 Fax: (858) 552-
0172
HME# 400511
Rev
B
2/17/03
Figure 1. Headset features

2
III. ROUTINE HS400 OPERATION
HS400 control buttons are touch-sensitive. Use your fingertip, not your fingernail, when
touching the buttons.
The HS400 can be operated in “half-duplex” or “full-duplex” modes.
In the half-duplex mode, you must press and hold a button while talking to a customer,
and release the button to hear the customer’s response. The HS400
push-to-talk (PTT) mode is an example of half-duplex operation.
In the full-duplex mode, you can transmit and receive communication at the same time, as
in a normal telephone conversation. The HS400 hands-free (HF) and auto hands-free (AHF)
modes are both examples of full-duplex operation. In the HF mode, transmission and
reception are activated by touching and releasing a button. In the AHF mode, transmission
and reception are activated automatically when a customer drives into the drive-thru lane.
A. Power On/Off
1. Power Light
•• Light blinks while the headset is transmitting your voice
•• Light steady ON when headset is not transmitting
•• Light is red for lane 1
•• Light is green for lane 2
2. Power On
•• Press and release the power ON/OFF button
•• Voice message in earpiece says “Power on, lane one (or two)”
•• Power light blinks green, then goes on steady red (for lane 1) or green (for lane 2)
3. Power Off
•• Press and hold power ON/OFF button 3 seconds
•• Voice message in earpiece says “Power off”
•• Power light goes off
B. Volume Up/Down
1. Single-Step Volume Adjustment
•• Lightly touch and release Volume-up or Volume-down button
•• Beep sounds in earpiece each time button is pressed
•• Volume increases or decreases, one step at a time
2. Continuous Volume Adjustment
•• Lightly press and hold Volume-up or Volume-down button
•• Volume increases or decreases continuously while button is held
•• Series of beeps sounds in earpiece until volume reaches maximum or minimum

3
C. Talk to Customers
1. Single-Lane Operation (one base station operating one speaker post)
a. Push-To-Talk Mode
•• Customer begins speaking at speaker post or menu board
•• Adjust customer’s voice level in headset if necessary
•• Press and hold A1 or A2 button to speak to customer — Release to listen
b. Hands-Free Mode
•• Customer begins speaking at speaker post or menu board
•• Adjust customer’s voice level in headset if necessary
•• Touch and release A1 or A2 button to speak and listen to customer
•• Touch and release B button to end communication with customer
•• Touch and release A1 or A2 button if you need to speak to the customer again
•• If customer drives away from speaker post or menu board, headset
automatically stops transmitting
c. Auto Hands-Free Mode
•• Headset begins transmitting automatically when customer enters drive-thru lane
•• Speak and listen to customer without pressing any buttons
•• Adjust customer’s voice level in headset if necessary
•• Touch and release B button to end communication with customer
•• Touch and release A1 or A2 button if you need to speak to the customer again
•• If customer drives away from speaker post or menu board, headset
automatically stops transmitting
2. Dual-Lane Operation (two base stations operating two speaker posts)
a. Push-To-Talk Mode
•• Customer begins speaking at speaker post or menu board
•• Adjust customer’s voice level in headset if necessary
•• Press and hold either the A1 button to speak to customer in Lane 1 or A2
button to speak to customer in Lane 2 — Release to listen
b. Hands-Free Mode
•• Customer begins speaking at speaker post or menu board in your lane
•• Adjust customer’s voice level in headset if necessary
•• Touch and release A1 button for Lane 1 or A2 for Lane 2, to speak and
listen to customer
•• Touch and release B button to end communication with customer
•• Touch and release A1 button for Lane 1 or A2 for Lane 2, if you need to
speak to the customer again
•• If customer drives away from speaker post or menu board, headset
automatically stops transmitting
c. Auto Hands-Free Mode
•• Headset begins transmitting automatically when customer enters your lane
•• Speak and listen to customer without pressing any buttons
•• Adjust customer’s voice level in headset if necessary
•• Touch and release B button to end communication with customer
•• Touch and release A1 button for Lane 1 or A2 for Lane 2, if you need to
speak to the customer again
•• If customer drives away from speaker post or menu board, headset
automatically stops transmitting

4
b. Battery Replacement
•• Place end of battery into battery com-
partment, with metal contacts downward
•• Press top of battery into battery compart-
ment until it snaps in place under battery-
release button
D. Talk to Other Crew Members
•• Press and hold B button to speak to other crew members wearing HS400s
•• Release to listen
E. Change and Charge Batteries
If you hear “Headset Battery Low” in your headset, the battery needs to be replaced
and recharged. HS400 batteries need be recharged after 8 to 9 hours of normal use.
1. Change Batteries
a. Battery Removal
•• Press upward on battery-release button
•• Pull battery out from the top
2. Charge Batteries
•• Insert battery in one of four charging ports until it clicks in place
•• Battery charging time is approximately 2 hours
•• Yellow light next to battery port stays on when there is no battery in that port
Yellow light flashing next to battery indicates battery CHARGE PENDING, which
means the battery is out of its operating range (32
o
-104
o
F, 0
o
-40
o
C). Charging
will begin when battery is within its normal operating range.
Yellow light on next to battery in charging port means CHARGE FAILED. Follow
diagnostic instructions on side of battery charger.
•• Red CHARGING light next to battery stays on while battery is charging
•• Green READY light next to battery goes on when battery is fully charged
•• Store fully charged batteries in storage ports
Figure 3.
Battery removal
Battery
release
button
Figure 4.
Battery replacement
Battery in
Charging port
Battery in
storage port
Figure 5.
AC40 Battery Charger

5
IV. AUTO-HANDS-FREE SETTING
The auto-hands-free feature allows only one operator to communicate with a customer in
one drive-thru lane without pressing any buttons.
CAUTION: Only one HS400 per lane can be set in the auto-hands-free mode, or
interference will occur when a customer enters the drive-thru lane.
•• With the power already on, press and hold Power button and touch Volume-down
button — You will hear “Auto-hands-free on” or “Auto-hands-free off”
NOTE: You must touch Volume-down button within 2 seconds after pressing the
Power button, or you will turn the power off and have to begin again.
•• The last auto-hands-free on/off message you hear will remain in effect until you change
it again.
V. CONFIGURATION SETTINGS
•• With the power already on, press and hold Power button and press B button.
NOTE: You must press the B button within 2 seconds after pressing the power button,
or you will turn the power off and have to begin again.
•• You will hear “Configuration” in headset
•• Select any configuration setting described in A – C, beginning below
•• When finished, press and release B button to exit configuration-settings mode. You
will hear “Power on, lane (one or two)” in the headset earpiece
•• Configuration settings will remain in effect until you change them again
A. Hands-free On/Off
•• Touch and release Volume-down button — you will hear “Hands-free on”
•• Touch and release Volume-down button again — you will hear “Hands-free off ”
•• You will continue to hear “Hands-free on” or “Hands-free off ” messages alternating
each time you touch and release Volume-down button. The last hands-free on/off
message heard will be selected when you exit the configuration-settings mode
B. Single/Dual Lane
•• Touch and release A1 button — you will hear “Single lane”
•• Touch and release A1 button again — you will hear “Dual lane”
•• You will continue to hear “Single lane” or “Dual lane” messages alternating each
time you touch and release A1 button. The last single/dual lane message heard
will be selected when you exit the configuration-settings mode

6
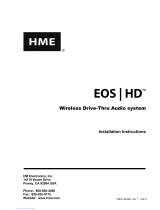
C. Channels 0 - 7
CAUTION: The HS400 channel setting should not be changed unless it has been
necessary to change the drive-thru audio system base station frequency. Call
HME Customer Support at 1-800-848-4468 for assistance.
•• Note the SW1 DIP switch settings in the System 400 Base Station
•• Match the settings in the base station with one of the horizontal lines on the table in
Figure 6 to determine on which HS400 Channel Setting your headset must be set
NOTE: If the SW1 settings in your base station do not match any of horizontal lines
on this table, call HME Customer Support at 1-800-848-4468 for assistance.
•• To set/change HS400 channels, touch and release A2 button repeatedly until you
hear “Channel (0 through 7).” Stop after you hear the correct HS400 Channel
Setting your headset.
•• To save this channel setting, press the B button. You will hear “Channel
(0 – 7) saved,” and you will be automatically returned to the configuration-settings
mode. NOTE: If you do not press the B button, after 10 seconds the HS400 will be
automatically returned to the configuration-settings mode.
System 400 Base Station
(Base Station #1 in Dual Lane Stores)
SW1 DIP Switch Settings
HS400
Channel
Setting
1 2 3 4 5 6 7 8
0
OFF OFF OFF OFF OFF OFF OFF OFF
1
ON OFF OFF OFF ON OFF OFF OFF
2
OFF ON OFF OFF OFF ON OFF OFF
3
ON ON OFF OFF ON ON OFF OFF
4
OFF OFF ON OFF OFF OFF ON OFF
5
ON OFF ON OFF OFF OFF OFF OFF
6
OFF ON ON OFF ON OFF OFF OFF
7
ON ON ON OFF OFF ON OFF OFF
Figure 6. SW1 DIP switch in
System 400 Base Station

7
VI. WHAT TO DO IN CASE OF PROBLEMS
If any problem occurs in operation of your HS400, replace the battery with a known-good
battery. If the problem is not corrected, call HME Customer Support at 1-800-848-4468.
VII. HOW TO CARE FOR THE EQUIPMENT
A. Proper Handling
•• When adjusting microphone position, hold boom at base, not at microphone end.
•• Carry headset by headband, not by earpiece or battery end, and never by
microphone boom.
•• Use both hands to put headset on or take it off.
B. Cleaning
•• Remove batteries from headsets.
•• Clean batteries and headsets with damp sponge sprayed with household cleaner.
Squeeze excess liquid out of sponge before using it.
•• Clean metal contacts on batteries and headsets as follows. Wet tip of swab with
alcohol and squeeze excess alcohol from it. Wipe each contact with swab and be
certain all contacts are dry before reinstalling batteries in headsets.
•• Foam muffs on headset earpieces can easily be replaced for sanitary purposes.
To order extra foam muffs, call your local HME sales representative.

8
VIII. EQUIPMENT SPECIFICATIONS
Battery type: 3.6 Volt Lithium Ion
Battery life: 8 hours (typically)
RF Frequency: Receive - 457.5125MHz – 457.6125MHz
Transmit - 468.4875MHz – 469.8875MHz
Weight: 4.7 oz (1.33 kg) with battery
Controls: Power ON/OFF button
Volume-up button
Volume-down button
“A1” button
“A2” button
“B” button
Indicators: Dual color LED (red/green)
IX. FCC NOTICE
HME wireless radio frequency systems are type-accepted in the United States under Part
90 of the Federal Communications Commission (FCC) Code of Federal Regulations, and
type-approved in Canada by Industry and Science Canada. Because licensing depends
on the system’s application, it is the user’s responsibility to apply for a license from the
FCC in the U.S. and its possessions, or from Industry and Science Canada in Canada and
its territories. Licensing requirements vary from country to country. Contact your local
licensing agency for specific requirements.
This device complies with Part 15 of the FCC rules. Operation is subject to the following
two conditions: (1) This device may not cause harmful interference, and (2) This device
must accept any interference received, including interference that may cause undesired
operation.
NOTE: This equipment has been tested and found to comply with the limits for a Class A
digital device, pursuant to Part 15 of the FCC rules. These limits are designed to provide
reasonable protection against harmful interference when the equipment is operated in a
commercial environment. This equipment generates, uses and can radiate radio
frequency energy and, if not installed and used in accordance with the instruction manual,
may cause harmful interference to radio communication. Operation of this equipment in a
residential area is likely to cause harmful interference, in which case the user will be
required to correct the interference at his own expense.
Changes or modifications not expressly approved by HM Electronics, Inc. could void the users
authority to operate this equipment.
/