Page is loading ...

5.2
®
®
5.2
mmol
L
Before Meal Before Meal
®
ReminderReminder
NotesNotes
12:00 PM l 10/1312:00 PM l 10/13
12:00 PM
METER BG
mmol/L
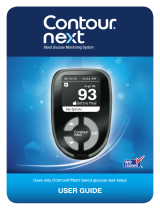
USER GUIDE
Uses only CONTOUR
®
NEXT blood glucose test strips from Bayer
Wireless Blood Glucose
Monitoring System
DATE:
CLIENT:
DESCRIPTION:
SCHAWK JOB#:
SKU#:
DIMENSIONS:
PRINTER SPEC:
RELEASE: V-0
LANGUAGE(S): ENGLISH
INTERNAL: R-X
18211 NE 68th Street, E120
Redmond, WA 98052
T: 425-881-5454
BAN#:83940409 Rev. 01/14
Contour Next Link User Guide - Canada
January 30, 2014
Bayer HealthCare
Contour Next Link User Guide - English
912882
9747 Parent Ban# 84612503
6" (H) x 4.5" (W)
PUSG0494 REV G
FONTS:
Helvetica, Helvetica Neue, Zapf Dingbats, Skinny Mini, Mini Micra
COLORS:
Cyan Magenta Yellow Black
NOTE: THIS COLOR PROOF INDICATES COLOR BREAK ONLY AND MAY NOT ACCURATELY REFLECT ACTUAL PRODUCTION COLOR.
Regional Master Template No: M-UG-0354-R0002
Clinical Trial / Global Master Template No: M-UG-0297-R0005
FC: 17.25mm BC: 8.5mm
Footer: 7mm
1/3rd of the Cross clear
space has been applied.
7mm min.
83940409_CntrNextLINK_UG_ENca_FpBp_v0.indd ofc183940409_CntrNextLINK_UG_ENca_FpBp_v0.indd ofc1 1/30/14 8:50 AM1/30/14 8:50 AM

iiiii
®
INTENDED USE
The CONTOUR
®
NEXT LINK wireless blood glucose monitoring system
from Bayer (meter, test strips and control solution) is intended for
self-testing by persons with diabetes to monitor glucose concentrations
for the quantitative measurement of glucose in fresh capillary whole
blood drawn from the fingertip or palm.
It is intended for
in vitro
diagnostic use only
. The clinical utility of this device is that it may
be used as an aid to monitor the effectiveness of a diabetes control
program.
The CONTOUR NEXT LINK wireless blood glucose monitoring system is
intended to be used to transmit glucose values to compatible Medtronic
devices and facilitate transfer of information to Medtronic CareLink
®
software through use of radio frequency communication.
The CONTOUR NEXT LINK wireless blood glucose monitoring system
from Bayer is not intended for the diagnosis of or screening for diabetes
mellitus and it is not intended for use on neonates.
IMPORTANT SAFETY INFORMATION
WARNINGS
The CONTOUR NEXT LINK wireless blood glucose monitoring system
is intended for single-patient use only and should not be shared.
Serious Illness
• Capillary (fingerstick or Alternative Site) blood glucose
testing may not be clinically appropriate when peripheral
flow is decreased. Shock, severe hypotension, hyperosmolar
hyperglycaemia, diabetic ketoacidosis, and occurrence of
severe dehydration are examples of clinical conditions that
may adversely affect the measurement of glucose in peripheral
blood.
1-3
• Keep out of reach of children. This kit contains small parts which
could cause suffocation if accidentally swallowed.
Talk to Your Health Care Professional
• Before setting any Target ranges or High or Low Alerts on
your meter.
• Before changing your medication based on test results.
• If your blood sugar reading is under 2.8 mmol/L, follow medical
advice immediately.
• If your blood sugar reading is over 13.9 mmol/L, wash and dry
your hands well and repeat the test with a new strip. If you get
a similar result, call your health care professional as soon as
possible.
• About whether Alternative Site Testing (AST) is appropriate
for you.
Potential Biohazard
• Always wash and dry your hands well with soap and water before
and after testing, handling the meter, lancing device or test strips.
• The meter, lancing device and lancets are for single person
use only. Do not share them with anyone including other family
members. Do not use on multiple persons.
• All parts of this kit are considered biohazardous and can
potentially transmit infectious diseases, even after you have
performed cleaning and disinfection. For instructions, please see
Cleaning and Disinfection, page 66.
• The MICROLET
®
2 lancing device is intended for self-testing by a
single patient. It must not be used on more than one person due
to the risk of infection.
•
Use a new MICROLET
®
lancet each time you test because it is
no longer sterile after use.
• Always dispose of test strips and lancets as medical waste or as
advised by your health care professional. All products that come
in contact with human blood should be handled as if capable of
transmitting infectious diseases.
83940409_CntrNextLINK_UG_ENca_FpBp_v0.indd ii-iii83940409_CntrNextLINK_UG_ENca_FpBp_v0.indd ii-iii 1/30/14 8:51 AM1/30/14 8:51 AM

iv v
PRECAUTIONS
• Read your CONTOUR
®
NEXT LINK user guide, the MICROLET
®
2
lancing device package insert, your Medtronic device user guide and
all instructional materials provided in your meter kit before testing.
Please follow all instructions for use and care exactly as described to
help avoid inaccurate results.
• Examine product for missing, damaged, or broken parts. If the test
strip bottle is open inside a new box of strips, do not use those strips.
For replacement parts, contact Bayer Customer Service. Please see
back cover for contact information.
• The C
ONTOUR NEXT LINK meter from Bayer only works with
CONTOUR
®
NEXT test strips and CONTOUR
®
NEXT control solutions.
• Always keep the C
ONTOUR NEXT test strips in their original bottle.
Tightly close the bottle immediately after removing a test strip. The
bottle is designed to keep the test strips dry. Avoid exposing meter and
test strips to excessive humidity, heat, cold, dust, and dirt. Exposure
to room humidity from leaving the bottle open or not storing the strips
in their original bottle can damage your test strips. This could lead to
inaccurate results. Do not use a test strip that appears damaged or has
been used.
• Check the expiry dates on your test strips and control solution. Do not
use the test strips or control solution if the expiry date printed on the
bottle label and carton has passed. This can cause inaccurate results.
For the control solution, do not use if it has been 6 months since you
first opened the bottle. After first opening the bottle, write the 6-month
discard date on the control solution label.
• If your control solution test result is out of range, contact Bayer
Customer Service. Please see back cover for contact information. Do
not use the meter for blood glucose testing until you resolve this issue.
• The meter has been designed to give accurate results at temperatures
between 5° to 45°C. If you are outside this range, you should not test.
Whenever the meter is moved from one location to another, allow
approximately 20 minutes for the meter to adjust to the temperature of
the new location before performing a blood glucosetest.
• Do not perform a blood glucose test when the C
ONTOUR NEXT LINK
meter is connected to a computer.
• Use only approved cables or wall charger from the manufacturer or a
5V charger approved by a certified body such as UL, TUV or CSA.
• The C
ONTOUR
®
NEXT LINK meter from Bayer has been preset and
locked to display results in mmol/L (millimoles of glucose per litre
of blood).
O
Results in mmol/L will always have a decimal point;
O
Results in mg/dL will never have a decimal point.
Example:
.
or
93
O
Check your display screen to be sure the results are shown the
right way. If not, please see Bayer Customer Service contact
information on the back cover of this user guide.
• The C
ONTOUR NEXT LINK wireless blood glucose monitoring system
from Bayer has a measuring range of 1.1 mmol/L to 33.3 mmol/L.
O
For results under 1.1 mmol/L or over 33.3 mmol/L:
о
If your blood sugar reading is under 1.1 mmol/L, the “Follow
Medical Advice Immediately” screen will display and the meter
will beep twice. Contact your health care professional.
о
If your blood sugar reading is over 33.3 mmol/L the next screen
will tell you to retest. The meter will beep twice. If results are
still over 33.3 mmol/L, “Follow Medical Advice Immediately” is
displayed.
• Please be aware that USB ports in some computers and self-
powered USB hubs can become much warmer than the room. A
USB extension cable is available. If you wish to test immediately
after disconnecting from your computer, please use the USB
cable to protect the meter from exposure to heat created by the
computer.
CAUTION: Your CONTOUR NEXT LINK meter only works with
CONTOUR
®
NEXT test strips and CONTOUR
®
NEXT control solutions.
83940409_CntrNextLINK_UG_ENca_FpBp_v0.indd iv-v83940409_CntrNextLINK_UG_ENca_FpBp_v0.indd iv-v 1/30/14 8:51 AM1/30/14 8:51 AM

GETTING
STARTED
TESTING FEATURES USING THE
MAINMENU
TECHNICAL
AND CARE
vi
Rechargeable Battery
The CONTOUR
®
NEXT LINK meter from Bayer has a rechargeable battery.
You must charge your battery before you can use your meter and you
cannot do a blood sugar test while the battery is charging.
Charge Your Meter Using a Wall Outlet or a Computer
CAUTION: Please be aware that USB ports in some computers
and self-powered USB hubs can become much warmer than the
room. If you wish to test immediately after disconnecting from your
computer, please use the USB cable to protect the meter from
exposure to heat created by the computer.
CAUTION: Do not perform a blood glucose test when your meter is
connected to an external device, e.g., computer.
• Remove USB cap.
• Insert the meter USB plug into the wall
charger* or use the USB extension
cable.
The meter is fully charged when the test
strip port light stops flashing and turnsoff.
NOTE: Your meter can Rapid Charge. After 1 minute of charging,
you can unplug the meter and run one blood sugar test, if needed.
A USB extension cable is included for your convenience.
OR
• Remove USB cap.
• Insert the meter USB plug into your
computer or use the USB extension
cable.
• Be sure your computer is turned on and
not in sleep, hibernate, or power save
mode.
Table of Contents
Your CONTOUR
®
NEXT LINK Wireless Blood Glucose
Monitoring System from Bayer ........................................ 2
Your C
ONTOUR
®
NEXT Test Strip ......................................... 2
Your M
ICROLET
®
2 Lancing Device ..................................... 3
Initial Setup ........................................................................ 5
Preparing the Lancing Device .......................................... 13
Getting the Blood Drop — Fingertip Testing .................... 15
Test Results ..................................................................... 17
Alternative Site Testing (AST) — Palm ............................. 19
Control Solution Testing ................................................... 27
AutoLog (Marking Your Results) ...................................... 30
Sending Results to Your Pump ........................................ 30
Test Reminders ................................................................ 31
Notes ............................................................................... 34
Logbook ..........................35
Trends (Averages and
Summaries) ...................36
Setup ..............................38
Pump Options ..................38
Meter Send Options .........41
Test Reminders .................43
Date and Time ..................45
Sound ...............................47
AutoLog ............................47
Blood Sugar Targets .........49
Trends Range ...................51
High and Low Alerts .........52
Set Language ...................53
Customer Service .............53
Transferring Data to Medtronic’s CareLink
®
Therapy
Management Software ........................................................ 54
Error Detection Displays ........................................................ 55
Battery Status ........................................................................ 55
Technical Information ............................................................ 60
Caring for Your Meter ............................................................ 66
Cleaning and Disinfection ...................................................... 66
Warranty ................................................................................ 72
INDEX .................................................................................... 74
*Charger is available separately from Bayer Customer Service if not
included in your meter kit. See contact information for Bayer Customer
Service on back cover.
83940409_CntrNextLINK_UG_ENca_FpBp_v0.indd vi-183940409_CntrNextLINK_UG_ENca_FpBp_v0.indd vi-1 1/30/14 8:51 AM1/30/14 8:51 AM

GETTING
STARTED
GETTING
STARTED
32
Before Meal
mmol
L
12:00 PM l 10/13
5.2
Reminder
Notes
®
Selection/Scrolling
Buttons
See page 4
Your MICROLET
®
2 Lancing Device
Re-setting Handle
Grip Indent
Display Screen
Meter USB Plug
Top Menu Button
See page 4
Protective
USB Cap
Test Strip Port
Insert the test strip here.
To turn on the test strip
port light, see page 4.
Your CONTOUR NEXT Test Strip
Grey Square End
Insert this end into the test strip
port with the grey end facing up.
Sample Tip
Blood sample pulled in here.
Getting Started
The CONTOUR
®
NEXT LINK Wireless Blood
Glucose Monitoring System from Bayer
The CONTOUR NEXT LINK wireless blood glucose monitoring
system from Bayer works with CONTOUR
®
NEXT test strips from
Bayer.
WARNING
Keep out of reach of children. Accidental swallowing
could cause suffocation.
Round Protective Cap
Adjustable Grey Endcap (fingertip)
Endcap Dial
Lancet Holder
Lancet
Release Button
Your MICROLET
®
2 Lancing Device
The CONTOUR
®
NEXT LINK Wireless Blood
Glucose Monitoring System from Bayer
CAUTION: The CONTOUR NEXT LINK meter from Bayer only
works with CONTOUR NEXT test strips and CONTOUR
®
NEXT
control solutions.
“Talks” to Your Compatible Medtronic Device
Alternative Site Testing Clear
Endcap (palm)*
Your CONTOUR
®
NEXT LINK meter can automatically send your
blood glucose result directly to your compatible Medtronic
device, if your meter and pump are linked. This eliminates the
need to manually enter your blood glucose result into your insulin
pump. Your compatible Medtronic device will only accept the
glucose result if the Meter Send Option in your device’s Utility
Menu is set to On and you have programmed the device with the
meter’s ID (serial) number. Up to 3 CONTOUR NEXT LINK meters
can be connected to your Medtronic pump. To use the meter link
features, your CONTOUR NEXT LINK meter and Medtronic device
must be within 1.22 meters of each other. If you are not using the
meter link feature, you may want to set the Send Option to Never
on your CONTOUR NEXT LINK meter to save battery power.
* AST Endcap may not be included in
all meter kits.
83940409_CntrNextLINK_UG_ENca_FpBp_v0.indd 2-383940409_CntrNextLINK_UG_ENca_FpBp_v0.indd 2-3 1/30/14 8:51 AM1/30/14 8:51 AM

GETTING
STARTED
GETTING
STARTED
54
OK
The Main Menu has three choices: Logbook, Trends and Setup.
Select one by pressing the button next to your choice.
Turn On
MENU
Logbook
Trends
Setup
®
Meter Overview
Turning the Meter On or Off
• Press and hold the top Menu button to turn the meter on
or off.
• Insert a test strip to turn the meter on.
• Meter turns off after 3 minutes of inactivity.
Using the Top Menu Button
The top Menu button has three functions:
• To turn the meter on/off, press and hold the top
Menubutton.
• To go back one screen from most screens, press the top
Menu button once.
• To turn on/off the test strip port light, quickly press the top
Menu button two times.
Using the Selection/Scrolling Buttons
Initial Setup
Meter Overview
• The three buttons next to the screen allow you to make your
selection by pressing the button next to your choice.
• Scroll up or down for additional choices when the or
arrows appear on the meter screen.
Button
OK Button
Button
CAUTION: Unplug meter from charging source before
beginning Setup.
• When your choice is highlighted, make a selection by
pressing OK.
NOTE: Press and hold the or button to scroll
through the list faster.
Using the Main Menu
Initial Setup
1. Before use, fully charge
your meter. See page vi.
2. Press and hold
the top Menu
button until the
meter turns on.
After a welcome
screen, you see
the Language
choicescreen.
83940409_CntrNextLINK_UG_ENca_FpBp_v0.indd 4-583940409_CntrNextLINK_UG_ENca_FpBp_v0.indd 4-5 1/30/14 8:51 AM1/30/14 8:51 AM

GETTING
STARTED
7
GETTING
STARTED
6
MAIN MENU
Basal
Reservoir + Set
Utilities
3. Press the button to see
more language choices.
When your language is
highlighted, press OK.
4. Press
OK
to confirm.
If the correct language is
not displayed, press
No
.
LANGUAGE
English
Deutsch
Español
OK
Connect to a MiniMed
Pump?
OK
Skip
CONNECT TO PUMP
8. Scroll to
Connect Devices
and press
ACT
.
5. If you are connecting to
a MiniMed
®
pump now,
press
OK
and go to Step6.
If not, press
SKIP
and go
to Step 17.
NOTE: Pump refers
to your compatible
Medtronic device.
9. Select
On
and press
ACT
. If you are
replacing
a meter, go to
Step 10
. If
you are
adding
a new meter, go to
Step 12
.
Connect to Pump
Language:
English
OK
No
10. To replace a meter, select
Delete ID
and
press
ACT
.
Set Language
11. If you have multiple meter IDs, repeat
Step 10 for each one.
12. To add a new meter, select
Add ID
and
press
ACT
. Refer to Step 6 (or see
meter back) to find meter ID (SN).
Use the up and down arrow buttons to
enter the six character meter ID shown
on the meter screen.
Press
ACT
after each character entry.
6.
STOP. Do
NOT
press
ANY
buttons.
This screen displays the meter ID (in the bottom left corner).
This ID is needed to complete the connection process.
Put down your meter. Pick up the compatible Medtronic device
and continue with Step 7.
Then scroll to
Meters
and press
ACT
.
NOTE: If your UTILITIES MENU does not contain Connect
Devices, scroll to Meter Options and press ACT.
These meter screen images are for
illustration purposes only.
UTILITIES MENU
Alarm Clock
Connect Devices
Block
DEVICE OPTIONS
Meters
Remotes
Other Devices
METER OPTION
Off
On
METER ID MENU
Add ID
Delete ID
Review ID
DELETE METER ID
1. aaaaaa
2. bbbbbb
3. ------
METER ID MENU
Add ID
Delete ID
Review
ADD METER ID
123456
Enter this Meter ID
into your Pump:
123456
CONNECT TO PUMP
Next
Go Back
7. Press
ACT
to go
to the
MAIN MENU
.
Scroll to
Utilities
by
pressing the down
arrow. Press
ACT
.
Connect to Pump
Set Language
83940409_CntrNextLINK_UG_ENca_FpBp_v0.indd 6-783940409_CntrNextLINK_UG_ENca_FpBp_v0.indd 6-7 1/30/14 8:51 AM1/30/14 8:51 AM

GETTING
STARTED
9
GETTING
STARTED
8
Enter this Meter ID
Enter this Meter ID
into your pump:
into your pump:
123456
123456
?
Next
Next
Go Back
Go Back
CONNECT TO PUMP
CONNECT TO PUMP
METER ID MENU
Add ID
Delete ID
Review ID
REVIEW METER ID
1. 123456
2. ------
3. ------
10/11/10
10/11/10
12:00 PM
12:00 PM
Accept
Accept
Change
Change
CURRENT DATE & TIME
CURRENT DATE & TIME
13. Select
Review ID
on your compatible
Medtronic device
to confirm that your
CONTOUR
®
NEXTLINK
meter ID has been
correctly entered. If
incorrect, go back to
Step 10.
14. Return to your
C
ONTOUR NEXT LINK
meter. After you have
entered the meter ID
into your compatible
Medtronic device,
press
Next
.
Automatically send
results to the Pump?
Always
Ask me
Never
SEND OPTIONS
Meter Send Options
15. After the meter and pump are connected, you set your
Send Options
. This controls how your meter sends blood
glucose readings to your Medtronic pump.
Your options are:
Always
Meter will always send results
Ask Me
Meter will ask you before sending results
Never
Meter will never send results
OK
Send Options set.
Meter will ask you
before sending results.
AutoLog is Off.
Accept
Turn On
AUTOLOG
NOTE: For detailed instructions, see your compatible
Medtronic device user guide.
STAT
STAT
STAT
A
STA
STA
ST
STAT
STA
S
US
US
US
US
U100
U100
U100
1
U100
0
0
00
00
Batt
Batt
t
Batt
Batt
t
ery:ery:
ery:
ery
r
Nor
Nor
r
Nor
r
Nor
r
r
N
r
r
ma
mal
mal
mal
l
l
al
m
S/N#S/N#
N
N
S/N#
S/N#
N
N
N#
N
N
N
N
N
454454
454
454
454
4
4
54
54
4
0
056
056
56
56
056056
056
056
56
6
6
1
1
12:
00
PM
P
P
P
P
12:00
PM
P
P
M
Mon
n
n
11
O
CT 2
2
2
2
2
2
CT
0
0
0
010
0
0
®
Set Date and Time to Match Medtronic Device
Meter Send Options
Press the
Send Option
that is best for you.
Your choice can be
changedlater using
Setup (see page 42).
16. Press OK.
Set Date and Time to Match Medtronic Device
17. The date and time
on your
meter
must
match the date
and time on your
Medtronic device
.
Pick up Medtronic
device. Press
ACT
to go to the
MAIN
MENU
. Scroll to
Utilities
and press
ACT
. Scroll to Time/
Date and press
ACT
. Select a time format and press
ACT
. Note
the time and date.
Return to your
meter
. Follow instructions on your meter to
change the time and date to match your
Medtronic device
.
18. When the AutoLog
screen appears, press
Accept to keep AutoLog
OFF. Or, to activate
AutoLog, select Turn On.
AutoLog
The AutoLog feature lets you mark your test result as
Fasting Before Meal After Meal No Mark
Your meter comes preset with AutoLog turned OFF.
83940409_CntrNextLINK_UG_ENca_FpBp_v0.indd 8-983940409_CntrNextLINK_UG_ENca_FpBp_v0.indd 8-9 1/30/14 8:51 AM1/30/14 8:51 AM

GETTING
STARTED
GETTING
STARTED
1110
NOTE: Your Target ranges must be within your High and
Low Alert levels. You set your Target ranges next.
Accept
Change
HIGH AND LOW ALERTS
High: 13.9
mmol/L
Low: 3.9
mmol/L
Your meter comes preset with a high alert level of 13.9 mmol/L
and a low alert level of 3.9 mmol/L. You can Accept or Change
these levels.
19. Select Accept to keep the
preset alert levels. If you
wish to change these
alert levels, press Change.
20. If you selected Change,
press the or
button to select your
High Alert level. This
can be set between
7.0 - 20.0 mmol/L.
PressOK.
21. Press the or
button to select your
Low Alert level. This
can be set between
3.0 - 5.5 mmol/L.
Press OK.
NOTE: Press and hold the or button to scroll
through the numbers faster.
HIGH AND LOW ALERTS
High: 13.9
mmol/L
Low: 3.9
mmol/L
OK
HIGH AND LOW ALERTS
High: 14.0
mmol/L
Low:
3.9
mmol/L
OK
22. The next screen confirms
your choices. Press
Accept to confirm your
Alert settings.
Alerts are set.
Accept
Change
High: 14.0
mmol/L
Low: 3.8
mmol/L
Target Ranges
Next you are asked to accept your blood sugar Targets. Targets
are your personal ranges for your blood sugar results. With
AutoLog OFF, you have a single Target range. With AutoLog
ON, you have Target ranges for Fasting, Before Meal, and
After Meal.
NOTE: Targets can only be set inside your selected Alert
level(s). For additional information, you may contact
Customer Service. Contact information for Customer
Service is on the back cover.
23. If AutoLog is OFF, Accept
or Change the preset
blood sugar Target
range. The preset range
is 3.9 - 10.0 mmol/L.
Accept
Change
TARGET
3.9 - 10.0
WARNING
Talk to your health care professional before setting any
High or Low Alerts on your meter.
WARNING
Talk to your health care professional before setting any
Target ranges on your meter.
®
High and Low Alerts
Target Ranges
High and Low Alerts
The High and Low Alert feature tells you when your test result
is above or below the settings you choose. Results above High
are marked High Blood Sugar. Results below Low are marked
Low Blood Sugar. Alerts appear as large orange numbers.
NOTE: Alerts can only be set outside your selected
Target Range(s). For additional information, you may
contact Customer Service. Contact information for
Customer Service is on the back cover.
83940409_CntrNextLINK_UG_ENca_FpBp_v0.indd 10-1183940409_CntrNextLINK_UG_ENca_FpBp_v0.indd 10-11 1/30/14 8:51 AM1/30/14 8:51 AM

TESTING
TESTING
1312
Setup is complete.
Insert strip to start a
test.
Initial Setup is complete.
You may now test
your blood sugar. See
Testing,below.
Testing
Getting Ready to Test
Read your CONTOUR
®
NEXT LINK user guide, your
Medtronic device user guide, the MICROLET
®
2 lancing device
insert and all instructional materials provided in your meter kit
before testing. Please follow all instructions for use and care
exactly as described.
24. To change the Targets
press the or button
until the desired Target
is reached and then
press
OK
. Press Accept on
confirmation screen.
TARGET
4.2 - 10.0
OK
You can change these settings later by going to the Main Menu
and selecting Setup. See page 49.
Fasting 4.0 - 7.0 mmol/L
Before Meal 4.0 - 7.0 mmol/L
After Meal 5.0 - 10.0 mmol/L
The values based on Canadian Diabetes Association (CDA)
recommendations are as follows:
5
Examine product for missing, damaged, or broken parts. If the
test strip bottle is open inside a new box of strips, do not use
those strips. Contact Bayer Customer Service for replacement
parts. Please see back cover for contact information.
If AutoLog is ON, Accept
or Change the preset blood
sugar range for Fasting,
Before Meal, and After Meal
screens. Each Target has an option to Accept or Change.
NOTE: As shown in the meter screen above, the preset
values of 3.9-7.2 are based on ADA recommendations.
4
TARGET
3.9 - 7.2
Fasting:
Accept
Change
Have all the materials you need ready before you
begin testing. This includes your CONTOUR NEXT LINK
meter, CONTOUR NEXT test strips, and the MICROLET
®
2
lancing device and MICROLET
®
lancets. You may also
need CONTOUR NEXT control solution to perform a quality
control check. C
ONTOUR NEXT control solutions are available
separately if not included in the meter kit.
• Do not perform a blood glucose test when your meter is
connected to an external device, e.g., computer.
• Use only approved cables or wall charger from the
manufacturer or a 5V charger approved by a certified body
such as UL, TUV or CSA.
CAUTION: Your CONTOUR
®
NEXT LINK meter only works
with C
ONTOUR
®
NEXT test strips and CONTOUR
®
NEXT
control solutions.
®
Getting Ready to Test
Preparing the Lancing Device
Preparing the Lancing Device
WARNING: Potential Biohazard
The MICROLET 2 lancing device is intended for self-
testing by a single patient. It must not be used on more
than one person due to the risk of infection.
1. Remove the endcap from the
MICROLET 2 lancing device
with your thumb on the
grip indent as shown. Snap
the endcap off from top
tobottom.
Use a new MICROLET lancet each time you test because it
is no longer sterile after use.
Read the MICROLET 2 lancing device insert for complete
instructions. If you are using a different lancing device, see that
manufacturer’s instructions for use. For Alternative Site Testing
instructions, see page 19.
83940409_CntrNextLINK_UG_ENca_FpBp_v0.indd 12-1383940409_CntrNextLINK_UG_ENca_FpBp_v0.indd 12-13 1/30/14 8:51 AM1/30/14 8:51 AM

TESTING
15
TESTING
14
APPLY BLOOD
WARNING
Always wash your hands with soap and water and dry
them well before and after testing, handling the meter,
lancing device or test strips.
2. Hold the test strip with the
grey square end facing up.
3. Insert the grey square end
into the test strip port until
the meter beeps (if the
Sound is set to ON).
Preparing the Test Strip
Getting the Blood Drop — Fingertip Testing
6. The puncture depth depends
on the endcap setting and
the amount of pressure
applied to the puncture site.
Rotate the endcap dial to
adjust the puncture depth.
1. Remove a C
ONTOUR
®
NEXT test strip from
the bottle. Tightly close the bottle lid
immediately after you have removed the
test strip.
You will see the Apply Blood
screen. The meter is now
ready for you to test.
NOTE: After test strip is inserted, if you do not apply
blood to the test strip within 1 minute, the meter screen
will dim and the meter will beep. Press any button and
the Apply Blood screen will become bright again. After a
total of 3 minutes of inactivity the meter will turn off.
Preparing the Test Strip
4. Twist off the round protective
lancet cap. Save it for
disposing of the used lancet.
5. Replace the grey endcap
before getting blood drop.
1. Press the endcap firmly
against the puncture site and
press the blue releasebutton
with your thumb.
Getting the Blood Drop — Fingertip Testing
2. Stroke your hand and finger
toward the puncture site to
form a drop of blood. Do
not squeeze around the
puncturesite.
2. Loosen the round protective
cap on the lancet by rotating
it ¼ turn, but do not remove
it. Always use MICROLET
®
lancets for the best
operation.
3. Insert the lancet firmly into
thelancing device until it
comes to a full stop. This
will re-set the device. You
can also pull and release
there-setting handle.
83940409_CntrNextLINK_UG_ENca_FpBp_v0.indd 14-1583940409_CntrNextLINK_UG_ENca_FpBp_v0.indd 14-15 1/30/14 8:51 AM1/30/14 8:51 AM

TESTING
TESTING
1716
STRIP UNDERFILLED
APPLY MORE BLOOD NOW
9.3
5
TESTING...
After applying blood to the
test strip when AutoLog is
turned OFF, your result will
appear after the 5 second
countdown.
Too Little Blood
Remove used strip.
Repeat test with new
strip.
E01
If you do not re-apply
enough blood within about
30 seconds, you will see a
screen telling you to remove
the strip and repeat with a
newstrip.
If
Always
was selected in
Send Options during Setup,
your result is automatically
sent to your pump. If
Never
was selected in Send
Options, you will not have the option to send the result to your
pump. If
Ask Me
was selected in Send Options, you can choose
to send your result to your pump after each blood sugar test.
Press
Send
or
Don’t Send
. If Send is chosen, press OK on the
Send confirmation screen.
Leave the test strip in the meter to set an optional reminder for
your next test (see page 31) or adda note (see page 34).
YOUR RESULTS
Send
Don’t Send
9.3
mmol
L
If you are done, remove the test strip from the meter. Press and
hold the top Menu button to turn off the meter. The meter also
turns off after 3minutes of inactivity.
10:30 AM | 10/11
Reminder
Notes
9.3
mmol
L
Sent
®
Apply More Blood
Test Results
4. Immediately touch the tip of
the test strip to the drop of
blood. The blood is pulled
into the test strip through
the tip.
Apply More Blood
Test Results
Testing With AutoLog Off
Hold the tip of the test strip in the blood drop until the
meter beeps.
Do not press the tip against the skin or place the blood on top
of the test strip or you could get inaccurate results or errors.
If the first blood drop is not
enough, the meter will beep
twice and display “STRIP
UNDERFILLED” and “APPLY MORE
BLOOD NOW.” You have about
30 seconds to apply more
blood to the same strip.
CAUTION: Always check the display on your pump to
ensure that the glucose result shown agrees with the
glucose result shown on the meter.
3. Test immediately after
a good drop of blood
hasformed.
83940409_CntrNextLINK_UG_ENca_FpBp_v0.indd 16-1783940409_CntrNextLINK_UG_ENca_FpBp_v0.indd 16-17 1/30/14 8:51 AM1/30/14 8:51 AM

TESTING
19
TESTING
18
OK
Fasting
Before Meal
After Meal
No Mark
AUTOLOG
Fasting
The Fasting marker can be used when testing
blood sugar levels after going without food
and sugared drink for 8 hours.
Before Meal
The Before Meal marker can be used when
testing blood sugar levels within 1hour
before a meal.
After Meal
The After Meal marker can be used when
testing blood sugar levels within 2hours after
a meal.
No Mark
You can select No Mark if you are testing
attimes other than before or after a meal or
fasting.
9.3
10:30 AM | 10/11
Reminder
Notes
9.3
mmol
L
After Meal
Your test result appears as
a large number and then
changes to the usual test
result screen.
If you are done, remove the test strip. To turn off the meter,
press and hold the top Menu button. Or, after 3 minutes of
inactivity, the meter turns off automatically.
YOUR RESULTS
Send
Don’t Send
9.3
mmol
L
Before Meal
If you make your AutoLog selection very quickly, you may see
the remainder of the testing countdown.
CAUTION: Always check the display on your pump to
ensure that the glucose result shown agrees with the
glucose result shown on the meter.
WARNING
• Ask your health care professional if Alternative Site
Testing is right for you.
• Do not calibrate your continuous glucose monitoring
device from an AST result.
• Do not calculate a bolus based on an AST result.
®
Testing With AutoLog On
Alternative Site Testing (AST) — Palm
If
Always
was selected in
Send Options during Setup,
your result is automatically
sent to your pump. If
Never
was selected in Send
Options, you will not have the option to send the result to your
pump. If
Ask Me
was selected in Send Options, you can choose
to send your result to your pump after each blood sugar test.
Press
Send
or
Don’t Send
. If Send is chosen, press OK on the
Send confirmation screen.
Leave the test strip in the meter to set a reminder for your next
test (see page 31) or add a note (see page34).
Alternative Site Testing (AST) — Palm
IMPORTANT: For Alternative Site Testing, use the clear endcap
on your lancing device. Your CONTOUR
®
NEXT LINK meter can
be used for fingertip or palm testing. See the MICROLET
®
2
insertfor complete instructions in Alternative Site Testing.
Testing With AutoLog On
After you apply blood to the
test strip, use the to select
Fasting
,
Before Meal
,
After
Meal
, or
No Mark
, and then
press
OK
. (Scroll down to see
No Mark
.)
NOTE:
• Your test result does not display until you make an
AutoLog selection.
• If your result is above or below your High or Low
Alertsettings, you will see your result without pushing
abutton.
83940409_CntrNextLINK_UG_ENca_FpBp_v0.indd 18-1983940409_CntrNextLINK_UG_ENca_FpBp_v0.indd 18-19 1/30/14 8:51 AM1/30/14 8:51 AM

TESTING
TESTING
2120
8. Hold the tip of the test
strip in the blood drop
until the meter beeps. Do
not press the tip against
the skin or place the blood
on top of the test strip or
you could get inaccurate
results or errors.
®
Getting a Blood Drop for Alternative Site Testing
Getting a Blood Drop for Alternative Site Testing
Getting a Blood Drop for Alternative Site Testing
1. Wash your hands and the
puncture site with soap and warm
water. Rinse and dry well.
2. Attach the clear AST endcap to
the M
ICROLET
®
2 lancing device.
3. Select a puncture site from
a fleshy area on the palm.
Avoidveins, moles, bones,
andtendons.
4. Press the clear endcap
firmly against the puncture
site andthen press the blue
releasebutton.
5. Maintain steady pressure until a
small, round blood drop forms.
6. Lift the device straight up and
away from the skin without
smearing the blood.
7. Test immediately after you have formed a small, round
blooddrop.
Immediately touch the tip of the test strip to the drop of
blood. The blood is pulled into the test strip through the tip.
Do not test the blood sample from palm if you get:
• Smeared blood
• Clotted blood
• Runny blood
• Clear fluid mixed with the blood
IMPORTANT: Do not use AST under the following conditions:
• If you think your blood sugar is low
• When blood sugar is changing rapidly (after a meal, insulin
dose, or exercise)
• If you are unable to feel symptoms of low blood sugar
(hypoglycaemic unawareness)
• If you get alternative site blood sugar results that do not
agree with how you feel
• During illness or times of stress
• If you will be driving a car or operating machinery
Alternative Site test results may be different from fingertip
results when glucose levels are changing rapidly (e.g., after
a meal, after taking insulin, or during or after exercise).
Additionally, glucose levels may not rise as high or fall as low
as levels in the fingertip. As such, fingertip testing results may
identify hypoglycaemic levels sooner than alternate site results.
Alternative Site Testing is recommended only when it is more
than 2 hours after a meal, diabetes medication, or exercise.
If you do not have a clear endcap to perform AST, contact
Bayer Customer Service. Please see back cover for contact
information.
83940409_CntrNextLINK_UG_ENca_FpBp_v0.indd 20-2183940409_CntrNextLINK_UG_ENca_FpBp_v0.indd 20-21 1/30/14 8:51 AM1/30/14 8:51 AM

TESTING
23
TESTING
22
TESTING
22
STRIP UNDERFILLED
APPLY MORE BLOOD NOW
If the first blood drop is
not enough, the meter will
beep twice and display
“ STRIP UNDERFILLED” and
“APPLY MORE BLOOD NOW.”
You have about 30 seconds
to apply more blood to the
samestrip.
YOUR RESULTS
Send
Don’t Send
9.3
mmol
L
Before Meal
Too Little Blood
Remove used strip.
Repeat test with new
strip.
E01
If you do not apply more
blood within about 30
seconds, remove the strip
and repeat with anewstrip.
9. If you have the AutoLog
feature turned ON, the
AutoLog screen appears.
Select
Fasting, Before
Meal, After Meal, or No
Mark by pressing the OK
button when your selection
is highlighted. Scroll down to
see
No Mark
.
OK
Fasting
Before Meal
After Meal
No Mark
AUTOLOG
NOTE:
• Your test result does not display until you make an
AutoLog selection.
• If your result is above or below your High or Low
Alertsettings, you will see your result without pushing
abutton.
WARNING
• Dispose of the used lancet as medical waste or as
advised by your health care professional.
•
Do not reuse lancets. Use a new MICROLET
®
lancet
each time you test.
Getting a Blood Drop for Alternative Site Testing
Removing the Used Lancet
If you are done, remove the test strip from the meter. Press and
hold the top Menu button to turn off the meter. The meter also
turns off after 3minutes of inactivity.
a
b
2. Place the round protective lancet
cap on a flat surface with the
Bayer logo facing down.
3. With the used lancet still in the
lancing device, push the lancet
needle completely into the
middle of the exposed side of
the cap.
Removing the Used Lancet
1. In one hand, hold the lancing
device with your thumb on the
grip indent, with your other hand,
hold the endcap as shown, and
gently snap off the endcap.
If
Always
was selected in
Send Options during Setup,
your result is automatically
sent to your pump. If
Never
was selected in Send
Options, you will not have the option to send the result to your
pump. If
Ask Me
was selected in Send Options, you can choose
to send your result to your pump after each blood sugar test.
Press
Send
or
Don’t Send
. If Send is chosen, press OK on the
Send confirmation screen. You can change your send option at
any time using the Setup Menu (see page42).
WARNING
• Do not calculate a bolus based on an AST result.
• Do not calibrate your continuous glucose monitoring
device from an AST.
4. While pressing the release
button (a), pull the re-setting
handle (b), and the lancet will
drop into the container you
haveselected.
83940409_CntrNextLINK_UG_ENca_FpBp_v0.indd 22-2383940409_CntrNextLINK_UG_ENca_FpBp_v0.indd 22-23 1/30/14 8:51 AM1/30/14 8:51 AM

TESTING
TESTING
2524
3.8
Low Blood Sugar
14.0
High Blood Sugar
• A screen with large orange
numbers alerts you that
your blood sugar is high.
WARNING: Potential Biohazard
• Always dispose of test strip and lancet as medical
waste or as advised by your health care professional.
All products that come in contact with human blood
should be handled as if capable of transmitting
infectious diseases.
• Please refer to your M
ICROLET
®
2 package insert for
instructions on how to properly remove and dispose of
the lancet.
WARNING
You should consult your health care professional for
glucose values specific to your needs.
• If your blood sugar reading is under 2.8 mmol/L, follow
medical advice immediately.
• If your blood sugar reading is over 13.9 mmol/L, wash
and dry your hands well and repeat the test with a new
strip. If you get a similar result, follow medical advice
immediately.
• Always consult your health care professional before
changing your medication based on test results.
®
Test Results — Expected Values
High and Low Blood Sugar Alert Screens
Test Results — Expected Values
Blood glucose values will vary depending on food intake,
medication dosages, health, stress, or activity. Non diabetic
plasma glucose concentrations are normally maintained within
a relatively narrow range, approximately 3.9 - 6.1mmol/L in
afastingstate.
6
High and Low Blood Sugar Alert Screens
Your meter has been preset with a low blood sugar
(hypoglycaemia) value of 3.9 mmol/L and a high blood sugar
(hyperglycaemia) value of 13.9mmol/L. These are the preset
values, but can be customized by you and/or your health care
professional. Youcan change the High and Low Alert levels
under Main Menu, Setup option (see page52).
If your blood sugar reading is under your low blood sugar
alertlevel:
• A screen with large orange
numbers alerts you that
your blood sugar is low.
If your blood sugar reading is over your high blood sugar
alertlevel:
83940409_CntrNextLINK_UG_ENca_FpBp_v0.indd 24-2583940409_CntrNextLINK_UG_ENca_FpBp_v0.indd 24-25 1/30/14 8:51 AM1/30/14 8:51 AM

TESTING
TESTING
2726
Before Meal
After Meal
Time After Meal
Don’t Feel Right
Sick
Stress
Activity
Go Back
ADD NOTES
OK
NOTE: If the highlight
is over an item that has
previously been selected,
you will see a red “X”
instead of “OK.”
10:30 AM | 10/11
Reminder
Notes
14.0
mmol
L
High Blood Sugar
Before Meal
After Meal
Time After Meal
Don’t Feel Right
Sick
Stress
Activity
Go Back
ADD NOTES
WARNING
Shake the control solution well before testing.
WARNING
• Do not calibrate your continuous glucose monitoring
device from a control result.
• Do not calculate a bolus based on a control result.
®
Testing in the Dark
Control Solution Testing
Testing in the Dark
Your meter has a lighted test strip port to help you test in
the dark.
• With the meter off, give the top Menu button two quick
presses to turn on the test strip port light.
• Insert a test strip and the display screen appears.
• Once blood is applied to the test strip, the light goes off.
• Continue with your test.
• Two quick presses of the top Menu button also turns off
thelight.
Control Solution Testing
CAUTION: Use only CONTOUR
®
NEXT control solution
from Bayer (Normal, Low and High) with your
CONTOUR
®
NEXT LINK blood glucose monitoring system.
Using anything other than CONTOUR NEXT control solution
can cause inaccurate results.
CAUTION: Check the expiry date on the test strip bottle
and the expiry date and discard date on the control solution
bottle. DO NOT use expired materials.
Quality Control
You should perform a control test when:
• using your meter for the first time
• you open a new bottle or package of test strips
• you think your meter may not be working correctly
• you have repeated, unexpected blood glucose results
Normal, Low and High control solutions are available separately
if not included in the meter kit. Always use C
ONTOUR NEXT
control solutions from Bayer. Other brands
could present incorrect results. If you need help
locating CONTOUR NEXT control solutions from
Bayer, contact Bayer Customer Service. Please
see back cover for contact information.
1. Remove the test strip from the bottle and
firmly snap the lid closed.
• If AutoLog is ON and you
did not mark your result
before the high or low alert
appeared, select Notes.
• Press the or button to
scroll through the choices.
• Press
OK
when your choice
is highlighted.
83940409_CntrNextLINK_UG_ENca_FpBp_v0.indd 26-2783940409_CntrNextLINK_UG_ENca_FpBp_v0.indd 26-27 1/30/14 8:51 AM1/30/14 8:51 AM

TESTING
TESTING
2928
10:30 AM | 10/11
6.7
mmol
L
Control Test
APPLY BLOOD
WARNING
• If the control solution test result is out of range,
the result may be transmitted to your pump when
in “Always” send mode (see page 30).
• Do not send an out of range control result to
yourpump.
®
Control Solution Testing
10. The meter shows the
AutoLog screen (if
AutoLog is ON) but will
sense control solution.
The meter will count
8. Immediately touch the
tip of the test strip to the
drop of control solution.
9. Hold the tip in the drop
until the meter beeps.
CAUTION: If your control solution test result is out of range,
contact Bayer Customer Service. Please see back cover for
contact information. Do not use the meter or test strips for
blood glucose testing until the issue is resolved.
11. Compare your control test result to the ranges
printed on the test strip bottle.
12. Remove test strip. To turn the meter off,
press and hold the Menu button, OR, after
3 minutes of inactivity, the meter turns off.
Dispose of the used test strip as medical
waste or as advised by your health care
professional.
NOTE: Control test results that are marked as “Control
Test” are not transmitted to the pump.
down for 5 seconds and the control test result will display
on the meter. It automatically marks the result as a “Control
Test” and stores it in memory. Control test results are not
included in your blood sugar averages.
7. Squeeze a small drop of control solution on a clean non-
absorbent surface.
Do not apply control solution to your finger or to the test
strip directly from the bottle.
5. Shake the control solution
bottle well before every
use.
6. Remove bottle cap and
use a tissue to wipe
away any solution around
the bottle tip before
dispensing a drop.
4. You will see the Apply
Blood screen. The meter is
now ready for you to test.
2. Hold the test strip with the
grey square end facing
up.
3. Insert the grey square
end of the test strip into
the test strip port until the
meter beeps.
Control Solution Testing
83940409_CntrNextLINK_UG_ENca_FpBp_v0.indd 28-2983940409_CntrNextLINK_UG_ENca_FpBp_v0.indd 28-29 1/30/14 8:51 AM1/30/14 8:51 AM

FEATURES
31
FEATURES
30
YOUR RESULTS
Send
Don’t Send
9.3
mmol
L
Before Meal
OK
Fasting
Before Meal
After Meal
No Mark
AUTOLOG
10:30 AM | 10/11
Reminder
Notes
5.1
Before Meal
mmol
L
SETUP
Pump Options
Reminder: Off
Date
OK
AutoLog (Marking Your Results)
Test Reminders
Sending Results to Your Pump
You can send your results to the pump during testing. During
Initial Setup (Send Options) or in Setup (Pump Options - Send
Options), choose Ask Me or Always.
If
Always
was selected in
Send Options during Setup,
your result is automatically
sent to your pump. If
Never
was selected in Send
Options, you will not have the option to send the result to your
pump. If
Ask Me
was selected in Send Options, you can choose
to send your result to your pump after each blood sugar test.
CAUTION:
• You may want to test with Send Options set to Never if
you do not want to create a wireless signal (for example,
if you have been asked to turn off all electronic devices
in an aircraft).
• Always check the display on your pump to ensure that
the glucose result shown agrees with the meter display.
Features
Your CONTOUR
®
NEXTLINK meter includes many
testingfeatures.
AutoLog (Marking Your Results)
Your meter comes with an AutoLog feature that lets you
markyour test result as
Fasting,
Before Meal,
After
Meal and No Mark.
Your meter comes with AutoLog OFF. If you would like to
see your results when Fasting, Before Meal or After Meal, we
recommend that you turn on this feature (see page 47).
If you have turned AutoLog ON in Setup, before your test result
is displayed, the AutoLog screen appears. However, if your
result is above your High Alert setting or below your Low Alert
setting, you will always see your result in 5 seconds without
pushing a button.
Press
Send
or
Don’t Send
. You can change your Send Option at
any time using the Setup Menu (see page42).
1. With the test strip
still in the meter,
press Reminder.
Setting a Test Reminder
Test Reminders
A reminder for your next test can be set after testing OR from
the Setup Menu (see page 43).
A reminder can be set in 15-minute increments from 15 minutes
to 23 hours, 45 minutes.
OR from the Setup Menu
press the button to
highlight
Reminder: Off
. Press
OK
to turn the Reminder ON.
83940409_CntrNextLINK_UG_ENca_FpBp_v0.indd 30-3183940409_CntrNextLINK_UG_ENca_FpBp_v0.indd 30-31 1/30/14 8:51 AM1/30/14 8:51 AM

FEATURES
FEATURES
3332
REMINDER
15
mins
CHANGE COUNTDOWN
3
hrs
OK
Reminder in:
15
mins
3
hrs
Change
Done
Changing a Reminder Time
1. Press the or button to select the correct hours and
minutes (in 15-minute increments).
REMINDER
Start
Change
Go Back
2
hrs
COUNTDOWN
REMINDER
30
mins
REMINDER IN
1
hr
Stop
Change
Go Back
2. To stop the countdown,
press Stop.
A confirmation screen
appears and the
countdownstops.
1. Press Reminder. If the
countdown is currentlyon,
the screen will read
“Reminder In” with the
remaining amount of
timedisplayed.
10:30 AM | 10/11
Reminder
Notes
9.3
mmol
L
After Meal
Turning Off a Test Reminder
A reminder can be turned off or changed after testing or from
the Setup Menu.
NOTE: If you do a blood sugar test within 15 minutes of a
set reminder, the reminder turns off automatically.
REMINDER
Start
Change
Go Back
2
hrs
COUNTDOWN
®
Test Reminders
Changing a Reminder Time
2. Press OK after
eachselection.
A screen confirms the
reminder countdown time.
When the Reminder feature is on, the clock symbol appears in
the headers on the Setup and Main Menu screens.
The meter retains the reminder time that you set until you
change it or turn it off.
Getting a Reminder
When the reminder time is reached, 20 beeps will sound. The
meter will turn on and a reminder screen will appear.
You can stop the beeps in two ways:
NOTE: If you decide to test within 15 minutes before
the reminder time, the countdown is stopped with the
insertion of the test strip. Proceed with testing.
Time for your next
test.
OK
1. Press OK, insert a test strip
and proceed with testing,
OR
2. Insert a test strip and
proceed with testing (see
page 12).
You can change
the Reminder
Countdown
time by
pressingChange.
2. Press Start
to begin the
countdown. The
preset time is
2hours or, if you
have changed it,
the last reminder
time that you set
isnow the default.
83940409_CntrNextLINK_UG_ENca_FpBp_v0.indd 32-3383940409_CntrNextLINK_UG_ENca_FpBp_v0.indd 32-33 1/30/14 8:51 AM1/30/14 8:51 AM
/