Page is loading ...

Setup Guide — P/2 DA2 WM F, WM F AAP, EC F, D
This guide provides basic instructions for an experienced
installer to set up and operate the Extron
®
P/2 DA2 WM F, WM F AAP, EC F, D Series of
distribution amplifiers.
Installation
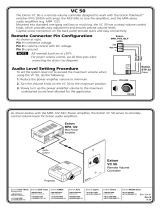
These distribution amplifiers are high performance one input, two output video devices with
audio that accept video input from a VGA-QXGA compatible PC and distributes that signal to
separately buffered outputs. Refer to the user manual for specific mounting instructions. An
example application for the P/2 DA2 D is shown below. Refer to the user manual for other
application and installation examples.
COMP
UTER IN
MONIT
OR
OUT
AUDI
O IN
Projector
Extron
MHR-5 Cable
PC w/ Audio
Extron
P/2 DA2 D
Distribution Amplifier
Audio
Audio
Output
Extron
MPA 122
Mini Power Amplifier
POWER
12V
3A MA
X.
OUTP
UTS
4/8 Ohms SPEAKERS
INPUT
S
L
R
L
R
REMO
TE
10V
VOL/MUTE
L
MPA
122
R
C
US
Extron
SI 3CT LP
Full-Range Ceiling
Speakers
C
Installation and service must be performed by authorized personnel only.
Step 1 — Power down
Power off the display device, the PC and its local monitor.
Step 2 — Connect inputs
• For video input, connect the VGA output of the PC to the Input or Computer In 15-pin
HD connector on the faceplate of the distribution amplifier.
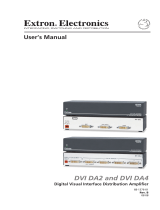
• For unbalanced stereo audio input, connect the input device
to the 3.5 mm female audio jack on the faceplate of the
distribution amplifier. Wire the audio plug as shown on the
right.
Step 3 — Connect outputs
• If a local monitor is being used, connect the monitor of the PC to the Buffered Local
Monitor or Monitor Out 15-pin HD output connector on the faceplate of the distribution
amplifier.
(Continued on reverse side)
Sleeve ( )
Ring (R)
Tip (L)

Setup Guide — P/2 DA2 WM F, WM F AAP, EC F, D
Extron USA - West
Headquarters
+800.633.9876
Inside USA / Canada Only
+1.714.4 91.1500
+1.714.4 91.1517 FAX
Extron USA - East
+800.633.9876
Inside USA / Canada Only
+1.919.86 3.1794
+1.919.86 3.1797 FAX
Extron Europe
+800.3987.6673
Inside Europe Only
+31.33.453.4 040
+31.33.453.4 050 FA X
Extron Asia
+800.7339.876 6
Inside Asia Only
+65.638 3.4400
+65.638 3.4664 FAX
Extron Japan
+81.3.3511.7655
+81.3.3511.7656 FAX
Extron China
+400.883.1568
Inside China Only
+86.21.3760.156 8
+86.21.3760.156 6 FA X
Extron Middle East
+971.4.2991800
+971.4.2991880 FA X
© 2010 Extron Electronics. All rights reserved. www.extron.com
68-463-52
Rev. A
01 10
• Connect the display device to the 15-pin HD connector on the rear panel of the
P/2 DA2 WM F, WM F AAP, EC F or to the 5 BNC connectors on the rear panel of the
P/2 DA2 D.
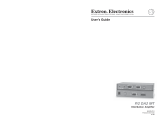
• For audio output, connect the audio output device to the 3.5 mm direct insertion 5-pole
connector on the rear panel of the distribution amplifier. See the diagram below.
Unbalanced Stereo Output
Tip
NO GROUND HERE.
Sleeve(s)
Tip
NO GROUND HERE.
Balanced Stereo Output
Tip
Ring
Sleeve(s)
Tip
Ring
L R
L R
Left
Right
Left
Right
CAUTION
For unbalanced audio, connect the sleeve(s) to the center contact ground. DO NOT connect the
sleeve(s) to the negative (-) contacts.
Step 4 — Set DIP switches
Two sliding-type DIP switches can be found on the faceplate of the P/2 DA2 WM F,
WM F AAP, EC F. Refer to the user manual for setting the DIP switch for the D model.
To set these DIP switches, slide the switch to on/closed or off/open position.
The two DIP switches provide proper ID bit termination for a laptop computer that is not
attached to a local monitor. Also, see the note below regarding local monitor output and the
setting of internal jumpers.
IDPin4andIDPin11
ON – Set both pins to On if you are using the P/2 DA2 WM F, WM F AAP,
EC F with a laptop computer that is not attached to a local monitor.
OFF – Set both pins to Off if you are attaching a local monitor to the
P/2 DA2 WM F , WM F AAP, EC F.
N
The jumpers inside the distribution amplifier are set at the factory for output
to a local monitor. However, you can direct output to a data display by resetting the
jumpers. Refer to the user manual for further details.
Step 5 — Power up
Connect the power supply cord of the distribution amplifier to a 100 to 240 VAC power source
and power up the local monitor, PC, audio and display device. See the wiring diagram below.
C
Always use a power supply specified by Extron for the distribution
amplifier. Use of an unauthorized power supply voids all regulatory
compliance certification and may cause damage to the power supply and
the distribution amplifier.
Power Supply
Output Cord
Captive Screw
Connector
3
5
SECTION A–A
Ridges
Smooth
A A
Tie Wrap
C
Power supply voltage polarity is critical. Incorrect voltage polarity can
damage the power supply and the distribution amplifier. Identify the
power cord negative lead by the ridges on the side of the cord.
ID PIN 4
ID PIN 11
/