Page is loading ...

WiFi1080p Smoke Detector Hidden Camera
User’s Guide

WiFi 1080p Smoke Detector Hidden Camera
The WiFi 1080p Smoke Detector Hidden Camera is a 1080P high definition
covert DVR that supports up to a 32GB micro SD card. The device records
continuous and/ or motion-activated video. It also can capture photos. This
hidden camera is battery powered.
In the Box:
You will find the WiFi 1080p Smoke Detector Hidden Camera, USB Cable,
and this User’s Guide.

Getting Started
The first step in using your WiFi cam is to charge the device via the USB
cable provided for 3 hours before use. Next you will insert your Micro SD
card into the WiFi Hidden camera located between below the USB port.
Next, go to the App or Google Play store and download the free
“iMiniCam” Application. This camera will work without the presence of an
SD card; it is not recommended if you would like to use the customizable
video recording settings. If the network connection is lost, the camera
could miss capturing video without an SD card providing backup storage.
This device does not have internal memory and relies on a micro SD card
for video recording to be saved. The micro SD card should be inserted
with the gold contacts facing downward. Before inserting a micro SD card,
make sure the card is formatted correctly. The device can record in the
FAT16/32 format. If you aren’t sure how to format an SD card, you can find
instructions here: http://l.bhs.net/sd-format.
Getting to know your iMiniCam Mobile Application

Con guring A Local Wireless Network Connection
Con guring A Local Wireless Network Connection


By connecting to your camera through its WiFi hotspot connection (known
as “Direct Connect”), you’re able to view your video locally within 100 feet
of the device.
It takes up to 5 minutes for the camera’s hotspot/WiFi to send out a
signal after the device is fully powered on. After 5 minutes, open the WiFi
settings on your mobile device (smartphone or tablet). From here you will
locate the Camera’s WiFi device name: “CMxxxxxxxxxxxxxx” (with the X’s
representing a unique combination of numbers and letters specific to your
camera). Select this network and connect. Once you connect successfully
you will exit out of the WiFi menu. You are now connected to the camera’s
WiFi Wireless Hotspot Network.
Next, open the iMiniCam application from your mobile device. On the upper
right-hand corner select the + icon and select “Add new online camera”.
The default password will automatically populate in the Password field.


Select Search and your camera will appear. Note: The camera’s default
password is (8888).
Select your camera and click OK. Your camera is now online;Prompt to
change default password, enter desired password and select change.
Next to the camera shown online select the settings wheel;from here you
Select your camera and click OK. Your camera is now online;Prompt to Select your camera and click OK. Your camera is now online;Prompt to
change default password, enter desired password and select change.change default password, enter desired password and select change.
Next to the camera shown online select the settings wheel;from here you Next to the camera shown online select the settings wheel;from here you


can customize your settings. Select Advanced Confi g In the next section
we’ll cover connecting your camera to your WiFi network (known as a “P2P
Connection”), enabling you to view video remotely.
Con guring A P2P Network Connection
By connecting your camera to your WiFi network,Select WiFi Confi g.In WiFi
Con guring A P2P Network Connection

Confi g, select your Home or Offi ce WiFi SSID name and enter your network
Password. Once you enter your network information, your camera will reboot;
you will have to exit out of the iMiniCam app while the settings apply. After 1
minute, the camera’s indicator light will come on fl ash and then remain solid
blue. Your camera is now connected to your wireless network.

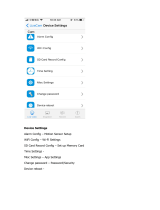
Conguring Other Advanced Settings
Within the iMiniCam app, clicking the gear icon located next to your
camera and selecting Advance Config will offer additional configuration
options besides connecting your camera to your WiFi network.
Alarm Configuration: Selecting the Alarm Config option allows you to
customize recording trigger settings.
Motion Detection Sensitivity: 1 is highest, 7 lowest for detecting activity. 4
is recommended for normal activity
Alarm Schedule: Scheduled recording, choose start and end time for
recording to trigger.
Alarm Interval: Choose between 30-300 seconds after motion is detected
to start recording again.
On-Screen Display: When motion is detected an event will display on your
screen.


SD Card Record Conguration
In the SD Card Record Config section you’re able to customize the settings
determining how and when your camera will record to an SD card.
Record:
• Record when Alarms: This option means the camera is activated based
on motion
• Record All Day: This option means continuous recording
• Timing Record: This option means you will schedule a start and end time for
Video to record.
Resolution: Select 1080p, 720p, 640p resolutions. Lower resolution will
preserve storage space.
File Length: Length of recorded video file choose between 1-20 minutes.
Record Sound: Is disabled.
Loop Recording: continuously record video (hour after hour) to the same SD
memory card.

Time Settings
Manual Choose time and Time Zone Or Sync time
with application based on Network settings applied.
MISC Settings - LED Indicators
Off: Turn LED Indicators off of the device
On: Turn LED Indicators on will appear illuminated on
the device
Flicker: LEDs will fl ash on the device

Change Application password
Here you can modify your current password to
protect anyone from accessing your camera
feed.
Glossary
In the SD Card Record Confi g section you’re able to customize the
settings determining how and when your camera will record to an SD card.
GB: GB is short for gigabyte which is a unit used to measure computer
storage capacity and is approximate to 1.07 billion bytes. 1 Gigabyte
of data is almost twice the amount of data that a CD-ROM can hold.
Additionally, 1 Gigabyte could hold the contents of about 10 yards of
books on a shelf.

LED: An abbreviation for “light emitting diode,” it’s an electronic device that
lights up when electricity passes through it. LEDs are good for displaying
images because they can be relatively small, and they do not burn out.
However, they require more power than LCDs.
Micro SD Card: Micro SD cards, also known as TransFlash, are smaller
versions of SD memory cards. As electronic devices are becoming smaller,
Micro SD cards are becoming more and more common in the marketplace.
USB Port: A USB port is a standard cable connection interface on
personal computers and consumer electronics. USB ports allow stand-
alone electronic devices to be connected via cables to a computer. USB
can connect computer peripherals such as mice, keyboards, PDAs,
gamepads and joysticks, scanners, digital cameras, printers, personal
media players, flash drives, and external hard drives.

/