Page is loading ...


HomeTroller Getting Started Guide – rev 2.0 Page 1
Table of Contents
Introduction......................................................................................................... 2
What’s Included.......................................................................................................... 2
Key Features .............................................................................................................. 3
Control Unit Specifications............................................................................................ 5
Installation .......................................................................................................... 6
Mounting the HomeTroller ............................................................................................ 6
Rear Panel Layout ....................................................................................................... 6
Perform a System Test................................................................................................. 7
Accessing the HomeTroller............................................................................................ 7
HomeTroller Operating System Protection (HSProtect)...................................................... 9
Setting the Time Zone ............................................................................................... 10
Using RealVNC for Remote Access ............................................................................... 10
Adding and Configuring Devices ........................................................................ 12
About Devices........................................................................................................... 12
Supported Technologies and Manufacturers................................................................... 12
Configuring Devices................................................................................................... 13
Creating Devices....................................................................................................... 14
Controlling Devices with Events......................................................................... 16
Elements of an Event................................................................................................. 16
Creating an Event ..................................................................................................... 17
Voice Recognition .............................................................................................. 18
The Speaker Client Application.................................................................................... 18
Voice Recognition Events............................................................................................ 20
Command Syntax...................................................................................................... 20
HomeSeer Phone ............................................................................................... 23
Connecting the Telephone Voice Interface..................................................................... 23
Enabling the Phone Feature ........................................................................................ 24
Running Events by Phone........................................................................................... 24
The Address Book ..................................................................................................... 24
Receiving Phone Messages ......................................................................................... 24
Caller Announcements ............................................................................................... 25
Customizing the HomeTroller............................................................................. 25
ASCII Scripting......................................................................................................... 25
Scripting.................................................................................................................. 25
Digital I/O................................................................................................................ 25
Advanced Programming ............................................................................................. 26
Operating System Restrictions........................................................................... 26
Technical Support .............................................................................................. 26
Information ....................................................................................................... 27
FCC/CE Regulations................................................................................................... 27
Warranty Information ................................................................................................ 27

HomeTroller Getting Started Guide – rev 2.0 Page 2
Introduction
The HomeTroller™ is a hardware-based home automation controller designed to incorporate all
the power and flexibility of HomeSeer HS2 software into a very compact, rugged, and easy-to-
install unit. The HomeTroller is designed to control lighting, appliances, security, HVAC, and
infrared (IR) devices, such as home theatre equipment. Since the HomeTroller is an open
standards system, the system can be integrated with numerous technologies from scores of
industry leaders, such as Lutron, Leviton, Intermatic, Lightolier®, HAI, JDS, Global Caché and
many more.
An open Application Program Interface (API) is included for programmers to add support for just
about any custom or proprietary systems that may be required.
This system uses HSProtect™ technology to protect the operating system on the hard disk.
You must read and understand how HSProtect works in order to operate the system
properly. See the section on HSProtect for more information.
What’s Included
The HomeTroller is shipped with the following parts:
• One HomeTroller Home Automation Controller Unit
• One Power Supply Unit
• One Power Cord
• One HomeTroller Getting Started Manual
The following HomeSeer (brand) software add-ons (“plug-ins”) are available
separately for use with the HomeTroller. Plug-ins may be installed from within the
HomeTroller “updater”. Some plug-ins are included at no cost. Others must be
purchased at homeseer.com:
Plug-ins to support the following:
• Global Cache IR Controller
• HAI Thermostat Plug-In
• HAI Omni Panel
• HomeVision Plug-in
• HouseLinc Plug-in
• Insteon Basic Plug-in
• IRLinc 1623PC Plug-in
• Is Speaking Plug-in
• iTunes® Media Player
• JDS IR XPander Plug-in
• JDS Stargate Plug-in
• Lightolier Compose Plug-in
• Lutron RadioRA
• Marrick LynX10-PLC X10 Plug-in
• Windows Media Center (MCE) 2005
• Windows Media Player 9/10
• MR26A Plug-in
• Napco Gemini
• NEOSpeech Dictionary Editor

HomeTroller Getting Started Guide – rev 2.0 Page 3
• Ocelot Plug-in
• OnQ Panel Plug-in
• PowerLinc USB Plug-in
• RCS Serial Thermostat Plug-In
• RCS X-10 Thermostat Plug-In
• Shopping list script
• Slinke Plug-in
• TempLinc Plug-in
• TI103 X10 Plug-in
• TouchPad Interface
• UPB (Universal Powerline Bus)
• WebCam Plug-in
• Weather script
• Z-Wave USB Drivers
3rd Party plug-ins are also available for use with the HomeTroller. For a complete
listing of these plug-ins, visit homeseer.com or use the HomeTroller updater.
Additional Software:
• RealVNC (Remote Access Tool)
• MS Internet Explorer
• MS Outlook Express
• MS Windows Media Player
• HSProtect system tray monitor
NOTE: HomeTroller is NOT designed to run MS-Office.
Key Features
Reliability
The HomeTroller was designed to be very reliable. The embedded operating system is locked
(write-protected) to prevent unwanted changes and to guard against file corruption from virus,
spyware and malware attacks.
Web-Based Management
The system may be managed Via any web browser. This allows for easy unit management and
configuration on- or off-site. Easily add/change schedules or troubleshoot issues from anywhere.
Mechanical Design
The HomeTroller has a very small footprint (9.25” wide x 7” deep x 2” high) and can installed
vertically or horizontally.
Software Features
The HomeTroller offers many features not found in other stand-alone automation controllers
such as:
• HSProtect™
This protects the operating system from unwanted writes during normal operation.
With HSProtect, it’s virtually impossible to corrupt any files on the C drive. The
system is monitored using a system tray application. Current status of your system

HomeTroller Getting Started Guide – rev 2.0 Page 4
may be checked by hovering your mouse over the HSProtect system tray icon.
• HSSentry™
This is a hardware watchdog that is reset from within the HomeSeer scheduler. If the
scheduler stops running for any reason, HSSentry™ will reset the unit. This results in
virtually 100% uptime for the unit.
• Remote access
The entire system can be monitored and controlled from the web, allowing users to
keep tabs on their home(s) while away. This is an excellent solution for vacation
and/or 2nd homes.
• Text-To-Speech Processing
The included text-to-speech engine allows for system reminders, alerts and
announcements using synthesized or (optionally) concatenated human speech
models. This feature can be used for announcing incoming phone calls, motion at the
front door, news, weather, medicine schedule, appointments and many other itmes.
Announcements can also be sent to any computer on the home network (LAN) or on
the internet (WAN). The unit includes one of the best sounding voices available,
which is very natural and easy to understand.
• Voice Recognition / Voice Control
Any computer on the home network (LAN) or on the internet (WAN) can be used to
control your HomeTroller system with voice commands. Voice commands may also
be issued by telephone using HomeSeer Phone software (optional). Voice may also
be used to create automation events!
• Powerful event mechanism
Trigger event actions based on any of the following:
Conditions (many)
Status change of any device
Absolute time
Sunrise/sunset (with offset)
By email received
Security panel events
By matched infrared
Recurring at regular second/minute intervals
I/O events from controllers
Events from plug-ins
• Event Actions
In response to event triggers, these actions (and more) may be performed:
Send lighting control signals (operate devices)
Play sounds or speak using text-to-speech
Send email
Run a script
Trigger another event
Dial a network connection
Media Player functions
Plug-in functions
Web Camera functions
Phone functions such as dialing a phone number or extension phone

HomeTroller Getting Started Guide – rev 2.0 Page 5
Customizable Software
HomeTroller is designed for easy installation and configuration by any homeowner. The unit
features an easy-to-use, menu-driven interface for setup and configuration.
For those who wish to venture a bit further, the system software is totally customizable! The
user interface is web-based and may be changed using cascading stylesheet (CSS) commands.
The included software API allows for the creation of custom software “plug-ins” using the .NET
development environment. These plug-ins are used to provide additional support for custom
hardware and software. The system also includes a powerful scripting interface that supports
popular scripting languages such as VBScript, VB.NET, JavaScript, Python and Perl. Scripts
provide a quick way to add custom functionality using complex if-then-else logic, or for sending
binary or ASCII text to a serial port. The user interface and custom interfaces are built or
modified using simple web (HTML) technologies.
Add-Ons
Software add-ons are referred to as “plug-ins”. They enhance the operation of the HomeTroller
by adding functionality such as integration with a security panel, infrared controller, or media
player application like MS Windows® Media Player or Apple’s iTunes® media player. To see the
latest list of plug-ins available, click on the Updater button and follow the prompts. Some plug-
ins are free, some are not.
Control Unit Specifications
Size: 9.25” W, 2” H, 7” D Processor: 1.0 GHz VIA C7
Storage 4 GB DOM Fans: fanless
Memory: 1 GB DDR2 OS: Embedded Windows XP (XPe)
Serial Ports: 4 Video Out: SVGA
USB Ports: 3 (2 rear, 1 front) Audio: Mic In / Line Out
Network (1 port):10/100 Ethernet PS/2 Keyboard and Mouse ports
Power Supply: 100-240v – 50/60 Hz
Certifications: UL, FCC, RoHS, CE

HomeTroller Getting Started Guide – rev 2.0 Page 6
Installation
Mounting the HomeTroller
The HomeTroller can be set on a shelf and may be mounted horizontally or vertically. While the
unit can be located just about anywhere, these simple installation tips should be observed:
• Allow for adequate airflow around the unit.
• If possible, install an uninterruptible power supply or surge suppressor to protect the unit
from power outages or line voltages fluctuations.
• Locate near other home automation equipment for easier connectivity.
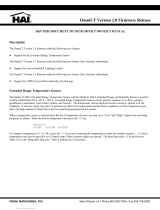
Port Layout
A description of each port is included below.
Figure 1: Front / Rear Panel of HomeTroller
1. Power: Connect the included power supply cable to this jack.
2. Monitor: To monitor the unit directly, plug a VGA monitor into this port. This is not
necessary for home network (LAN) or internet (WAN) control.
3. Keyboard: To control the unit directly, plug a PS/2 keyboard into this port. This is not
necessary for home network (LAN) or internet (WAN) control.
Mouse: To control the unit directly, plug in a PS/2 mouse into this port. This is not

HomeTroller Getting Started Guide – rev 2.0 Page 7
necessary for home network (LAN) or internet (WAN) control.
4. Serial Ports: Thermostats, controllers, security systems and other technology interfaces
can communicate with the HomeTroller through these RS-232 serial ports. Four ports
are provided. Additional ports may be added by using USB-to-serial port converters.
5. USB 2.0: Allows the HomeTroller to monitor and control USB-style home automation
interfaces and peripherals. 3 ports are provided, 2 on the rear and 1 in the front.
6. LAN: Connect a standard 10/100 network cable into this jack for home network (LAN)
and internet (WAN) operation.
7. Audio In – Microphone: Connect a microphone to this port for voice control of the
HomeTroller .
8. Audio Out : Connect this to the audio out connection on your audio receiver or whole
house audio system for text-to-speech announcements or music.
9. Parallel Port: (unused).
Perform a System Test
Once the HomeTroller is mounted and home automation devices have been attached, follow the
steps below to perform a system test.
1. Turn on the unit. The green LED on the front should be on. The blue LED will show disk
(DOM) activity. The yellow LED shows network activity.
2. If connected to a monitor and keyboard, the startup screen will appear and the unit will
automatically log in. The default login is administrator for user and admin for the
password.
If connecting remotely from another computer, launch the web browser and enter the
URL of the box using its name or IP address. The default name set for the unit is
HomeTroller (http://HomeTroller). The IP address can be set manually or a dynamic
(DHCP) address can be used.
3. The Start page will appear. This page gives you quick access to the most commonly used
areas of the system.
4. Follow the steps below to test the built-in audio function of the HomeTroller
a. Attached speakers or headphones to the appropriate “audio out” jack(s)
b. From the HomeTroller web interface, click the “Control” button to open the Control
Panel.
c. In the “Immediate Script Execution” box, type: [hs.speak "HomeTroller test"]
without the brackets.
d. Click the “Execute Command” button. The HomeTroller should now speak
“HomeTroller test”.
Accessing the HomeTroller
There are several graphical user interfaces (GUIs) for controlling the HomeTroller. Some
interfaces, however, are only available in certain situations, as explained below.

HomeTroller Getting Started Guide – rev 2.0 Page 8
Web Browser
The HomeTroller can be controlled using a web browser on the HomeTroller unit itself, or from
any other web browser anywhere in the world. The built-in web server is enabled by default. To
configure it, navigate to the Setup area and click on the Web Server tab. Options in this screen
determine the port the web browser will use to access the HomeTroller and whether or not
guests can view events. The features accessible through the web browser depend on options set
in the Web Server Setup screen and access rights of the user as set in the Web Users Setup
screen.
Figure 2: HomeTroller Web Browser
The HomeTroller web page can be accessed using one of the following methods:
• On the computer running the HomeTroller, launch Internet Explorer and type
http://localhost or http://127.0.0.1 in the Address bar and press Enter or click Go.
• On a computer on the same network as the HomeTroller (home network), type
http://hostname where “hostname” is the name of the HomeTroller (HomeTroller)
Alternatively, type http://192.168.0.n, where “n” is the last number of the IP address
of the HomeTroller on the home network. This IP address is typically assigned by your
home network router.
• On a computer other than the one running the HomeTroller, launch Internet Explorer and
type http:// followed by the IP address of the HomeTroller.
Which buttons appear at the top of the web page depends on which options are enabled in the Web
Site Setup screen. This Getting Started Guide assumes that all available buttons have been enabled.

HomeTroller Getting Started Guide – rev 2.0 Page 9
Touchscreens and Pocket PCs
The HomeTroller can also be controlled through touchscreens and pocket computers (or PDAs).
These interfaces are similar to controlling the HomeTroller through web browsers, but the layout
of the screens is adjusted for easy control through touchscreens or PDAs. The appearance of the
screens is set in the Touchpad Display Setup Admin screen, by selecting a specific “skin”.
Selecting a skin in the Touchpad Display Setup Admin screen sets a “cookie” on the computer in which
the skin was selected. In this manner, a touchscreen monitor can be set to the “Americana” skin while
a PDA is set to the “Pocket PC” skin.
To control the HomeTroller from a touchpad or pocket computer, set it up to access the
HomeTroller web pages by going to http://localhost/touchpad_control or
http://127.0.0.1/touchpad_control or http://yourIPaddress/touchpad_control. The URL
to use depends on if you’re accessing the web pages through the home network or over the
Internet. A port number will need to be added to the URL address if the HomeTroller web server
is set up on a port other than the default port of 80 (specified in the Web Server Setup Screen).
Note: The TouchPad interface is not installed on the HomeTroller by default. To install the
TouchPad interface, select the Updater button and follow the prompts until a list of updates
appears. Check the TouchPad Interface update then click Next to download this update. You
then need to restart the unit to install the update. Now go into the HomeTroller Setup, click the
Interfaces tab and enable the TouchPad Interface. Note that you need to be connected to the
Internet to install updates.
HomeTroller Operating System Protection (HSProtect™)
The operating system (OS) of the HomeTroller is stored on drive C on the internal Hard Disk and
is shipped in a “Read-Only” state. This state prevents unauthorized or accidental changes to the
OS or “C” drive. You can still write to the drive, but the writes are done to an “overlay” partition
and are not saved to the actual C drive. From the users perspective, it appears the data is being
saved on the “C” drive. If the system is restarted, the data that was written is lost. The status fo
the HSProtect system is monitored with a system tray application. You can over your mouse
over the HSProtect icon to see the current status of the system. If HSProtect is disabled, the
system tray application will pop up a balloon warning you that the system is not active and that
the “C” drive is writable. There may be times when it is necessary to make changes to the OS or
add additional files/programs to the “C” drive. When this happens, follow this procedure:
Committing data to the C drive
1. Save your data to the C drive as usual. Run any installers that may install an application.
2. Before you restart the unit, right click on the HSProtect system tray icon and select “Save
Changes to C Drive”. Only data that was written to the drive before you made this
selection will be saved. If you make further changes, select this option again to save the
changes.
3. Now restart the unit. The changes will be committed to the drive when the system starts
up.
4. Verify that your changes are saved.
Advanced Settings
If you want to totally disable the drive C protection for some length of time, you can do so with
the command line tool “ewfmgr”. To run this tool, bring up a command prompt and type one of

HomeTroller Getting Started Guide – rev 2.0 Page 10
the following commands (YOU MUST REBOOT THE SYSTEM BEFORE ANY OF THESE
COMMANDS WILL TAKE AFFECT)
1. To totally disable the protection: ewfmgr c: -disable
2. To re-enable the protection: ewfmgr c: -enable
When do I need to commit data to the drive? This list will help you determine when you need to
commit changes:
1. Whenever you change any system settings from the Windows control panel
2. Any changes you are making to the C drive
3. Any changes to iTunes, as the library file is stored on the C drive. Use the iTunes options
to set your media library to the D (due to there being more space on the D drive)
You do not need to commit these changes:
1. Changes from within HomeSeer. HomeSeer is installed on the D drive, which is not
protected. Any changes from within HomeSeer are typically saved to the HomeSeer
folder.
2. Media Player library changes. The administrator account that is running HomeSeer has its
application directory on the D drive. This is where Media Player saves its library
information. Therefore you do not need to commit changes that you make to the Media
Player library. If you store media files on the HomeTroller, use the Media Player options
to set the media file folder on the D drive.
3. Any change to the D drive.
Setting the Time Zone
The HomeTroller is pre-configured for the correct date and time for Eastern Standard Time (US).
To change the time zone for your unit, follow these steps:
1) Double Click on the clock in the lower right hand corner of the screen. Set the time zone
from the Time Zone tab.
2) Since this change is a change to the operating system, you need to commit the change
to disk. Right click on the HSProtect system tray icon and select “Save Changes to Drive
C”. Now restart the unit to commit the changes.
Using RealVNC for Remote Access
RealVNC is a freeware software tool that will allow you to access the Windows® interface of the
HomeTroller from any remote computer via home network (LAN) or the internet (WAN). The
HomeTroller is shipped with RealVNC pre-installed for remote access. Remote desktop is also
available, however it is not recommended. When you disconnect a remote desktop session,
Windows will disable the audio system and text-to-speech and voice recognition will not operate.
To Access the HomeTroller from Any Computer on your Home Network
1. Open any Java-compatible browser and in the address box enter
http://HomeTroller:5800. Alternately, you may use the LAN IP address for your
HomeTroller. Example: http://192.168.0.100:5800
2. If a security message appears, click the run button.
3. A small box titled “VNC Viewer: Connection Details”. Click ‘OK’ in this box.
4. Another small box titled “VNC Authentication” now appears. Use the password “admin”
and hit the ‘enter’ key. The Windows interface for the HomeTroller should now appear.

HomeTroller Getting Started Guide – rev 2.0 Page 11
To Access the HomeTroller from Any Computer on the Internet
1. Open any Java-compatible browser and in the address box enter
http://[IP Address]:5800 (where [IP Address] represents the physical or virtual internet
IP Address for your HomeTroller). Example: http://77.324.445.103:5800 or
http://mydomain.com:5800
2. If a security message appears, click the run button.
3. A small box titled “VNC Viewer: Connection Details”. Click ‘OK’ in this box.
4. Another small box titled “VNC Authentication” now appears. Use the password “admin”
and hit the ‘enter’ key. The Windows interface for the HomeTroller should now appear.
NOTE: If your internet connection is protected by a firewall or router, you’ll need to open port 5800 to
allow internet access to your HomeTroller. Check with your firewall or router manufacturer for details
on how to do this.

HomeTroller Getting Started Guide – rev 2.0 Page 12
Adding and Configuring Devices
About Devices
Devices are objects that hold information. Often these objects are tied to a real, physical device
in your home, such as a light switch, garage door, or television. The information the device
object holds is the status of that real device. A device can also hold information such as a
weather forecast or the winning lottery numbers that were downloaded from the Internet.
Various types of devices can be used with the HomeTroller, such as lights, appliances, security,
HVAC, and infrared.
Supported Technologies and Manufacturers
Hardware support is accomplished through the use of software plug-ins or scripts. This allows
for easy upgrades in the future. A software API (Application Programming Interface) is available
for developers to create their own plug-ins.
The following technologies and manufacturers are supported. Please check our website for the
latest supported hardware list as support for new hardware is constantly being added.
Technologies Lighting Security HVAC Infrared RFID A/V
Compose
Infrared
Insteon
Radio RA
RFID
Text-to-
Speech
UPB
Voice
Recognition
X-10
Z-Wave
Centralite
HAI
HomePro
Intermatic
Lightolier
Lutron
PCS
Smarthome
Simply
Automated
X-10
DSC
Elk
Napco
HAI
On-Q
GE/Caddx
Aprilaire
Enerzone
HAI
HomePro
RCS
Applied
Digital
Global Caché
Home
Electronics
IR Trans
JDS Inc.
Nirvis Inc.
SmartHome
UIRT
iAutomate.com
Apple
iTunes ®
Windows
Media Center
2005
Windows
Media Player
9/10
Russound
Figure 3: Supported Hardware List

HomeTroller Getting Started Guide – rev 2.0 Page 13
Configuring Devices
Specifying Device Types
Before adding devices to the
HomeTroller, you must first
specify the types of devices that
will be used. The Interfaces
Setup screen is where you enable
and configure plug-in programs
that can be used with the
HomeTroller. Plug-ins are
designed to integrate the
HomeTroller with other hardware
and software and to add
additional functionality to the
HomeTroller.
To get to this screen, launch the web interface (see page 8), click the Setup button beneath the
time and date bar, and then click the Interfaces tab.
Buttons appear under the columns for the type of hardware or software the particular plug-in
supports. By default, the button will be labeled Disabled, which indicates that the plug-in is not
enabled or not active. Click the button to enable the plug-in.
By default, this screen will be empty. Select the Install More Interfaces link at the bottom, or
click on the Updater button to get a list of available interfaces that you can add to the system.
Click the SAVE button to save the changes.
Z-Wave Devices
Refer to documentation included with your Z-Wave PC interface.
Interfaces Setup Screen
Figure 4: Interface Setup

HomeTroller Getting Started Guide – rev 2.0 Page 14
Creating Devices
The Add Device screen is where you create devices
in the HomeTroller. Once a device has been added,
it can be used in events and controlled by voice.
For the Z-Wave system, devices are automatically
added to the HomeTroller through the Interfaces
tab (see page 13). You cannot manually add Z-
Wave devices through this screen. You can modify
some properties of a Z-Wave device that has
already been created. Add Insteon and UPB
devices using the Config button from the Interfaces
page.
To get to this screen, launch the web interface to
get to the Status screen (see page 8 for a
screenshot), then click the Add Device button. The
appearance of the screen and
the fields available will vary
depending on the type of
device selected.
Lighting
In the Add Device screen (see above), select from the Device Type field the type of lighting
device you’re creating, such as “Lamp Module”, “PCS Light Switch”, “LM465”, etc. Give the
device a name, such as “Living Room Light”; specify its Super location (Second Floor, Outside,
East Wing, etc.) and then specify its Sub location (Timmy’s Bedroom, Garage, Den, etc.); and
select its House Code and Unit Code from the drop-down menus. Select any other options you’d
like to enable for this device by checking the appropriate check box in the Options field. Click
the SAVE button to finish creating the device. The Device Type normally only pertains to X10
type devices and thermostats. Most other lighting systems will create devices automatically. See
the Climate section for more information about thermostat devices. To create devices for other
lighting systems, make sure that system is enabled on the Interfaces tab in Setup. Once
enabled, devices for that system will be automatically added, or click on the Config button for
the appropriate system to create devices. For example, if a UPB lighting system is used the UPB
Configuration will ask for the location of your UPStart configuration file. Once this file is given,
all your UPB devices will be created automatically after reading the UPStart file.
Infrared/Home Theatre
Before creating infrared devices, you must first enable an infrared device in the Interfaces Setup
Screen and create infrared buttons (signals) in the Infrared Signal Configuration screen.
In the Add Device screen (see page 14), select Infrared Device from the Device Type field.
Give the device a name, such as “Family Room TV”, and specify its location (living room,
bedroom, etc.). Select any other options you’d like to enable for this device by checking the
appropriate check box in the Options field. In the Infrared Keys area, select an infrared button
that was previously created in the Infrared Signal Configuration screen from the drop-down
menu, then click the ADD button. Click the SAVE button to finish creating the device. Note that
Infrared devices cannot be configured until an Infrared controller is selected on the Interfaces
page in Setup.
Figure 6: Add Device Screen

HomeTroller Getting Started Guide – rev 2.0 Page 15
Security
In the Add Device screen (see page 14), select from the Device Type field the type of security
device you’re creating, such as “Motion Sensor”. Give the device a name, such as “Porch
Sensor”; specify its location (front porch, sidewalk, etc.); and select its House Code and Unit
Code from the drop-down menus, if the security device is an X-10 device. Select any other
options you’d like to enable for this device by checking the appropriate check box in the Options
field. Click the SAVE button to finish creating the device. If a security panel is being used such as
an HAI or NAPCO Gemini panel, make sure the appropriate plug-in is enable for the panel you
are using. Select the panel from the Interfaces tab in Setup and enable the plug-in. The
HomeTroller communicates with most panels through the serial interface. Once the interface is
enable, devices that represent the panels zones will automatically be created. You can view and
control these devices from the Status page.
Climate
In the Add Device screen (see page 14), select from the Device Type field the type of
thermostat device you’re creating, such as “RCS TR15 Thermostat”. Give the device a name,
such as “Guest Room Thermostat”; specify its location (first floor, guest room, etc.); and select
its House Code and Unit Code from the drop-down menus. Select any other options you’d like to
enable for this device by checking the appropriate check box in the Options field. If the
thermostat is connected to a COM Port on the HomeTroller, then specify the port number in the
Thermostat COM Port field. Click the SAVE button to finish creating the device. Thermostats are
supported in 2 ways. The most basic support is through a script file. This file may be modified by
you if required. Once a thermostat device is created, one device appears on the status page and
displays the current status of the thermostat. Buttons are also provided for setting the mode
and temperature setback.
Some thermostats may also be controlled though a special software plug-in. Thermostat plug-
ins provide more control over the thermostat and also provide feedback to the HomeTroller. This
allows events to be triggered on changes made to the thermostat externally, such as a set point
change. Click on the Updater button to get a list of available thermostat plug-ins. Plug-ins are
available for RCS and HAI thermostats.
Virtual Devices
Virtual devices don’t have a corresponding physical device, but hold values and states. For
instance, a virtual device could be created to hold the status of a motion sensor flag. An event
could then be created that increments the value of the flag when the corresponding motion
sensor detects motion. The number of visitors that approached the house could then be
determined by viewing the value of the virtual flag device.
To create a virtual device, go to the Add Device screen (see page 14) and select Virtual from
the Device Type field. Give the device a name, such as “Front Sidewalk Motion Flag”; specify its
location (sidewalk, driveway, etc.); and select its House Code and Unit Code from the drop-
down menus. Select any other options you’d like to enable for this device by checking the
appropriate check box in the Options field. Click the SAVE button to finish creating the device.
This device can not be used in events. The most likely use is when applying a condition to an
event. The condition can look at the state of a virtual device and control whether or not the
event triggers. One example is a Home/Away device. Setting this device can alter events based
on whether the home owner is home or away.

HomeTroller Getting Started Guide – rev 2.0 Page 16
Controlling Devices with Events
Events are one or more actions that are carried out in response to specific trigger, such as an
absolute time, Dawn or Dusk, push of a button, change in status of a device (something turned
on or off), voice command or receipt of an email. Events are sometimes referred to as “macros”
by other programs.
Each event is triggered in some manner (see Triggers below). Each event can carry out one or
more actions (see Event Actions below). Event triggers and actions are set in the Events screen.
Elements of an Event
Triggers
A trigger is used to tell the event to perform some action. Triggers are selected from the Event
Trigger screen.
Conditions
Conditions give more flexibility in determining when an event should trigger. You can set as
many conditions as you want on a trigger. The event will trigger only when all of the conditions
are true. One or more conditions can be added to each event. Multiple conditions can be set up
so that they’re all required to be true (conditions separated by AND) or only one condition is
required to be true (conditions separated by OR). Conditions can be added to events when the
Apply conditions field is enabled in the Trigger screen for that event.
Event Actions
There are several types of actions that can be carried out in an event and events can contain
one or more actions. Actions are added to events from the Event Actions screen.
Event Groups
Each event may be assigned to a specific group. The group is simply a name and has no other
significance. This allows you to put all related events into the same group. For example, you
may have a bunch of events that control all of the lights on the first floor. You could put them all
in your downstairs lights group. There is no limit to the number of groups you can create.
Events are assigned to groups in the Event Properties screen.
You can view the events in a specific group by selecting the group name from the drop-down
Groups box at the top of the Events screen. Selecting All Groups from the drop down list will
display all of your events.

HomeTroller Getting Started Guide – rev 2.0 Page 17
Creating an Event
Naming the Event
The Event Properties screen is
where basic options for the
specified event can be set, such as
the name of the event, whether or
not it will respond to voice
commands, and so on.
To get to the screen, click Add
Event from the Events screen to
create a new event, or click the
Name tab from the Event Trigger
and Event Actions screens.
Give the event a name, such as
“Porch Lights On”. To be able to
run the event by voice, specify the
voice command that will be used to
trigger the event and select
whether the voice command can
be given via microphone,
telephone, or both. To have the
HomeTroller confirm the command
before running the event, enable
the Confirm Voice field. Type a
four-digit number in the DTMF
Trigger field to be able to run the
event by pressing the corresponding buttons on telephone keypad. Select any other options
you’d like to enable for this event by checking the appropriate check box in the Options field.
Specifying the Event’s Trigger
The Event Trigger screen lists all of the trigger and condition types available in the HomeTroller.
To get to this screen, click the Trigger tab from the Event Properties or Event Actions screens.
In this screen, select the type of trigger that will run the event, such as a specific point in time,
an email message is received, a device changes status, etc. Select which days of the week the
event can run, whether the trigger has additional conditions that must be met, and whether the
events start time is to be randomized based on the value set in the General Setup screen.
Additional fields will appear in the screen, depending on which type of trigger is selected. For
triggering on the status change of a Z-Wave device, enable polling for the Z-Wave device in the
devices properties screen. This will ensure that the HomeTroller sees any changes to the
device’s status. You can then set a trigger on that particular device changing status, such as
someone arriving home. The status change trigger can be used on any device.
Setting the Event’s Actions
The Event Actions screen is where actions are added to an event. Select an action to be carried
out when the event runs by making a selection in the Add Action drop-down menu, setting the
appropriate values for the action, and clicking UPDATE. More than one action can be carried out
when an event is triggered; to add more actions, select them from the drop-down menu and
click UPDATE after adding each action.
The Event Properties Screen
Figure 7: Add Events Screen

HomeTroller Getting Started Guide – rev 2.0 Page 18
Once finished naming an event, specifying its trigger, and adding actions, click the SAVE button
at the bottom of the screen to finish adding the event.
Voice Recognition
The Speaker Client Application
The Speaker Client is a separate
application that works with the
HomeTroller. This application is used
by the HomeTroller to control all
audio functions including voice
recognition, text-to-speech
announcements and playing audio
files. . The Speaker Client can be run
on the HomeTroller and/or on any
number of remote computers.
Events in the HomeTroller can send
audio to a specific computer, a group
of computers, or to all computers
currently running the Client. If a
computer contains multiple sound
cards then multiple instances of the
Client can run on that computer;
each instance of the Client can
control a different sound card.
Installation
The HomeTroller is shipped with its own Speaker Client pre-installed. However, the Speaker
Client may also be installed on any remote computer to allow remote voice recognition, remote
text-to-speech announcements and remote audio file playing from the HomeTroller. To install
the Speaker Client on a remote computer, go to www.homeseer.com and click on the Downloads
link. Download the latest FULL version of HomeSeer and run the installer on the PC where you
want the speaker client installed. When the installer starts, select the Speaker Client only install
option.
Event Actions
Event actions for the Speaker Client contain an optional parameter named Host. This parameter
can be used to specify the Client to which the audio will be sent.
The format of the parameter is host:instance, where “host” is the host name or IP addresses
of the computer running the Client and “instance” is the instance name of the Client, for those
computers running multiple instances. When the Client is first run, the instance name is set to
“default”. To send the audio to all Clients running on all computers, leave the Host parameter
blank or use an asterisk (*) for the instance.
Examples:
127.0.0.1
127.0.0.1:default
Figure 8: Speaker Client Main Screen

HomeTroller Getting Started Guide – rev 2.0 Page 19
127.0.0.1:*
To send audio to the specific PC named “myserver”:
myserver
To send audio to the specific instance named “soundcard1” on the PC “myserver”:
myserver:soundcard1
Speaker Client Settings
The Speaker Options screen is where parameters can be set for a Client. Different parameters
can be set for each Client, including the voice selection and the attention and ignore phrases
and acknowledgements. Click the Options menu item in the Speaker screen to get to the
Speaker Options screen.
If the speaker client PC needs to run multiple speaker client applications (such as to support
more than one sound card), the speaker client needs to be launched with its instance name.
Launch the speaker client with a parameter to the exe file with the instance name like:
Speaker.exe soundcard1
This can be done with a shortcut or from a command prompt. The above command launches the
speaker client with a new instance named soundcard1. This new instance has totally separate
settings from any other instance running on the same computer.
Remote Connections
The Speaker client may be accessed from ANY OTHER COMPUTER in the word! This will allow
you to receive text-to-speech announcements and control your HomeTroller by voice from your
work computer (for example). To configure the speaker client for remote connections, you must
follow these guidelines:
1) Install the speaker application client on the remote computer. This is
accomplished by running the installer on the CD supplied with your HomeTroller
and selecting the option to install only the speaker application.
2) Make note of the “Speaker Client Port” number on the HomeTroller Setup screen
(on the General Tab in the “Other Settings” section),
3) Run the speaker application client on the remote screen and open the “Options”
screen (see Figure 9 below). In this screen, enter the static IP address or your
‘MyHomeSeer-Connect’ address. For information about HomeSeer’s
‘MyHomeSeer-Connect’ service, visit homeseer.com.
4) For security purposes, you’ll need to enter a “Connection Username” and
“Connection Password” on this screen also. Be sure to enter a username and
password from the “Web Users” tab of the Setup screen in your HomeTroller.
NOTE: This login must have ‘normal’ or ‘admin’ privileges.
5) Click “OK” to save your settings and then click “Connect” on the main speaker
application client screen to establish a connection to your HomeTroller.
/