PulseWorx Control4 UPB Driver User manual
- Category
- Software manuals
- Type
- User manual

UPStart Users Guide
Version 8.1
11-Jan-2017
Updated: Feb 2020
192 Parthenia Street, Suite '
Northridge, CA 91234
P: 818.701.9831
SFV[email protected]
www.pcslighting.com

The information contained in this document is subject to change without notice. Powerline
Control Systems provides this information “as is” without warranty of any kind, either
expressed or implied, but not limited to the implied warranty of merchantability and fitness for
a particular purpose. Powerline Control Systems may improve or change the product at any
time without further notice; this document does not represent a commitment on the part of
Powerline Control Systems.
Windows is a registered trademark, and Windows NT is a trademark of Microsoft Corporation.
All other product names and services identified in this document are trademarks or registered
trademarks of their respective companies and are used throughout this document in editorial
fashion only and for the benefit of such companies. No such use, or the use of any trade
name, is intended to convey an endorsement or other affiliation with Powerline Control
Systems.
© 2004-2017 Powerline Control Systems, Inc.
All rights reserved. Printed in the U.S.A.
January 23, 2017

Chapter 1 What is UPStart? 1
About this guide.....................................................................................................1
Quick tour of UPStart..............................................................................................2
The conventions used in this guide..........................................................................3
Procedures and operations common in UPStart ........................................................3
Printing...............................................................................................................4
Command Steps Dialog........................................................................................4
Common Windows procedures used in UPStart ........................................................6
Chapter 2 Getting started with UPStart 9
System Requirements.............................................................................................9
Installing UPStart ...................................................................................................9
Connecting UPStart to the powerline .......................................................................9
UPB Interface Setup Dialog................................................................................10
Chapter 3Creating a UPB Network 15
What are the Network Parameters? .......................................................................15
The Network ID.................................................................................................15
The Network Name............................................................................................15
The Network Password ......................................................................................16
Starting a New UPB Network.................................................................................16
New Network ....................................................................................................16
Editing your Network Parameters .......................................................................18
Notes and Installer/Customer Information ..........................................................19
The Network and the Network File ........................................................................20
Creating a network file from an existing network.................................................21
Chapter 4 System Designer 23
Adding Rooms...................................................................................................25
Adding Devices..................................................................................................25
Scenes..............................................................................................................26
Keypad Setup....................................................................................................27
The Designer Complete and Next Steps ..............................................................28
Chapter 5 Adding and Deleting Devices 31
Adding a single device ..........................................................................................31
The Add Devices Wizard ....................................................................................31
Deleting Devices ..................................................................................................35
Chapter 6 Organizing with the Design and Display Panes 37
Design Pane.........................................................................................................38
Design Pane Operations.....................................................................................39
Close, but not Windows Explorer ........................................................................40
Display Pane ........................................................................................................41
Room Displays ..................................................................................................42
User Displays ....................................................................................................42

Icon and List View.............................................................................................44
Design Pane Operations.....................................................................................45
The Inspector ...................................................................................................45
Chapter 7 Saving your Network File 47
Saving your Network File ......................................................................................47
Saving the network for the first time ..................................................................47
Periodic File Updates .........................................................................................48
Opening a Saved Network file ...............................................................................48
Automatic Network Verification ..........................................................................48
Exporting your Network ........................................................................................49
Chapter 8 Editing a Device’s Configuration Info 51
Opening the Edit Device dialog .............................................................................51
About the Edit Device Dialog..............................................................................52
Making desired changes.....................................................................................52
Saving changes for later ....................................................................................52
Canceling changes.............................................................................................53
Programming changes into the Device...................................................................53
Editing multiple devices at one time ......................................................................54
Chapter 9 Scenes and the Scene Editors 57
What are Scenes? ................................................................................................57
Adding Scenes to Device Configurations ................................................................59
The Visual Scene Editor (VSE) ............................................................................59
The Dialog based Scene Editor (DSE) .................................................................67
The Builder Dialog................................................................................................74
Seeing too many scenes?......................................................................................76
Chapter 10 Programming Devices 77
Programming Configuration Information into a device ............................................77
Programming Configuration Information into all devices .........................................79
Programming Configuration Information into selected devices.................................80
Chapter 11 Testing Devices and the Network 83
Performing a Device Communications Test ............................................................83
The Communications Test Tab ...........................................................................83
Running the Communications Test .....................................................................84
Rating the Communications Test ........................................................................84
Communication Phase .......................................................................................85
Device to Device Communication Test ................................................................86
Functionally Testing Your UPB Device....................................................................88
The Device Test Tab..........................................................................................88
Testing a Wall Switch Dimmer............................................................................88
Testing a 6-Button Controller .............................................................................90
The Network Communications Test .......................................................................90
Configuring the Network Communications Test ...................................................91
Starting the Network Communication Test ..........................................................91
Interpreting the Network Communication Test results..........................................93

Chapter 12 Verifying Devices 95
Performing a Network Verification .........................................................................95
The Network Verification Dialog .........................................................................96
Finding all Devices in the Network ......................................................................97
Testing the Communication level........................................................................97
What if the Communication Is Bad?....................................................................97
Comparing the Device Memory to the File Contents.............................................97
What if Device Memory Matches the File Contents? .............................................98
What If Device Memory Is Different Than File Contents? .....................................98
Examining and resolving differences ...................................................................98
Verify Indications ............................................................................................ 100
Single Unit Verify ............................................................................................... 100
Chapter 13 Utilities 101
Discovering Devices............................................................................................ 101
Viewing a Device................................................................................................ 104
Viewing a device that is in your Network........................................................... 104
Viewing a Device that is not part of your Network ............................................. 104
Copying one device’s configuration to another device ........................................... 105
Replacing a Device ............................................................................................. 107
Reading Devices into the Network File................................................................. 108
Reading a Single Device into the file................................................................. 108
Reading All Devices into the file ....................................................................... 109
UPB Logging ...................................................................................................... 110
Configuring Logging ........................................................................................ 110
Viewing the Log .............................................................................................. 111
Chapter 14 Working in Offline Mode 113
Why use Offline Mode?....................................................................................... 113
Changing to Offline Mode ................................................................................... 114
Things you can’t do in Offline Mode..................................................................... 114
Things you can do in Offline Mode ...................................................................... 114
Chapter 15 Customizing UPStart Behaviors 117
UPStart File tab.................................................................................................. 117
Reopen Last File Loaded when UPStart begins .................................................. 117
Automatic Network Verification upon file reopen ............................................... 118
Auto Save on Device Write............................................................................... 118
Auto Export on File Save.................................................................................. 118
UPStart Operation tab ........................................................................................ 118
Status during verify ......................................................................................... 119
Show Unit numbers ......................................................................................... 119
Auto Close Popup on Success........................................................................... 119
Use Visual Scene Editor ................................................................................... 120
Web Mountain model numbers......................................................................... 120
Design pane TCT and RCT ............................................................................... 120
Gateway connection catalog............................................................................. 120
Gateway firmware check.................................................................................. 120

Application update check ................................................................................. 120
Log tab.............................................................................................................. 120
Timeout and Reply tab ....................................................................................... 120
Serial and USB timeouts................................................................................... 121
Number of Retries ........................................................................................... 121
Repeaters .......................................................................................................... 122
Repeater Use .................................................................................................. 122
Transmission Count ......................................................................................... 122
Transmission Count to the repeater.................................................................. 122
Advanced........................................................................................................... 123
Network Communications Test configuration..................................................... 123
Provide support for all UPB interfaces ............................................................... 124
Extra Features ................................................................................................... 124
Chapter 16 Advanced Topics 125
UPB Explorer...................................................................................................... 125
Chapter 17 Getting Help 127
Web site Support ............................................................................................... 127
Other considerations .......................................................................................... 127
Technical support............................................................................................... 127
Appendix 1 UPStart versions 129
UPStart Powerline Control Systems...................................................................... 129
UPStart Simply Automated.................................................................................. 129

1
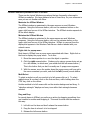
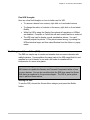
Chapter 1
What is UPStart?
UPStart is a Windows based software application that gives you the ability to
easily setup and test your UPB devices. Using UPStart, you can unlock the
hidden potential inside of your UPB devices to design a custom lighting and
control system that is tailored to your needs and desires.
Not only are you able to configure your lighting and control system but, with
UPStart’s powerful test capabilities, you can also test your powerline for noise,
measure communication signal strengths, and functionally test your UPB devices.
All this gives you good confidence that once you are finished installing and
configuring your UPB lighting and control system you never worry about coming
back later to fix or “tweak” the system.
UPStart is designed to interface to the powerline through a special device called
a Powerline Interface Module (PIM). The PIM plugs into any standard electrical
wall outlet and connects to your PC or laptop computer via either a serial or USB
cable.
Depending upon the manufacturer of the Powerline Interface, it may be called
something different than a “PIM”. In this User Guide, the term PIM is used to
refer to any UPB powerline interface.
About this guide
This guide covers the basic operations of UPStart in both Online and Offline modes.
Such topics covered are:
Installing the UPStart software and hardware
The UPStart Wizard
Creating UPB networks
Adding and deleting devices in a UPB network
Editing device properties
Viewing device properties
Programming devices
Note
: UPStart is supplied by many different UPB manufacturers. All
versions of UPStart provide most of the same general facilities but in some
manufacturer’s UPStart versions there may be additional features available
or fewer features then described in this User Guide. An appendix is
provided that details differences between UPStart versions.

Chapter 1 – What is UPStart
2
The Visual Scene Editor (VSE) and Dialog based Scene Editor (DSE)
The Visual Scheduler
Verify: Comparing device memory to file contents
Working with UPStart in Online and Offline mode
Operations for the PulseWorx Gateway
UPStart utilities
Configuring UPStart
Getting help
Quick tour of UPStart
To use UPStart once you have installed it:
1. From the Windows task bar, click the Start button.
2. Choose Programs.
3. Then click UPB.
4. Then click on UPStart
When you first start UPStart its main window appears on the screen. If you
previously had configured UPStart for using a PIM, the PIM is started when
UPStart starts.
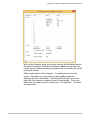
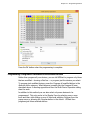
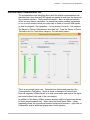
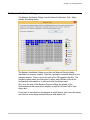
Across the top of the UPStart window is title bar which shows the name of the
loaded file and below that the ribbon. Across the bottom is a status bar.

Chapter 1 – What is UPStart
3
On the left side of the UPStart main window is what is called the
Design Pane
.
The Design Pane shows each room in the network and any devices in that room.
Below the rooms list are any scenes in your network and their effect on any
devices. Also, at the top of the Design Pane are listed any Displays you created
to show a selected set of devices.
On the right side of the UPStart main window is the
Display Pane
. In the
display pane appears icons for the UPB devices. The Display Pane is also used
for the Visual Scene Editor described later.
The status bar at the bottom of the window contains several smaller panes that
display information about your network. These are – left to right:
The name of the display appearing in the Display Pane
A signal / noise meter. As UPB commands are received and transmitted,
the meter displays how strong are the signals. Good signals display in
green and noise in red or orange.
The TX=1 (or 2, or 3) is the number of times messages are transmitted in
what are called “multi-packets”. If there is a repeater in your UPB
installation this will be 2 (or 3 or 4).
An indication if the network file is modified or not
If the CAPS lock is on
If the NUM lock is on
The conventions used in this guide
In this guide, we assume that you are familiar with the use of Windows, and the
most common Windows conventions, such as click, double-click, right mouse
click, use of the browse function, directories, and files. However, some of these
common Windows conventions most often used in UPStart are documented in
the section following.
When working with the mouse, if a procedure says click, we mean to use the
mouse button you most often use, generally the left. If you need to right-click
an item, we’ll specify that.
Procedures and operations common in UPStart
There are several common tasks that occur in multiple places in UPStart, and
that you may find yourself using in different wizards, or for the various dialogs.
Rather than repeating them or explaining them each time they are used, we
have placed them here to save time and paper.

Chapter 1 – What is UPStart
4
Printing
UPStart provides printing support for details on several elements of your design,
using a typical Windows format. You can select any of the four print commands
available from the Application menu:
Print—provides the typical Windows print dialog box, allowing you to
determine the printer, page range, number of copies, and so on.
Pint Preview—shows you a reduced, full page layout of what you are printing.
Print Setup—opens a dialog box where you can view and set the name and
location of your printer, paper size and orientation.
The UPStart printouts contain information about each device in your network.
UPStart formats and prints the information you chose in a columnar format for
devices and scenes, with headings for the different sections. The path for your
design is included at the top of each page, along with the printout page number.
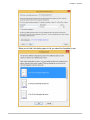
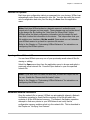
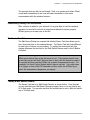
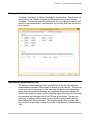
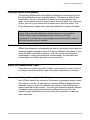
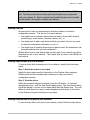
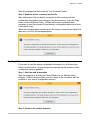
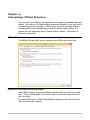
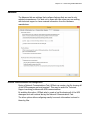
Command Steps Dialog
In almost all places in UPStart where it is communicating with a device to read or
write its configuration memory, UPStart lets you to watch the activity by
displaying what is called the Command Steps Dialog or Command Steps
Checklist.
The Command Steps dialog always begins with the same section: it makes sure
that the Powerline interface is connected and there is not too much noise to
proceed. Then it checks the ID portion of the device memory to make sure it is
working with the expected device. This dialog appears as:
If you would like to see the actual steps in the operation, press the
More Detail
button.

Chapter 1 – What is UPStart
5
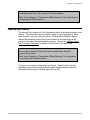
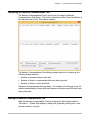
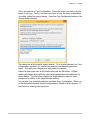
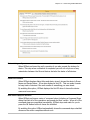
If UPStart fails one of these command steps it places a red “X” next to the failed
step and stops and instructs you as to what to do next. If UPStart successfully
completes all of its command steps it places a checkmark next to each step and
displays a message that the operation completed successfully. Press the OK
button to close the command steps dialog.
By default, the command steps dialog
automatically closes when
completed. If you would rather it stop each time the command steps are
done, then you may configure UPStart to require the OK button press.
Refer to the chapter on “Customizing UPStart Behaviors” to learn about
changing the UPStart options.
If ever the Command Steps dialog shows an error, and it is an error you
can fix – for example the device left setup mode because you waited too
long at some step – you can correct the error and press the Try Again
button to retry the operation. The Details button displays information
that may help technical Support resolve any issues you may have. It
displays is a listing of the messages between UPStart and the PIM and
from the PIM to your device. You can ignore the Detail button unless
asked to collect the information by Technical Support.

Chapter 1 – What is UPStart
6
Common Windows procedures used in UPStart
There are also typical Windows procedures that are frequently referenced in
UPStart procedures. We have gathered a few of them here, for your reference in
case you are not familiar with them.
Maximize the UPStart Window
The UPStart window is maximized in the same manner as most Windows
programs. Using the left mouse button, click on the maximum button on the
upper right hand corner of the UPStart window. The UPStart window expands to
fill the whole display.
Minimize the UPStart Window
The UPStart window is minimized in the same manner as most Windows
programs. Using the left mouse button, click on the minimize button on the
upper right hand corner of the UPStart window. UPStart is removed from the
display and appears in the Windows Task Bar as a button labeled with your
network name.
Right click for popup menu
Most items in UPStart have a popup menu associated with them. Right click on
the item to display the popup menu. To do this:
1. Move the mouse pointer to or over the object in question.
2. Click the right mouse button. (Unless you’re using a mouse device set up
for a left-hander, in which case, you would click the left mouse button.)
This is the button that you don’t normally use. A popup menu appears.
3. With the mouse, move the pointer down the popup menu until you get to
the menu command you want, and click the left (normal) mouse button.
Multi-Select
To select a single icon all you need do is to left mouse click on it. To select
multiple icons at one time, click on the first and then, while holding down the
CTRL key, click on the others.
Another method is to left mouse click on the window background and drag. A
“selection rectangle” displays and every icon within that rectangle becomes
selected.
Drag and Drop
In several places in UPStart you perform an action by dragging something from
one location to another and dropping it. This must be done with the mouse in
this way:
1. Left click on the item and don’t release the mouse button
2. Drag the item to where it is to be dropped
3. Release the left mouse button.

Chapter 1 – What is UPStart
7
Drag and Drop is used in construction of displays and in the Visual Scene Editor.
Both are described in later chapters.
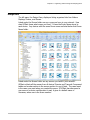
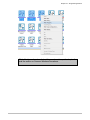
Ribbon
As in many modern Windows programs, below the menu at the top of the
UPStart window is the ribbon. The ribbon organizes commands into tabs called
“Categories”. In the categories are panels which contains buttons that start
operations that are related. The Upstart ribbon contains these categories –
from left to right.
Network
Operations that effect the whole installation
Devices
Operations specific to device configuration
Scenes
Operations for creating, viewing, and modifying scenes
Tools
Operations for testing devices and the installation
There is also an Application menu that is opened by clicking on the
“application bubble” at the left end of the ribbon and a help menu by clicking
on the “?” icon at the right end of the ribbon.
Like most ribbon applications you can customize the “Quick Action Toolbar”
(QAT) that appears at the very top of the ribbon at the left end. In the
picture above the “File Save”, “Network Verify”, and “Signal/Noise Meter”
buttons are available in the QAT. To change it just click on the small
downward pointing arrow to the right of the QAT and a user interface
displays that lets you add or remove buttons.

Chapter 1 – What is UPStart
8

9
Chapter 2
Getting started with UPStart
This chapter describes installing UPStart – a much simpler process than many
programs you may have worked with – and the procedure for connecting the
powerline interface.
System Requirements
The minimum recommended system requirements needed to run UPStart
properly are:
Any modern PC contains sufficient memory, disk, and processor speed.
Any version Microsoft®Windows®post XP.
One available serial (COMM) port or USB port.
Powerline Interface Module (PIM) – either Serial or USB
Serial or USB Cable
Installing UPStart
Installing UPStart is like installing other Windows®applications. Before installing
UPStart it is recommended that all other applications be closed.
Step 1: Get the UPStart installation software
The latest version of the UPStart Installation Software can be found on the web
site of your UPB hardware vendor. Download the latest version into a
convenient directory of your PC or laptop.
Step 2: Run the UPStart installation software
Double-click on the UPStart Installation Software icon to begin executing it.
Step 3: Follow the On-Screen instructions
The UPStart Installation Software provides easy to follow instructions to install
UPStart onto your computer.
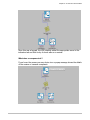
Connecting UPStart to the powerline
UPStart interfaces to the powerline through a special device called a Powerline
Interface Module. The PIM plugs into the powerline at any available 120VAC
wall outlet.

Chapter 2 – Getting Started
10
Depending upon the manufacturer of the Powerline Interface, it may be called
something different than a “PIM”. In this User Guide the term PIM is used to
refer to any UPB powerline interface.
There are several types of PIMs available: Serial, USB, or a network PIM called
the PulseWorx Gateway. The Serial PIM connects to any available serial (COMM)
port of your Windows based personal computer or laptop. There are two
different kinds of USB PIMs. One connects to the computer and a device driver
installs a virtual serial port. Other USB PIMs operate as a true USB device. Just
select the one you have:
The USB PIM connects to any available USB port of your Windows based
personal computer or laptop.
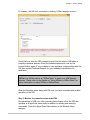
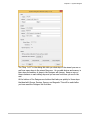
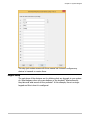
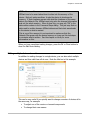
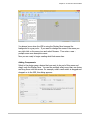
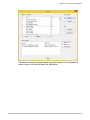
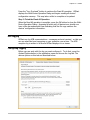
UPB Interface Setup Dialog
Once your PIM is properly connected to both the powerline and your computer it
is time to connect the UPStart software to your PIM. This is done using the UPB
Interface Setup Dialog. Press the
Configure
button in the
Powerline Interface
panel in the
Network
ribbon category. Follow the steps as described below to
connect UPStart to your PIM.
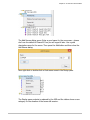
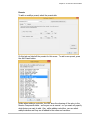
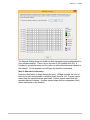
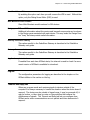
Step 1: Specify the UPB interface and communications port
In the UPB Interface Setup dialog specify the type of PIM you have connected.
If you selected a Serial PIM (RS232) or the UPB PIM type that works with a
virtual serial port then you must also specify the communications port (Comm 1,
Comm 2, etc.) that you have connected your Serial PIM to. The other kind of
USB PIM hides the port setting as it isn’t needed.
The other PIM options require more selections. Refer to the documentation of
those products for more information.

Chapter 2 – Getting Started
11
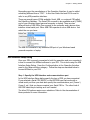
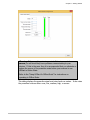
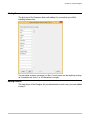
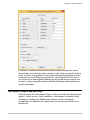
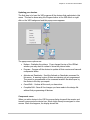
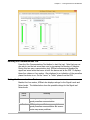
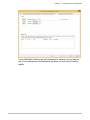
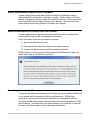
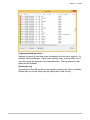
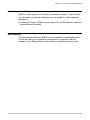
Step 2: Test the PIM communication path
Press the Connect button to test the communication path between UPStart and
the PIM. If the communication path is operational then UPStart reads the
firmware version and other items of your PIM and displays what was read.

Chapter 2 – Getting Started
12
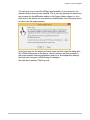
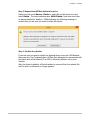
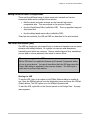
If, however, the PIM isn’t connected or working, UPStart displays an error:
Check that you have the PIM powered-up and that the serial or USB cable is
properly connected between it and the communications port, and try the
Connect button again. If you continue to have problems communicating with the
PIM then contact Technical Support for your hardware manufacturer for
assistance.
Offline Mode:
UPStart can still be used in an “Offline Mode” to setup your UPB Network
devices. Please refer to the chapter on “Using UPStart in Offline Mode” for
more information on using UPStart in Offline Mode.
Close the Interface select dialog with OK once you have connected and verified
operation of the PIM.
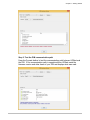
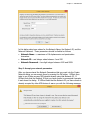
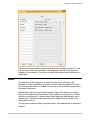
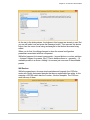
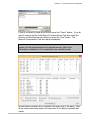
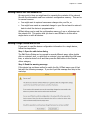
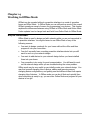
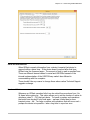
Step 3: Monitor for powerline noise at the PIM
One advantage of UPB over other powerline technologies is that the PIM also
operates as a signal and noise meter in addition to sending and receiving
commands. Press the
Signal-Noise Meters
button in the Network ribbon
category.

Chapter 2 – Getting Started
13
Warning
: If the powerline noise in your installation is ever rated as
severe you will most likely have problems communicating to your
devices. If this is the case, then it is recommended that you eliminate or
reduce the source of the powerline noise before you continue to use
UPStart in Online Mode.
Refer to the “Using UPStart In Offline Mode” for instructions on
operating in Offline Mode.
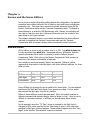
This dialog displays the powerline signal and noise levels on meters. It also rates
the powerline noise as either none, low, medium, high, or severe.

Chapter 2 – Getting Started
14
Page is loading ...
Page is loading ...
Page is loading ...
Page is loading ...
Page is loading ...
Page is loading ...
Page is loading ...
Page is loading ...
Page is loading ...
Page is loading ...
Page is loading ...
Page is loading ...
Page is loading ...
Page is loading ...
Page is loading ...
Page is loading ...
Page is loading ...
Page is loading ...
Page is loading ...
Page is loading ...
Page is loading ...
Page is loading ...
Page is loading ...
Page is loading ...
Page is loading ...
Page is loading ...
Page is loading ...
Page is loading ...
Page is loading ...
Page is loading ...
Page is loading ...
Page is loading ...
Page is loading ...
Page is loading ...
Page is loading ...
Page is loading ...
Page is loading ...
Page is loading ...
Page is loading ...
Page is loading ...
Page is loading ...
Page is loading ...
Page is loading ...
Page is loading ...
Page is loading ...
Page is loading ...
Page is loading ...
Page is loading ...
Page is loading ...
Page is loading ...
Page is loading ...
Page is loading ...
Page is loading ...
Page is loading ...
Page is loading ...
Page is loading ...
Page is loading ...
Page is loading ...
Page is loading ...
Page is loading ...
Page is loading ...
Page is loading ...
Page is loading ...
Page is loading ...
Page is loading ...
Page is loading ...
Page is loading ...
Page is loading ...
Page is loading ...
Page is loading ...
Page is loading ...
Page is loading ...
Page is loading ...
Page is loading ...
Page is loading ...
Page is loading ...
Page is loading ...
Page is loading ...
Page is loading ...
Page is loading ...
Page is loading ...
Page is loading ...
Page is loading ...
Page is loading ...
Page is loading ...
Page is loading ...
Page is loading ...
Page is loading ...
Page is loading ...
Page is loading ...
Page is loading ...
Page is loading ...
Page is loading ...
Page is loading ...
Page is loading ...
Page is loading ...
Page is loading ...
Page is loading ...
Page is loading ...
Page is loading ...
Page is loading ...
Page is loading ...
Page is loading ...
Page is loading ...
Page is loading ...
Page is loading ...
Page is loading ...
Page is loading ...
Page is loading ...
Page is loading ...
Page is loading ...
Page is loading ...
Page is loading ...
Page is loading ...
Page is loading ...
-
 1
1
-
 2
2
-
 3
3
-
 4
4
-
 5
5
-
 6
6
-
 7
7
-
 8
8
-
 9
9
-
 10
10
-
 11
11
-
 12
12
-
 13
13
-
 14
14
-
 15
15
-
 16
16
-
 17
17
-
 18
18
-
 19
19
-
 20
20
-
 21
21
-
 22
22
-
 23
23
-
 24
24
-
 25
25
-
 26
26
-
 27
27
-
 28
28
-
 29
29
-
 30
30
-
 31
31
-
 32
32
-
 33
33
-
 34
34
-
 35
35
-
 36
36
-
 37
37
-
 38
38
-
 39
39
-
 40
40
-
 41
41
-
 42
42
-
 43
43
-
 44
44
-
 45
45
-
 46
46
-
 47
47
-
 48
48
-
 49
49
-
 50
50
-
 51
51
-
 52
52
-
 53
53
-
 54
54
-
 55
55
-
 56
56
-
 57
57
-
 58
58
-
 59
59
-
 60
60
-
 61
61
-
 62
62
-
 63
63
-
 64
64
-
 65
65
-
 66
66
-
 67
67
-
 68
68
-
 69
69
-
 70
70
-
 71
71
-
 72
72
-
 73
73
-
 74
74
-
 75
75
-
 76
76
-
 77
77
-
 78
78
-
 79
79
-
 80
80
-
 81
81
-
 82
82
-
 83
83
-
 84
84
-
 85
85
-
 86
86
-
 87
87
-
 88
88
-
 89
89
-
 90
90
-
 91
91
-
 92
92
-
 93
93
-
 94
94
-
 95
95
-
 96
96
-
 97
97
-
 98
98
-
 99
99
-
 100
100
-
 101
101
-
 102
102
-
 103
103
-
 104
104
-
 105
105
-
 106
106
-
 107
107
-
 108
108
-
 109
109
-
 110
110
-
 111
111
-
 112
112
-
 113
113
-
 114
114
-
 115
115
-
 116
116
-
 117
117
-
 118
118
-
 119
119
-
 120
120
-
 121
121
-
 122
122
-
 123
123
-
 124
124
-
 125
125
-
 126
126
-
 127
127
-
 128
128
-
 129
129
-
 130
130
-
 131
131
-
 132
132
-
 133
133
-
 134
134
-
 135
135


PulseWorx Control4 UPB Driver User manual
- Category
- Software manuals
- Type
- User manual
Ask a question and I''ll find the answer in the document
Finding information in a document is now easier with AI
Related papers


Other documents
-
 HAI OmniLT Owner's manual
-
 PowerHome Automation PowerHome2 Insteon-Compatible Home Automation Software Quick start guide
-
 Simply Automated UPP User manual
-
 HAI 59A00-1 User manual
-
Leviton 35A00-1 Operating instructions
-
Home Automation 60A00-1 User manual
-
 HAI 37A00-1 User manual
-
 HomeTech UMC User manual
-
 HomeSeer Technologies HomeTroller Series II Getting Started Manual
-
Silicon Labs Z-Ware SDK 7.13.0 Web Server & Native Apps Installation User guide


