Page is loading ...

Swim spa systems
When two are better than one!
TechBook
Gecko Alliance
450 des Canetons, Québec (Qc), G2E 5W6 Canada, 1.800.78.GECKO
www.geckoalliance.com
Printed in Canada
9919-101142-B
Rev. 01-2016
© Groupe Gecko Alliance Inc., 2015
All trademarks or registered trademarks
are the property of their respective owners.
Versatility
Power
Control


1
Warnings ......................................................................................................................................................................... 2
Introduction ..................................................................................................................................................................... 3
Overview
- in.xe overview ..................................................................................................................................................... 4
- 5 pump swim spa configuration overview ........................................................................................................... 4
Installation
- in.xe control systems installation procedure ....................................................................................................... 5
- Swim spa control systems installation diagram ................................................................................................... 5
- Keypad installation ............................................................................................................................................. 5
Connections
- Connection of main and auxiliary keyads ........................................................................................................... 6
- Connecting high voltage accessories .................................................................................................................. 7
- in.link output connectors ................................................................................................................................... 7
Wiring
- in.link connector ................................................................................................................................................. 8
Electrical wiring
- Electrical wiring: all models ................................................................................................................................. 9
- Electrical wiring: North American models - 1 breaker ...................................................................................... 10
- Electrical wiring: North American models - 2 breakers ..................................................................................... 11
- Electrical wiring: European models - monophased ........................................................................................... 12
- Electrical wiring: European models - biphased ................................................................................................. 13
- Electrical wiring: European models - triphased ................................................................................................. 14
Power up and breaker setting ........................................................................................................................................ 15
Programming the control system
- Programming swim spa system with in.stik ...................................................................................................... 17
- Programming the control system with the keypad ............................................................................................ 18
Field programming options for control systems
- Definition tables .............................................................................................................................................. 19
- Table 1 - in.xe ................................................................................................................................................... 19
- Table 2 - in.xe (older versions only) .................................................................................................................. 21
- Table 3 - in.xe (older versions only) .................................................................................................................. 22
Compatible keypads ...................................................................................................................................................... 23
Troubleshooting ............................................................................................................................................................. 24
Specifications ................................................................................................................................................................ 25
Table of contents

2
WARNINGS:
Before installing or connecting the unit, please read the following.
* FOR UNITS FOR USE IN OTHER THAN SINGLE-FAMILY DWELLINGS, A CLEARLY LABELED EMERGENCY SWITCH SHALL
BE PROVIDED AS PART OF THE INSTALLATION. THE SWITCH SHALL BE READILY ACCESSIBLE TO THE OCCUPANTS AND
SHALL BE INSTALLED AT LEAST 5’ (1.52 M) AWAY, ADJACENT TO, AND WITHIN SIGHT OF THE UNIT.
* ANY DAMAGED CABLE MUST BE IMMEDIATELY REPLACED BY QUALIFIED PERSONNEL.
* TURN POWER OFF BEFORE SERVICING OR MODIFYING ANY CABLE CONNECTIONS IN THIS UNIT.
* TO PREVENT ELECTRIC SHOCK HAZARD AND/OR WATER DAMAGE TO THIS CONTROL,
ALL UNUSED BUSHING CONDUITS MUST BE PLUGGED WITH THE ATTACHED NIPPLE.
* THIS CONTROLLER MUST NOT BE INSTALLED IN PROXIMITY OF HIGHLY FLAMMABLE MATERIALS.
* LOW SUPPLY VOLTAGE OR IMPROPER WIRING MAY CAUSE DAMAGE TO THIS CONTROL SYSTEM.
READ AND FOLLOW ALL WIRING INSTRUCTIONS WHEN CONNECTING TO POWER SUPPLY.
* THIS PACK CONTAINS NO USER SERVICEABLE PARTS. CONTACT AN AUTHORIZED SERVICE CENTER FOR SERVICE.
* ALL CONNECTIONS MUST BE MADE BY A QUALIFIED ELECTRICIAN IN ACCORDANCE WITH THE NATIONAL
ELECTRICAL CODE AND ANY STATE, PROVINCIAL OR LOCAL ELECTRICAL CODE IN EFFECT AT THE TIME OF THE
INSTALLATION.
* PRODUCT MUST BE DISPOSED OF SEPARATELY IN ACCORDANCE WITH LOCAL WASTE DISPOSAL LEGISLATION.
* THIS APPLIANCE IS NOT INTENDED FOR USE BY PERSONS (INCLUDING CHILDREN) WITH REDUCED PHYSICAL,
SENSORY OR MENTAL CAPABILITIES, OR LACK OF EXPERIENCE AND KNOWLEDGE, UNLESS THEY HAVE BEEN GIVEN
SUPERVISION OR INSTRUCTION CONCERNING USE OF THE APPLIANCE BY A PERSON RESPONSIBLE FOR THEIR
SAFETY.
* CHILDREN SHOULD BE SUPERVISED TO ENSURE THAT THEY DO NOT PLAY WITH THE APPLIANCE.
* MEANS FOR DISCONNECTION MUST BE INCORPORATED IN THE FIXED WIRING IN ACCORDANCE WITH
THE WIRING RULES.
* CAUTION: IN ORDER TO AVOID A HAZARD DUE TO INADVERTENT RESETTING OF THE THERMAL CUT-OUT,
THIS APPLIANCE MUST NOT BE SUPPLIED THROUGH AN EXTERNAL SWITCHING DEVICE, SUCH AS A TIMER,
OR CONNECTED TO A CIRCUIT THAT IS REGULARLY SWITCHED ON AND OFF BY THE UTILITY.
* PARTS CONTAINING LIVE PARTS, EXCEPT PARTS SUPPLIED WITH SAFETY EXTRA-LOW VOLTAGE NOT EXCEEDING
12 V, MUST BE INACCESSIBLE TO A PERSON IN THE BATH OR SPA.
* PARTS INCORPORATING ELECTRICAL COMPONENTS, EXCEPT REMOTE CONTROL DEVICES, MUST BE LOCATED OR
FIXED SO THAT THEY CANNOT FALL INTO THE BATH OR SPA.
* PARTS ARE TO BE INSTALLED IN THE CORRECT ZONE AND EQUIPOTENTIAL BONDING CARRIED-OUT IN
ACCORDANCE WITH THE WIRING RULES.
* CLEARANCE AND MINIMUM DISTANCE BETWEEN THE VARIOUS PARTS OF THE APPLIANCE AND THE SURROUNDING
STRUCTURE ARE NOT SPECIFIED AS LONG AS THEY ARE SUFFICIENT SO THAT THE AMBIENT TEMPERATURE
AROUND THE CONTROLLER DOES NOT EXCEED 50 OR 60°C.
Warnings
Aeware
®
, Gecko
®
, and their respective logos are Registered Trademarks of Gecko Alliance Group.
in.xe™, in.access™, in.keys™, in.touch™, in.k200™, in.k400™, in.k450™, in.k600™, K-19™, K-35™, K-8™, in.k1000™,
in.k800™, in.k500™, in.k300™, in.flo™, in.put™, in.seal™, in.link™, in.t.cip™, in.stik™, heat.wav™, Y Series™ and their respective
logos are Trademarks of Gecko Alliance Group.
All other product or company names that may be mentioned in this publication are tradenames, trademarks or registered trademarks of
their respective owners.

3
Introduction
Swim spa systems
When two are better than one!
Gecko offers control systems for swim spas that truly take
into account the unique relaxation and swimming features
of this type of spas.
Designed to be versatile and to provide a maximum
of possible configurations, the Gecko system for swim
spas includes two in.xe controllers, a main keyboard, an
optional auxiliary keyboard and interface cable 8 '.
Total control of all the swim spa functions and accessories
connected to its relaxation and exercise zones is then
available at one's fingertips.

4
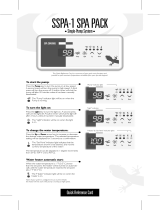
Note: No connectors should remain unplugged. Use blank plugs to fill unused connectors.
* Available only on IN.XE-5.
Overview
Master Slave
XP3 XP3XP3
XP2XP2
Ozonator
in.k100
in.split cable
(9920-401248)
in.tr LV-LV-8KCO cable
(9920-401316)
Pump 2 Pump 1 Pump 4 Pump 5 Pump 3
in.k800
CoolRays
CoolRays
in.stream 2
in.p4
in.xe overview
5 pump swim spa configuration overview
*Attention, overiew is shown as an example, many other configurations, may be done.
Transformer
fuse
Main power entry
connection
Main power cable
input entry
Mounting feet
Installation brackets
Door to access
power input
connectors
and fuses
Light output
2 connectors for
outputs controlled by
independant relays
(for ozonator, CP, light,
blower or any other
accessories)
* Only one output is available
on IN.XE-3
Connector for direct
output (for audio or
video accessories)
Main keypad
connector
Accessory fuse
Pump 2 fuse Pump 1 fuse
Communication link
(in.stik, in.terface,
in.touch, in.clear
and in.stream)
Bonding lug
Access to heater
connections
heat.wav
heater
*Pump 2
Connector
Pump 1
Connector

5
Installation
in.xe control systems installation procedure
For ground or wall installation of your in.xe control systems please refer to in.xe techbook, section installation
for complete instructions
Swim spa control systems installation diagram
XP2
water stream
MASTER
in.xe
spa filter
flow
spa
SLAVE
in.xe
flow
flow
* A minimum flow of 18 GPM is required.
About 2'
For detailed instructions and a drilling template, refer to the compatible keypad section and select your main or auxiliary
keypad to be redirected to the corresponding techbook.
Keypad installation
Warning
Leave a 2' distance between the MASTER in.xe and the SLAVE in.xe during installation (see diagram below).

6
Connections
Connection of main and auxiliary keyads
Note: Always shut power down before connecting an accessory to the in.xe.
To connect the keypad insert the in.link connector into the appropriate keypad connector (as illustrated.)
Keypad
Connect the main keypad as
indicated here.
MASTER IN.XE
Keypad
Connect the auxiliary keypad as
indicated here.
SLAVE IN.XE

7
Connections
Connector 2Connector 1 Connector 3
Connector 4
Connector 5
Connector C
Connector CO
Connector L1
Connecting high voltage accessories
Female connector on spa pack
LCHC
6
5
4
3
2
1
6
5
4
3
2
1
High-Current - HC connectors
Master in.xe
Connector Output Typical Device
Connector 1 Output 1 Pump 1 high speed
Output 2 Pump 1 low speed
Connector 2 Output 3 Pump 2 high speed
Low-Current - LC connectors (relay controlled)
Connector Output Typical Device
Connector 3 Output 4 none
Connector 4 Output 5 Ozonator
Low-Current - LC connectors (always on)
Connector Output Typical Device
Connector 5 Output 6 Accessories audio/video/etc.
Low voltage connectors - LV
Connector C Main keypad
Connector CO
Communication port
(cable in.tr 9920-401316)
Connector L1 Light output 12V AC
in.link output connectors
High-Current - HC connectors
Slave in.xe
Connector Output Typical Device
Connector 1* Output 1 Pump 3 high speed
Output 2 Pump 4 high speed
Connector 2 Output 3 Pump 5 high speed
Low-Current - LC connectors (relay controlled)
Connector Output Typical Device
Connector 3 Output 4 none
Connector 4 Output 5 none
Low-Current - LC connectors (always on)
Connector Output Typical Device
Connector 5 Output 6 Accessories audio/video/etc.
Low voltage connectors - LV
Connector C Auxiliary keypad
Connector CO
Communication port
(cable in.tr 9920-401316)
Connector L1 Light output 12V AC
* in.split cable necessary to connect two pumps to a same connector.
** Attention, the typical devices are given as examples, many other configurations may be done.


9
Main electrical box GFCI panel
Warning
For units for use in other than single-family
dwellings, a clearly labeled emergency switch shall
be provided as part of the installation. The switch
shall be readily accessible to the occupants and
shall be installed at least 5'
(1.52 m) away, adjacent to, and within sight
of the unit.
-----
This product must always be connected to a
circuit protected by a ground fault interrupter.
-----
Proper wiring of the electrical service box,
GFCI and in.xe terminal block is essential.
-----
Check your electrical code for local regulations.
Only copper wire should be used, never aluminum.
-----
Disposal of the product
The appliance (or the product) must be disposed
of separately in accordance with the local waste
disposal legislation in force.
To complete the electrical connections of the control system you will need a Phillips screwdriver and a flat-head
screwdriver.
Loosen the 2 screws of the spa pack door and open it.
Remove 5 1/2" (142 mm) of cable insulation.
Strip away 1" (25 mm) of insulation from each wire.
Pull the cable through the cutout of the box and secure it with a strain relief (1" NPT strain relief; hole diameter: 1.335"
(34,42 mm)). Ensure that the NPT strain relief clamps around the outer sheath of the cable.
* For CE/AU/NZ, use an IEC certified plastic bushing that will maintain the IPX5 rating.
Warning
Cut electrical
power before
proceeding to any
electrical job.
The wiring must be
done by a qualified
electrician in
accordance to
local electric code.
Electrical wiring: all models
Main power
Bonding lug
Electrical wiring

10
Insert every wire in the appropriate control system terminal, in accordance to the color code indicated on the sticker.
Use a Phillips screwdriver or a flat-head screwdriver to tighten the terminal screws.
Connect the ground conductor wire to the front of the control system, (the ground conductors of the appartus should be
connected with a grounded electrode).
Electrical wiring: North American models - 1 breaker
Electrical wiring
GREEN
GREEN
RED
RED
RED
BLACK
WHITE
GREEN
BLACK
BLACK
WHITE
WHITE
ON
OFF
ON
OFF
ON
OFF
ON
OFF
ON
OFF
GREENWHITEREDBLACK
ON
OFF
Main electrical box
GFCI
Master
Slave
G
L2
N
L1
GREEN
WHITE
BLACK
RED
G
L2
N
L1
GREEN
WHITE
BLACK
RED
Warning
This wiring diagram is for reference use only. In the event that there is a difference between this diagram and
the electrical code in effect at the moment of installation, the electrical code in effect at the moment prevails.

11
Electrical wiring: North American models - 2 breakers
Electrical wiring
GFCI GFCI
Main electrical box Main electrical box
Slave
GREEN
GREEN
RED
RED
RED
BLACK
WHITE
BLACK
BLACK
WHITE
WHITE
ON
OFF
ON
OFF
ON
OFF
ON
OFF
ON
OFF
ON
OFF
GREEN
GREEN
GREEN
RED
RED
RED
BLACK
WHITE
BLACK
BLACK
WHITE
WHITE
ON
OFF
ON
OFF
ON
OFF
ON
OFF
ON
OFF
ON
OFF
GREEN
Master
G
L2
N
L1
GREEN
WHITE
BLACK
RED
G
L2
N
L1
GREEN
WHITE
BLACK
RED
Insert every wire in the appropriate control system terminal, in accordance to the color code indicated on the sticker.
Use a Phillips screwdriver or a flat-head screwdriver to tighten the terminal screws.
Connect the ground conductor wire to the front of the control system, (the ground conductors of the appartus should be
connected with a grounded electrode).
Warning
This wiring diagram is for reference use only. In the event that there is a difference between this diagram and
the electrical code in effect at the moment of installation, the electrical code in effect at the moment prevails.

12
Electrical wiring: European models - monophased
Electrical wiring
Warning
in.xe.ce models must always be connected to a circuit protected by a Residual-Current Device (RCD) having a
rated operating residual-current not exceeding 30 mA.
GREEN/
YELLOW
BLUEBROWN
ON
OFF
ON
OFF
ON
OFF
ON
OFF
ON
OFF
ON
OFF
BLUE
BLUE
BLUE
BROWN
GREEN/YELLOW
GREEN/
YELLOW
BROWN
BROWN
GREEN/YELLOW
ON
OFF
Main electrical box RDC box
Master
Slave
G
N
L2
L1
GREEN
BLUE
BROWN
G
N
L2
L1
GREEN
BLUE
BROWN
Insert every wire in the appropriate control system terminal, in accordance to the color code indicated on the sticker.
Use a Phillips screwdriver or a flat-head screwdriver to tighten the terminal screws.
Connect the ground conductor wire to the front of the control system, (the ground conductors of the appartus should be
connected with a grounded electrode).
Warning
This wiring diagram is for reference use only. In the event that there is a difference between this diagram and
the electrical code in effect at the moment of installation, the electrical code in effect at the moment prevails.

13
ON
OFF
ON
OFF
ON
OFF
ON
OFF
ON
OFF
ON
OFF
BLUE
BLUE
BROWN
BLUE
BLUE
BROWN
GREEN/YELLOW
GREEN/
YELLOW
BROWN
GREEN/YELLOW
ON
OFF
ON
OFF
ON
OFF
ON
OFF
ON
OFF
ON
OFF
BLUE
BLUE
OWN
BROWN
BLUE
BLUE
BROWN
GREEN/YELLOW
GREEN/
YELLOW
BROWN
GREEN/YELLOW
ON
OFF
ON
OFF
Master
Slave
G
N
L2
L1
GREEN
BLUE
BROWN
G
N
L2
L1
GREEN
BLUE
BROWN
Warning
in.xe.ce models must always be connected to a circuit protected by a Residual-Current Device (RCD) having a
rated operating residual-current not exceeding 30 mA.
Electrical wiring: European models - biphased
Electrical wiring
Main electrical box RDC box
Insert every wire in the appropriate control system terminal, in accordance to the color code indicated on the sticker.
Use a Phillips screwdriver or a flat-head screwdriver to tighten the terminal screws.
Connect the ground conductor wire to the front of the control system, (the ground conductors of the appartus should be
connected with a grounded electrode).
Warning
This wiring diagram is for reference use only. In the event that there is a difference between this diagram and
the electrical code in effect at the moment of installation, the electrical code in effect at the moment prevails.

14
Electrical wiring: European models - triphased
Electrical wiring
GREEN/
YELLOW
BLUE
BLUE
BLACK
BLACK
BLACK
BROWN
BLACK
BLACK
BLUE
GREEN/YELLOW
BROWN
BROWN
BLACK
BROWN
ON
OFF
ON
OFF
ON
OFF
ON
OFF
ON
OFF
ON
OFF
GREEN/YELLOW
BLUE
GREEN/
YELLOW
ON
OFF
Main electrical box RDC box
Master
Slave
G
N
L2
L1
VERT
BLEU
NOIR
G
N
L2
L1
VERT
BLEU
NOIR
BRUN
Insert every wire in the appropriate control system terminal, in accordance to the color code indicated on the sticker.
Use a Phillips screwdriver or a flat-head screwdriver to tighten the terminal screws.
Connect the ground conductor wire to the front of the control system, (the ground conductors of the appartus should be
connected with a grounded electrode).
Warning
in.xe.ce models must always be connected to a circuit protected by a Residual-Current Device (RCD) having a
rated operating residual-current not exceeding 30 mA.
Warning
This wiring diagram is for reference use only. In the event that there is a difference between this diagram and
the electrical code in effect at the moment of installation, the electrical code in effect at the moment prevails.

15
Lamp test
All segments and LEDs
light up.
Software revision Low-level selected
Low-level selected from the
low-level menu.
Software number
8.8.8
Display sequence at start up (every parameter is displayed for 2 seconds)
IMPORTANT Please read the following before starting the device.
Verify that all accessories are linked to the ground lug and connected to the control
system.
A minimum flow of 68 LPM (18 GPM) is required. Make sure that all valves are
open in the spa plumbing and that the water flow is sufficient between the main
pump and the water heater.
Turn on the breaker.
in.flo dry-fire protection
At start up, the in.flo’s detector verifies the water flow according to the following sequence:
The Pump 1 or the circulation pump runs for a period of 2 to 5 minutes.
The display will show “- - -“ during the flow verification. After this time, the system confirms if flow is adequate
or not.
If the flow is sufficient, the temperature of the water is displayed on the keypad screen. When the water has reached the
consigned temperature plus 0.45°C (0.8°F), the water heater turns off.
Power up and breaker setting

16
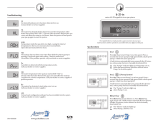
Power up and breaker setting
The values displayed by
the system correspond
to 80% of the maximum
amperage capacity of the
GFCI (RCD).
Use the Up or Down keys
to choose the desired
value.
The value can typically be
modified from 10 to 48 A.
Press on the Prog. key to
set the breaker rating.
The tables below indicate the typical value of b for different GFCI/RCD ratings. Choose the one that corresponds to your
breaker.
Note: Every OEM has its own preestablished configurations.
98
It is important to specify
the current rating of the
GFCI/RCD used to ensure
a safe and efficient current
management (and reduce
nuissance GFCI/RCD
trippings).
Press and hold the
Prog. key until you access
the breaker setting menu.
(the programming
menu will appear first).
If your control system is
equipped with the phase
configuration menu, it will
appear before the breaker
setting menu.
Note: if the keypad does not
have the Prog. Key, use the
Light key.
Choose the number of
phases supplying your
spa (1 to 3). Use the Up
or Down keys to select the
number of phases and
press on the Prog. key to
confirm your selection.
in.xe
GFCI/RCD b
60A 48A
50A 40A
40A 32A
30A 24A
20A 16A
4 8
4 8
.
Selecting number of phases
UL
Menu not
available
CE 1 or 2
UL Swim 1 or 2
CE Swim 1, 2 or 3
in.xe

17
When starting up, the
control system will
download the different
low-level configurations
from the in.stik’s memory.
The low-level selection
menu will then appear.
The keypad will display
L xx. “xx” corresponds
to the number of the first
low-level configuration
downloaded into the
system’s internal memory.
Cut the power. Unplug
your main keypad from
the MASTER control
system and connect to
the SLAVE unit.
Follow the previous steps,
by connecting the in.stick
on the SLAVE unit to
program it.
Once the SLAVE unit is
programmed, cut the
power.
Reconnect your
main keypad to the
MASTER unit and the
communication wire
between the two units.
Restart the system.
Use the Up/Down keys to
select the desired low-level
configuration.
Press on the Prog. key
to confirm the chosen
configuration.
Note: if the keypad does not
have the Prog. Key, use the
Light key.
If, at start up, the keypad
displays a flashing “L xx”,
all low-level configurations
have been downloaded but
none has been selected.
If you have an error
message, please refer to
the Troubleshooting guide.
To download new
preestablished internal
configurations to the swim
spa follow the following
steps.
Cut the power.
Unplug in.tr wire
(9920-401316) located
between both in.xe and
connect the in.stik to the
communication port in the
front of the MASTER unit
(see in.xe image).
Finish off by starting up the
control system.
Communication port
Programming the control system
in.xe
Programming swim spa system with in.stik

18
Programming the control system
Although every in.xe
control system is factory
configured, in certain
cases, during maintenance
or replacement of the
equipment, it may be
necessary to select a new
pre-determined low-level
configuration.
Complete the next few
steps to get to the low-level
configuration selection
menu.
Press and hold the
Pump 1 key for
30 seconds.
98
Press on the Prog. key
to confirm the chosen
configuration.
After 25 seconds, if you
have not pressed the
Prog. key, the system will
exit the menu without
saving any changes made
to the settings.
Note: if the keypad does not
have the Prog. key, use the
Light key.
The keypad will display
L xx. “xx” corresponds to
the number of the low-level
configuration presently
used by the system.
Use the Up/Down keys to
select the new low-level
configuration.
Programming the control system with the keypad
/