Page is loading ...

Installation Instructions
Kit P/N: 1UCMA-137
G
en
e
i
1
U
C
able
M
a
n
agem
e
nt
A
r
m
Patent(s) Pending
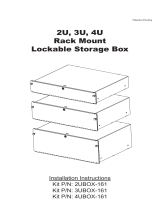
Universal 1U-2U
Cable Management Arm
Installation Instructions
Kit P/N: 1UCMA-137
2UCMA-137

Page 2
Short
Rack Bracket
Rear
Rack
Post
2.0" Additional Space
Long
Rack Bracket
Rear
Rack
Post
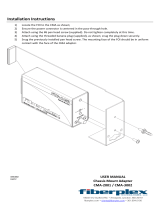
Kit Contents
Step 1.
Select the Rack Bracket
: Typical installations will use the Short Rack Bracket.
The Long Rack Bracket is needed when the back of the server is near the rear
mounting posts. If the Long Rack Bracket is needed, remove the Short Rack
Bracket and attach the Long Rack Bracket using the same pin and retainer.
Cable Management
Arm (CMA)
Chassis
Bracket
Short
Rack Bracket
Long
Rack Bracket
Rack Mount Hardware:
(3) 12-24 Square Nuts
(3) 10-32 Pan Head Screws, 3/4"
(3) 12-24 Pan Head Screws, 3/4"
(3) 12-24 Cage Nuts "Black"
Cable Management Arm
Hardware:
(6) 12" Zip Ties
(1) Velcro One-Wrap 50"
(1) Plastic Lanyard 6"
(1) Chassis Bracket with Adhesive
Installation Instructions
*
*
1U Cable Management shown,
2U works identically

Page 3
Installation Instructions
Step 2.
The Rack Hardware kit provides various screws and nuts for the four most common
types of racks.
Rack Mount Hardware
12-24 Threaded Racks:
Attach with the larger 12-24 Screws.
10-32 Threaded Racks:
Attach with the smaller 10-32 Screws.
Round Hole Racks:
(non-threaded) Attach with the larger 12-24 Screws
and the square nuts.
Square Hole Racks:
Install Cage Nuts in appropriate positions.
Attach with the larger 12-24 Screws.
Attach the CMA to the Rack
: The attachment of the CMA to your rack will vary
based on your application. Rack Mount Hardware is provided for typical
installations. Depending on the type of server and how the rail attaches to the
rack, additional hardware may be required.
Short Rack Bracket
Long Rack Bracket
*
*
1U Cable Management shown,
2U works identically

Warranty Statement
Innovation First, Inc. warrants our products against defects in material and workmanship for a
period of one (1) year from the date of purchase. Innovation First, Inc. liability shall be limited to
repairing or replacing, at our option, any defective product.
Rack Hardware Kit
502
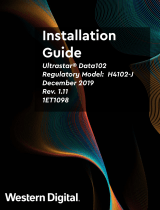
One end of Lanyard
held with Pin
One end of
lanyard attached
to screw on chassis
Both ends of Lanyard
held with Pin
Lanyard looped
thru handle
Step 3.
Attaching the CMA to your server
: There are four methods for linking the
moveable end on the CMA to your server:
A) Route the cables from the chassis to the arm. Leave 2" - 4" between
the box and the end of the arm. Tightly tie the cables to the arm with Zip-Ties.
C) Attach the lanyard to a screw or hole on the box.
B) Loop the lanyard around a handle or other feature on the box.
D) Adhere the Chassis Bracket to the side of the server.
Chassis Bracket
Pin Removed
Zip Ties
489
/