Page is loading ...

Get social with us and discover more about our products, tips and exclusive discounts!
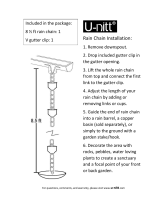
Please carefully unpack and identify each component before beginning assembly.
Before you begin, please refer to parts list to make sure that you have all parts. Please take
care when assembling the unit and always place the parts on a clean, soft surface. If you
require assistance with assembly or parts, please call 888-357-7263.
ASSEMBLY INSTRUCTION
8.5FT RAIN CHAIN

Assembly Instruction
1
A
B
STEP 1
Unhook the V-shaped Gutter Clip (B) from the Rain Chain (A).
PARTS LIST
8.5ft Rain Chain (A)
Qty: 1
Gutter Clip (B)
Qty: 1
IT’S BEST TO CHOOSE A LOCATION WHERE RAIN CHAINS CAN LEAD TO LANDSCAPED AREAS, RAIN BARREL AND
WHERE OVERFLOW CAN BE DIVERTED FROM FOUNDATIONS.
ASSEMBLY INSTRUCTION
PRE-ASSEMBLY PREPARATION
• Please read through this instruction before beginning assembly.
• Installation may require some slight bending of gutter clip that can be easily
done by hand or with pliers.
• Please check for any loose links or chains and tighten them before use.

A
B
B
STEP 2
Slide the Gutter Clip (B) into the rain gutter drain hole.
STEP 3
Hook Rain Chain (B) onto Gutter Clip (A). Wait for rain and enjoy!
Note: Use a filter screen to prevent leaves and debris from dropping into
your rain chain if needed.
Assembly Instruction 2

/