Toro Pick-Up Broom Gutter Brush, TXL 2000 Tool Carrier Installation guide

Type
Installation guide

Toro Pick-Up Broom Gutter Brush, TXL 2000 Tool Carrier is a versatile attachment designed to enhance the cleaning capabilities of your Toro TXL 2000 Tool Carrier. With its robust construction and innovative features, this gutter brush offers efficient and effective debris removal, making it an ideal choice for maintaining clean and tidy outdoor areas.

Toro Pick-Up Broom Gutter Brush, TXL 2000 Tool Carrier is a versatile attachment designed to enhance the cleaning capabilities of your Toro TXL 2000 Tool Carrier. With its robust construction and innovative features, this gutter brush offers efficient and effective debris removal, making it an ideal choice for maintaining clean and tidy outdoor areas.

FormNo.3426-135RevC
Pick-UpBroomGutterBrush
TXL2000ToolCarrier
ModelNo.22544
InstallationInstructions
Installation
LooseParts
Usethechartbelowtoverifythatallpartshavebeenshipped.
Description
Qty.
Use
Nopartsrequired
Preparethemachine.
Gutterbrushmanifold
1
Gutterbrusharm
1
Brushhead1
Bolt(7/16x1inch)
3
Lockwasher1
Flatwasher1
Hitchpin1
Hitchclip1
Installthegutterbrush.
Shorthoses
2
Elbowtting
1
Narrowhoses2
Installthehoses.
Nopartsrequired
Completetheinstallation.
PreparingtheMachine
Important:Thiskitinstallstothepick-upbroom;
acquirethepick-upbroombeforeinstallation.
Note:Thegutterbrushcanbeinstalledontheright
orleftsideofthepickupbroom;thismanualshows
theinstallationtotherightside.
Note:Determinetheleftandrightsidesofthe
machinefromthenormaloperatingposition.
1.Parkthetractionunitonalevelsurface.
2.Disengagetheauxiliaryhydraulics.
3.Loweranyequippedattachments;refertoyour
Operator’sManual.
4.Engagethetractionunitparkingbrake.
5.Shutoffthetractionunitengineandremovethe
key.
6.Disconnectthetractionunitbattery;refertoyour
Operator’sManual.
©2019—TheToro®Company
8111LyndaleAvenueSouth
Bloomington,MN55420
Registeratwww.T oro.com.
OriginalInstructions(EN)
PrintedintheUSA
AllRightsReserved
*3426-135*C
InstallingtheGutterBrush
Important:Youmaydiscardallremovedparts
unlessotherwisenoted.
WARNING
Seekimmediatemedicalattentionifuidis
injectedintoskin.Injecteduidmustbe
surgicallyremovedwithinafewhoursbya
doctor.
Ensurethatallhydraulic-uidhoses
andlinesareingoodconditionandall
hydraulicconnectionsandttingsaretight
beforeapplyingpressuretothehydraulic
system.
Keepyourbodyandhandsawayfrom
pinholeleaksornozzlesthateject
high-pressurehydraulicuid.
Usecardboardorpapertondhydraulic
leaks.
Safelyrelieveallpressureinthehydraulic
systembeforeperforminganyworkonthe
hydraulicsystem.
1.Removethenutandboltsecuringthehose
clamptothemanifoldmountingbracketonthe
leftsideofthemachineandremovetheclamp.
2.Installthegutterbrushmanifoldtothemanifold
mountingbracketwiththe3bolts(7/16x1inch),
lockwashers,andatwashers(Figure1).
g269186
Figure1
1.Bolt(7/16x1inch)
3.Flatwasher
2.Lockwasher
4.Gutterbrushmanifold
3.Removethebolt,lockwasher,andretaining
washerfromthebottomofthegutter-brush
broommotor.
4.Installthebrushheadtothegutterbrushusing
thebolt,lockwasherandretainingwasher
(Figure2).
g284029
Figure2
1.Gutterbrushmotorshaft
3.Lockwasher
2.Retainingwasher4.Bolt
5.Positionthegutterbrushonthedesiredside
ofthepick-upbroomandinstallthehitchpin
throughthemountholes(Figure3).
g269239
Figure3
1.Hitchpin3.Hitchclip
2.Gutterbrushmount(left
side)
4.Gutterbrushmount(right
side)
2
6.Securethegutterbrushtothecornerofthe
pick-upbroomwiththeadjustmentchain;refer
toAdjustingtheGutterBrushHeight(page5).
7.Markwhichhoseisinwhichportonthepick-up
broommotoranddisconnectthehoses;plug
thehoseendsandsetthemasideforlater
installation.
8.Supportthepick-upbroombrushandbroom
shaftsothatthebroomwillnotfallwhen
removingthepick-upbroomhydraulicmotor.
9.Removethenuts(1/2inch)andboltssecuring
thepick-upbroomhydraulicmotorandmount
bracket,rotatetheassemblyclockwise90°,and
installtherotatedassemblywiththeremoved
hardware(Figure4).
10.RemovethestraightttingsinstalledintheA
andBportsofthemotormanifold.
Note:Youmayneedtoremove1ofthe
socket-headcapscrewstoaccomplishthis.
InstallingtheHoses
1.Installtheshorthosestothemotormanifold
ports;connectthehoseinpick-upbroommotor
port“B”tothegutterbrushmanifoldport“M1”
andthehoseinpick-upbroommotorport“A”to
gutterbrushmanifoldport“M2”.
2.Connectthehosethatwasconnectedtopick-up
broommotorport“A”toport“P2”onthegutter
brushmanifold.
3.Connectthehosethatwasconnectedtopick-up
broommotorport“B”toport“P1”onthegutter
brushmanifold.
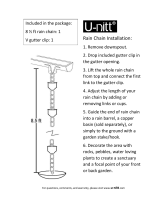
4.Removethecasedrainplugonthepick-up
broomhydraulicmotor(locatedontheopposite
sideofthemotorfromthehoseports).
5.Installtheelbowttingorientedsothatthetting
pointstowardtheholeinthemotorguard.
g269295
Figure4
1.Routethecasedrainhose
throughhere.
3.Casedrainplughole
2.Elbowtting
6.Installthenarrowhosesfromthegutterbrush
manifoldtothegutterbrushmotoraccordingto
theinstructionsbelow:
Ifthegutterbrushismountedontheright
sideofthepick-upbroom,routethehoses
throughbothhoseguides,connectthehose
fromport“A”onthegutterbrushmotorto
port“M3”onthegutterbrushmanifold,and
connectthehosefromport“B”toport“M4”
(Figure5).
Ifthegutterbrushismountedontheleft
sideofthepick-upbroom,routethehoses
throughthecenterhoseguide,connectthe
gutterbrushhosefromport“A”onthegutter
brushmotortoport“M4”onthegutterbrush
manifold,andconnectthehosefromport“B”
toport“M3”.
3
g269332
Figure5
Rightsidemountshown
1.Port“M3”3.Port“A”
2.Port“M4”
4.Port”B”
7.Connectthecasedrainhosetothegutterbrush
manifoldandtotheelbowttingofthepick-up
broomandsecurethecasedrainhosetothe
motorhoseswithzipties.
CompletingtheInstallation
1.Tightenallthehoseconnections.
2.Connectthetractionunitbattery;refertoyour
Operator’sManual.
3.Turnonthetractionunitandtestthegutterbrush
operation;withthepick-upbroomspinning
forward(clockwisewhenlookingfromthemotor
end),thegutterbrushshouldthrowmaterialin
frontofthepick-upbroom.
4.Ifthegutterbrushdoesnotspinwiththepick-up
broomspinningforward,runthebroominthe
reversedirection;ifthegutterbrushspins,the
narrowhosesareinstalledincorrectly.
Note:Wheninstalledcorrectly,thegutterbrush
doesnotoperatewhenthepick-upbroomis
spinningbackward.
5.Ifanyhydraulicuidwasspilled,ensurethatthe
tractionunithydraulicuidisatthecorrectlevel;
refertoyourtractionunitOperator’sManual.
4
Operation
AdjustingtheGutterBrush
Speed
Thegutterbrushisequippedwithavariable-speed
knobontopofthegutterbrushmanifold(Figure6).
Turnthisknobcounterclockwisetolowerthespeed,
andturnitclockwisetoincreasethespeedof
thegutterbrush.Turningtheknoballtheway
counterclockwiseturnsoffthegutterbrush.
g269343
Figure6
1.Variable-speedknob
AdjustingtheGutterBrush
Height
Adjustthepositionoftheadjustmentchaintoraise
orlowerthegutterbrush.Liftuponthebrushand
placetheadjustmentchainintheslotforthedesired
brushheight(Figure7).
Whenthegutterbrushisnotinuse,pullthechainback
asfaraspossibletoraiseitintothestorageposition.
g269252
Figure7
1.Chainslot
2.Adjustmentchain
5
Maintenance
LubricatingtheBrush
Cutter
1.Parkthetractionunitonalevelsurface,engage
theparkingbrake,andlowertheloaderarms.
2.Shutoffthetractionunitengineandremovethe
key.
3.Cleanthegreasettingswitharag.
4.Connectagreaseguntothebrushcutterhinge
pingreasetting(Figure8).
g269344
Figure8
1.Greasetting
5.Pumpgreaseintothettingsuntilgreasebegins
tooozeoutofthebearings.
6.Wipeupanyexcessgrease.
MiscellaneousMaintenance
Checkforwearonbrushhead;ifthewirelengthof
thegutterbrushislessthan15.25cmor6inches
(abouthalftheoriginallength),thebrushhead
needstobereplaced.
Checkforloose,worn,ormissingparts,repairor
replaceasneeded.
Removeanyforeigndebrissuchasstring,wire,
etc.thatmayhavewrappedaroundthebrush
head.
Inspectthegutterbrushmotor,manifold,hydraulic
ttingsandhosesforleaksanddamage.Replace
asneeded.Ensurethatthemachineisshutoff
andhydraulicpressureisrelievedbeforechecking
forleaks.Neveruseyourhandstocheckfor
high-pressurehydraulicleaks.
ContactyourAuthorizedServiceDealerforany
requiredreplacementparts.
6
Notes:
  • Page 1 1
  • Page 2 2
  • Page 3 3
  • Page 4 4
  • Page 5 5
  • Page 6 6
  • Page 7 7
  • Page 8 8

Toro Pick-Up Broom Gutter Brush, TXL 2000 Tool Carrier Installation guide

Type
Installation guide

Toro Pick-Up Broom Gutter Brush, TXL 2000 Tool Carrier is a versatile attachment designed to enhance the cleaning capabilities of your Toro TXL 2000 Tool Carrier. With its robust construction and innovative features, this gutter brush offers efficient and effective debris removal, making it an ideal choice for maintaining clean and tidy outdoor areas.

Ask a question and I''ll find the answer in the document

Finding information in a document is now easier with AI